
Greg The Robot - Game Dev with TypeScript
5.00/5 (35 votes)
A shoot'n'up HTML5 game made with Phaser game framework

Introduction
In this article, I’ll present you an HTML5 “shoot’em’up” style game using TypeScript and a nice game development library called Phaser.
This project is a tribute to good ol’ arcade games from the 80s, more specifically the awesome game "Knightmare" made by Konami in 1986.
Hopefully, this article will appeal to those looking for a basic game structure to build upon. I believe the TypeScript part is one of the strong points of this project, because it increases productivity in development process, which is not restricted to game projects but applies for JavaScript development in general.
Background
In August 2017, there was a Hackathon competition focused on games. Some of my colleagues at Caelum Ensino e Inovação decided to join the competition, but the number of members kept growing, so we had to split them into different teams with different projects. Eventually, we came up with different games using Unity, JavaScript and Phaser/TypeScript.
I got the position as the developer of one of the teams, and after a while talking about possible projects, I did put forward one suggestion, and the rest of the team agreed. At the time, I was inspired by Knightmare, an excellent game made by Konami in 1986 for the MSX computer platform, which obviously was a time way before the age of internet, HTML or JavaScript. Konami managed to take an amazing game with great sound and graphics and cram it into a cartridge of a mere 32KB of RAM memory!
But obviously, the technology had to be different. We didn’t intend to rip off Konami’s characters, graphics and music, so we had to come up with our own storyline and art. We did set up a brainstorming session and discussed the ideas for about one hour and finally, we agreed to make the main character (the hero) as a poor but likeable robot engaging in an adventure across a robotic wasteland dominated by an evil robot.
The ideas were flowing from our minds, and we started the development, but unfortunately at some point after the brainstorm, we figured out that we wouldn’t meet the hackathon deadline if we implemented everything we imagined. So we had to cut off many of the not-so-vital features of the game.
The game was entirely made on HTML5/JavaScript using the Phaser game library. Although very different in form, it shares with the original Konami’s game mentioned above many aspects, such as:
- A lone hero
- The “shoot’em’up” platform
- The vertical auto-scrolling background
- The “raining down” enemies
- The level bosses
Acknowledgements
Priscila Sonnesso
She composed the sounds and background music for the game with the help of a simple loop synthesizer. The sounds indicate events such as when the player is obtaining energy or when he is dying. The background music is a simple loop that resembles a cybernetic environment. The inspiration was the German electronic music band Kraftwerk, famous in the eighties for its themes about robots and futuristic world.
Kauê Felipe
He worked on the background graphics to match with the level maps. These maps are defined by plain text ASCII character files, where a dot represents a free square space, and an “X” means an impassable wall. He used Paint.NET to compose the graphics so that the image would match exactly the boundaries of the map and the underlying obstacles.
Pedro Emanuel
He used a school notebook to draw the characters of the game: Greg the Robot and the Bosses. Pedro is a big fan of cartoon and anime and his contribution gave our game a nice cartoonish feel.
Marco Bruno
Our team manager. Organized the team, provided ideas and directed our development.
Software Requirements
Visual Studio 2017
Before downloading the game source code, please install Visual Studio Community 2017 or superior, which is the integrated development environment required for this project.
TypeScript
You can download the TypeScript Development Kit for Visual Studio from the link below. You will be able to develop large-scale JavaScript applications for any web browser, any machine or operating system. TypeScript generates a clean and readable code that adheres to JavaScript standards.
Phaser
The source code that comes with this article already contains all Phaser library files required for the application to run. But you might want to create a brand new Phaser project with Typescript from scratch, and in this case you can follow this Using Phaser with TypeScript tutorial.
Phaser

Phaser is a 2D game development library based on JavaScript/HTML5. It contains many built-in features useful for a great number of game styles and scenarios. For example, it has the concept of sprites. Sprites in a game are the 2 dimensional bitmaps that contain the definition for the game characters, such as the hero and the enemies. Not only that, sprite files also almost always contain the different character frames that comprises the character’s animation. To be fair, many game libraries also deal with sprites. But Phaser comes with a built-in collision detection and handling mechanism that is very easy to set up and implement.
<!DOCTYPE html>

<html lang="en">
<head>
    <meta charset="utf-8" />
    <title>Greg The Robot</title>
    <link rel="shortcut icon" href="greg.ico" />
    <link rel="stylesheet" href="app.css" type="text/css" />
    <script src="phaser/phaser.js"></script>
    <script src="app.js"></script>
</head>
<body>
    <h1></h1>

    <div id="content"></div>
</body>
</html>
Like many game frameworks, Phaser is based on update / render loops. These loops separate two fundamental aspects of the game execution: each game update loop gives the game the opportunity to update the game state and each character’s background states, such as position, score, and so on. It is used to handle the game’s logical data and behavior. On the other hand, the render loop is where we tell the graphics to be displayed: for example, suppose you have two different sprites, one for the hero and another for its shadow. How the game decides which one should be displayed on the background and foreground? It’s the render loop that describes the order in which the sprites will appear on screen.
class GregTheRobot {
    game: Phaser.Game;
    statusBar: Phaser.BitmapText;
    constructor() {
        this.game = new Phaser.Game(512, 512, Phaser.AUTO, 'content', {
            create: this.create, preload: this.preload
        });
    }
    .
    .
    .
    //a lot more code here...
    .
    .
    .
}

window.onload = () => {

    var game = new GregTheRobot();

};
Fortunately, unless you really need to change how things naturally appear on screen, Phaser does not require you to implement the render loop. It assumes that every sprite should be rendered, unless you programmatically destroy it or change its visibility to hidden.
If you start small and keep slowly adding Phaser features to your game, it feels like a short learning curve. Things can become more complicated if your game code grows without control and if you don’t clean up and refactor your JavaScript code every now and then. Fortunately, the Phaser packages also comes with TypeScript support, which helps in avoiding many programming mistakes.

As for the technology behind Phaser: it uses both a Canvas and WebGL renderer internally and can automatically swap between them based on browser support. This allows for lighting fast rendering across desktop and mobile. Phaser uses and contributes towards the excellent Pixi.js library for rendering.
Preloader
A game usually requires many resources, such as images, sounds, spritesheets, tilemaps, JSON, XML, which are parsed and handled automatically. They are ready for use in game and stored in global cache. Phaser can load each asset with a single line of code.
You can load assets in a Phaser project by invoking the game.load method inside of a function called preload. When the program starts, Phaser always look for the function named "preload" and load the assets defined in it.
preload() {
    //menu & splash screen images
    this.game.load.spritesheet('menu', 'assets/backgrounds/menu.png', 512, 384);
    this.game.load.spritesheet('splash1', 'assets/backgrounds/splash1.png', 512, 384);

    //game state JavaScript files
    this.game.load.script('baseState', 'gamestates/baseState.js');
    this.game.load.script('menu', 'gamestates/menu.js');
    this.game.load.script('splash1', 'gamestates/splash.js')
    this.game.load.script('gameOver', 'gamestates/gameOver.js')
    this.game.load.script('level', 'gamestates/level.js');
    this.game.load.script('theEnd', 'gamestates/theEnd.js')

    //classes for player, enemies, boss, etc.
    this.game.load.script('player', 'player/player.js');
    this.game.load.script('playerBullet', 'player/playerBullet.js');
    this.game.load.script('playerState', 'player/playerState.js');
    this.game.load.script('boss', 'enemies/boss.js');
    this.game.load.script('enemy', 'enemies/enemy.js');
    this.game.load.script('battery', 'extras/battery.js');

    //level intro images
    this.game.load.image('level1', 'assets/backgrounds/level01.jpg');
    this.game.load.image('level2', 'assets/backgrounds/level02.jpg');
    this.game.load.image('level3', 'assets/backgrounds/level03.jpg');

    //spritesheets for every character in the game
    this.game.load.spritesheet('player', 'assets/sprites/player.png', 32, 32);
    this.game.load.spritesheet('battery', 'assets/sprites/battery.png', 32, 32);
    this.game.load.spritesheet('boss1', 'assets/sprites/boss1.png', 96, 96);
    //...etc...
    this.game.load.spritesheet('enemy1', 'assets/sprites/enemy1.png', 32, 32);
    //...etc...
    this.game.load.spritesheet('playerBullet',
              'assets/sprites/PlayerBullet1SpriteSheet.png', 32, 32);

    //sound & music resources
    this.game.load.audio('start', ['assets/audio/start-level.wav']);
    this.game.load.audio('intro', ['assets/audio/sound-intro.wav']);
    //...etc...

    //the bitmap containing the game fonts
    this.game.load.bitmapFont('bitmapfont',
            'assets/fonts/bitmapfont_0.png', 'assets/fonts/bitmapfont.xml');
}
The above preload function deals with the following types of assets:
- spritesheets
- images
- audios
- bitmap fonts
Notice that all these assets are loaded by passing a string key as a parameter. This will later on be used to identify the correct asset when the resource is needed. By preloading assets, we can assure the program will not suffer delays during the game play because all resources are already available in memory.
Animation
Phaser supports classic spritesheets with a fixed framed size, texture packer and flash CS6 CC JSON files and XML files.
For this project, I decided to use the fixed framed size spritesheets.
TypeScript

TypeScript is a free and open source programming language co-created by Anders Hejlsberg (who co-created/designed C#, Delphi and Turbo Pascal) and developed by Microsoft, which aims to improve and secure the production of JavaScript code. It’s a superset of JavaScript, which means that every well-formed JavaScript is also a TypeScript code. Since web browsers don’t recognize TypeScript, it has to be transcompiled (or as we usually call it, transpiled) into JavaScript before they are sent to the web browser.
TypeScript supports the ECMAScript 6 specification and provides type-checking capabilities. This means that if you create a custom function accepting as parameters a string and a number, respectively, you can’t call such function with two strings, or two numbers, or any other combination of values that doesn’t match exactly the function signature. This type-checking feature enables design-time debugging, in a way that could never be accomplished with plain old JavaScript. That also means faster development, since a type mismatch bug will be caught sooner, instead of lurking in the dark until the code is released to production.
Another nice aspect of TypeScript is that you can take a JavaScript project and start migrating it to TypeScript little by little, one file at a time, since every JavaScript is also TypeScript.
As for working with TypeScript in a Phaser project, you can read the article: Using Phaser with TypeScript.

With TypeScript, Phaser development can be much easier. For example, in traditional JavaScript code, most of the time, the IDE can't figure out to which type the variable belongs, so it can't tell exactly which members of a given object are really available at a given moment when you are typing the "object + dot + member". This happens because JavaScript is a weakly typed language.
When we work with TypeScript, we can associate types to our objects, so in this case the IDE can now predict which members belong to the object:

We can code in TypeScript, but in the end the web browser will only recognize JavaScript. This is when the transpiler kicks in. For example, observe the following TypeScript code:
class Player implements IPlayer {
    level: BaseLevel;
    game: Phaser.Game;
    cursors: Phaser.CursorKeys;
    layer: Phaser.TilemapLayer;
    bulletSound: Phaser.Sound;
    diedSound: Phaser.Sound;
    damageSound: Phaser.Sound;
    rechargeSound: Phaser.Sound;
    sprite: Phaser.Sprite;
    isWeaponLoaded: boolean;
    velocity: number;
    walkingVelocity: number;
    state: IPlayerState;
    power: number;
    constructor(
        level: Level1, cursors: Phaser.CursorKeys,
        layer: Phaser.TilemapLayer, bulletSound: Phaser.Sound,
        diedSound: Phaser.Sound, damageSound: Phaser.Sound,
        rechargeSound: Phaser.Sound) {
        this.level = level;
        this.game = level.game;
        this.cursors = cursors;
        this.layer = layer;
        this.bulletSound = bulletSound;
        this.diedSound = diedSound;
        this.damageSound = damageSound;
        this.rechargeSound = rechargeSound;
        this.damageSound.onStop.add(function () {
            this.sprite.animations.play('run');
        }.bind(this));
        this.power = 10;
        this.create();
    }
Now notice how the types are stripped from the code when the JavaScript is generated from TypeScript;
class Player {
    constructor(level, cursors, layer, bulletSound, diedSound, damageSound, rechargeSound) {
        this.level = level;
        this.game = level.game;
        this.cursors = cursors;
        this.layer = layer;
        this.bulletSound = bulletSound;
        this.diedSound = diedSound;
        this.damageSound = damageSound;
        this.rechargeSound = rechargeSound;
        this.damageSound.onStop.add(function () {
            this.sprite.animations.play('run');
        }.bind(this));
        this.power = 10;
        this.create();
    }
Mission
Robocity
The game takes place in the dystopian futuristic metropolis of Robocity, a place perverted by a robotic villain. The city used to be an electronic paradise, in which the techno-citizens lived in harmony with their asynchronous behaviors, predictable loops and performing random tasks.
Greg the Robot
Greg is a non-conformist and self-aware robot. He is a reminiscent specimen from an old age generation of robots which was spared the yoke of the New Robotic Order, because their electronic components are so old they can’t be hacked by the New Order. Since all his friends are now slaves, all of a sudden Greg becomes an unsuspected hero. He sees what’s wrong and decides to take action. His walking is slow and his behavior is erratic, but he knows the future of Robocity depends on his success.
Enemies


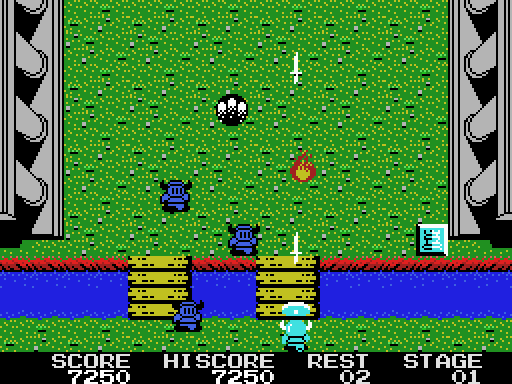
Our hero’s mission is to walk down the path, battling enemies and defeating each level’s boss. His enemies are the formerly peaceful citizens of Robocity, now converted into minions under the yoke of the evil Robotron. As Greg the Robot walks, he loses units of energy, so he must save energy by avoiding running without necessity. Fortunately, there are battery cells that can be found along the way, so Greg can replenish his batteries as he walks.
Bosses

Each level ends in a final arena guarded by one of Robotron’s generals. Our hero must defeat the boss and cross the gate that leads to the next level.
Game Views

Game Menu
The game menu shows only the game title, the Greg the robot image and a text asking the player to press space bar to start.
Once the player press the space bar, he is taken to the next game view: the level presentation screen.
Level Presentation

The level presentation view only shows a text with the level number.
Level Scenes

The level view is where the game really happens. Here, you control the hero through the cursor keys and shoot the projectiles to eliminate the enemies.
As you lose energy, the length of the power bar in the lower portion of the screen decreases. Whenever you collide with an enemy or get hit by some projectile, you lose a certain amount of energy. But you can capture battery cells along the way, and your energy increases up to 100% of your power capacity.
Game Over
The game ends when Greg’s energy bar becomes empty. After that, the player is redirected to the menu screen for a new game round.
Game Characters
Player

Our hero Greg is represented by the Player class, which in turn implements the IPlayer interface. This interface has a speed field, a sprite field and a boolean value field indicating whether the weapon is loaded or not.

The velocity is a constant value and determines how fast our hero moves to cover a distance when the player press the arrow buttons. For example:
    runLeft() {
        this.sprite.body.velocity.x = -this.velocity;
    }
The sprite is a type of object that stores the graphical bitmap definition for our hero (and the enemies) and describes how they are shown on screen.
this.sprite = this.game.add.sprite(this.game.world.centerX - 16,
              this.game.world.height - 64, 'player');
The boolean value indicates whether the weapon is loaded or not. Each shot fired from our hero empties the weapon and this prevents him from throwing many projectiles at the same time.
if (this.player.isWeaponLoaded && keyboard.isDown(Phaser.KeyCode.SPACEBAR)) {
    this.player.isWeaponLoaded = false;
    this.player.shoot();
}
else if (!keyboard.isDown(Phaser.KeyCode.SPACEBAR)) {
    this.player.isWeaponLoaded = true;
}
The Player object has a wasHit event, which is called in case of collisions of enemies and bosses with the player sprite.
wasHit() {
    this.damageSound.play();
    this.sprite.animations.play('hit');
    this.decreasePower(1);
}
The behavior classes assigned to the Player class as the state field define their possible states: running and dying, which are provided by the classes PlayerStateRunning and PlayerStateDying respectively. The constructor of the Player class defines that the weapon is loaded. At the setup of Player class, we define: the sprite, the animations, the base speed, the walking speed and also the dimensions of the hero.
When Greg is hit, we play the sound and also show the animation sequence corresponding to the damage. And the energy must be decreased accordingly.
wasHit() {
    this.damageSound.play();
    this.sprite.animations.play('hit');
    this.decreasePower(1);
}
    decreasePower(energyAmount: number): boolean {
        if (this.power - energyAmount > 0) {
            this.power -= energyAmount;
            this.level.updatePowerBar();
            return true;
        }
        else {
            this.power = 0;
            this.level.updatePowerBar();
            this.state = new PlayerStateDying(this);
            this.diedSound.play();
            this.level.playerStateChanged(this.state);
            return false;
        }
    }
At the “recharge energy” event, we play the recharging sound and increase the power supply in the power bar.
    recharged(charge: number) {
        this.rechargeSound.play();
        this.increasePower(charge);
    }

    increasePower(energyAmount: number): boolean {
        if (this.power + energyAmount < 100) {
            this.power += energyAmount;
            this.level.updatePowerBar();
            return true;
        }
        else {
            this.power = 100;
            this.level.updatePowerBar();
            return false;
        }
    }
As the hero ressurects, we reestablish its initial state, and set up its default animation as walking. By doing this, we ensure the player keeps playing.
The walk method moves the player sprite in an upward direction and is called automatically without the player’s interference. It is executed only to compensate the vertical autoscroll that keeps pulling down the level background. Otherwise, the player sprite would be scrolled down along with everything and would end up offscreen.
    walk() {
        if (this.noCursorKeyDown()) {
            this.sprite.body.velocity.y = - this.walkingVelocity;
        }
    }
The run events are used to update the direction of the speed vector according to the arrow buttons pressed.
    runUp() {
        this.sprite.body.velocity.y = -this.velocity;
    }

    runDown() {
        this.sprite.body.velocity.y = this.velocity;
    }

    runLeft() {
        this.sprite.body.velocity.x = -this.velocity;
    }

    runRight() {
        this.sprite.body.velocity.x = this.velocity;
    }
    update(cursors: Phaser.CursorKeys, keyboard: Phaser.Keyboard, camera: Phaser.Camera) {
        if (cursors.up.isDown) {
            this.player.runUp();
        }
        else if (cursors.down.isDown) {
            if (this.player.sprite.body.y <
                camera.y + camera.height
                - this.player.sprite.height) {
                this.player.runDown();
            }
        }

        if (cursors.left.isDown) {
            this.player.runLeft();
        }

        else if (cursors.right.isDown) {
            this.player.runRight();
        }
The shoot event triggers a method where the shooting sound is played and a new object with the bullet sprite is added to the game. This projectile can hit enemies and damage them.
    firePlayerBullet() {
        let playerBullet: PlayerBullet =
            new PlayerBullet(this, this.layer, this.bulletSound, this.player, this.boss);
        playerBullet.setup();
        this.playerBullets.push(playerBullet);
        if (this.player.decreasePower(1)) {
            this.updatePowerBar();
        }
    }
Whenever our hero is damaged, its energy is decreased accordingly to the damage type. If the remaining energy drops to zero, then Greg has suffered a fatal blow. In such case, we show the sprite animation of Greg being killed, followed by the Game Over music. After that, the player is taken to the start menu.
On the other hand, when the energy increases, the power bar grows according to the amount received. The maximum energy level in the bar is 100.
Enemies
Every enemy class inherits from an abstract class, which contains:
- The loaded weapon indicator
- The speed vector
- The enemy position
- Enemy number and id

The BaseEnemy class contains the function that handles collisions against the player. Whenever a collision is confirmed, the player suffers a damage corresponding to the enemy strength. But after that, the enemy is destroyed. The BaseEnemy also allows the enemy to be checked for collisions against other enemies. In this case, none of them are destroyed, but this ensures they are not overlapped, and it brings more realism to the game.


Animation
Level Scrolling
scroll() {
    this.game.camera.y -= this.getScrollStep();

    if (this.game.camera.y > 0) {
        this.statusBar.position.y -= this.getScrollStep();
        this.powerBar.position.y -= this.getScrollStep();
        if (this.player.state instanceof PlayerStateRunning) {
            this.player.walk();
        }
    }
    this.game.time.events.add(Phaser.Timer.SECOND / 32, this.scroll.bind(this));
}
Player Animation
For this project, I decided to use the fixed framed size spritesheets:

add(name: string, frames?: number[] | string[],
    frameRate?: number, loop?: boolean, useNumericIndex?: boolean): Phaser.Animation;
With Phaser's AnimationManager class, we can add new frame animations that will later on be used to represent the player's different states:
setup() {
    .
    .
    .
    this.sprite.animations.add('run', [0, 1, 2, 3], 4, true);
    this.sprite.animations.add('hit', [4, 5, 6, 7, 4, 5, 6, 7], 10, true);
    this.sprite.animations.add('die', [4, 5, 6, 7, 4, 5, 6, 7], 10, true);
    this.sprite.animations.play('run');
    .
    .
    .
}
Take for example, the Player's "hit" animation above. It is played when the hero suffers a damage. Now take a look at the parameters needed to perform this animation:
- name:
hit - frames:
[4, 5, 6, 7, 4, 5, 6, 7] - frameRate:
10 - loop:
true
This means that when the hero is hit, the frames with the frame indexes above will be animated with a frame rate of 10 frames per second. Also, the animation is in loop, which means the frame sequence will repeat indefinitely.
Sounds
The sound in this game as not just a resource to make the game more interesing, but they play a very important role: they define the interval between events. For example; when the user presses the spake key in Menu screen, the music will begin, but the level 1 will not really start until the music ends:
update() {
    if (this.game.input.keyboard.isDown(Phaser.KeyCode.SPACEBAR)) {
        this.pushSpaceKey.alpha = 0;
        this.game.add.tween(this.pushSpaceKey).to({ alpha: 1 }, 100,
                            Phaser.Easing.Linear.None, true, 0, 50, true);
        this.startSound.play();
    }
}
How the above code works?
- First, the program checks whether the space bar key is pressed
- If it's pressed, the "PUSH SPACE KEY" text becomes transparent (i.e., we set the color alpha to zero)
- Then we make the text blink indefinitely by alternating between color alpha 0 and 1. We call the
tweenmethod. "Tween" is short for "betweening", that is, the process of generating intermediate frames between frame keys. - Without stopping the blinking animation, we play the
startSoundmusic.
But how does the program know when the music ends? To explain that, we must see the code where the startSound field is initialized:
create() {
    .
    .
    .
    this.startSound = this.game.add.audio('start');
    this.startSound.onStop.add(function () {
        this.game.state.start('splash1');
    }.bind(this));
}
Now we can see the onStop event of startSound being implemented. When the sound ends, the function will kick in and the game level splash1 will start.
Likewise, each of the other game sounds will determine when the next event will begins.
- Background music
- Shooting
- Energy up / down
- Game over
Collisions
You can bring more realism to the game by introducing physics constraints, such as collisions. Otherwise, the sprites would overlap each other or just float away offscreen, like ghosts.
Player x Map
The level map has established limits (left & right margins, plus obstacles on the way), so we can't allow our hero to bypass any of these limits. Fortunately, Phaser has a nice collision detection library, that allows us to define that the player cannot overlaps another given object in the game. We do this by calling the game.physics.arcade.collide() method, passing as arguments both the player's sprite and the level layer object:
this.game.physics.arcade.collide(this.sprite, this.layer);
Player x Enemy
We can't allow the player and enemies to overlap each other. We determine that they collide by calling the game.physics.arcade.collide() method, but in this case, we also provide a function that will define which behavior will take place once a player is hit by the enemy's body:
- We make the player suffer a damage, and
- We destroy the enemy's sprite, removing it from the game
checkPlayerCollisions() {
    this.game.physics.arcade.collide(this.sprite, this.player.sprite, function () {
        this.level.playerWasHit(this);
        this.sprite.destroy();
    }.bind(this));
}
Bullet x Enemy
Bullets are a nice way to get rid of enemies at long distance, without being hit and suffering damage. Once a bullet is fired, we check whether it collided or not with an enemy, and in this case, we destroy both the enemy and the bullet.
this.level.enemies.forEach(enemy => {
    this.game.physics.arcade.collide(this.sprite, enemy.sprite, function () {
        this.destroyed = false;
        this.level.playerBulletHit(this, enemy);
        this.sprite.destroy();
        enemy.sprite.destroy();
    }.bind(this));
});
Enemy x Enemy
Enemies in our game are not Pac Man ghosts, so they shouldn't overlap. So, when they collide, they still keep separated we don't destroy anything. We just bring a little more realism to the game.
checkEnemyCollisions(enemies: BaseEnemy[]) {
    enemies.forEach(other => {
        if (this.id != other.id) {
            this.game.physics.arcade.collide(this.sprite, other.sprite, function () {

            }.bind(this));
        }
    });
}
Player x Boss
A collision with the boss is almost the same as the collistion with a minor enemy, that is, causing damage to the player. But in this case the boss isn't destroyed.
this.game.physics.arcade.collide(this.sprite, this.player.sprite, function () {
    if (this.player.sprite.animations.currentAnim.name == 'run') {
        this.player.wasHit(this);
    }
}.bind(this));
Bullet x Boss
The level boss can sustain a number of bullets before being destroyed. But the code below just describes the behavior from the player bullet viewpoint. The Boss damage management is inside the Boss class.
this.game.physics.arcade.collide(this.sprite, this.boss.sprite, function () {
    this.sprite.destroy();
    this.level.playerBulletHit(this, this.boss);
    this.boss.wasHit();
    this.destroyed = false;
}.bind(this));
Level Map
As said before, each level has a background image that will scroll down as our hero walks the path.
Each level also has a associated plain text file, where each character represents a 32x32 position in the background image:

As we can see, the dot represents an empty 32x32 space in the map, and the X corresponds can be any of the obstacles in the image, such as walls, pipes, maze and so on.
Other characters, such as lower case letters (a, b, c, d), correspond to different enemies that should be placed as the map scrolls down.
As the level is started, it loads the plain text file and populates a matrix with the ASCII file contents:
let lines : string[] = this.readFile("/assets/maps/Map0" +
                       this.levelNumber + ".txt").split('\n');
for (let y = 0; y < lines.length; y++) {
    let line : string = lines[y];
    let lineArray : number[] = new Array(line.length);
    for (let x = 0; x < line.length; x++) {
        let char : string = line[x];
        if (char == 'X') {
            this.map.putTile(1, x, y, this.layer);
            lineArray[x] = 1;
        }
        else {
            lineArray[x] = 0;
        }
    }
}
Once the matrix is loaded, we still have to build all the objects found in the map, such enemies and batteries. Let's see how they are mapped:

The BaseLevel class holds an instance for enemies and another one for batteries. These arrays of objects are populated according to the contents of the mapAsStringArray matrix. Each of these enemies are instantiated with the position found in the map.
setupEnemies(mapAsStringArray: string[]) {
    this.enemies = [];
    let enemycodes : string = 'abcde';
    for (let y = 0; y < mapAsStringArray.length; y++) {
        let line : string = mapAsStringArray[y];
        for (let x = 0; x < line.length; x++) {
            let char : string = line[x];
            let indexOf : number = enemycodes.indexOf(char);
            if (indexOf >= 0) {
                let enemy: BaseEnemy;
                let id: number = this.enemies.length + 1;
                switch (indexOf) {
                    case 0:
                        enemy = new EnemyA(this, this.game, this.layer, this.bulletSound,
                        this.player, x * 32, y * 32, indexOf + 1, id);
                        break;
                    case 1:
                        enemy = new EnemyB(this, this.game, this.layer, this.bulletSound,
                        this.player, x * 32, y * 32, indexOf + 1, id);
                        break;
                    case 2:
                        enemy = new EnemyC(this, this.game, this.layer, this.bulletSound,
                        this.player, x * 32, y * 32, indexOf + 1, id);
                        break;
                    case 3:
                        enemy = new EnemyD(this, this.game, this.layer, this.bulletSound,
                        this.player, x * 32, y * 32, indexOf + 1, id);
                        break;
                    case 4:
                        enemy = new EnemyE(this, this.game, this.layer, this.bulletSound,
                        this.player, x * 32, y * 32, indexOf + 1, id);
                        break;
                }
                enemy.setup();
                this.enemies.push(enemy);
            }
        }
    }
}
Conclusion
Thank you very much for you time and patience. I hope the article or this project's code have somehow helped you, induced interest or at least gave you some insights about game development. In my opinion, Phaser is easy to use, has a short learning curve, provides good support and has an active community.
Feel free to use the code. If you have any ideas, complaints or suggestions, please use the comment section below. Also, if you want to create a game project using Phaser, please let me know.
History
- 2017/11/27 - Initial version
- 2017/11/28 - Added level map explanation