
Step by Step Guide for Jwt Token Based Authentication in ASP.NET Core WebApi with AngularJS Client Application.
You have to follow all 3 steps.
Introduction
Authenticate is always a major part of any application. Ok start straight .......on what we will going to do in this article. We will try to implement token based authentication in WEBAPI(core) Using Jwt Token. Authentication will on both sides:
1) On Client End (Angular Application)

In the above image, we are trying to access "About page" without any authentication which is Showing error "Non Authenticated". We will provide valid token to the client application to access the page.
2) On Server / Controller End (WebApi Application)
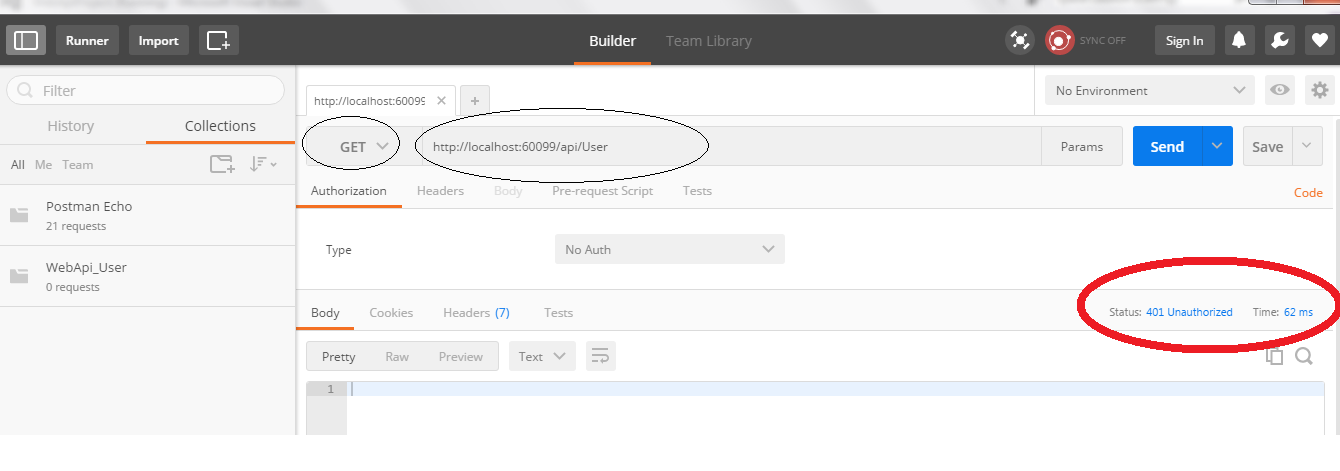
In the above image, when anyone tries to hit get() method of User controller, she/he should provide a valid token to access the action method. Otherwise, it will show unauthorization error as in the above image.
So now we will learn how we can generate Token and use it in authentication in this and authorization (in the next tutorial)......... :)
- We will create one WebAPI(Core), which will generate and authenticate Token on server side.
- We will create the AngularJS client application, which will use the token sent by web API for the authentication of pages.
- We will use token to authenticate controller action method with claim based authorization.
Background
- Understanding of AngularJs
- Understanding of AngularJs UIRoute Module
- Understanding of WebAPI (Dotnet Core)
Let Show Begin
First, we will see what JWT Tokens stand for, JWT is JSON Web Tokens (JWT) with the following features:
- JSON Web Tokens work across different programming languages: JWTs work in .NET, Python, Node.js, Java, PHP, Ruby, Go, JavaScript, and Haskell. So you can see that these can be used in many different scenarios.
- JWTs are self-contained: They will carry all the information necessary within itself. This means that a JWT will be able to transmit basic information about itself, a payload (usually user information), and a signature.
- JWTs can be passed around easily: Since JWTs are self-contained, they are perfectly used inside an HTTP header when authenticating an API. You can also pass it through the URL.
You can learn more about json from the link given below:-
- Source: https://scotch.io/tutorials/the-anatomy-of-a-json-web-token
Now we will try to generate the token from the web API in the steps given below:
Step 1
- Download Angular application which is using
UIRoutefrom the above attached files with the name of Download AngularJsRoutingExample.zip. - Folder structure will be as follows:

- Change the path of the local host in the APP.js file:

- Run the app and your client application is ready to go. Insert the User/Password as given below:

Step 2
Now we will setup the WEBAPI Core project.
- Download WEBAPI application from the above attach files with the name of Download WebApiProject.zip.
// Note you should have .net core install in your computer
// Please follow following link for the same https://www.microsoft.com/net/core#windowsvs2015
// Order of installation matter.
// If you find any difficulty then please delete Json.Lock and close VS and open again
- After unzip, you will get the following structure of the project.

You need to create the database as per the models in the Structure.
Now in the above image, there is a structure of the complete project with Generic Repository, etc. only target on controllers.
JwtController-> Containing the code of JWT token generation.UserController-> Which we want to access after authentication - If everything is fine, then we will run both the applications (Angular + WebApi) at once and try to login to the WebApi login controller.
- Once you Login to
JwtController, it will generate the token and provide the Token called as Bearer Token to the Angular application. Then, Angular application uses that token to access pages as like AboutUs With the help of UIRoute of Angular. - Process is as follows:
We will store that token into a angular service (App.js) and change the state as shown in the image below:

- As we know, on every state change
.RUNof angular will call, where we will check authentication.
Points of Interest
Now we are able to get user authentication for the Angular Home/About Us state and we can also access the UserController of WebApi using Token and Postman Application. In the next article, I will describe all about how token will be generated and what is Claim based authentication. :)
All suggestions are welcome...