
MVC Application from Empty Application
4.08/5 (7 votes)
Convert an Empty Web Application to MVC Web Application using VS 2015 IDE
Introduction
This will convert your empty web application to an MVC application.
This is the first article I am writing, so please comment on my writing and do let me know if anything more needs to be covered into this. I am planning to discuss more about the MVC pattern using Microsoft Technologies. I will be further extending this with Web API, Angular and other important things.
So the story starts with my thought of an MVC application using the latest framework for Microsoft; as I have been developing various applications using Microsoft technologies only, and my whole experience of 4 years revolves around Microsoft MVC and Web API only.
When I was exploring web applications in Visual Studio 2015, a thought came to my mind: How to create an MVC application from scratch, from scratch, I mean from empty template; not using the built-in MVC template, which does all the necessary configurations. Then I thought why not start with this idea only.
Using the Code
So, first things first, let’s create one sample application. Please follow the below steps for the same:
- Open Visual Studio 2015 and select “New Project” option. Then select “ASP.NET Web Application”.

- Give a name to your project. “
MVC_fromEmptyApplication” in my case.
- Select “ASP.NET 5 Empty Application” from ASP.NET 5 Preview Template.

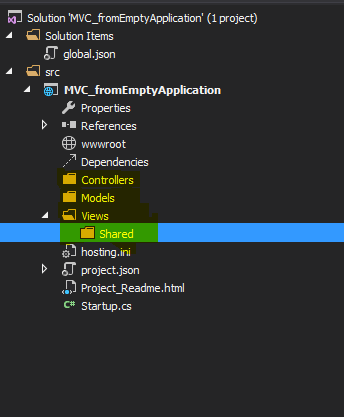
- Once your application is created, you will get the below folder structure. This will consist of very basic things which are needed to create any web application. When you will expand the “References”, you will find a handful of DLLs which are very basic (e.g., Microsoft.CSharp, mscorlib, System, System.Core).

- When you will open the “Startup.cs”, you will see the below code. This file consists of the methods which are necessary to configure your web application. It has a simple code which writes “
Hello World” to the response.
- When you will open the “project.json” file, you will find the below code. This file consists of the basic configuration which you can associate with the “web.config” file in previous versions. This has configurations about the version of your web-application, dependencies on which your application depends, framework, your publish configurations.

- We will first update the above file to have all our dependencies placed which will be needed by our application. Update the “dependencies” section in the project.json file with the below entries.

When you will save the file, you will find that the references you added are automatically being added to your project from Nuget.

- Open “Startup.cs” file and update the “
ConfigureServices” method to include the MVC services in the project. This is needed to include the MVC services into the application which will help you create the MVC application.For that, write the below code in the method:
services.AddMvc();

- Create the MVC folder structure in the application. For this, add 3 folders, viz., “Controllers”, “Model”, “ Views”.
Under “Views”, add “Shared“ folder for your layout and shared partial views.
- Now, we will add our first controller to the application. Add a controller under the “Controllers” folder and name it as “HomeController.cs”.

- Now create a view which will be rendered when you will hit the Index Action method of the above controller. For this, first add a folder with the name “Home” same name as the controller. Under this folder, add a View with the same name as the action method, i.e.,
Index.
- Create a layout page for your application. (Layout page serves as your master page)

- Till now, we have configured our MVC web application. Now we will write some code which will return some output. To achieve that, set the variables required on the view. In my case, I have set “
Title” and “Message”.
- All set to go….!!!!
Hit F5 and run the application. You will get the below screen with your message.

A sample application is added with this article.
Points of Interest
Now, we have configured an empty application as an MVC application, which you could have easily done through the MVC template; but using this template will result in unnecessary files and code in your application.
So, it’s your choice how you want to proceed with the project creation.
History
This is the very first article I have written. I will be extending it for ASP.NET Web API soon.