
Creating JQuery Mobile CRUD Apps using JQM.Show, Genymotion, Android Studio and MS WebMatrix
5.00/5 (2 votes)
Create JQuery Mobile Apps with JQM.Show on your PC with these tools.
Introduction
Some articles ago I demonstrated how one can create JQuery Mobile CRUD apps using a RAD tool I developed called JQM.Show. As discussed, this RAD tool is installable on your android mobile device and currently supports 4-7 inch screens and is currently available from the Android Play Store. The purpose of this article is to demonstrate how I am currently using JQM.Show with Genymotion, Android Studio and MS WebMatrix on my PC to develop my JQuery Mobile CRUD apps. This is done without the use of a physchical android device.
To be able to build your own JQM.Show apps, you need the following tools.
Genymotion: According to their website, Genymotion is a fast and easy to use android emulator to run and test your android apps. You will have to go on over their site and sign up and install this tool on your computer. This tool is free for personal use. You can download it here.
Android Studio: This tool is used to develop Android Apps, but I dont use to develop apps. What I need from it, is it functionality to view the internal Genymotion emulator file contents. Applications created by JQM.Show get written to the root folder structure of the device and are viewable with your device's file browser. I use the Android Device Monitor > File Explorer to get the contents of my folders, thus the need to Android Studio to access the emulator device. You can download it here.
MS WebMatrix: This tool is a webserver that I'm using to test my developed JQuery Mobile apps and also run them within the various internet browsers. This is just a matter of choice, but I believe any local webserver will do to test your created JQM.Show JQuery Mobile apps. With webmatrix it has been easy for me just to Open Folder as Site for my JQM.Show created projects so that I can test them. We will follow the same approach here. You can download it here.
JQM.Show: This is the RAD tool that uses my Application, Model, Fields approach to develop JQuery Mobile Apps. You will download this later from here for your emulator.
Some silly assumptions: You have read my articles on creating apps with JQM.Show. Anyway, we will create one here. You are also familiar with JQuery Mobile and how to create applications with that framework. Finally, you have installed the tools mentioned above and ready. Below are the various backends for the movie database. As you will note, the UI is the same but then the CRUD functionalities a little different per back end.
Download MoviesDatabaseWebSQL.zip
Download MoviesDatabaseXML.zip
Download MoviesDatabaseLocalStorage.zip
Download MoviesDatabaseJSON.zip and a bonus
Download MoviesDatabaseIndexedDB.zip
I have included the IndexedDB version here as a curiosity point for those of you and will write an article soon about how that works.
Background
The installments in creating JQuery Mobile CRUD web apps using JQM.Show were discussed earlier on. These are
Part 1, Part 2 and Part 3. Anyway, we will create an app here inside GenyMotion.
NB: Please ensure that your internet connection is active for these preparations:
Preparing Genymotion:
Once you have installed Genymotion, you need to add a device profile to it to be able to run an android emulated device in it. To do this:
1. Start Genymotion (it will ask you to sign in with the details you used when downloading it)

2. Click Add, a list of available devices will be listed where you can select the one you want to use. I would recommend that you select a 7inch device from the list as this will provide a more nicer JQM.Show user experience.

3. Click Next, depending on whats on your device, Virtual Box will also be installed in your device.

4. Once done, select your device of choice and click Start, this should start your emulator. This should display the emulator as depicted delow for example.

Preparing Android Studio:
1. Once installed, this might ask you to update the files needed. The only thing we need from AS is the Android Device Monitor to access the file explorer to be able to drag and drop files into our genymotion device easily.

2. Start the Android Device Monitor (located at the top toolbar). This might give an error, click Ok if it does.
3. Once successful, this should open the monitor. Once done, select File Explorer tab. This should display the list of folders and files on your emulated device, the root folder is mnt\shell\emulated\0. This is the folder where JQM.Show will store the created projects.

Preparing MS WebMatrix
1. Once installed, there is nothing much to do here except wait for the JQM.Show created project folder. I will show you how we will do this later on. For all out projects, we will click File > Open > Folder as Site..

Preparing JQM.Show
This process involves preparing the genymotion emulator to use JQM.Show.
1. In your genymotion emulator, open a browser and type in https://play.google.com/store/apps/details?id=com.b4a.JQMShow and install JQM.Show on your emulated device.
You can also achieve this by
1.1 Open browser on your emulator
1.2 Type in https://play.google.com/store and search for Anele Mbanga or JQM.Show.

2. Click on JQ,Show and install it. This might ask you to sign in, use your gmail username and password.
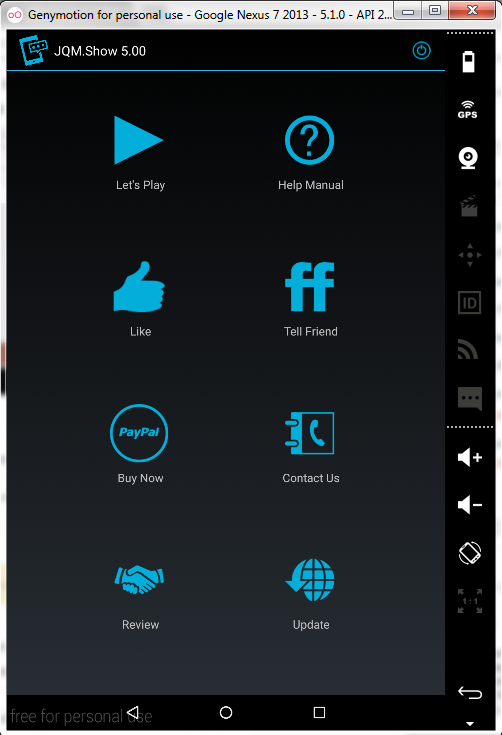
3. Once, installed, use the back menu to go to the home screen of your device and start JQM.Show, you are now ready to develop your JQuery Mobile CRUD Web App. This should display the screen below.

Using the code
Let's develop a simple web app and export it out of the device, put it into our ms webmatrix web server and run it in our internet browser locally.
Creating a JQquery Mobile CRUD App
1. To use JQM.Show, you need to register first. click Skip, you can scroll through this introduction at a later stage.
2. Click Let's Play. If you already have an account with JQM.Show, Sign In else Sign Up.

3. You should see a blank screen without any projects at first.

4. Let's create a new project. Select New App Wizard. We will create a simple movie database app.
4.1. On App Name, type Movies Database, leave the security thingy off. Click Next

4.2 On the Model Name, type Movie and Display Name, Movies, click Next

4.3 In this screen we need to detail what each movie model will hold. For each movie lets store the name, year and genre. Let's just keep it simple. Type in Movie Name, Movie Year, Movie Genre as the field names and click Next.

4.4. From now on, JQM.Show is ready to write the code for you for your CRUD app and also generate the user interface. From the next screen click Finish.

4.5 Some seconds later, the screen below should appear indicating the location of your created application.

Congratulations, you have just created your first JQM.Show JQuery Mobile Web App from your PC. Now let's export the project folder out of your emulator to your PC.
Pulling the JQuery Mobile CRUD App from the emulator device
5. Open up the Android Device Monitor, locate the project folder under mnt\shell\emulated\0. By default, a WebSQL project that uses SQLite has been created and has that suffix.
5.1. Select the folder to make it active as depicted in the rectangle
5.2 Select the button to pull the folder from the device to the PC.

5.3 In the next screen, select Desktop as your destination and click OK

A progress bar will appear indicating the progress of your operation. When it hides, you will be done pulling the folder from the device.
Congratulations, you have just exported your project from the emulated device to your desktop. Now lets see how the output looks like from. We will do that using MS WebMatrix.
Running the JQuery Mobile CRUD App
6. Fire up MS WebMatrix if its not running
6.1 Select File > Open, Folder as Site, from the webmatrix select folder, select MovieDatabaseWebSQL folder and click Select Folder

6.2 If the next screen says, PHP detected, click Cancel as we dont want to install PHP yet.
6.3. We need to update some site settings for our app so that it works properly now. If all goes well, you should be seeing a structure like this, if not, it will be all the files for the site listed without any folders. The current unplublished version of JQM.Show has been updated to keep this structure now and will be available soon.

You might notice folders like controllers, models and views, dont be alarmed. JQuery Mobile as yet does not support AngularJS in anyway but I wanted to structure all my folders properly for ease of code maintenance.
6.3. Select Site from the navigation tab and select Settings. Select None as .Net version as the app is not using .NET.
You can also disable Enable PHP. Click the Files navigation item and click Restart from the menu. If all is well you should see a notification saying:: at the bottom of the screen.
The following site has restarted successfully: 'MoviesDatabaseWebSQL'.
6.4. From the run menu, select the browser that you want to run your site with. I prefer Google Chrome.

That should open up your browser and run your JQuery Mobile CRUD App called Movie Database. As this app uses default icons and everything, customisation can be done to suit your needs by editing the index.html file directly.
You should see this..

Congratulations, your app has been fully created directly from your PC with JQM.Show.
Adding a movie:
Select Movies > New (capture your movie details and select Save.

I like using the Ripple Emulator for my tests, you can download it here for the Chrome explorer. I open my ripple from the plug-ins and select iPhone 5.

Go around, play around with your app and add some more movies.
Digging Deeper into the source code & backend
The source code generated here is the same format and template as per my previous discussions for CRUD apps but because we are creating a completely new app, to store movies, lets look at how our screen is designed
Back End
1. In your Chrome browser, press F12, this should open developer mode.
2. Select Resources and Locate MovieDatabase file under WebSQL.

Our movie record has been saved. The javascript that does that is this.
// Save click event on Add page
            $('#pgAddMovieSave').on('click', function (e) {
                e.preventDefault();
                e.stopImmediatePropagation();
                //get form contents into an object
                var MovieRec = pgAddMovieGetRec();
                //save object to WebSQL
                app.addMovie(MovieRec);
            });
The screen contents are read and saved in a variable called MovieRec and this is saved with app.addMovie
//read contents of each form input
        function pgAddMovieGetRec() {
            //define the new record
            var MovieRec = {};
            MovieRec.MovieName = $('#pgAddMovieMovieName').val().trim();
            MovieRec.MovieYear = $('#pgAddMovieMovieYear').val().trim();
            MovieRec.MovieGenre = $('#pgAddMovieMovieGenre').val().trim();
            return MovieRec;
        }
app.addMovie uses a defered method of SQLite to save records to the database.
// add a new record to WebSQL storage.
        app.addMovie = function (MovieRec) {
            $.mobile.loading("show", {
                text: "Creating record...",
                textVisible: true,
                textonly: false,
                html: ""
            });
            // define a record object to store the current details
            var MovieName = MovieRec.MovieName;
            // cleanse the record key of spaces.
            MovieName = MovieName.split(' ').join('-');
            MovieRec.MovieName = MovieName;
            // store the json object in the database
            $.when(SqlInsertRecord(dbMoviesDatabase, "Movie", MovieRec)).done(function () {
                //show a toast message that the record has been saved
                toastr.success('Movie record successfully saved.', 'Movies Database');
                //find which page are we coming from, if from sign in go back to it
                var pgFrom = $('#pgAddMovie').data('from');
                switch (pgFrom) {
                    case "pgSignIn":
                    $.mobile.changePage('#pgSignIn', {transition: pgtransition});
                    break;
                    default:
                    // clear the edit page form fields
                    pgAddMovieClear();
                    //stay in the same page to add more records
                }
                }).fail(function (err) {
                //show a toast message that the record has not been saved
                toastr.error('Movie record NOT successfully saved.', 'Movies Database');
            });
            $.mobile.loading("hide");
        };
For a very detailed explanation on how I have built WebSQL JQuery Mobile CRUD apps before, please refer to this article. The source code is exactly the same with the exception of the model names, the methodology is the same.
Just to peek on the index.html boilerplate code, this has been the output of the header.
Front End Peek
<!DOCTYPE html>
<html  manifest="index.appcache">
<head>
<title>Movies Database</title>
<meta charset='utf-8'/>
<meta name='format-detection' content='telephone=no' />
<meta name='viewport' content='width=device-width, initial-scale=1, user-scalable=no, minimum-scale=1, maximum-scale=1'/>
<meta name='playstore' content='https://play.google.com/store/apps/details?id=com.b4a.JQMShow'/>
<meta name='apple-mobile-web-app-cabable' content='YES'/>
<meta name='keywords' content='JQM.Show,JQuery Mobile,JQuery,JavaScript,Google Play Store,Anele Mbanga,Mobile,Hybrid,HTML,CSS,Responsive,HTML5,JSON,Stringify,Parse'/>
<meta name='mobile-web-app-capable' content='yes'/>
<meta name='apple-mobile-web-app-title' content='Movies Database'/>
<meta name='apple-mobile-web-app-status-bar-style' content='black-translucent.'/>
<meta name='version' content='1.00' />
<meta name='generator' content='JQM.Show 5.00' />
<meta name='date' content='2015-05-15 17:32' />
<meta name='copyright' content=' ' />
<meta name='author' content=' ' />
<meta name='email' content='' />
<meta name='website' content='' />
<meta name='description' content='. Available from Android Play Store at https://play.google.com/store/apps/details?id=com.b4a.JQMShow' />
<link rel="apple-touch-icon" href="images/apps.png">
<link rel="icon" type="image/png" href="images/apps.png">
<link rel="shortcut icon" type="image/png" href="images/apps.png">
<link rel="apple-touch-icon" sizes="57x57" href="images/apps57.png">
<link rel="apple-touch-icon" sizes="72x72" href="images/apps72.png">
<link rel="apple-touch-icon" sizes="80x80" href="images/apps80.png">
<link rel="apple-touch-icon" sizes="114x114" href="images/apps114.png">
<link rel="apple-touch-icon-precomposed" href="images/appsIconPreComposed.png">
<link rel="apple-touch-startup-image" href="images/appsIconStartUp320by460.png">
<link rel="stylesheet" href="css/toastr.min.css">
<link rel="stylesheet" href="css/jqm-datebox.css">
<link rel="stylesheet" href="css/animate.css">
<link rel="stylesheet" href="css/addtohomescreen.css">
<link rel="stylesheet" href="css/jquery.mobile-1.4.5.min.css">
<script src="js/jquery.min.js" type="text/javascript"></script>
<script src="js/jquery.mobile-1.4.5.min.js" type="text/javascript"></script>
<script src="js/navbar.js" type="text/javascript"></script>
<script src="js/jqm-datebox.core.js" type="text/javascript"></script>
<script src="js/jqm-datebox.mode.slidebox.js" type="text/javascript"></script>
<script src="js/jqm-datebox.mode.flipbox.js" type="text/javascript"></script>
<script src="js/jqm-datebox.mode.datebox.js" type="text/javascript"></script>
<script src="js/jqm-datebox.mode.customflip.js" type="text/javascript"></script>
<script src="js/jqm-datebox.mode.custombox.js" type="text/javascript"></script>
<script src="js/jqm-datebox.mode.calbox.js" type="text/javascript"></script>
<script src="js/toastr.min.js" type="text/javascript"></script>
<script src="js/fastclick.js" type="text/javascript"></script>
<!--[if IE]>
<script src="js/html5.js" type="text/javascript"></script>
<![endif]-->
<script src="js/stanfordcryptolibrary.js" type="text/javascript"></script>
<script src="js/excellentexport.min.js" type="text/javascript"></script>
<script src="js/d3.min.js" type="text/javascript"></script>
<script src="js/d3tree.js" type="text/javascript"></script>
<script src="js/addtohomescreen.min.js" type="text/javascript"></script>
<script src="js/remoteserver.js" type="text/javascript"></script>
<script src="js/support.js" type="text/javascript"></script>
<script src="js/websql.js" type="text/javascript"></script>
<script src="js/app.js" type="text/javascript"></script>

<style>body * {font-family: 'Helvetica Neue', Helvetica, Arial, sans-serif; }
.ui-header .ui-title, .ui-footer .ui-title {margin-right: 0 !important; margin-left: 0 !important; }
.marker {max-width: 100%; max-height: 100%; }
.tab-content {display:none; }
.tab-content:first-child { display: block; }
.ui-body-c { border: 1px solid #aaa!important;}
caption {font-weight: bold; font-size: 1.1em; }
.ui-li .ui-btn-inner a.ui-link-inherit, .ui-li-static.ui-li { display: block !important; padding: 0.9em 75px 0.9em 15px !important; }
body .ui-li .ui-li-desc {white-space: normal; }
body .ui-footer .ui-title {white-space: normal; }
a, button, .myelements {-ms-touch-action: manipulation; touch-action: manipulation; }
img { padding: 5px; }
.ui-li-has-thumb .ui-btn-inner a.ui-link-inherit, .ui-li-static.ui-li-has-thumb { min-height: 80px !important; }
.ui-li-has-arrow .ui-btn-inner a.ui-link-inherit, .ui-li-static.ui-li-has-arrow { padding-right: 10% !important; }
.ui-li-has-thumb .ui-btn-inner a.ui-link-inherit, .ui-li-static.ui-li-has-thumb { padding-left: 25% !important; }
.iphonedv { width:150px;height:96px;margin:15px 4px 10px 4px;float:left;padding-bottom:35px;text-align:center; }
.iphonebtn { text-decoration: none; color: #FFFFFF; }
.backpicture { background-image:url('images/b1.jpg');background-repeat:no-repeat;background-size:cover; }
.red {color:red; }
.rightnav { width:65%;float:left;margin-left:35px;}
.leftnav { width:30%;float:left; }
.borderdv { border-radius: inherit; }
.centertext { text-align: center; }
.ui-icon-exportexcel:after {background-image: url("images/exportexcel.png");background-size: 14px 14px;}
.ui-icon-records:after {background-image: url("images/records.png");background-size: 14px 14px;}</style>
</head>
Please note the file paths, depending on the JQM.Show version used, your files might not be in folders yet, but will be the same however. You can then reopen the project in JQM.Show and customise it with your author details and sites etc.
You can find a detailed user manual for JQM.Show here for more details.
If you want to convert your app into a hybrid app that will run on iPhone or Android, you can follow my article here and that should not be a challenge.
Also if you would rather use different backends like JSON, XML, you can just change the backend in JQM.Show and the respective code applicable to those backends will be created. Using such backends for development was discussed in my articles below:
- JQuery Mobile JSON Back End
- JQuery Mobile XML Back End
- JQuery Mobile LocalStorage Back End
- JQuery Mobile WebSQL Back End (which has been for this article)
Points of Interest
There has been a lot of details that I have explained in my previous articles in terms of creating CRUD JQuery Applications. With this article I wanted to bring closer anyone who would want to develop similar applications using JQM.Show however on a PC and not a device. JQM.Show has been specifically developed to run on Android Devices, however I have demonstrated above that even if you dont have an android device, you can do the same on your PC.
Genymotion is very fast and I like it in testing my android devices. I'm developing my android apps using B4A which is available here and with both that and Genymotion, for me its limitless.
That's all folks, hope this has been a very enlightening article. Enjoy it.