
Measuring temperature, GPS, vibration and set alarms by NET Micro Framework
4.96/5 (36 votes)
If you know C# or VB you are ready to learn desirable and Simple way for monitoring your environmental condition (measure temperature, humidity, GPS coordinate position, vibration) and set alarms (turn on or blinking LED, buzzer and etc) by installing NET Micro Framework and buy compatible board (F
IoT Competition Stage 2 - Preface
Internet of Things (IoT) makes our world as possible as connected together. Nowadays we almost have internet infrastructure wherever and we can use it whenever. Embedded computing devices would be exposed to internet influence. Common instances for embedded computing devices are MP3 players, MRI, traffic lights, microwave ovens, washing machines and dishwashers, GPS even heart monitoring implants or biochip and etc.
Now the important question is how to use cutting edge technologies to improve IoT developing and its performances, I mean how to make IoT easier by WIFI, High level language with the less confusing in writing code and configuring complex devices. Is there any way to buy compatible board and write your code in C# or VB on .NET platform and finally reach to your purpose ??!!
What is your purpose:
Writing in C# or VB on .NET platform on compatible board by installing free and open source NET Micro Framework on .NET and measure your temperature, humidity, vibration, GPS coordinate position and display alarm when its value are more or less than your expectation.
Introduction
Why .NET Micro Framework (NETMF):
Advantages:
- If you want to build system and write your codes on classic ways, therefore you have to spend lots of your time to learn low level language while here with NETMF you just need to know C#, then you just be familiar with hardware catalog.
- Classic ways need compiler for microcontroller while here you are free to install NETMF on your current .NET (Visual Studio 2010, 2012, 2013).
- NETMF is open source.
- Your code can be run on other devices in the range of NETMF compatible device.
- NETMF debugging is as easy as .NET debugging.
Disadvantage:
- NETMF works with high level language such as C# or VB.NET so it might be slower than low level language such as Assembly.
Requirements (Totally)
1. Hardware: It is physical board that you are going to manage and control your environment by this device.
- Boards: (You should buy one of two options from shopping and take and read their tutorial how to run it and connect it with your computer, because of they have various versions )
- GHI Electronics: https://www.ghielectronics.com/
- Simple Board (red color):
- .NET Gadgeteer (black color): http://www.ghielectronics.com/products/dotnet-gadgeteer
- Netduino: http://www.netduino.com/
- GHI Electronics: https://www.ghielectronics.com/
- USB Cable:
2. Software:
-
Visual Studio 2010, 2012, 2013: http://www.visualstudio.com/en-us/products/visual-studio-express-vs.aspx
-
.NET Micro Framework SDK(4.3): https://netmf.codeplex.com/releases/view/118283
Installing Steps for NET Micro Framework (NETMF):
Installing NETMF Step 0 (Important Tip):
You should remove and uninstall any previous version .NET Micro Framework from your computer , because of preventing any confliction in your system.
Installing NETMF Step 1:
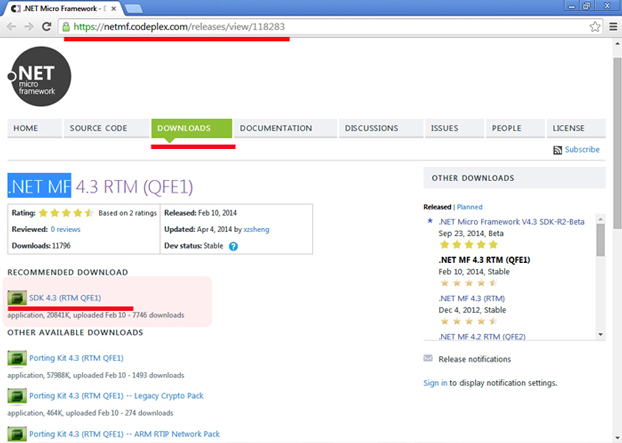
Go to this link: https://netmf.codeplex.com/releases/view/118283 .
Then click on SDK 4.3 (RTM QFE1) -> To download NET Micro Framework.
Installing NETMF Step 2:
Now it will be placed on your local drive (C:\.... or D:\.....) -> Then right click on this "zip" file and extract it.

Installing NETMF Step 3:
Double click on the extracted file and run it.

Installing NETMF Step 4:
This is "Welcome page" --> click on "Next"

Installing NETMF Step 5:
Click on "I accept .. " --> Then click on "Next"

Installing NETMF Step 6:
Click on "Complete Option" --> Then click on "Next"

Installing NETMF Step 7:
It time to click on "Install"

Installing NETMF Step 8:
Waite until finishing ...

Installing NETMF Step 9:
Click on "Finish". Now you have installed NETMF on your .net successfully.

Running Simple Code on NETMF Just for Test:
Running Test on NETMF Step 1:
New Project: Open you Visual Studio 2012 or 2013 --> File (Menu) --> New --> Project

Running Test on NETMF Step 2:
Select your language in the left side --> Select Micro Framework --> Select Console Application
Name your project & Determine Location & Solution Name --> Click on "Ok"

Running Test on NETMF Step 3:
Now select "Program.cs" from your solution window --> Inside Main() (you start from Main() to do anything)
Write simple code just for illustrating on console to be sure everything is all right:

Sample Code to Show Simple Text on Console:
using System;
using System.Threading;
using Microsoft.SPOT;
using Microsoft.SPOT.Hardware;
using Microsoft.SPOT.IO;
using System.IO;
using System.IO.Ports;
using System.Text;
using System.Runtime.CompilerServices;
using Microsoft.SPOT.Presentation.Media;
using System.Diagnostics;

namespace MFConsoleApplication1
{
    public class Program
    {
        public static void Main()
        {

            Debug.Print("This is first project on NETMF");


        }

    }
}
Running Test on NETMF Step 4:
When you encounter NETMF you have two options for running your project on "Emulator" or "Device". Now you should test if your NETMF works all right or not, so let`s to select "Emulator" mode instead of any device or board.
On "Solution Explorer" right click on Project Name --> Select "Properties"

Running Test on NETMF Step 5:
Firstly on the left side select ".NET Micro Framework" --> Transport: Emulator & Device: Microsoft Emulator
Tick "Generate native stubs for internal methods"

Running Test on NETMF Step 6:
To see your result on output window: Go "View" (Menu) --> Select "Output"

Running Test on NETMF Step 7:
Build your project: Go to "Build" (Menu) --> Select "Build Solution"

Running Test on NETMF Step 8:
Press "F5" or "Start" (Green button) to run:

Running Test on NETMF Step 9:
If you are not able to see output result --> Go to: "Tools" (Menu) --> "Import and Export Settings"

Running Test on NETMF Step 10:
Select "Export selected environment settings"

Running Test on NETMF Step 11:
Select "Import and Export Settings"

Running Test on NETMF Step 12:
Do not change anything and click "Finish"

Running Test on NETMF Step 13:
Now again run your project "F5" or press "Start" then you will see something like below picture.
You will see your text here "This is first project on NETMF"

Running Test on NETMF Step 14:
Debugging: Debugging in NET MF is as easy as on .NET platform. Click on left side where I have drawn "red line" to point red circle --> then run project "F5" --> to go through code press "F11" --> you can use "Call Stack", "Immediate Window", "Locals", "Watch"

Press "F11":

Setup Device PC Steps:
Tip : You should not produce any static electricity via rubbing body or anything on your board to avoid discharge your board.
Setup Device on PC Step 1: "Red Board"
In this section I just explained GHI Electronics devices (FEZ), to have more information please go to: https://www.ghielectronics.com/docs/230/netmf-processor-setup
There are two types: First one is red board --> you should connect USB cable from computer to black board.

Setup Device on PC Step 2: "Black Board" or "Gadgeteer"
The second one is black board which is called "Gadgeteer" --> you should connect wire from black board ("Gadgeteer") to "D" labeled socket on red board --> then connect via USB cable from your PC to his red board

Setup Device on PC Step 3: "Wait to Load Driver"
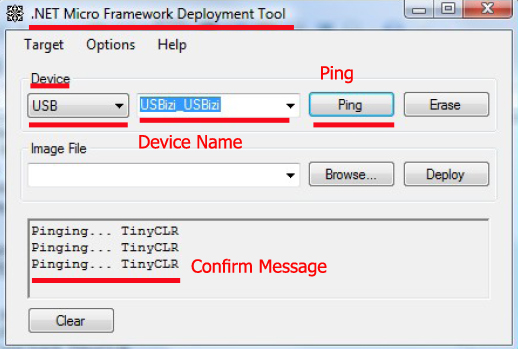
Fez Config: You will see window like this --> Select "USB" & Device Name: "X" --> Then click on "Check Update"

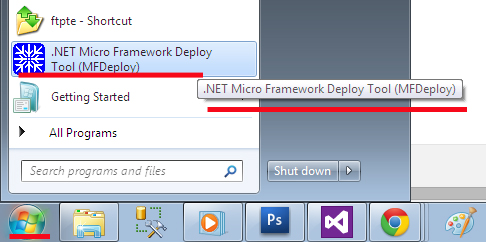
Setup Device on PC Step 4: "MFDeploy"
Actually "NETMF SDK" from "MFDeploy" and here it helps us to get it if our device was connected properly or not?
Go to: Start --> Select ".Net Micro Framework Deploy"

You should see "Confirm Message" which includes: "Pinging ... TinyCLR" --> So now everything is ok by now.
Setup Device on PC Step 5: "Convert from Emulator mode to device mode"
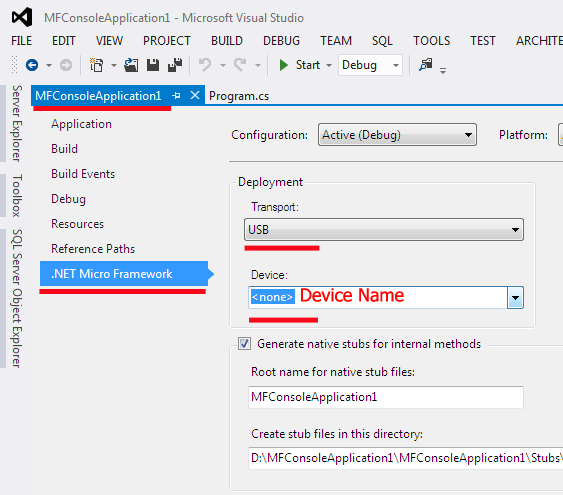
On your solution explorer right click on project name --> select "properties"
On the left side select ".NET Micro Framework" --> ( Transport = USB ) & ( Device = your Device Name )
Installing Gadgeteer Steps:
Installing Gadgeteer on your PC Step 1:
If your device is belong to "black board" such below picture so you have to install "Gadgeteer".
Go to: https://gadgeteer.codeplex.com/releases/view/119122

Installing Gadgeteer on your PC Step 2:
Expand zip file and run .exe

Allow it to install and wait until it is finished.

Requirement Assemblies Steps:
Requirement Assemblies Step 1:
On Solution Explorer --> right click on References Folder --> select "Add Reference"

Requirement Assemblies Step 2:
You need these selected references for now select them and click on "OK"

Requirement Assemblies Step 3:
Add these references to your "program.cs"
using System;
using System.Threading;
using Microsoft.SPOT;
using Microsoft.SPOT.Hardware;
using Microsoft.SPOT.IO;
using System.IO;
using System.IO.Ports;
using System.Text;
using System.Runtime.CompilerServices;
using Microsoft.SPOT.Presentation.Media;
using System.Diagnostics;
Turn on and Blink LED Steps:
Turn on LED Step 1:
Read carefully catalog or any guidance text on your board. If it mentions:
( Output pins can be in "0" or "1" states )
"This board is powered off 3.3V" --> pin set to "1" you have ~ 3.3V (near 3.3V) on output pin
--> pin set to "0" you have ~ 0V (near 0V) on output pin
Turn on LED Step 2:
FEZ boards have LED pin. Now I want to write a sample code to turn on LED either totally or on the FEZ board:
For having more information please look at: http://www.ghielectronics.com/downloads/FEZ/Beginners%20guide%20to%20NETMF.pdf

Developers use "Thread" for making interrupt inside code (albeit in a very simple description). Here I used Thread.Sleep(Timeout.Infinite); --> It causes to LED turn on Infinitely. If you insert value according to millisecond this LED will be blinked
using System;
using System.Threading;
using Microsoft.SPOT;
using Microsoft.SPOT.Hardware;
using Microsoft.SPOT.IO;
using System.IO;
using System.IO.Ports;
using System.Text;
using System.Runtime.CompilerServices;
using Microsoft.SPOT.Presentation.Media;
using System.Diagnostics;

namespace MFConsoleApplication1
{
    public class Program
    {
        public static void Main()
        {

            OutputPort <code>LED</code>;
            <code>LED</code> = new OutputPort((Cpu.Pin)4, true);
            Thread.Sleep(Timeout.Infinite);

        }

    }
}
Or by adding "GHIElectronics" to your references and write:
using System;
using Microsoft.SPOT;
using System.Threading;
using Microsoft.SPOT.Hardware;
using GHIElectronics.NETMF.FEZ;

namespace MFConsoleApplication1
{
public class Program
{
public static void Main()
{
OutputPort <code>LED</code>;
<code>LED</code> = new OutputPort((Cpu.Pin)FEZ_Pin.Digital.LED, true);
Thread.Sleep(Timeout.Infinite);
}
}
}
Blink LED Step 1:
using System;
using Microsoft.SPOT;
using System.Threading;
using Microsoft.SPOT.Hardware;
using GHIElectronics.NETMF.FEZ;
namespace MFConsoleApplication1
{
public class Program
{
public static void Main()
{
OutputPort LED;
LED = new OutputPort((Cpu.Pin)FEZ_Pin.Digital.LED, true);
while (true)
{
LED.Write(!LED.Read());
Thread.Sleep(300);
}
}
}
}
Measuring Temprature by NETduino Steps:
For having more information please look at: http://forums.netduino.com/index.php?/topic/1008-analog-in-put-c-coding/
using Microsoft.SPOT;
using Microsoft.SPOT.Hardware;
using SecretLabs.NETMF.Hardware;
using SecretLabs.NETMF.Hardware.Netduino;

namespace NDP_SocketSender1
{
    public class Program
    {
        public static void Main()
        {

            AnalogInput a5 = new AnalogInput(Pins.GPIO_PIN_A5);

            while (true)
            {
                string s = a5.Read().ToString();
                Debug.Print(s);
                Thread.Sleep(200);
            }
        }
    }
}
Measuring Vibration by FEZ Steps:
For having more information please look at: https://www.ghielectronics.com/community/forum/topic?id=4013
You can measure vibration for setting alarm, you need " Piezo electric transducer, 30Vp-p "
using System;
using System.Threading;
using Microsoft.SPOT;
using Microsoft.SPOT.Hardware;
using Microsoft.SPOT.IO;
using System.IO;
using System.IO.Ports;
using System.Text;
using System.Runtime.CompilerServices;
using Microsoft.SPOT.Presentation.Media;
using System.Diagnostics;
using GHIElectronics.NETMF.FEZ;

namespace MFConsoleApplication1
{
    public class Program
    {
        public static void Main()
        {

            OutputPort led = new OutputPort((Cpu.Pin)FEZ_Pin.Digital.LED, ledState);
            GHIElectronics.NETMF.Hardware.AnalogIn analog= new GHIElectronics.NETMF.Hardware.AnalogIn(GHIElectronics.NETMF.Hardware.AnalogIn.Pin.Ain0);

analog.SetLinearScale(-512, 512);

            int MaxVibration = 0;
            int analog_Value=0;
            while (true)
            {

                Thread.Sleep(50000);


                MaxVibration = 0;
                for (int Count = 0; Count < 1000; Count++)
                {

                    analog_Value = analog.Read();


                    analog_Value = System.Math.Abs(analog_Value);

                    if (MaxVibration < analog_Value)
                    {
                        MaxVibration = analog_Value;
                    }
                }

                if (MaxVibration > 100)
                {
                    led.Write(true);
                }
                else
                {
                    led.Write(false);
                }

            }


        }

    }
}
Measuring GPS by NETduino Steps:
For having more information please look at:
http://bobcravens.com/2010/09/gps-using-the-netduino/
http://forums.netduino.com/index.php?/topic/37-yet-another-supported-shield-question-gps/
using System;
using System.IO.Ports;
using System.Threading;
using Microsoft.SPOT;
using Microsoft.SPOT.Hardware;
using SecretLabs.NETMF.Hardware;
using SecretLabs.NETMF.Hardware.Netduino;
using System.Text;
using System.Runtime.CompilerServices;
using Microsoft.SPOT.Presentation.Media;
using System.Diagnostics;

namespace MFConsoleApplication1
{
    public class Program
    {

        public static void Main()
        {

           SerialPort serialPort = new SerialPort("COM1", 4800, Parity.None, 8, StopBits.One);
            serialPort.Open();

          OutputPort powerPin = new OutputPort(Pins.GPIO_PIN_D2, false);

            while (true)
            {
                int bytesToRead = serialPort.BytesToRead;
                if (bytesToRead > 0)
                {
                    // waiting ........
                    byte[] buffer = new byte[bytesToRead];
                    serialPort.Read(buffer, 0, buffer.Length);
                    // print out our received data
                    Debug.Print(new String(System.Text.Encoding.UTF8.GetChars(buffer)));
                }

                Thread.Sleep(100); // wait ......
            }


 }

    }
}
Netduino Shape:

GPS Shield:

References:
http://www.netmf.com/get-started/
https://www.ghielectronics.com
Feedback
Feel free to leave any feedback on this article; it is a pleasure to see your comments and vote about this code. If you have any questions, please do not hesitate to ask me here.