
An Introduction to Workspaces::Tasks
4.86/5 (8 votes)
Using, managing and loving your TODO list.
Introduction
For years we at CodeProject have fought over which task tracking system to use and the arguments all came down to "which system sucked the least". There are some fantastic task tracking systems out there that almost work for us, but they are either too complicated, too slow, don't work on tablets, or force you to do something you don't want to do.
Our goal with ::Tasks was to create a system that was fairly dumb in that it didn't know what you wanted to do, it just provided a consistent and extensible framework in which you could do it. The fundamental goals of Tasks were:
- Create a task tracking system better than Notepad or an Excel spreadsheet
- Create an application that focused on the user's data, not the application
There is a constant temptation among software developers to make the application the main feature instead of making the user's data within that application the main feature. The software behind a great video game is invisible to a user; you completely forget you're using a software application. Business applications, to race to the other end of the spectrum, often go the other way and make the application the focus. Our weekly meetings were 50% about how to use the tools we were using and 50% about how we could write a better one. And 50% about what we were meant to be talking about. Software is meant to make like easier, not merely be an end unto itself.
Workspaces::Tasks
::Tasks is our first application written on our Workspaces platform that provides support for our Article system. Each article on CodeProject has a "Bugs and Suggestions" tab that provides a ::Tasks instance for that article. If you want to use ::Tasks for your own projects just open a new workspace at Workspaces - it's free.
Workspaces is written primarily in CoffeeScript as a single-page application using the Ember.js framework with a Node.js backend and a MongoDB persistence layer. ::Tasks uses the same stack except for the addition of a little Ruby On Rails, though we are shifting from Ruby to pure node.js. The whole thing is hosted on Amazon Web Services using Capistrano and Chef for management and deployment. There's a little Go sprinkled in there for grins but it's merely a little dabbling on the side.
The specific goals of ::Tasks are
- Organise and manage task lists
- Be fast
- Be simple
- Work on a desktop and a tablet
- Be extensible
Further (implied) goals were that ::Tasks should
- live on the ::Workspaces platform
- Be geared towards simultaneous multiple users
- Ensure alerts, updated and user communication was baked in
The Grid
The core of the ::Tasks UI is the grid. We tried many, many commercial and open source grids and none suited. Many were close, but in the end the effort involved in reworking the grid (and working around the grids) to suit our needs meant it was more efficient to simply write our own.
The grid is pure JavaScript and supports the features you'd expect: resizable columns, sortable, drag and drop and in-place editing.

The grid was (understandably) 90% of the UI work and the focus of most of the optimisation. To gain speed we've optimised data serialisation, worked with pre-rendering the HTML on first load, added partial and on-demand grid population and spent weeks trimming milliseconds here and there to ensure the application is as fast as possible during interaction. We still have a number of tricks we're planning on implementing so the work continues. As Ember.js evolves, it also opens door for new speedups over time.
Your Tasks
The goal was to ensure the system was as simple to use as Notepad or Excel, so the focus is on simple lists that are in-place editable and can be arranged using simple drag and drop.
In the default layout you see your tasks listed one after the other. To make a task a child of another task simply drag one task on top of another. To create a new task just choose the "Add New" menu dropdown which allows you to add a new task a the end of the list, a new sibling to the currently selected task or a new child of the current task. Hint: use the keyboard shortcuts Ctrl+Enter / Shift+Enter to save time.

Once you've added a new item it's simply a matter of filling in the details: Title, type, a description (using Markdown), assignees and whatever other fields you are using.

Hit Enter and the task is created and a new, blank task is then also created ready for you to add your next item. The goal is "better than notepad" and in notepad you type, hit enter, type, hit enter. That's the pattern we've used in ::Tasks.
Organising and managing Your Tasks
A core feature of ::Tasks is "Organise and manage task lists" but there are, fundamentally, two ways of organising tasks:
- Hierarchically by Project. Organising items based on where they fit in the Grand Plan
- A flat list: eg By priority, by assignee or just a "What's on the list for today?"
The default Tree layout allows you to organise your lists as a hierarchical tree. You enter tasks then drag and drop them to produce a tree of tasks.

There is another layout called List Layout that allows you to organise your items in a flat list based on different ordering criteria than the Tree list.

Initially the items will be ordered as you enter them, but when in List layout you can drag and drop items to rearrange them (but not add parent/child relations - that's for Tree layout only). The order you place items will be maintained as you switch between List and Tree layout.
Filtering and Grouping
You don't always want to see all of the tasks all of the time so ::Tasks allows you to filter and group your tasks.
To filter, click the "funnel" icon at the top of the column whose values you want to filter and then select the items you wish to include in the filter. In the example below I've chosen to only view items with a Status of New, Open, In Progress, On Hold, Needs Help and Resolved. I'm not going to show the items that are Closed, Rejected or Completed.

Hit apply and you have your filter. Do this on as many columns as you wish to fine tune your filter. Your final set of filters can be viewed and adjusted using the Filter dropdown

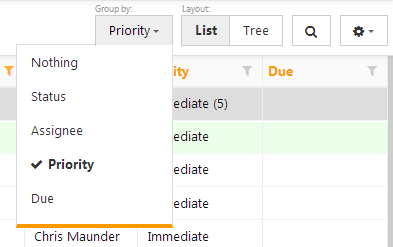
Grouping is done by selecting the column by which to group items in the Group By dropdown
Defining and Saving Views of your Tasks
Having the ability to view tasks as a project tree or as a flat list of TODO items is nice, but you need a way to define different views of the items you're managing. Doing this is silly simple in ::Tasks.
- Choose your layout: List or Tree
- Apply any filters you need
- Group the items if necessary
- Adjust the column sizes if necessary
- Go to the Views dropdown and at the bottom enter the title of the view you wish to save and hit Add.

Once a view is created you then share the view so others can use your view, set it as your main (default) view, or (if you've shared the view) set it as the main view for everyone, not just yourself.

Viewing and Editing items
The small window we provide for entering the item description isn't always enough, and nor does the main grid view of tasks provide the full description. Clicking the title of any task opens up the Detail pane that shows an expanded and editable version of a task.

Click the description to edit the description, or click on any of the properties to present a dropdown (or other control) to edit their settings. Further, attachments can be added by dragging and dropping and, if you're using a sensible modern browser, images can be pasted directly into descriptions. Be aware that descriptions are formatting using Markdown, but remember that Markdown also supports straight HTML. The best of both worlds.

Of course, when you have multiple people working on a project there's going to be some back-and-forth among them so each item has a comment area attached at the bottom. Again, everything's formatted in Markdown.

The final piece is the notification system. At the end of the Detail pane are two controls: A "Notify" checkbox that allows you to enable notifications on an item (assignee will always get notifications if they have that option set globally) and another dropdown that allows you to have others be notified. This is incredibly handy when you need to assign an item to one person but have another person be notified of a change of status.
Wrapping up
So far I've touched on the basics of using ::Tasks. Adding, managing, viewing and modifying items has been designed to be as simple as possible and to provide the means to organise and present items in different manners depending on different requirements.
::Tasks is simple and is not meant to replace full blown project management systems with Gantt charts and burn down graphs. It's meant to allow you to organise your tasks, your TODOs and your thoughts, yet it also offers significant configuration possibilities..
In my next article I'll dive into the customisations and extensions that are possible as well as some of the UI hacks we've opened up.