
C++/CLI for Beginners
4.72/5 (12 votes)
I'm going to show you some not quite evident things if you're about to write a C++/CLI application.
Introduction
While writing my previous article about a properly drawn tab control, I decided it wouldn't be bad to create a C++/CLI version of the control. Well, it appeared to be not as straightforward as I initially thought. Therefore I'd like to share my experience in this article, hopefully, it'll be useful for those who decide to fight with C++/CLI for some reason. Here I'd also like to point out that this article is not intended for experts, gurus, etc. If you feel like you belong to Visual Studio development team, this is not the article you're looking for  .
.
Our Goal
Let's imagine that we have to create a new Windows Forms (that's the point) application and we're forced to use C++/CLI. Moreover we have only the modern versions of Visual Studio (like 2012 or 2013) at our disposal.
Doing the Job
Before we continue, I want to make some agreement here: when I say "Visual Studio", unless otherwise specified I mean Visual Studio 2012/2013.
- Creation of a Windows application
If we try to do this, we'll soon investigate that there is no such template for C++/CLI in Visual Studio.
OK then, we'll choose the "CLR Console Application" and turn it into a Windows application. "CLR Empty Project" is not our choice because it won't even create an entry point for the application. Please, follow me on project naming, so you can find the files I'll be referring! In the project we've created, there are no forms at all. Let's add one. Right-click on the project node in the solution explorer and choose Add>New Item... Select new Windows form.

The application is still console. Let's do some magic and turn it into Windows one. Go into CppTutorial.cpp and correct it so it looks like this:
#include "stdafx.h"

using namespace System;
using namespace System::Windows::Forms;

#include "MainForm.h"

[STAThreadAttribute()]
int main(array<System::String ^> ^args)
{
    Application::EnableVisualStyles();
    Application::SetCompatibleTextRenderingDefault(false);
    Application::Run(gcnew CppTutorial::MainForm());

    return 0;
}
Now run your application. You'll see a nasty console window in the background. To get rid of it, go to the project's properties, select the Configuration Properties>Linker>System section. Set SubSystem to Windows.

To make your code compilable, go to Configuration Properties>Linker>Advanced. Set entry point to Main.

Also, correct the code in the CppTutorial.cpp slightly.
#include "stdafx.h"

using namespace System;
using namespace System::Windows::Forms;

#include "MainForm.h"

[STAThreadAttribute()]
void Main(array<System::String ^> ^args)// it's now void and starts with capital M
{
    Application::EnableVisualStyles();
    Application::SetCompatibleTextRenderingDefault(false);
    Application::Run(gcnew CppTutorial::MainForm());
}
Build and run the project. Congratulations! We have a shiny new Windows application running.
- Architecture switching
The application we've just created is 32 bit. You can easily make it 64 bit using the configuration manager (I assume you know what that is). But if you want to create an MSIL application (i.e. Any CPU), unlike in C# or VB .NET, you won't find such an option there. What do we do? OK, there is a way. Go to Configuration Properties>General and change Common Language Runtime Support to either
/clr:pureor/clr:safe:
Built the project. We now have an Any CPU assembly here. You can read more about the
/clrswitch here. - Changing .NET version
Initially we created our project with .NET Framework 4.5 selected. But what if we change our mind. Now we want it to be 4. Changing .NET version is easy with C# or VB .NET projects. With C++/CLI, you have to modify a .vcxproj file manually. Let's do this. Right-click on your project and select Unload Project. Right-click it again and select Edit CppTutorial.vcxproj. Find the section looking like this:
  <PropertyGroup Label="Globals">
    <ProjectGuid>{Some GUID here}</ProjectGuid>
    <TargetFrameworkVersion>v4.5</TargetFrameworkVersion>
    <Keyword>ManagedCProj</Keyword>
    <RootNamespace>CppTutorial</RootNamespace>
  </PropertyGroup>
Change
TargetFrameworkVersionto v4.0. Save, then right-click on the project in the solution explorer and select Reload Project. Our project is now .NET 4.0. You can verify it in the project properties.
- Assembly version
Open the AssemblyInfo.cpp file. You can change quite a lot of information here. But after compilation and looking into your EXE details, you'll find out the information is not there. Here's how you do this the C++/CLI way. For the convenience, add a new header file named AssemblyInfo.h and put the following code in there (version numbers and string contents are up to you indeed).
#pragma once

#define Assembly_Copyright L"Copyright © Vladimir Svyatski 2015"
#define Assembly_Description L"A sample application for CodeProject"
#define File_Version 1,0,0,0
#define File_Version_Str "1.0.0.0"

//CLR assembly version
#define Assembly_Version L"1.0.0.0"
Now make your AssemblyInfo.cpp look like this:
#include "stdafx.h"

using namespace System;
using namespace System::Reflection;
using namespace System::Runtime::InteropServices;

#include "AssemblyInfo.h"

//
// General Information about an assembly is controlled through the following
// set of attributes. Change these attribute values to modify the information
// associated with an assembly.
//
[assembly:AssemblyTitleAttribute(L"CppTutorial")];
[assembly:AssemblyDescriptionAttribute(Assembly_Description)];
[assembly:AssemblyConfigurationAttribute(L"")];
[assembly:AssemblyCompanyAttribute(L"")];
[assembly:AssemblyProductAttribute(L"CppTutorial")];
[assembly:AssemblyCopyrightAttribute(Assembly_Copyright)];
[assembly:AssemblyTrademarkAttribute(L"")];
[assembly:AssemblyCultureAttribute(L"")];

//
// Version information for an assembly consists of the following four values:
//
//      Major Version
//      Minor Version
//      Build Number
//      Revision
//

[assembly:AssemblyVersionAttribute(Assembly_Version)];

[assembly:ComVisible(false)];

[assembly:CLSCompliantAttribute(true)];
It's not over yet, we need to edit app.rc. Double-click on it and in the resource view, right-click on the app.rc node, select Resource Includes... Include AssemblyInfo.h there as shown.
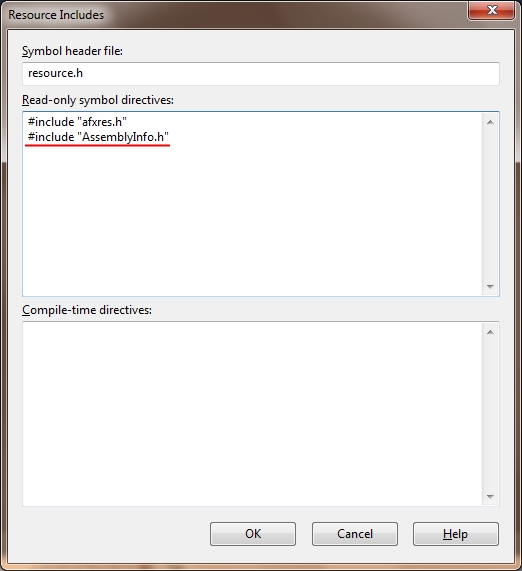
Click OK (it'll show you a warning most likely but that's fine, just accept it). Now in the resource view, add a new version resource. Now we want to put our definitions from AssemblyInfo.h there, but Visual Studio will be overwriting them every time you add a new resource into app.rc. We're going to trick it. Add a new file named app.rc2 to the Resource Files section. Modify your resource includes again: this time add a compile-time directive.
#include "app.rc2"
Open app.rc in the text mode, cut the
VERSIONINFOresource and paste it into app.rc2. app.rc2 should look like this (with the definitions from AssemblyInfo.h):#ifdef APSTUDIO_INVOKED #error this file is not editable by Microsoft Visual C++ #endif //APSTUDIO_INVOKED ///////////////////////////////////////////////////////////////////////////// // Neutral resources #if !defined(AFX_RESOURCE_DLL) || defined(AFX_TARG_NEU) LANGUAGE LANG_NEUTRAL, SUBLANG_NEUTRAL ///////////////////////////////////////////////////////////////////////////// // // Version // VS_VERSION_INFO VERSIONINFO FILEVERSION File_Version PRODUCTVERSION File_Version FILEFLAGSMASK 0x3fL #ifdef _DEBUG FILEFLAGS 0x1L #else FILEFLAGS 0x0L #endif FILEOS 0x40004L FILETYPE 0x0L FILESUBTYPE 0x0L BEGIN BLOCK "StringFileInfo" BEGIN BLOCK "041904b0" BEGIN VALUE "FileDescription", Assembly_Description VALUE "FileVersion", File_Version_Str VALUE "InternalName", "CppTutorial.exe" VALUE "LegalCopyright", Assembly_Copyright VALUE "OriginalFilename", "CppTutorial.exe" VALUE "ProductName", "CppTutorial" VALUE "ProductVersion", File_Version_Str END END BLOCK "VarFileInfo" BEGIN VALUE "Translation", 0x419, 1200 END END #endif
To compile the project, make sure that our app.rc2 is specified as
Nonein the vcxproj file:<ItemGroup> <None Include="app.rc2" /> </ItemGroup>
Build the project, open EXE details in Windows Explorer and voila:

- Signing an assembly
This can easily be done in C# or VB .NET. In C++/CLI, it's a bit more tricky. First of all, we are going to need a SNK file. We can create it in 2 ways
- Via console magic using sn.exe utility. I'm not going to describe this way here. Let's leave it as an exercise for those who interested.
- We can create a temporary C# or VB .NET project just to generate SNK. Let's stick with this one.
Go on, create a C# project (it doesn't really matter whether you choose Windows Application, Console Application or anything else). Open its properties and in the Signing section check Sign the assembly. In the combo box below select <New...>. Fill in the dialog as you like, but for the sake of this tutorial, name the signature file signature.snk. Now copy generated SNK file into our C++/CLI project's directory and include it into the project. We're nearly done. Open the project's properties. In the Configuration Properties>Linker>Advanced section specify Key File as
$(ProjectDir)signature.snkas shown below:
Build your assembly, it's now signed.
That's it! I hope the article is useful for you in some way.
History
- 13.02.2015 - Initial version submitted