
MVC Patterns (Active and Passive Model) and its implementation using ASP.NET Web forms
4.88/5 (24 votes)
MVC Pattern and it's types and implementation using Passive Model.
Introduction
This tutorial distinguish between MVC Patterns, specially Active Model MVC Pattern and Passive Model MVC Pattern with diagram for both technical’s and non- technical’s. This tutorial also describes the implementation of MVC pattern with Passive Model using ASP.Net web forms.
Contents
- Part1: Distinguish between Active Model and Passive Model MVC Patterns.
- Part2: Introduction of Passive Model MVC Pattern.
- Part3: Sample ASP.NET Web Forms project using MVC Pattern with Passive Model.
Part 1: Distinguish between Active Model and Passive Model MVC Patterns
Introduction of the MVC Pattern
Model View Controller (MVC) is popular UI design pattern. It is used to represent the Presentation layer. This pattern separates the application codes. MVC pattern has three components, named Model, View and Controller.Introduction of the Active Model and Passive Model MVC Patterns
Active Model MVC Pattern: In Active Model within three components of MVC Pattern showed in below figures 1.1 and 1.2, the Model is in action. The main difference with Passive Model implementation is, in Active Model implementation the Model notifies the View when the Model is changed by Controller. The pictorial representation will clear it more.Passive Model MVC Pattern: But in Passive Model implementation, Model is inactive. It is not in action. It does not notify View when it is changes by Controller. The notification task is done by Controller. That’s the major difference between the two.
I think the above discussion makes the reader clear a lot. For more clarification I am representing the both with diagram side by side.
Firstly using Non-technical notations

|

|
| Figure 1.1: Active Model(Image Source-http://www.codeproject.com/Articles/661878/Implementation-of-MVC-Patterns-in-ASP-NET-Web-form) | Figure 1.2: Passive Model |
Secondly using UML class diagram:

|

|
| Figure 1.1: Active Model(Image Source-http://www.codeproject.com/Articles/661878/Implementation-of-MVC-Patterns-in-ASP-NET-Web-form) | Figure 1.2: Passive Model |
In the above four diagram it is clear that, in Active Model diagrams, Model depends on View and notify about changes to View. And in Passive Model diagrams both Controller and View depends on Model but Model does not depends on anyone and instead of Model, Controller notifies View.
Hope now the differtiation is clear. For details about Active Model MVC Pattern, please visit my article http://www.codeproject.com/Articles/661878/Implementation-of-MVC-Patterns-in-ASP-NET-Web-form.
Part 2: Introduction of Passive Model MVC Pattern
Figure 1.2 and Figure 2.2 shows the main component of MVC Pattern with Passive Model and their relationship. Let’s describe in details.
- View: View represents the user interface. The data it shows, gets form Model Component. View gets updated notification from Controller when it updates the Model.
- Controller: Controller acts as intermediate between View and Model. When user fires an event, then View receives it and handover the control to Controller. Then Controller updates the Model and notifies View about update.
- Model: Model contains data for the Application.
The following diagram shows the sequence diagram for MVC Pattern with Passive Model.

|
| Figure 3: Sequence diagram of MVC Pattern with Passive Model. |
The above sequence diagram starts from User request, when User fires an event on UI. The View sends RequestUpdate message to Controller, passing itself as a parameter. Controller updates Model, calling helper function UpdateModel. After successful updates the Model, Controller notifies the View using NotifyUpdate message, with passing the updated Model as an argument. After notified, the View updates the UI with the updated value and View gets the updated value from Model.
Part 3: Sample ASP.NET Web Forms project using MVC Pattern with Passive Model
Project Description: The sample project shows a Dashboard with the present stock of a sales center. The Dashboard is shown below. In the Dashboard I have used two Views to show the status of Computer accessories and Mobile Accessories. For the two Veiws there are two Controllers and two Models. Step by step description of the Project are below.

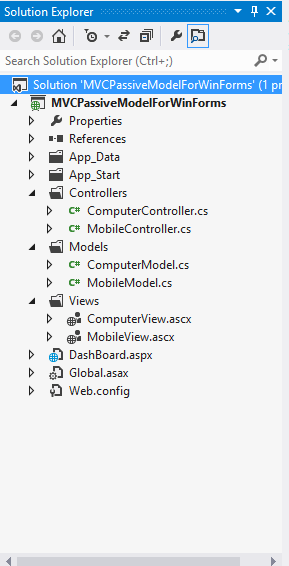
Step 1 - First create a project like shown in the below solution Image.
Step 2 - The code for the ComputerController are shown below.
public class ComputerController
{
    private ComputerModel Model;
    private ComputerView View;
    public ComputerController(ComputerModel paramModel, ComputerView paramView)
    {
        Model = paramModel;
        View = paramView;
    }
    public void InitializedConponent(bool ispostback)
    {
        if(!ispostback)
            View.InitializedView(Model);
    }
    public ComputerController()
    {
    }
    public void RequestUpdate(ComputerView view)
    {
        if (Model != null)
        {
            UpdateModel(view.Monitor, view.Fan, view.Motherboard);
            this.NotifyView();
        }
    }
    public void UpdateModel(int paramMonitor, int paramFan, int paramMotherboard)
    {
        Model.Monitor += paramMonitor;
        Model.Fan += paramFan;
        Model.Motherboard += paramMotherboard;
    }
    public void NotifyView()
    {
        View.Update(Model);
    }
}
Step 3- The code for the Model Class ComputerModel are shown below.
public class ComputerModel
{
    private ArrayList aList = new ArrayList();
    public ComputerModel(string paramName, int paramMonitor, int paramFan, int paramMotherboard)
    {
        Name = paramName;
        Monitor = paramMonitor;
        Fan = paramFan;
        Motherboard = paramMotherboard;
    }
    public string Name { get; set;}
    public int Monitor { get; set; }
    public int Fan { get; set; }
    public int Motherboard { get; set; }
}
Step 4 - The html part of the ComputerVeiw are below.
<%@ Control Language="C#" AutoEventWireup="true"
  CodeBehind="ComputerView.ascx.cs" Inherits="MVCPassiveModelForWinForms.Views.ComputerView" %>
<div style="height:30px; background-color:black; color:white; margin-bottom:10px;">
    <asp:Label ID="label1" runat="server"
      Text="Computer Accessories" style="display:block; text-align:center;"></asp:Label>
</div>

<table style="padding:10px 0px;float:left; width:365px;">
    <tr>
        <td style="font-weight:bold;">Monitor:</td>
        <td><asp:TextBox ID="txtMonitor" runat="server"></asp:TextBox></td>
        <td>Pieces</td>
    </tr>
    <tr>
        <td style="font-weight:bold;">Fan:</td>
        <td><asp:TextBox ID="txtFan" runat="server"></asp:TextBox></td>
        <td>Pieces</td>
    </tr>
    <tr>
        <td style="font-weight:bold;">Motherboard:</td>
        <td><asp:TextBox ID="txtMotherboard" runat="server"></asp:TextBox></td>
        <td>Pieces</td>
    </tr>
    <tr>
        <td>
            <asp:Button ID="btnUpdate" runat="server"
               Text="Add New" OnClick="btnUpdate_Click" />
        </td>
        <td></td>
        <td></td>
    </tr>
</table>

<span style="font-weight:bold; color:black; margin-bottom:10px; display:block;">Present Stock:</span>
<div style="font-size:14px;">
    <table>
        <tr>
            <td>Monitor:</td>
            <td><asp:Label ID="lblMonitor" runat="server"></asp:Label></td>
            <td>Pieces</td>
        </tr>
        <tr>
            <td>Fan:</td>
            <td><asp:Label ID="lblFan" runat="server"></asp:Label></td>
            <td>Pieces</td>
        </tr>
        <tr>
            <td>Motherboard:</td>
            <td><asp:Label ID="lblMotherboard"
               runat="server"></asp:Label></td>
            <td>Pieces</td>
        </tr>
    </table>
</div>
The Backend code for ComputerView are below:
public partial class ComputerView : System.Web.UI.UserControl
{
    private ComputerController Control;
    private ComputerModel Model = new ComputerModel("Computer Accessories", 30, 20, 40);
    protected void Page_Load(object sender, EventArgs e)
    {
        Control = new ComputerController(Model, this);
        Control.InitializedConponent(IsPostBack);
    }
    public int Monitor { get; set; }
    public int Fan { get; set; }
    public int Motherboard { get; set; }
    protected void btnUpdate_Click(object sender, EventArgs e)
    {
        Monitor = Convert.ToInt32(txtMonitor.Text.ToString());
        Fan = Convert.ToInt32(txtFan.Text.ToString());
        Motherboard = Convert.ToInt32(txtMotherboard.Text.ToString());
        Control.RequestUpdate(this);
    }
    public void Update(ComputerModel paramModel)
    {
        UpdateInterface(paramModel);
    }
    public void UpdateInterface(ComputerModel auto)
    {
        if (Monitor != auto.Monitor)
        {
            lblMonitor.Text = auto.Monitor.ToString();
        }
        if (Fan != auto.Fan)
        {
            lblFan.Text = auto.Fan.ToString();
        }
        if (Motherboard != auto.Motherboard)
        {
            lblMotherboard.Text = auto.Motherboard.ToString();
        }
    }
    public void InitializedView(ComputerModel paramModel)
    {
        lblMonitor.Text = paramModel.Monitor.ToString();
        lblFan.Text = paramModel.Fan.ToString();
        lblMotherboard.Text = paramModel.Motherboard.ToString();
    }
}
Step 5 - The html for Dashboard is shown below.
<%@ Page Language="C#" AutoEventWireup="true"
  CodeBehind="DashBoard.aspx.cs" Inherits="MVCPassiveModelForWinForms.DashBoard" %>
<%@ Register Src="~/Views/ComputerView.ascx" TagPrefix="com" TagName="Computer" %>
<%@ Register Src="~/Views/MobileView.ascx" TagPrefix="mob" TagName="Mobile" %>
<!DOCTYPE html>

<html xmlns="http://www.w3.org/1999/xhtml">
<head runat="server">
    <title></title>
    <style type="text/css">
        body {
            font-family:Verdana;
        }
    </style>
</head>
<body>
    <form id="form1" runat="server">
        <div style="height:400px; width:825px; margin:auto auto;">
            <div style="border:1px solid; width:400px; height:400px; float:left; margin-right:20px;">
                <com:Computer runat="server" id="computer" />
            </div>
            <div style="border:1px solid; width:400px; height:400px; float:left;">
                <mob:Mobile runat="server" id="mobile" />
            </div>
        </div>
    </form>
</body>
</html>
Note: For Mobile Accessories the View, Controller and Model implementation, please check the attached Project ZIP file.
Conclusion
In conclusion I want to say, MVC Pattern is used to separate the UI from Business logic and Data. It makes the Unit Testing so easy. During implementation with Active Model, Model Notify View about data changes and with Passive Model, Controller notifies View about data changes. This tutorial describes Passive Model MVC Pattern and for details about Active Model, please visits my article http://www.codeproject.com/Articles/661878/Implementation-of-MVC-Patterns-in-ASP-NET-Web-form.