
Don’t Build Games from Scratch Part 1: Creating and Deploying Multiplayer Servers on Azure PlayFab
5.00/5 (1 vote)
In this article, we explore packaging then deploying a game to Azure PlayFab servers.
Microsoft Game Stack provides the tools and services that enable game developers of all sizes — from indie studios to AAA teams — to build and launch amazing games. In my previous series about Microsoft Game Stack, Azure for Game Developers, our scalable real-time multiplayer backend features on Azure were do-it-yourself. But using an out-of-the-box solution like PlayFab can be an easier, more cost-effective option.
Using the PlayFab backend enables studios and game developers to spend their time improving gameplay and mechanics instead of worrying about spinning up and scaling servers. By avoiding building the game’s supporting infrastructure from scratch, developers reduce their game’s time-to-market and quickly get it out to eager gamers.
In the first article of this series, I’ll demonstrate how to integrate a real, fully functional multiplayer game server. I’ll use PlayFab multiplayer servers to automatically scale on-demand and be ready for pre-built complex services such as Matchmaking and Party.
I’ll show you how to package a fully playable open-source multiplayer snake game to deploy to Azure PlayFab multiplayer servers. I’ll wrap the game with the PlayFab Game Server SDK, package it all into a zip file, and configure PlayFab to deploy the package to virtual machines automatically as needed. You should know some Java to follow along with this tutorial.
Note that this series will use only a little bit of PlayFab’s monthly 750 free core hours and 10 GB of free network usage, but you'll need to add a credit card to your account to enable the multiplayer server feature.
Requirements
To follow along with this guide, you need a PlayFab account and the following software installed on your computer:
Downloading the Multiplayer Snake Game Code
We use the same captivating open-source multiplayer snake game from the previous series, but we’ll make minimal changes to the original code. If you already have a fork from following the previous series, I recommend creating a new fork or downloading a copy of the original repository for this guide.
So, first, download and extract the repository to a new folder on your computer.

Open the folder from Visual Studio Code and install the dependencies to test and ensure everything is correct. We do this by opening the terminal directly inside VS Code with the keyboard shortcut Ctrl + ` and typing npm install.
Now, run the project locally using the command npm start and open the game in a web browser at http://localhost:3000. You should see and be able to play the snake game.


Compiling the Code into a Windows Executable
Next, we’ll turn our Node.js code into a .exe using Nexe to run directly on PlayFab’s managed Windows containers. PlayFab doesn’t yet offer a Game Server SDK for a Node.js environment, so this step allows us to wrap our code with a shell process that we'll build in the next step.
First, install Nexe using your VS Code terminal:
npm install nexe –g
Then, run the following command to test and ensure the compile process is working correctly:
nexe -i app.js -r public/** -o server.exe
This command should produce a server.exe executable that you can run directly in the terminal to start the snake game server. If it’s working correctly, you'll see the same playable game in a web browser.

Wrapping the Multiplayer Snake Game for PlayFab Deployment
PlayFab provides the Game Server SDK (GSDK) for C#, C++, and Java environments to integrate with their servers seamlessly. Since our example game is written in Node.js, we’ll build a C# wrapper to use the GSDK and run the server process separately. But don’t worry — you don’t need to know C# for this guide.
Let’s start with PlayFab’s sample wrapper code. We’ll modify it to work with the snake game.
First, download or clone the PlayFab Multiplayer Server Samples repository and copy the wrappingGsdk example folder into a directory of your choice to keep your game server code.

Then, delete and replace the fakegame folder with your snake game folder. I named my folder snakegame because it rhymes!

Next, open the build.ps1 PowerShell script in VS Code. Remove or comment out the command on line 6 that builds the fakegame project, as it no longer exists.
Then, paste the following script directly below the line you just removed or commented out. It compiles the snake game into server.exe and recursively copies three directories into the drop destination folder. This project needs the socket.io client module as per this GitHub issue. Also, note that you need to change the folder path if you didn’t name it snakegame.
nexe --cwd $scriptRoot\snakegame -i app.js -r public\** -o $dropDir\w10x64\server.exe
Copy-Item $scriptRoot\snakegame\node_modules\socket.io-client -Destination $dropDir\w10x64\node_modules\socket.io-client -Force -Recurse
Copy-Item $scriptRoot\snakegame\app -Destination $dropDir\w10x64 -Force -Recurse
Copy-Item $scriptRoot\snakegame\public -Destination $dropDir\w10x64 -Force -Recurse
Now you can run the build.ps1 script file in PowerShell by right-clicking and selecting Run in PowerShell or from a PowerShell window. This action builds and packages everything into a gameassets.zip file inside the drop folder. If the script prompts you with an Execution Policy Change, choose [A] Yes to All.


Before moving on to the next step, it's a good idea to test locally to ensure you built the snake game correctly. Do this by running the server.exe executable located inside the drop/w10x64/ folder from your terminal window. Check that you can see and play the game from your web browser at http://localhost:3000.
Deploying to PlayFab
Now for the fun part. We’re ready to deploy our server to the PlayFab servers.
First, log into PlayFab and create a studio if you don’t have one already. Then, open the placeholder game titled My Game.

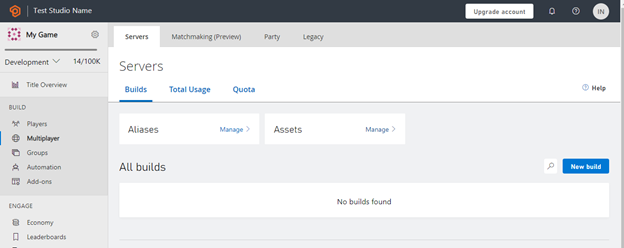
Navigate to the Build > Multiplayer section of the dashboard and ensure the Multiplayer Servers option is enabled. You may need to add a credit card to your account, even though this example will only use a little bit of the free monthly core hours and network usage.


Next, click New build to configure a new game server build.
Specify a Build name such as Snake Game v1 and select Dasv4 (2 cores) as the Virtual machine to qualify for PlayFab’s complimentary evaluation core hours. Drag and drop the gameassets.zip file you generated in the previous step into the Assets section.

Next, set the following as the Start command:
C:\Assets\wrapper.exe -g C:\Assets\server.exe
Then, click + Add region and select East US or North Europe, depending on which area is closest, and set both the Standby servers and Max servers to 1 for now. This number allows PlayFab to automatically spin up more game server instances as necessary to meet your players’ demands for multiplayer matches.

Now, add Port 3000 as TCP with a unique port name in the Network section. Then, click Add build.

This action starts setting up a standby server for your game. After a few minutes, the build status should show as Deployed.

Now you should be able to go to the Servers tab and see one server with the Running status.
Click Connect on the server. You will see the virtual machine (VM) server’s IP address and the option to connect to it directly through Remote Desktop by downloading the RDP file.
Since PlayFab VMs default to starting at port 30000, you may be able to simply check that the server deployed adequately by opening a web browser to port 30000 for that server address, such as http://ip-address:30000 (for example, http://20.185.73.214:30000).

If that test doesn’t work, it could indicate that the port was mapped differently, and you need to connect via Remote Desktop. Open a command prompt as Administrator from inside the remote desktop connection. Run docker ps to see what port mapped to the game’s 3000, then open it from your computer’s web browser.
If this still doesn’t work, you might not have appropriately packaged the game and wrapper. You should revisit the previous step of wrapping the snake game.

What’s Next?
Now that we’ve packaged and uploaded a custom multiplayer game server to PlayFab, you can see how PlayFab handles the rest of the hard work for you. PlayFab automatically deploys the code to VMs and scales them to meet player demand as necessary. This ease of DevOps and maintenance can save plenty of effort and reduce time-to-market for games with real-time multiplayer features.
Next, let’s get players logging into the game using PlayFab. That way, we don’t need to build a user account system and backend from scratch. Join me in the next part of this series, where I’ll show you how to add PlayFab player authentication to your game.