
JukeBox API - A Project for Artists and Developers
Project aimed at joint development between programmer and graphics artist
Introduction
I need to start by discussing what this project is and what it is not. It is NOT a plug-n-play JukeBox. It is what it says it is … a JukeBox API. It is fully functional on the front end and it does play media. I'm listening to The Beatles from a FLAC rip right now. But it has no back-end to speak of, you have to hand code XML files in the XmlData folder in the project. If you don't want to do this and you are not inclined to develop an automated back-end, then there isn't much here for you.
I developed this project because I wanted to experiment with a WPF Solution that was aimed equally at graphics artists as well as code developers. As I started working with WPF a few months ago, I read how it was a good environment for coders and artists to jointly develop projects. In the intervening months, despite extensive research on the Internet, I have not come across a single project that experimented with artist/coder collaboration. So I choose to develop this project.
For reasons stated above, I am not going to spend a lot of time talking about the ins and outs of the technology that went into this project. I went to the trouble of thoroughly documenting the code and I provided extended explanation in the code when I did something that is not a standard coding technique. What I intend to do is carefully cover the individual steps that someone will need to follow to re-imagine the current JukeBox presentation into something that is their own visual creation.
You will need to create a C:\XMLData directory and seed it with a JukeQueue.xml dataset (included) and a few FlowDocuments before using the software. I will address this requirement in more detail later – and also how to modify the code to change the directory location. I just wanted to mention it up front – I hate it when a 'gotcha' gets buried in the fine print.
Nomenclature
Because this is primarily a graphics driven project, I want to spend a little time talking about the terms that I will use to describe the interface.
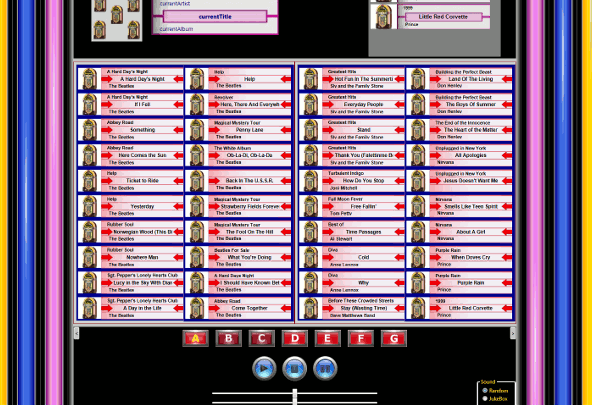
The overall graphic interface is made up of 4 outer docking panels with a book in the center. Some of the interface has been partially cropped out of the above snapshot to get the graphic down to size for this article. The left and right panels have color bars. The top panel has the Juke Label for the current song on the left and a listbox with the JukeQueue playlist on the right. The bottom panel has 7 selector buttons (labelled A – G), 3 round media action buttons, two sliders (volume and balance), a left/right set of book paging buttons, and a group box with two options for sound bites. I will go into more detail on these controls later, all you need at this point is to understand the terminology that I'm going to use. It would be nice if we were all in the same room and I could use a laser pointer capable of burning a hole through 6 inch bricks but we are not and they took the laser away from me anyway.
There are 6 color bars, 3 on the left and 3 on the right that mirror the bars on the left. Each one of these color bars is made up of 3 strips. I will not be using the term 'column' when I discuss this part of the project; the term 'column' is too generic. The middle strip of each color bar has a white 'spirit' (to borrow a term from Atari) that floats from top to bottom in the center strip. The outer strips have a two color gradient that is animated to change colors over a 3-5 second period to give the illusion that the bar is glowing.
The 'Book' in the center of the project is a modified version of Mitsuru Turuta's paging project. There is a hyperlink to his blog on the 'About' page at the end of the book if you want to know more. The Microsoft Public License is also on this page. Please don't remove it. Mitsuru works for Microsoft and they own the license. One of the terms is that their Public License be included with Mitsuru's code. I simply put a FlowDocument on the About page and included the license in the project. Each page of the book is made up of an XAML UserControl with code-behind. I will discuss the set-up in more detail later. All you need to understand right now is that the pages of the book are essentially tab-control panels without the tabs. The first page after the cover is a sample form that comes with Mitsuru's project. I left it in for demonstration purposes only. See Mr. Turuta's blog for more information.
For those of you who are more technically oriented – this project is essentially made up of XAML UserControls and XML datasets bound to listboxes.
Nice Try But No Cigar!
If you have an ounce of artistic talent, you are probably looking at the JukeBox API and saying, “Nice try.” That fine by me. First of all, I'm not a graphic artist and secondly the project was throw together to show what is possible and not what is presentable. For example, the first 3 selector buttons on the bottom control panel use a plum red and the last 4 use a brighter red. You will be happy to know there is a complete set of each color in the \images folder. I just wanted to show each color. Each set of facing pages in the book that contain song labels use different labels and often different layouts. These are all just examples of what can be done and certainly not what you may want to see.
So let's start to break down the graphics and explore how you can gain control of the presentation. I will start with the color bars and their strips. As I mentioned, the outer strips are made up of standard XAML gradient mark-up. All of the colors for these gradients are in the Gradient Stop Collection at the top of the Windows1.xaml (figure 1). You change the colors for the outer strips here. There are only 3 color combinations that affect both the left and right side. If you change the Yellow/Gold combination, for example, you change it for both the left and right yellow/gold color bars. Leave the Black/Silver combinations alone unless you want to change everything about the presentation.
  <!--  G R A D I E N T   S T O P   C O L L E C T I O N S  -->

  <!-- If you want to change the colors of the outer strips for the Juke Bars  -->
  <!-- change these values and both the left and right dock bars will be upd...-->
        <GradientStopCollection x:Key="OuterColmnA" >
            <GradientStop Color="Orange" Offset="0.0" />
            <GradientStop Color="Gold" Offset="1.00" />
        </GradientStopCollection>
Directly below the Gradient Stop's are the Color Bar Animation Storyboards (figure 2). These markups control the timing and color of the revolving colors used in the strips defined directly above. I can go into some detail about what you need to do to modify them but you will learn more quickly if you just start playing with the markup. Change the value TO=”Yellow” to TO=”GREEN” and run the project. You will see the effects immediately! The duration value is self explanatory – it is in seconds.
  <!--  Color Bar Animation Storyboards  -->

    <!--  If you want to change the oscillating gradients in the outer strips
    <!--    this is the place!    -->
        <!--  Both the Left and Right Dock Panels use these values.
        <Storyboard>
          <!--  Yellow Bar Animation  -->
          <ColorAnimation Storyboard.TargetName="PlayAround"
        Storyboard.TargetProperty="Fill.GradientStops[1].Color"
            To="Yellow"  Duration="0:0:5"
            AutoReverse="True" RepeatBehavior="Forever"></ColorAnimation>
          <ColorAnimation Storyboard.TargetName="PlayAroundRght"
        Storyboard.TargetProperty="Fill.GradientStops[0].Color"
            To="Yellow"  Duration="0:0:5"
        AutoReverse="True" RepeatBehavior="Forever"></ColorAnimation>
Move down to the left panel markup values and look for the center spirit strips (figure 3). You will need to change the Background color to match the colors you choose to use in the gradient strips. Don't forget to go to the right panel when you are finished and change the center spirit strips there. Unlike the Gradient Stop Collections - you have to change the left and right panels individually. As you can see, these center spirit strips don't work the same way as the outer strips. The coding for the floating spirit required that they be handled as UserControls which requires some code-behind: see CustomDrawnElement.cs.
   <!-- L E F T   P A N E L   center Spirit strips -->
   <!-- L E F T   P A N E L   center Spirit strips -->

      <!--  These values are for the LEFT PANEL ONLY!!!  -->
Before we move down in the Windows1.xaml listing – let's go back up to the top of the listing. There are two ImageBrush markups there that affect the top panel presentation (figure 4). One of them has x:key=”JukeBrush” - the markup directly below it has x:key=”JukeBrushQueue”. These two ImageBrush markups determine which label will be used in the top panel. Even though both markups use the same ImageSource value, don't eliminate one of the ImageBrush markups – they have different Viewport values due to the different sizes of the labels on the screen.
        <!--  Default Juke Song Label -->
        <ImageBrush x:Key="JukeBrush" TileMode="None"
                 ViewportUnits="Absolute" Viewport="0 0 300 90"
                 ImageSource="images\jb45lb08.jpg" Opacity="0.90">
        </ImageBrush>
        <ImageBrush x:Key="JukeBrushQueue" TileMode="None"
                 ViewportUnits="Absolute" Viewport="0 0 222 62"
                 ImageSource="images\jb45lb08.jpg" Opacity="0.80">
        </ImageBrush>
Let's go to the top panel which is incongruently located near the bottom of the Window1.xaml listing. Because the jukelabel background images are already taken care of, the FontFamily and Foreground colors are the only attributes left that are of any real interest. I'm using FontFamily=”OCR-A II”, but I can't imagine most people will want to stick with this. Change the values as you see fit.
(Note: Don't change the order of the markup for the panels – it will affect which panels have control of the corners of the presentation. If you list the top and bottom panel before the left and right panels – the color bars will not extend from the top of the screen to the bottom.)
Next, let's go to the bottom panel markup which comes after the markup for the left and right panels and before the top panel. All of the graphic buttons for the bottom panel are ToggleButtons and they require two graphic values, one for the on-state and one for the off. The values for the 'A' selector button are below (figure 5). If you look closely, you will see that there is a graphic for the 'off' button (the default) and one for the 'on' button embedded in the <Setter> markup further in. All the toggle buttons work this way, including the media action buttons. Leave the slider controls alone – the min/max values have to be set to their current range to work correctly with the media player.
<!--  Page Set _A_  -->
  <ToggleButton  Width="78" Height="42" Background="Transparent" Margin="0" Name="PageA" >
     <ToggleButton.Template>
         <ControlTemplate>
             <Image Width="64" Height="40" Name="PanelA"
            Source="images\RectPlumABtn.png"  VerticalAlignment="Center"/>
             <ControlTemplate.Triggers>
                 <Trigger Property="ToggleButton.IsChecked"  Value="True">
                 <!-- The Setter control changes the
                button graphic to it's 'ON' image. -->
                     <Setter TargetName="PanelA" Property="Source"
                Value="images\RectMetalABtnOn.png" />
                 </Trigger>
             </ControlTemplate.Triggers>
         </ControlTemplate>
     </ToggleButton.Template>
  </ToggleButton>
Now move to the very bottom of the Windows1.xaml dataset and look for the controls:Book.ItemTemplate (figure 6). In the template, you will see the UCPages that are contained in the UCPages folder. The order of the UCPages makes up the presentation in the book. The book will match the list of UCPages here page for page. You will see that the left page of the first set of UCLabels doesn't come until page 3. Selector button A shows pages 3-4. What shows up on pages 3-4 is determined in the controls:Book.ItemTemplate. There isn't anything in the program that binds the UCLabels directly to the selector button. You have to line things up yourself.
    </controls:Book.ItemTemplate>
        <!--  These are the pages and their order in the Juke Song Book.  -->
        <local:UCCube />          <!-- Book Cover      -->
        <local:UCControls />        <!-- Page 1        -->
        <local:UCFlowDoc Title="Hello!"  Body="C:\XMLData\... />
        <local:UCLabelAl />        <!-- Page 3        -->
        <local:UCLabelAr />        <!-- Page 4        -->
        <local:UCLabelBl />        <!-- etc.        -->
        <local:UCLabelBr />
Lets go to the UCPages folder in the Solution Explorer and open it. There is a series of UCLabel pages that go from UCLabelAl to UCLabelGr. The lowercase l and r stand for left/right. Each page in the book is made up of two list boxes that contain 10 labels each. The values that go in these labels are in the XML files in the XMLData folder. There is one XML file for each SET of facing pages. The juke label background images are in the images folder, they all follow a JukeLabel___.png naming convention. (figure 7.) Look in the UCLabel__.xaml for the comment <!-- Listbox JukeLabel Background Image –-> and the markup for ImageBrush. The ImageSource="" attribute that goes with the ImageBrush element points to the graphic used for the JukeLabel background.
  <XmlDataProvider x:Key="SongsLeft" Source="\XMLData\PlaylstAI.xml"
                XPath="Playlist/Column[@Nbr='1']" />
  <XmlDataProvider x:Key="SongsRght" Source="\XMLData\PlaylstAI.xml"
                XPath="Playlist/Column[@Nbr='2']" />
  <!--  Listbox JukeLabel Background Image  -->
  <ImageBrush x:Key="JukeBrush" TileMode="None"
           Viewport="0 0 222 62" ViewportUnits="Absolute"
           ImageSource="\images\JukeLabelClassic.png"   Opacity="0.95">
  </ImageBrush>
I created most of the JukeLabels using the open source software package The Gimp. If you want to try your hand at it, just create a 320x110 dpi image and have at. There is an addendum attached to the project materials that goes into more detail on how to use The Gimp to create your own graphics. If your not familiar with The Gimp - it's good, it's free and there are a lot of good tutorials on the internet.
Don't assume the different UCLabel UserControls are generic. Most of them have been tuned to work with the JukeLabel graphic they are paired with. Each JukeLabel page has it's own unique UserControl UCLabel__ xaml markup. I did this to get the maximum flexibility when it came to customizing the jukelabels. There is a way to create a single UCLabel control. You will need to understand UserControls and take a look at the UCFlowDoc example. I pass parameters during initialization in that FlowDoc UserControl. You can do the same for the UCLabel and its XMLDataProvider parameters in the UCLabel control if you wish.
Thus endeth the graphics portion. There are 4 areas where you will have to go into the code to make modifications. Fortunately, none of the mods are complicated.
- If you are going to role your own you may as well have some fun with it. I added a 'sound bite' feature that randomly plays a different short sound bite before each song. The method is named
SoundBiteSetUp()and is found in Windows1.xaml.cs (figure 8). The first sound bite is called 'jukebox.wav'. I patched this together from several different sources - it is made up of some record noise sandwiched between some jukebox mechanical sounds. The rest of the 14 jukeEffects are all just the standard Microsoft Chimes.wav sound. Replace these with your own sound bites. Just make sure after you copy your media file into \Resources that you go into the media's WPF properties and change the 'Copy to Output Directory' to 'Copy always'. This code won't play the media unless you do. You should also set the Build Action in the properties box to 'Content'.RandomNbr = (RandomNbrx % 14); switch (RandomNbr) { case 0: jukeEffect = new Uri(@"Resources\jukebox.wav", UriKind.Relative); break; case 1: jukeEffect = new Uri(@"Resources\chimes.wav", UriKind.Relative); break; case 2: jukeEffect = new Uri(@"Resources\chimes.wav", UriKind.Relative); break;
Figure 8. -
The
Uripath for the mediaOpenstatement is hardcoded in the program. I know that's a no-no but I got tired of having to change the XML everytime I move the media to another drive label. The code is in Window1.xaml.cs in theNextJukeSongFromQueuemethod:string uriFilePath = @"M:" + JukeLabelElement["FilePath"].InnerText;
Change it to your drive letter. The rest of the path is in the XML
PlayLst datasets. - The value:
@"C:\XMLData\"is hard coded in several places in the program. You will need a directory to hold several supporting files. If you don't want to create a C:\XMLData directory then you will need to replace every occurrence of C:\XMLData with whatever you choose to use. - When I first found the page software project I wanted to modify the paging motion to be more like the panels in a jukebox. I finally decided it would be more fun to treat the JukeLabels Book like a magazine. I created a simple
FlowDocumentpage that would accept a heading and aUrifor theUserControl(figure 9). You can create as many of these pages as you care to. The selector buttons A-G will handle pages 3-16. Once you use up those slots, you will need to page forward manually or change the code to add more selector buttons.<local:UCFlowDoc Title="Hello!" Body="C:\XMLData\Introduction.xaml"/>
Figure 9.
I'm sure I forgot something but I hope you will agree that you can take this skeleton jukebox and modify it to look, act, and sound the way you want it. With the UCFlowDoc pages, you can even mix in your own blogs.
If You Are Still With Me?
So what did I learn from all of this? I've been working on this code on-and-off for a few months and even I am somewhat confused by all the options. I believe that Microsoft needs to offer developers a wizard or a script language that will allow us to treat our XAML markups like SQL stored procedures. With a stored procedure, I can protect my SQL but offer the business user access to the variables that he or she needs to query the data they require. I want to be able to create a script that will make certain XAML elements and attributes accessible to a graphics interface specialist without forcing them to dig through pages of XAML and risk having them make a modification that will cause problems. It will require extra work to do the additional markup and write whatever tips, instructions, or annotation that are required. Every project team would need to weigh the benefits and the risks.
Right now I think the idea of coders and graphics interface specialist collaborating on a sizable project is like a memo from the top – it's a fantasy. I also believe that WPF code is more expensive to write on the whole. Utilizing WPF's advanced graphic and media features seems to be one of the main justifications for the additional efforts. If collaboration between programmers and graphics artist is ungainly, then I don't see how we are going to get the productivity that users will expect. WPF may turn out to be a very, very nice niche technology.
I'm also perplexed by the scarcity of graphic/media material that is royalty free. I may not know the best places to look but I did spend some time looking. I can get free code, I can get free snippets, I can get free programs, I can get free trouble-shooting advice: getting so much as a nice looking icon is practically impossible without worrying about some hidden copyright. I could be wrong, but I don't see the open-source mentality in the graphics sector that is present in the programming world. Is there an equivalent to CodeProject in the graphics side of the house? If not – it's going to be difficult to experiment with joint project and make our way down the learning curve together.
Then again, I may be wrong. This is a project you can use to run your own little experiment and see what your results are. I have no doubt you will be successful. The question is, what would you do differently and what coding tools and graphic resources need to be developed to make the process more productive.
Using the Code
There is an introduction and set up instructions on page 2 in the JukeBook. I put in a lot of comments in the code. I put in a filewatcher to force two way binding. That code can be found in MyXMLDataProvider. It simply inherits XMLDataProvider and attaches the filewatcher methods. There is also a graphics how-to in the graphics folder.
The MitsuControls that take care of the book paging came with no documentation or comments. I added comments to the control logic but the graphics and geometry/trig that govern the paging effects are as is. In other words, you are on your own. I modified the code to allow auto paging. You won't be able to just pretend you are hitting the page button in your code in order to page forward. It won't work. The Mitsu code turns the page and then it sets up the next set of pages. If you ask for a new page while it is working on setting up the next pages, it will ignore your request. I added the property TargetPageNbr in Book.cs to facilitate auto paging.
To Do List
The next thing that I just have to do is buy a 19 inch touch screen and program the interface to work with the screen. Unfortunately a 19 inch screen cost around $900 dollars. I'll be accepting donations at the door.
I really do need to write a utility to help automate the PlayList XML files. I've been working with a free software package from J.River called Media Jukebox. There is no jukebox but it does have the ability to import tags (including FLAC!!!) and export XML. It exports way more information then I want but I can program around that. A good drag-n-drop routine should make things fairly straight forward on the GUI end.
It would be nice to be able to save the JukeQueue XML file. That would allow for a 'playlist' feature.
There is not a shuttle or random playback feature in the JukeQueue. The software plays the songs in the order they are selected. It wouldn't be hard to do. I'm just not sure how often it would get used.
I would like to create a resource in the program that is just an XML dataset with a list of 4 digit random numbers. The numbers would be used as tokens to allow an individual to request 6 songs once they have entered a valid token. The only use for this feature is at a party where a few wanna-be DJ's want everyone else to listen to their (and only their) favorite music. With the tokens, they get 6 songs just like everyone else. I admit it's a feature that addresses a pet peeve of mine, but isn't that why we roll our own software?
Credits
See the 'About' page in the JukeBook for the Microsoft Public License and Mr. Mitsu's blog link. He is currently not working on enhancements to the paging control but he does answer questions.
The snippet for the filewatch feature in MyXMLDataProvider is from this link.
History
- 21st August, 2009: Initial version