
A Simple Pie Chart Control - Improved 3-D Pie Chart
4.87/5 (80 votes)
A follow up to the simple pie chart control article which will detail the new improvements

Introduction
If you have seen the article, A Simple Pie Chart Control which was written to describe a simple pie chart implementation done using GDI+ graphics functionality, then this article is designated to the same pie chart control, updated with many improvements in 3-D pie chart and some added functionality to enhance the quality. The new functionalities are more on 3-D pie chart. This article contains details regarding the improvements, challenges faced and the particular solutions. This will be interesting to every one who took a good look into my first article.
Background
First of all, my first implementation had its own characteristics in drawing 3-D faces which I adhere to for several reasons. These characteristics were valid and relevant for my first implementation but held up against for further improvements. They are:
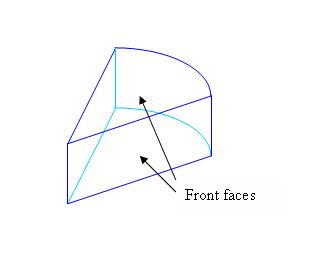
Draw the Visible Portion of the 3-D Pie
This is “draw only what can be seen” concept. So with the 3-D pie, the drawn portions are the upper elliptical surface, and the portion between 0 to 180 angles of the cylindrical face.
Low Processing - Rapid Animations
So the first reason somewhat implied by this reason or the other way around. Less drawing portions had given the pie less processing on graphics objects and it caused the animations to be a bit fast.
Less Animation - Simple Control
My first goal was to implement a simple pie chart control with a set of simple functionalities. So this had implied implementing the 3-D pie as it was.
But the 3-D pie has a minor drawback. The proportionality makes some pie elements disappear with small percentage values.
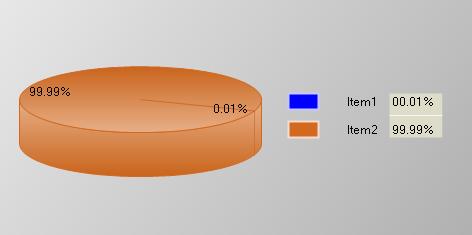
In the above graph, Item2 is not visible in the pie.
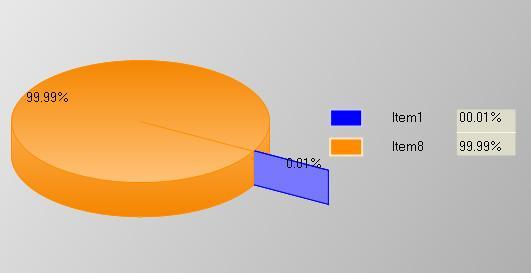
So a solution was needed to show this small slice of elements on the pie without affecting the proportions. The solution was to take out or rather slip out the small slice of elements from pie and display them. But with the existing design, this was not possible. And that’s what drove me to rewrite the 3-D pie implementation with the concept of “drawing everything”.
Designing 3-D Pie Elements
With the GDI+ drawing functions, it’s not hard to implement a 3-D pie element but the real challenge was to place them in correct place and in correct order. This is not only for set of elements but also for a single element considering its faces. If an element shows up in a wrong order or with wrong facing order, the 3-D look will get distorted.
The faces are ordered considering the place where element will reside. That comes in four categories:
- Right hand side
- Left hand side
- Element at the back
- Element at the front
With these cases, elements are created and given the 3-D look according to the position it was drawn.
Placing Elements in Correct Order
This was decided considering the basic visual characteristics.
- First draw the element which is furthest away from the front. This element should lie crossing the upper Y axis (rather 270° angular line).
- Draw other elements except the front element categorizing them as Right hand side or Left hand side.
- Finally draw the front element:

The function implementation is like this:
iter = map_pChart.begin();
	totalAngle = fl_startAngleIncline;

	for(; iter != map_pChart.end(); ++iter){
		ele = iter->second;
		if (ele){

			if (totalAngle >= 360)
				totalAngle -= 360;

			if ((totalAngle <= 90 &&
			    totalAngle+ ele->pie_3d_props.f_InclineAngle > 90) ||
				totalAngle >= 90 && (totalAngle+ ele->
				    pie_3d_props.f_InclineAngle - 360) > 90){
					pFront = ele;
					i_pieElement_front = iter->first;//save the
						// index of the front element
						// which will be drawn
			}

			if (totalAngle <= 270 && totalAngle+ ele->
					pie_3d_props.f_InclineAngle > 270 ||
				totalAngle >= 270 && (totalAngle+ ele->
					pie_3d_props.f_InclineAngle - 360) > 270){
				ielementLeft = iter->first;
				ielementRight = iter->first;
				i_pieElement_last = iter->first;//save the index
					     //of the last element will be drawn
				totalRight = totalAngle + ele->
					pie_3d_props.f_InclineAngle;
				totalLeft = totalAngle;
				pLast = iter->second;
			}
			totalAngle += ele->pie_3d_props.f_InclineAngle;
		}
	}

	if (pLast == pFront){
		if (totalLeft < 90 || totalLeft > 270)
			bRightAngled = true;	//The elements are on the
						//right hand side!
		else if(totalLeft > 90 && totalLeft < 270)
			bLeftAngled = true;//The elements are on the right hand side!
	}
	else{
		bLeftAngled = true;		//Elements are on both sides!
		bRightAngled = true;		//
	}

	if(pLast){
		if (pLast == pFront && bRightAngled)
			Construct3DElementSpecific(graphics, pLast,
			(REAL)totalLeft, PIE_LAST_RIGHT, PointF(0, 0));//Draw the pie
|					//element which is the front and last
		else if(pLast == pFront && bLeftAngled)//element.
				// First draw only the latter part of the element.
			Construct3DElementSpecific(graphics, pLast,
				(REAL)totalLeft, PIE_LAST_LEFT, PointF(0, 0));
		else
			Construct3DElement(graphics, pLast, (REAL)totalLeft,
				PIE_LAST, PointF(0, 0));//Draw the normal element
	}

	SolidBrush brtest(Color(255,25,25));
	ele = NULL;
	while(pFront != ele && bLeftAngled){
		ielementLeft--;
		iter = map_pChart.find(ielementLeft);
		if(iter!= map_pChart.end()){
			ele = iter->second;
			if (ele != pFront){
				totalLeft -= ele->pie_3d_props.f_InclineAngle;
				Construct3DElement(graphics, ele,
				(REAL)totalLeft, LEFT_ANGELD, PointF(0, 0));
			}
		}else{
			ielementLeft = i_elementIndex;
		}
	}

	ele = NULL;
	while(pFront != ele && bRightAngled){
		ielementRight++;
			iter = map_pChart.find(ielementRight);
			if(iter!= map_pChart.end()){
				if (totalRight >= 360)
					totalRight -= 360;
				ele = iter->second;
				if (ele != pFront){

					Construct3DElement(graphics, ele, (REAL)
					   totalRight, RIGHT_ANGLED, PointF(0, 0));
					totalRight += ele->
						pie_3d_props.f_InclineAngle;
				}
			}else{
				ielementRight = -1;
			}
	}

	if(pFront){
		if (pLast == pFront && bRightAngled)//Draw the pie element
						// which is the front and last
			Construct3DElementSpecific(graphics, pFront, totalRight,
			PIE_FRONT_RIGHT, PointF(0, 0));   //element. First draw
					//only the front part of the element.
		else if(pLast == pFront && bLeftAngled)
			Construct3DElementSpecific(graphics, pFront,
			REAL(totalRight - pFront->pie_3d_props.f_InclineAngle),
						PIE_FRONT_LEFT, PointF(0, 0));
		else
			Construct3DElement(graphics, pFront,
				(REAL)totalRight, PIE_FRONT, PointF(0, 0));
	}
Also another interesting implementation was the reverse order traverse for elements. That is from front element to the last element which was needed when the mouse was clicked. With the first implementation, this was assisted by saving the graphics paths of the cylindrical face for each element. Since now there are too many graphics objects to save, the reverse traverse was needed to make the control more feasible in memory consumption.
New Functionalities Added
Relatively Movable Pie Elements
With the 3-D elements drawn and also with the other two designs, the elements can be moved from the pie in the angular direction by setting up a distance index from the pie chart center point.
Transparency for the 3-D Pie Elements
This was a nice result gained from constructing all the element faces.
Moving the Pie Horizontally
This seems unnecessary but useful when the elements need more space to move.

New functions to set the transparency, distance from center and horizontal position are as follows:
BOOL SetDistanceIndex(PIECHARTITEM pItem, int iDistIndex);
BOOL SetDistanceIndexAll(int iDistIndex);
BOOL SetElementTransparency(PIECHARTITEM pItem, float flPercentage);
BOOL SetElementTransparencyAll(float flPercentage);
BOOL SetHorizontalOffset(int iHrzOffset);
Points of Interest
One of the obvious drawbacks with the new changes is that the animations tend to be a bit slower with more processing to be done. But it can compensate with the new qualities and functionalities added I guess. Also I got the chance to correct some visual flaws regarding the first implementation. One of them was the symmetrical division required for the pie drawing square. This means the area of the square should be able to separate symmetrically without generating floating point values. In other words, the length of a side should be an even number. Otherwise the two parts will be unequal in length by size 1 causing visual defects to high inclined 3-D pie charts.
void CPieChartWnd::GetBoundRect(LPRECT rect){
	CRect rectWn;
	GetClientRect(rectWn);
	rectWn.right = lb_param.xGapLeft;
	rectWn.top += 100;
	rectWn.left += 30;
	rectWn.bottom -= 30;

	if (rectWn.Height() > rectWn.Width()){
		rectWn.right = max(rectWn.right, (rectWn.left + MAX_PIECHARTPARAMS));
		rectWn.bottom = rectWn.top +  rectWn.Width();
	}
	else{
		rectWn.bottom = max(rectWn.bottom, (rectWn.top + MAX_PIECHARTPARAMS));
		rectWn.right = rectWn.left + rectWn.Height();
	}

	if (rectWn.Height() % 2 != 0){	//This is added to preserve the
					//symmetry of the pie
		rectWn.bottom += 1;	//Much important on larger inclinations
		rectWn.right += 1;
		lb_param.xGapLeft += 1;
	}
	rectWn.left += bkg_params.i_HorizontalOffset;
	rectWn.right += bkg_params.i_HorizontalOffset;
	CopyRect(rect, &rectWn);
}
I think this article will be interesting to everyone who read and gave feedback for the first article. I could have just updated the first article with the source and demo but thought writing an article will be nice too. Especially I would like to thank samal.subhashree who gave great ideas and feedback to implement these new improvements.
One of the nice looking charts I could get by setting up suitable values :) :

Article Update
From this, I would like to address some of the defects found by users in the previous implementation, including myself. This also includes some of the improvements which make the pie chart control more usable. Also, the new demo includes a new simple chart showing how to use the new functionality.
1. Defect one
Pie disappears for some inclinations when there's only one element present.
This was due to the angle calculation done in floating point values.
Previous:
if(inClineAngle - flStartIncline < 0.001 && ele->f_angle == 360)
Now:
if(ele->f_angle == 360)    	//+ changed the comparison since
			//floats are not equal all the time
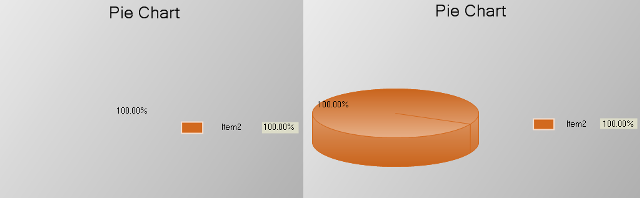
So the inclination of starting angle and pie chart element end angle comparison goes wrong due to floating values. So even the difference comparison inClineAngle - flStartIncline < 0.001 can go wrong. The fix was to simply remove it.
2. Defect Two
Label clips by end characters for some strings.
The reason for this was, in the earlier implementation, the length reserves for a label determined by the longest string value. Example, with two labels, “Item1” and “Item11” the longest is “Item11” with 6 characters and the reserved rectangle area is determine by the string ‘Item11”. But this was wrong. Since the characters can take various sizes when they are drawn, it should be the ‘visual length’ that should have been considered to determine the longest string, not the number of characters.

Here, “Arts-Crafts” is 11 characters. And “Recreation” is 10 characters. Since 11 characters, “Arts-Crafts” is used to determine the length of the rectangle area for a label. This causes the “Recreation” to appear as “Recreatio” since the word “Recreation” has the longest visual length.
This is fixed in the new code.
3. Defect Three
Pie appearance distorts for specific set of angles.
The reason for this was the angle comparison done without equal comparison (less or greater comparison without equal) for some of the specific boundaries of 0, 90, 360 angles. This was fixed in the new code.

4. Defect four
Labels clip rather not fit in to given window area.
The reason for this was the implementation design. My first implementation was to draw pie in a maximum area and draw the rest of the label area in the available space. So if the area is not enough to draw both, the labels will be clipped from end and the user needs to allocate more area to make it visible fully. But this was not a good design. So the new implementation will:
- First draw the labels relatively to the right side of the window,
- Then draw the pie in the available rectangle area.
This will compact the components inside the given window area not clipping the label area.

5. Improvements
Ability to specify absolute positions for pie and label rectangles.
The previous implementation was all about drawing components relatively. So it never troubled the user to place pie and labels in appropriate positions. But also it gives limited functionality when someone needs to arrange them on specific positions as they prefer. So with the new implementation, the rectangle areas for the pie and for the label rectangle can be specified and positioned. This will give the ability to fully use the available space, make it appear more compact.
Example: After specifying absolute positions.

6. Additional functionality
-
BOOL RemoveItemAll()
Remove all items once.
-
void SetPieChartRectOverride(CRect rectPie) :
Override the pie chart rectangle to specify absolute positioning for the pie.
-
void SetLabalRectOverride(CRect rectLabel) :
Set absolute positioning of label area:
-
void SetLabelFontSizeOverride(int fSize) :
This functionality was to define a font size for the labels. As you may have noticed, the font size is determined relatively to the size of the pie chart window area. With this, anyone can override that and give a specific font size
Notes
In the first implementations, these defects were found by a couple of users and I found some later while fixing those issues. The absolute positioning of pie and Labels will be a nice improvement since it will allow the user to define the locations and arrange as required. But using it will cause the user to handle resizing of window area of the pie and how these components will be shifted or resized according to those changes. I decided to write this article since I believe the followers of my previous article will find these improvements interesting.
The demo includes a new simple project pieChart2 which shows how to set the absolute positioning to two components, pie and the label area.
Also, I would like to thank the users who helped in finding these issues. :)