
Sending Values To and Receiving Values from a JavaScript Popup Window that Uses the MultiView and the GridView Control
4.00/5 (1 vote)
In this article, we will learn how to create a JavaScript popup window, how to use the MultiView control to move between two views, and also to use the GridView control with paging.
Introduction
Very often, we need to create a popup window in our applications. And, usually when we popup a window; we also need to communicate with that popup window from the caller window. In this article, I will show how to create a popup window (using JavaScript) in an ASP.NET application, and how the popup window can send back values to the original caller page and automatically click a button on that page. In addition, I will use MultiView control and also a GridView control with page indexing.
Step 1: Creating the First Page
Start a new ASP.NET website; by default you have the page Default.aspx. In this page, add a label, a text box (to enter student id), a link button (clicking this will bring up the popup window) and a submit button. You can add all these items from the Toolbox. Just to give a better alignment, I have added these controls inside an HTML table.
Here is the complete code that I wrote inside the div tag.
 <div>
    <table>
        <tr>
            <td>
                <asp:Label ID="Label1" runat="server" Text="Student Id"></asp:Label></td>
            <td>
                <asp:TextBox ID="txtStudentId" runat="server"></asp:TextBox></td>
            <td>
                <asp:LinkButton ID="LinkButton1" runat="server">
				Show Student List</asp:LinkButton></td>
        </tr>
        <tr>
            <td></td>
            <td>
                  <asp:Button ID="btnSubmit" runat="server" Text="Submit" />
            </td>
            <td></td>
        </tr>
     </table>
 </div>
Step 2: Creating the Database
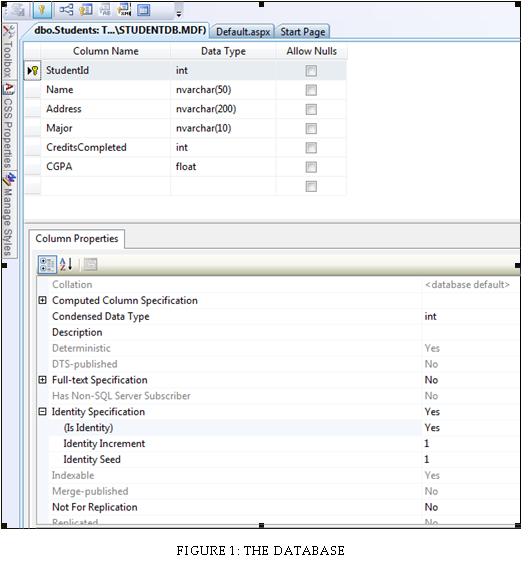
Now from the menubar WebSite | Add New Item | SQL Server Database, we add a database to our website. Our database, which is called StudentDB.mdf is a very simple database which contains only one table – Students.
In this table, StudentId is the Primary key with IsIdentity true, Identity Increment is set to 1 and Identity Seed is also 1. The table looks like this:
Then we insert some data to the database:
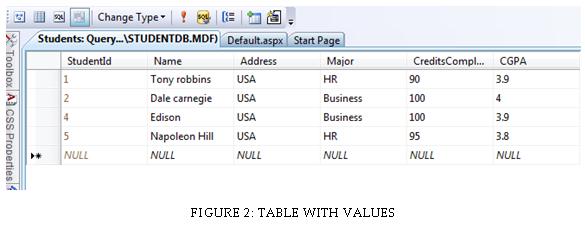
So, we have 4 students in the database, coming from two different majors.
Step 3: Completing the Start Page
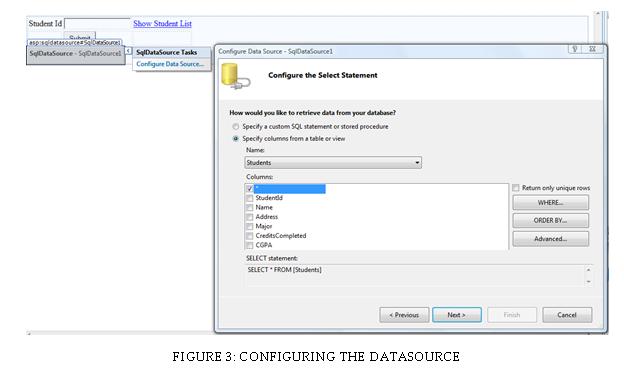
Next, from the ToolBox, we add an SqlDataSource control to the page Default.aspx. We can do it by double clicking the SQLDataSource control from the ToolBox. Then by clicking on the right-top arrow of the SQLDataSource that we have just added to our project, we get the link for Configure Data Source. By clicking on this link, we get the Configure Data Source Wizard. We select the data source (in our case, StudentDB.mdf), click Next and then again Next. We leave the default radio button selection (which is Specify columns of a table or view). In the columns area, we choose * (asterisk; to show all columns of the Students table). Then we click on the Where button.
In the Add WHERE Clause dialog box, we choose StudentId for the Column Field. We also choose = (equals to) as Operator, Control as Source and txtStudentId as Control.
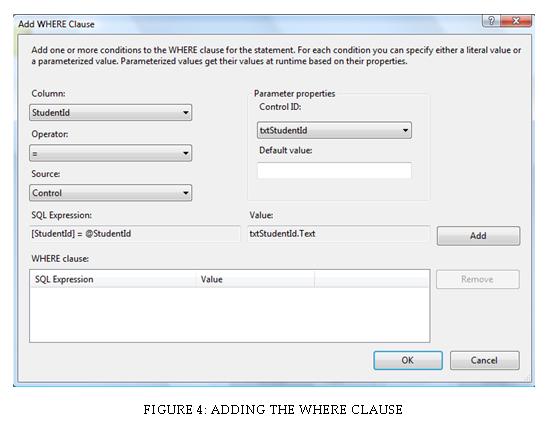
Then click Add, then OK, then Next and Finish to complete the wizard.
Now, we add a GridView control to our website. We add it, just after the table. Data will be bound to this GridView control (let’s name it GridView1) only when btnSubmit is clicked. Therefore, we have to write that code in the click event handler of the button.
To do this, we double click on the submit button and add the following action to its click event.
protected void btnSubmit_Click(object sender, EventArgs e)
    {
        GridView1.DataSource = SqlDataSource1;
        GridView1.DataBind();
    }
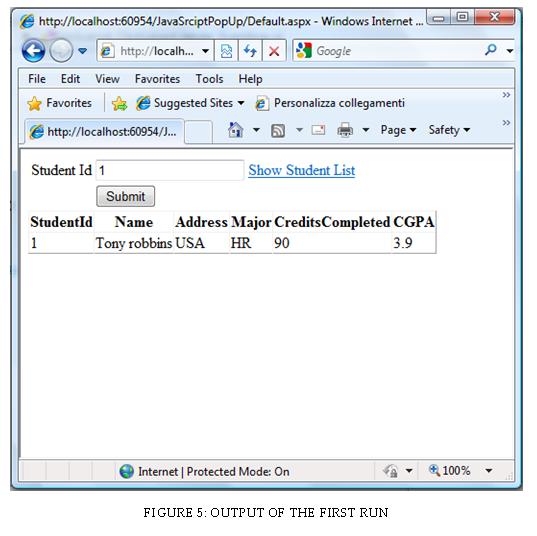
At present, our project is partially working. If we put a student id in the text box and then click on the submit button, we can see the student’s details. We can run the project pressing F5 and can have a look at it.
Now, in order to bring the popup menu, we add a JavaScript function near the head tag of Default.aspx.
<head runat="server">
    <title></title>
    <script type="text/javascript">
    function Navigate()
    {
        window.open("StudentList.aspx");
    }
    </script>
</head>
In the code behind page, we add the onClick property to the link button:
LinkButton1.Attributes.Add("onClick", "javascript:Navigate();");
Step 4: Adding & Modifying StudentList.aspx
Now we add a new web form named StudentList.aspx to our project from the menubar Website | Add New Item. At this point, if we run our project, clicking the link button would bring the popup window named StudentList.aspx. Now, we will fetch values from the database for this page.
We want that at first this page will show the list of Majors available, after we click on a Major, it will show all the students of that Major. Then, if we click on a student, the popup window will close itself, send back the selected student’s id to the txtStudent text field of the Default.aspx page and will also click the btnSubmit automatically. Thus, the student details for that selected student will be shown in GridView1.
To accomplish this, we will add a MultiView control to the page StudentList.aspx. The MultiView control will contain two views, each of which will contain a GridView control.
Here is the code for the MultiView control inside the div tag.
   <div>
       <asp:MultiView ID="MultiView1" runat="server">
        <asp:View ID="view1" runat="server"></asp:View>
        <asp:View ID="view2" runat="server"></asp:View>
        </asp:MultiView>
   </div>
Note that we have added the id and the runat properties to the views.
In each of the views, we will add a SqlDataSource control and a GridView control. We will set their properties using the wizards as we did for the page Default.aspx. But this time, we will have different select statements. Instead of showing how to set it up with the wizards, this time I just mention the source code here. Accomplishing these tasks using the wizard should be simple, self-explanatory and similar to the one that we did before. Make sure you place your cursor inside the proper view when you add the SQLDataSource control and the GridView control, because the code is added where you leave your cursor blinking.
Here is the code needed for the view1.
<asp:View ID="view1" runat="server">
            <asp:SqlDataSource ID="SqlDataSource1" runat="server"
                ConnectionString="<%$ ConnectionStrings:ConnectionString %>"
                SelectCommand="SELECT DISTINCT [Major] FROM [Students]">
			</asp:SqlDataSource>
            <asp:GridView ID="GridView1" runat="server" AutoGenerateColumns="False"
                DataSourceID="SqlDataSource1">
                <Columns>
                    <asp:BoundField DataField="Major" HeaderText="Major"
			SortExpression="Major" />
                </Columns>
            </asp:GridView>
        </asp:View>
Now, if we run the project and view the page StudentList.aspx, we will be able to see the list of Majors of the Students. But, how will we select a row? Well, there are several ways to do it, we accomplish it here in a very simple way. Just after the asp:BoundField tag, we add an asp:TemplateField, inside this TemplateField, we add an ItemTemplate which contains an asp:LinkButton. Here is the source code:
<Columns>
  <asp:BoundField DataField="Major" HeaderText="Major" SortExpression="Major" />
      <asp:TemplateField>
        <ItemTemplate>
           <asp:LinkButton id="lnkSelect1" runat="server"
		CommandName="select"  CommandArgument='<%# Eval("Major") %>'
		Text="Select">  </asp:LinkButton>
        </ItemTemplate>
      </asp:TemplateField>
</Columns>
Give special attention on how we have added a custom link button. We have given it an id, so that it can be identified, and most importantly, we have added the CommandName property, which will be used in the event handler RowDataBound of the GridView control. Also note that in order to pass the Major along with the click event, we have added the CommandArgument property. The Eval command binds the section fetched from the database to the CommandArgument. We will make use of these properties very soon.
Before moving on, we add the GridView control for the view2. Here is the code:
<asp:View ID="view2" runat="server">
     <asp:GridView ID="GridView2" runat="server">
     </asp:GridView>
</asp:View>
In the Page_Load event of StudentList, we set view1 as the default view for the MultiView. We also add event handlers for clicking the link buttons.
protected void Page_Load(object sender, EventArgs e)
{
 MultiView1.SetActiveView(view1);
 GridView1.RowCommand += new GridViewCommandEventHandler(GridView1_RowCommand);
}
In the GridView1_RowCommand event handler, we call a method BindGridView2 which dynamically declares a SqlDataSource control to fetch the students of the selected Major and then bind the SqlDataSource with the gridview. Here is the code:
void GridView1_RowCommand(object sender, GridViewCommandEventArgs e)
{
    if (e.CommandName == "Select")
    {
        bindGridView2(e.CommandArgument.ToString());
    }
}
private void bindGridView2(string Major)
{
    SqlDataSource sds = new SqlDataSource();
    sds.ConnectionString =
	ConfigurationManager.ConnectionStrings["ConnectionString"].ConnectionString;
    sds.ProviderName = "System.Data.SqlClient";
    sds.SelectCommandType = SqlDataSourceCommandType.Text;
    sds.SelectCommand = "Select * from Students Where Major=@MajorParam";

    /* MajorParam gets its value from LinkButton lnkSelect1's CommandArgument

    Recall that in lnkSelect1 we added parameter: CommandArgument='' */
    sds.SelectParameters.Add("MajorParam", Major);
    GridView2.DataSource = sds;
    GridView2.DataBind();
    MultiView1.SetActiveView(view2);
}
We should not forget to include the Configuration library by “using System.Configuration;” at the top of this page, otherwise we cannot use the ConfigurationManager.
At this stage, if we run the project, when we first come to the StudentList.aspx page, by selecting a section, we can see all the students of that section.
The next part is to add a selectable column to GridView2 so that when we select a row, the corresponding student Id will be sent back to Default.aspx and StudentList.aspx window will be closed automatically. This is done with the help of TemplateField tag, RowDataBound event and a little bit of JavaScript.
At first, we add a template field to the Gridview by the following statement in the aspx file.
<asp:View ID="view2" runat="server">
            <asp:GridView ID="GridView2" runat="server">
                <Columns>
                    <asp:TemplateField>
                        <ItemTemplate>
                            <asp:LinkButton id="lnkSelect2" runat="server"
				Text="Select">  </asp:LinkButton>
                        </ItemTemplate>
                    </asp:TemplateField>
                </Columns>
            </asp:GridView>
        </asp:View>
By the code segment, we have added a link button named lnkSelect2 to every row of the GridView2 control. We want to add an event handler to the click event to all the lnkSelect2 buttons. A good time to accomplish it is when the data are bound with the GridView control.
Therefore, we hook up an event handler of the RowDataBound event of the GridView2 control by adding the following code to the Page_Load event:
GridView2.RowDataBound += new GridViewRowEventHandler(GridView2_RowDataBound);
Then we write the body of the event handler as shown below:
void GridView2_RowDataBound(object sender, GridViewRowEventArgs e)
    {
        if (e.Row.RowType == DataControlRowType.DataRow)
        {
            LinkButton b = (LinkButton) e.Row.FindControl("lnkSelect2");
            b.Attributes.Add("onclick",
		"javascript:showStudents('" + Request.QueryString["tc"] + "','" +
		Request.QueryString["bc"] + "','" + e.Row.Cells[1].Text+"');");
        }
    }
But WAIT! It seems that we are getting some values from the query string by the names tc and bc. What are those? These are the control id’s of the txtStudentId Text box and btnSubmit Submit button of the previous page (Default.aspx). Unless we have those ids in this (StudentList.aspx) page, we cannot click them or send back values to them. So, their control ids’ have to be sent from the Default page to this page first. To accomplish this, we have to do two things.
First, on the Page_Load event of the Default page, we remove the statement that we had added just before starting Step 4, and then we add the following code:
LinkButton1.Attributes.Add("onClick",
"javascript:Navigate('" +
txtStudentId.ClientID + "','" +
btnSubmit.ClientID + "');");
It means that we are calling the JavaScript function Navigate with the control ids of the text box and the submit button. Next. We modify the Navigate function like this:
<script type="text/javascript">
            function Navigate(tControl, bControl) {
                window.open("StudentList.aspx?tc="+tControl+"&bc="+bControl, "",
	       "height=600,width=600,left=500,top=100,resizable=no,scrollbars=yes");
            }
        </script>
Finally, here is the JavaScript function showStudents, which should be written in between the head tags of StudentList.aspx. This function sends back the selected StudentId to the Default page, clicks the submit button and closes the popup window.
<script type="text/javascript">
        function showStudents(tControl, bControl, studId) {

            var tc = window.opener.document.getElementById(tControl);
            var bc = window.opener.document.getElementById(bControl);
            tc.value = studId;
            bc.click();
            window.close();
       }
    </script>
Step 5: Enabling Page Indexing
The Student List can be very long and we may want to enable page Indexing to the GridView2 control. This is achieved in two simple steps. First, by setting the AllowPaging property of the GridView control to True.
<asp:GridView ID="GridView2" runat="server" AllowPaging="True" PageSize="10">
And then by handling the PageIndexChanging event which is again done in two steps. At first by hooking up the event handler method inside the Page_Load method:
GridView2.PageIndexChanging +=
	new GridViewPageEventHandler(GridView2_PageIndexChanging);
And then by writing the body of the event handler as shown below:
void GridView2_PageIndexChanging(object sender, GridViewPageEventArgs e)
    {
        GridView2.PageIndex = e.NewPageIndex;
        bindGridView2(ViewState["Major"].ToString());
    }
Wait! Did you notice that we have used ViewState? This is needed in order to bind the data with the GridView2 control. Since we are reading ViewState[“Major”] here, we must have saved the value of Major to the view state in the first place. Guess where we should do this? Anywhere inside the bindGridView2 method of course. Because this is the place where we first came to know the value of the Major parameter. Therefore, add the following code anywhere in the bindGridView2 method.
ViewState["Major"] = Major;
The project is complete and should work now. We can now page through the Students and find it easier to select a student, even if the list of the students is very long.
Conclusion
Though most of these are old topics and pretty basic, we have covered a lot of stuff related to the GridView control and popup window in this tutorial. We have learnt how to create a JavaScript popup window, how to use the MultiView control to move between two views, we have also used the GridView control with paging. We have seen how to enable a selectable link button in a GridView control, and then how to use JavaScript to send back value from the popup window to the caller window.
History
- 16th April, 2009: Initial version