
Anaglyph ShaderEffect in WPF
This article shows how to use a WPF ShaderEffect for anaglyph blending (for red/cyan glasses). The effect can be used for both 2D and 3D elements.

Introduction
Anaglyph images provide a 3D stereoscopic effect when viewed with red/cyan glasses. This article shows how to use a WPF shader effect to blend a left and right image to produce the anaglyph illusion. This shader can be used for any kind of WPF UIElement.
Using the Code
To use this code in your own project, you should add the class AnaglyphEffect and the pixel shader AnaglyphEffect.ps (compiled HLSL).
Shader Effect
The anaglyph effect combines two image sources, the result is the red channel from the left image source and the green and blue channels from the right image source. The alpha is taken as the max of the two image sources. It is implemented with the following HLSL code:
sampler2D input1 : register(S0); // right image input
sampler2D input2 : register(S1); // left image input

float4 main(float2 uv : TEXCOORD) : COLOR
{
    float4 Color1;
    Color1 = tex2D( input1 , uv.xy);

    float4 Color2;
    Color2 = tex2D( input2 , uv.xy);

    Color1.r = Color2.r;
    Color1.g = Color1.g;
    Color1.b = Color1.b;
    Color1.a = max(Color1.a,Color2.a);

    return Color1;
}
Remember to save the effect file using Codepage 1252, otherwise fxc will not compile the shader code. In Visual Studio, use "File | Advanced save options..." and select "Western European (Windows) Codepage 1252".
Compiling the Shader Effect
Install Microsoft DirectX SDK, and add the fxc compiler to the path C:/Program Files/Microsoft DirectX SDK (June 2008)/Utilities/bin/x86 or similar.
The shader effect can be compiled with the command:
fxc /T ps_2_0 /E main /Fo AnaglyphEffect.ps AnaglyphEffect.fx
Then, add the compiled pixel shader (.ps) to the project as a Resource.
The shader effect can also be added to your build script with a shader effect build task, see WPF Futures for how to do this.
Shader Effect Class
The AnaglyphEffect class contains dependency properties for LeftInput and RightInput. These Brush inputs are used to define the input sources for the anaglyph blending shader.
I have not been using the RightInput property, since the effect is applied to the right image source element in all these demos.
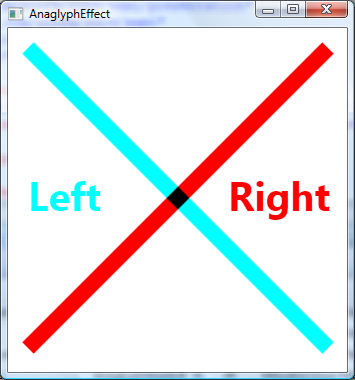
First Test of the Effect
First, we test the shader with some simple line and text visuals.
If you put on your anaglyph glasses and close your left eye, you should see only "RIGHT" and one of the diagonal lines. Vice versa for the right eye. It is normal to see a weak "ghost" of the "RIGHT" text when using the left eye only.
The source code can be found in TestWindow.xaml:
<Grid>
<Canvas Name="LeftCanvas" Background="White">
    <Polyline Points="20,20 320,320" Stroke="Black" StrokeThickness="16"/>
    <TextBlock Text="Left" Foreground="Black" Canvas.Left="20" Canvas.Top="140"
    FontSize="40" FontWeight="Bold"/>
</Canvas>
<Canvas Name="RightCanvas" Background="White">
    <Canvas.Effect>
        <cc:AnaglyphEffect x:Name="Effect2">
            <cc:AnaglyphEffect.LeftInput>
                <VisualBrush Visual="{Binding ElementName=LeftCanvas}"/>
            </cc:AnaglyphEffect.LeftInput>
        </cc:AnaglyphEffect>
    </Canvas.Effect>
    <Polyline Points="20,320 320,20" Stroke="Black" StrokeThickness="16"/>
    <TextBlock Text="Right" Foreground="Black" Canvas.Left="220" Canvas.Top="140"
    FontSize="40" FontWeight="Bold"/>
</Canvas>
</Grid>
Anaglyph Stereo Images
The next test is to blend two images to produce an anaglyph image. This is very easy, we just replace the Polyline/TextBlock elements from the first example with Image elements. I also added mouse capture to be able to move the top level image around. The result looks like this:
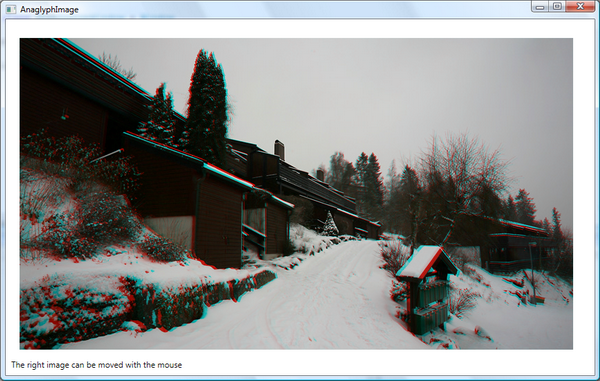
The images were taken using a tripod and a sliding plate. The distance the camera moved between the two images is called the stereo base. It depends on the distance to the nearest object and the focal length. See the section below about calculating the stereo base. For moving subjects, it is necessary to mount two cameras to a plate and synchronize the shutters exactly.
The XAML source follows:
<Grid>
<Canvas Name="LeftCanvas" Background="White" Width="1000" Height="500">
    <Image Source="images/left.jpg" Width="800"
              Height="450" Canvas.Left="20" Canvas.Top="20" />
</Canvas>
<Canvas Background="White" Width="1000" Height="500">
    <Image Name="RightImage" Width="800" Height="450" Canvas.Left="20" Canvas.Top="20"
    Source="images/right.jpg"
    MouseDown="Image_MouseDown" MouseMove="Image_MouseMove" MouseUp="Image_MouseUp"/>
    <Canvas.Effect>
        <me:AnaglyphEffect x:Name="Effect1">
            <me:AnaglyphEffect.LeftInput>
                <VisualBrush Visual="{Binding ElementName=LeftCanvas}"/>
            </me:AnaglyphEffect.LeftInput>
        </me:AnaglyphEffect>
    </Canvas.Effect>
</Canvas>
</Grid>
Calculating the Stereo Base
The stereo base can be calculated with the Bercovitz formula:
B = P * (L*N/(L-N)) * (1/F - (L+N) / (2*L*N))
where:
    B = stereo base (distance between the camera optical axes)
    P = parallax aimed for, in mm on the film
    L = largest distance from the camera lens
    N = nearest distance from the camera lens
    F = focal length of the lens
If you are using the 35mm format, you should aim for a parallax about 1.2mm, this is a ratio of ~ 1/30.
With a nearest distance of 2m, largest distance of 10m and a 50mm lens, the stereo base should be 57mm.
Anaglyph 3D Rendering
We will now use the effect on Viewport3D elements:
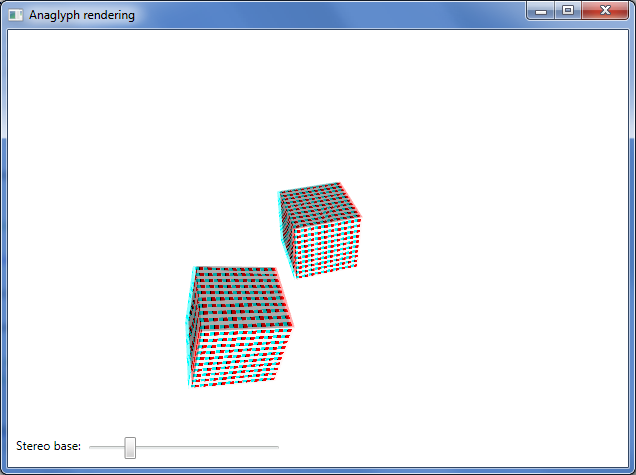
This window contains two Viewport3D elements, one for the left camera and one for the right.
I added a texture to the cube, this improves the perception of the depth.
The left view has a Camera positioned at [-0.15 5 4] pointing towards the origin:
<Grid Name="LeftView" Background="White">
    <Viewport3D >
        <ModelVisual3D>
            ...
        </ModelVisual3D>
        <Viewport3D.Camera>
            <PerspectiveCamera x:Name="LeftCamera"
                       Position="-0.15 5 4"
                       LookDirection="0 -5 -4"
                       UpDirection="0 0 1"
                       FieldOfView="75"
                       NearPlaneDistance="0.15"/>
        </Viewport3D.Camera>
    </Viewport3D>
</Grid>
And, the right view has a Camera at [0.15 5 4]. The Viewport3D is wrapped in a Grid element, and we add the anaglyph effect to the Grid.Effect property. Also note that I am setting the background colour to white for this to work:
<Grid Background="White">
    <Grid.Effect>
        <me:AnaglyphEffect x:Name="Effect1">
            <me:AnaglyphEffect.LeftInput>
                <VisualBrush Visual="{Binding ElementName=LeftView}"/>
            </me:AnaglyphEffect.LeftInput>
        </me:AnaglyphEffect>
    </Grid.Effect>
    <Viewport3D Name="RightView">
        <ModelVisual3D>
            ...
        </ModelVisual3D>
        <Viewport3D.Camera>
            <PerspectiveCamera x:Name="RightCamera"
                       Position="0.15 5 4"
                       LookDirection="0 -5 -4"
                       UpDirection="0 0 1"
                       FieldOfView="75"
                       NearPlaneDistance="0.15"/>
        </Viewport3D.Camera>
    </Viewport3D>
</Grid>
Anaglyph 3D Rendering
The solution also contains a project TransparentCube3D, that renders the cube in anaglyph mode on a transparent window.
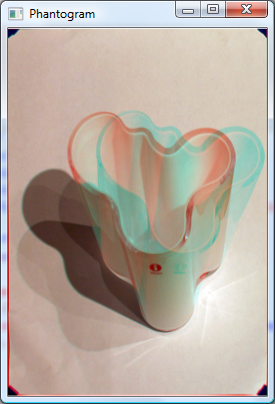
Phantogram
Phantograms give an optical 3D illusion from a 2D image. When the viewer is placed at the correct point, it looks like the image pops out of the surface. These images should be viewed from a 45 degree angle for the best effect.
This view can be created with the anaglyph shader effect and the following XAML code:
<Grid>
    <Image Name="LeftImage" Source="phantogram/iitala_left.jpg" />
    <Image Name="RightImage" Source="phantogram/iitala_right.jpg">
        <Image.Effect>
            <cc:AnaglyphEffect x:Name="Effect2">
                <cc:AnaglyphEffect.LeftInput>
                    <VisualBrush Visual="{Binding ElementName=LeftImage}"/>
                </cc:AnaglyphEffect.LeftInput>
            </cc:AnaglyphEffect>
        </Image.Effect>
    </Image>
</Grid>
(The vase was designed by Alvar Aalto.)
How to Make a Phantogram
- Place the item you want on a piece of paper, mark the corners of the paper.
- Set your camera on a tripod pointing 45 degrees down to the paper.
- Shoot a left and right picture a few cms apart (the "stereobase") (use a sliding plate if you have one).
- Crop and correct the perspective of the edges of the paper (in Photoshop, use the Crop tool with the "Perspective" option checked).
- Resize with unconstrained proportions to the original size of the paper.
- If displaying the phantogram in a different scale, the "stereobase" should be adjusted accordingly.

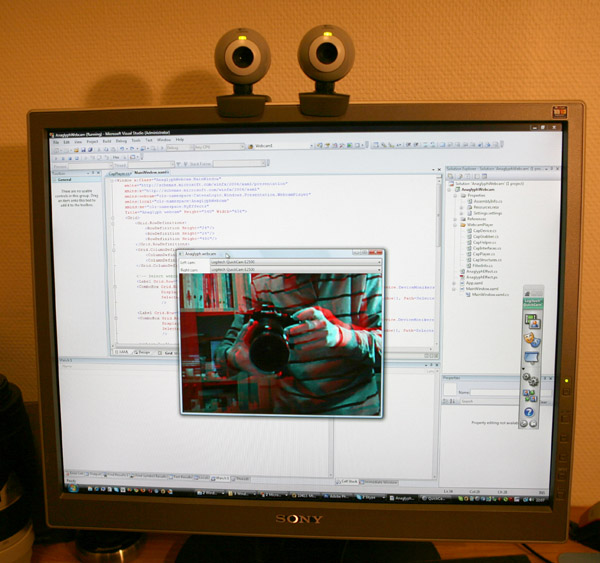
Anaglyph Webcam
To show video from a webcam, I use the excellent WpfCap webcam control for WPF. Using two CapPlayer controls and simply adding an anaglyph effect on the last one gives us the blended anaglyph video:
<webcam:CapPlayer Grid.Row="2" Grid.ColumnSpan="2"
	x:Name="webcamPlayer1" Height="480"
    Device="{Binding RelativeSource=	{RelativeSource AncestorType=
	{x:Type local:MainWindow}}, Path=SelectedWebcam1}">
</webcam:CapPlayer>
<webcam:CapPlayer Grid.Row="2" Grid.ColumnSpan="2" x:Name="webcamPlayer2" Height="480"
    Device="{Binding RelativeSource={RelativeSource AncestorType=
	{x:Type local:MainWindow}}, Path=SelectedWebcam2}">
    <webcam:CapPlayer.Effect>
        <me:AnaglyphEffect x:Name="Effect1">
            <me:AnaglyphEffect.LeftInput>
                <VisualBrush Visual="{Binding ElementName=webcamPlayer1}"/>
            </me:AnaglyphEffect.LeftInput>
        </me:AnaglyphEffect>
    </webcam:CapPlayer.Effect>
    <webcam:CapPlayer.LayoutTransform>
        <ScaleTransform ScaleX="1" ScaleY="-1"/>
    </webcam:CapPlayer.LayoutTransform>
</webcam:CapPlayer>
For some reason, the webcam control flips the video vertically. I added a ScaleTransform to the LayoutTransform that fixes this, but I hope to see a better solution.
The blended webcam video looks like this:
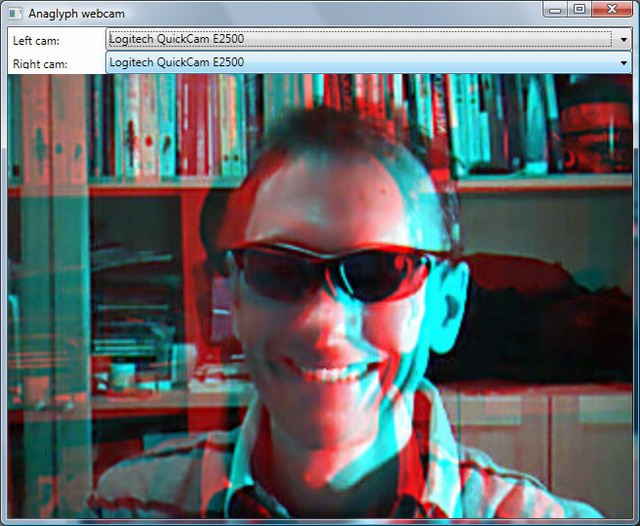
I used two inexpensive webcams on top of the screen, the alignment of the cameras could be improved.
References / Inspiration
- Charles Petzold's Space station
- Barcinski and Jean-Jean's Anaglyphs with Papervision3D
- Greg Schecter's multi-input effect
- Wikipedia anaglyph images
- Wikipedia phantograms
- John Wattie's Bercovitz formulae
History
- Jan 18, 2009 - First post
- March 19, 2009 - Added anaglyph webcam code
- November 8, 2009 - Added alpha to shader effect, texture to 3D cube, section about the stereo base, transparent window demo