
Newton Game Dynamics Extensions for the WPF - The Moon Lander Game
4.95/5 (56 votes)
Newton Dynamic Extensions for the WPF
- Download Binaries - 743.99 KB (Just the binaries of the Moon Lander game and Simple Example App)
- Download The_WPF_Project - 1.41 MB (Just the source, no binaries (includes the newton.dll))
References
- Newton Game Dynamics (1.53) (http://www.newtondynamics.com/) (Newton 2 it still under a controlled beta)
- The c# wrapper for Newton I found on the Code Plex (but I can't found the web source anymore)
It has been corrected and tested as I've been using it. If you would like to write a native Newton app in c# feel free to use it. - Blender (2.46), a free 3D modeling and animation package. (www.blender.org)
- Blender to XAML converter python script (xaml_export.py) (http://codeplex.com/xamlexporter)
I modified the script to export empty (no mesh data) scene nodes as ModelVisual3D elements. - 3D Tools for the Windows Presentation Foundation (http://www.codeplex.com/3DTools)
I stole the matrix MathUils library from there. - Chris Cavanagh using Newton in a very clever way (http://chriscavanagh.wordpress.com/2006/10/23/wpf-2d-physics)
Requirements
Visual Studio 2008 (to compile the project).Net framework 3.0 (to view the demos)
The Project Contents
Moon Lander Game (This is the part this article will focus on.)
Sweet little game demonstrating some interesting parts of the framework. The game uses fixed breakable joints for the Lander's legs. Merges 3D (for the Lander craft) and 2D (for the Ground) together to create a strange retro feel. The Lander model has been built using Blender and the Xaml editor so the xaml is quite large to work off as an initial example.Simple Boxes Test
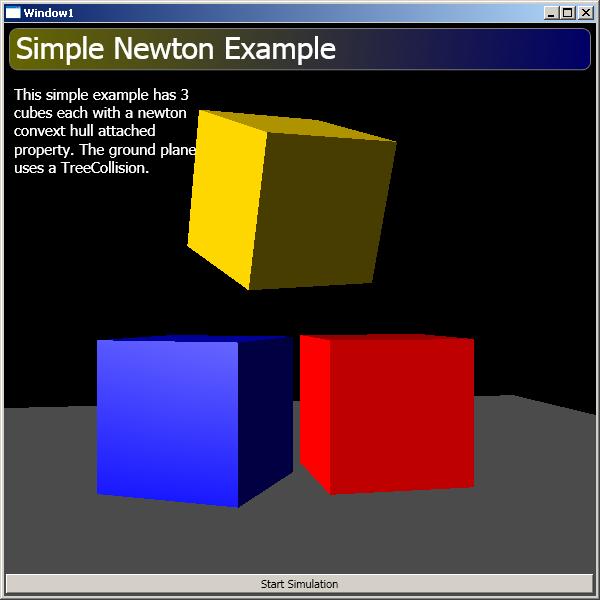
This is the simplest of example applications demonstrating just how easy it is to add newton to your WPF project.Blender
The 3D application Blender was used as the object modeler. This project includes the Blender to XAML Exporter specially modified to make it easier to structure a model to modify (via the Xml Editor) to include the newton fixturesThe Xaml Editor
3D designer allowing you to manipulate a 3D WPF model with 3D gizmos. Takes a source file (usually the output from your 3D packaged converted to XAML) and allows you to tweak it (usually adding the Newton extensions xaml) and play with the model in real time. You can then save out the result to be used in an application keeping the original source and changes separate allowing you to be back to your 3D package, make changes and re-tweak the model back into your WPF application.Planned Articles
Part1 - The basic concepts and the Moon Lander Game explained.*Part2 - Modeling with Blender and using the Xml Editor to tweak the model and setup for collisions.
*Part3 - More advanced Physics examples, plus the Crane project explained. (Make a crane with ONLY Xaml. No Coding!)
* - not written yet.
Introduction
The “Newton Game Dynamics” Extensions for the Windows Presentation Foundation is just that. With attached properties you will be able to extend an existing WPF Viewport3D scene to define Body definitions on your ModelVisual3D objects which will turn them into physical entities.
Ok. That’s the quick and dirty explanation.
Now for the more, dirty, detailed one.
The Newton Physics Engine
To quote from their web site:Newton Game Dynamics is an integrated solution for real time simulation of physics environments.
The API provides scene management, collision detection, dynamic behaviour and yet it is small, fast, stable and easy to use.
Our engine implements a deterministic solver, which is not based on traditional LCP or iterative methods, but possesses the stability and speed of both respectively.
This feature makes our product a tool not only for games, but also for any real-time physics simulation.
“Newton Game Dynamics” library is a really good, fast and free 3D rigid body physics engine. This means that it simulates solid hard objects, not soft squishy ones…though the author is threatening to include soft body simulation at some point. The author Julio Jerez, a bit of a nut job,...of the good kind, of course :-). He created the Newton Dynamics project with the intention that it always as realistic as possible. Some Physics engines out there fudge the math to gain speed. Julio wanted his library to be usable for true simulation applications and still be fast for gaming. Frankly a nut job giving away free software is good guy by my standards.
Now having said that it’s a good library is one thing, using it is quite another matter altogether. For one thing, 3D mathematics has always been quite a challenge. The WPF has made it much easier for the hobbyist like me to wack together some fun 3D scenes, but what use is that I SAY!....? if you can’t make the cube you just created in dodgy XMAL fly about a bit….you know, and bash into other cubes.
Newton is still fairly simple to setup but still. It takes quite some getting used to with it’s fancy “inverse mass matrices of rigid body” this and "Omega vector" that.
Yes even when using a physics library that deals with the *real* scary fiddly bits, it still assumes some heavy math knowledge to make it bend to your cube bashing will.
How a Physics Engine is used in conjunction with a Graphics Engine
The way a Physics Engine, library, thingy works is like this.You have visuals and bodies. The Visuals are the objects in your Graphics Engine and the Bodies are the objects in your Physics Engine.
You would create your 3D objects in your Graphics Engine Scene Manager, thingy, loading mesh objects, textures, etc. You would then have to do the same thing again in your Physics library’s world Space. Once they where both setup you would link them together using the Physics Engine’s callback events which would be triggered when something happened like “object x has just collided with object y and must move to these new coordinates”. The Graphics Engine would have its event handler called and then move it’s copy of the 3D visual object to the new position, essentially keeping in sync with what’s happing in the Physics world. This basically means the Physics engine is controlling the scene so any external events, like a player adding thrust to the spiffy Moon Lander by hitting the up key would have to be applied on the Physics Engine by calling a function to apply a force to the rigid body in a specified direction (which in my case is the Moon Lander object).
The WPF Newton Extension Classes....yes, that's what we need..., Extending your World
All I want to do is create some objects...identify them are physical Bodies give them mass, maybe join some together with a fxed, yet slightly bendy joint, flick the ON switch, grab my joystick...um, keyboard hit the up key and watch my Moon Lander GO! I don't want to have to mess about with local to world to local transforms, duplicate mesh initialisation calls. Why can't the Physics library just see what the object is made up of and setup a collision mesh? You know, chop chop.NOTICE:
Before we begin just a quick warning! This library is still very new, very broken and does not contain the complete list of Newton capabilities. Now I could have waited before publishing it, but I have no idea when I’d be finished with it and I’d like to give you all the befit of using it or at least playing with it...a little.Having said that, there’s enough working to get a real feel for what I’m aiming at. The Moon Lander game does work and will still hopefully bring you a bit of joy. It’s fun to watch the legs break off. (Yes we do have some breakable joints… :-)
Using the code
First steps into a Virtual World.
Ok here's how to use the Newton Extensions library.
You would create your Viewport3D scene in the normal manner. See the “Simple Boxes Test” example in the "Examples" directory,
Pretty simple, some cubes and a plane.
The non standard part of the XAML snippet were highlighted in yellow, but The Code Project's article scripts kept removing them sorry.
The first thing you would need to do is add the ”newton” namespace xmlns entry to link it to XAML.
The
<newton:World> entry is required somewhere on your page. It will manage the Newton world instance.The next requirement is to link the world to the viewport by setting the
World.World attached property onto the viewport control binding it to the instance of the world control created right above it.The Extensions have been primed.
<Window x:Class="Simple_Boxes_Test.Window1"
        xmlns="http://schemas.microsoft.com/winfx/2006/xaml/presentation"
        xmlns:x="http://schemas.microsoft.com/winfx/2006/xaml"
        xmlns:newton="clr-namespace:System.Physics.RidgedBody.NewtonDynamics;assembly=System.Physics.RidgedBody.NewtonDynamics"
        <Grid>
            <newton:World x:Name="_world" />
            <Viewport3D newton:World.World="{Binding ElementName=_world}">
                <Viewport3D.Camera>
                    <PerspectiveCamera Position="-0.3,0.7,0" LookDirection="0.2,0,-1" />
                    </Viewport3D.Camera>
The only thing left to do now is identify the visual objects that should become collidable Bodies.To do this you simply attach a
ConvexBody3D object to the ModelVisual3D. This will achieve the effect of wrapping a collision mesh around the visual and any of its children.That’s right, the visual and all it’s
Model3D objects and children ModelVisual3D will be wrapped as well, because when it comes down to it, anything under a visual moves with and is really part of …well the visual object as a whole.Now the body will default to having a mass of 1.
<!-- Box 1 -->

<ModelVisual3D newton:World.Body="ConvexBody3D">
    <ModelVisual3D.Content>
        <GeometryModel3D>
            <GeometryModel3D.Material>
                <MaterialGroup>
                    <DiffuseMaterial Brush="Blue" />
                    <SpecularMaterial Brush="White" />
                </MaterialGroup>
            </GeometryModel3D.Material>
        <GeometryModel3D.Geometry>
            <MeshGeometry3D ...MESH DATA... >
                </GeometryModel3D.Geometry>
                    </GeometryModel3D>
                        </ModelVisual3D.Content>
                            <ModelVisual3D.Transform>
                                <Transform3DGroup>
                                    <RotateTransform3D>
                                        <RotateTransform3D.Rotation>
                                            <AxisAngleRotation3D Axis="0,1,0" Angle="-30" />
                                        </RotateTransform3D.Rotation>
                                    </RotateTransform3D>
                                    <TranslateTransform3D OffsetZ="-5" />
                                </Transform3DGroup>
                            </ModelVisual3D.Transform>
                        </ModelVisual3D>
If you would like to define some properties of the ConvexBody3D class, like the Mass or the Update event, then you would have to extend the simple string initialisation to a <newton:ConvexBody3D /> XAML construct. In the following example the mass is set to “0.1” making the yellow cube much lighter than the other ones which have defaulted to 1. <ModelVisual3D>
<newton:World.Body>
<newton:ConvexBody3D x:Name="_yellowCube" Mass="0.1" ApplyForce="_yellowCube_ApplyForce"/>
</newton:World.Body>
...
I’ve also added an event to the body. Within this event I can apply a force to the body. The Newton Physics Engine is event driven. Meaning the process of calculating/simulating reality is involved and it can’t be interrupted. The calculation loop will need to call the “ok, update the bodies now” event when it’s good and ready to incorporate external input events into the system. That’s what the ApplyForce event is for. It will be called for each calculation frame when your code can influence the body (about 25 frames a second). The BodyForceEventArg can be used to apply a force to the body. The following example adds a force to the yellow cube when an arrow key is held down making it fly through the air. (And crash into stuff)// this event is called in every world update event. (About 25 frames a second)
private void _yellowCube_ApplyForce(System.Physics.RidgedBody.NewtonDynamics.Body sender,
System.Physics.RidgedBody.NewtonDynamics.BodyForceEventArgs e)
{
if (Keyboard.IsKeyDown(Key.Up))
{
e.AddForce(new Vector3D(0, 2, 0)); // add a force of 2 along the Y (up) axis
}
else if (Keyboard.IsKeyDown(Key.Left))
{
e.AddForce(new Vector3D(-1, 0, 0)); // add a force of 2 along the X (left) axis
}
else if (Keyboard.IsKeyDown(Key.Right))
{
e.AddForce(new Vector3D(1, 0, 0)); // add a force of 2 along the X (right) axis
}
}
This is how you would simulate thrust from a rocket booster. Basically thrust is a force that the booster would exert on the body in the opposite direction to the exploding fuel been expelled. This version of the AddForce method applies the force in world space meaning up is always the same. Up. No matter which way the object is pointing. There is an overloaded version of the method to apply the force in the object’s local space meaning up would be the object’s up direction. The Moon Lander game uses this overloaded version of the method.The Ground
There has to be a ground plane otherwise the cubes would just fall into oblivion; however the ground is attributed with anTerrianBody3D body. The difference is this body can have a concave shape (can have holes, more on that later), and it isn’t affected by gravity, nor will it move/react to something hitting it. If you had just used a normal ConvexBody3D body then it might have been pushed around by the weight the objects bouncing on and around it. Basically a Terrain is as solid as on object with infinite mass and can also take any shape. (Yes, I misspelt Terrain in the class names. I'm a knob. I know.)<!-- Plane -->
<ModelVisual3D newton:World.Body="TerrianBody3D">
<ModelVisual3D.Content>
Shrink Wrapping an Object with a Collision Mesh Shrink Wrap
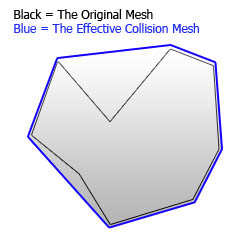
For optimization purposes in the Newton Collision Engine the effective collision mesh (in blue lines) wrapped around a given mesh object is like shrink-wrapping the actual mesh object. (The black lines)
That’s why it’s called a
ConvexBody3D body. It can’t have any indents or holes, so even though the original mesh might have a complex shape the collision mesh built from it would be something more…um, round, as if you took some shrink wrap and sealed the visual mesh....er, you know, for freshness. You might think that this is very limiting, but if you break your model into many smaller Model3D groups or Visuals then you can pretty much get away with anything. Newton allows a body to consist of many collision models (and even though each singular object in the group needs to be Convex, the group as a whole can take any shape) and my Extension classes uses this feature of Newton.The Terrain body on the other had does not suffer from this limitation. You can make it any shape you want, however, it acts as an infinitely heavy body so it can’t be moved, which is usually fine for a ground object.
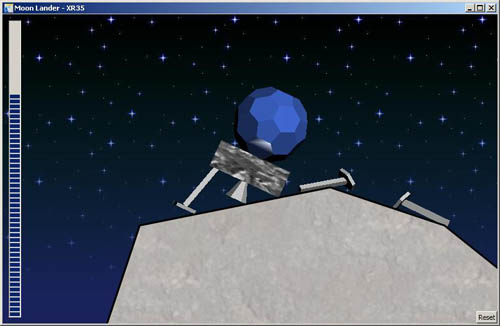
The Moon Lander XR-35 Project
This ominous sounding name is the impressive Moon Lander. Guide it down to safety on the nice flat spot at the bottom left of the screen. Be gentle though it’s legs are fragile and might break off if you land on an uneven patch of ground or if you come down too hard or wack it against something. (Possibly might effect your no claim bonus)
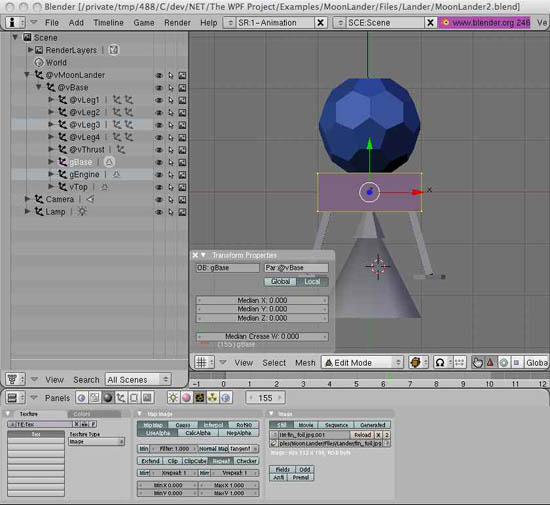
The Blender Model
I used blender and a modified “xaml_exporter.py” Python script to create and export the Moon Lander model.I’m not going to go into the usage of the “Xaml Editor “ in this article but will go through how I linked the exported model to the Newton properties in Part 2. The Blender files and exported XAML files are in the “Examples\MoonLander\Files\Lander” folder and the final XAML file is in the “Examples\MoonLander\Source\Models” folder as “MoonLander2.xaml” (this is the file the Moon Lander project uses).
The Exported Model
If you open up the “MoonLander2.blender.xaml-project” file in the “Examples\MoonLander\Files\Lander” folder with the Xaml Editor, select the “View” tab and then hit [F6], or select the “Dynamics/Start Simulation” menu you could play around with the model in real time by clicking and dragging the model around. You would them see the joints and goodies moving. If you don’t see the wire frame or joints select the “View” menu and select “Show Gizmos”.
The x:Name properties can be tied back to the @names in the blender scene nodes. The Newton Extension XAML bits would have been added to the XAML file exported from Blender and then merged into the final output by the “Xaml Editor”. (The next Article will deal with that).
The vBase Visual is part of the vMoonLander Visual which has been marked as a Newton body, so the entire Lander object has been defined as one body. (The legs has been separated out and joined with fixed joints)
The leg Visuals are hierarchically placed under the vBase Visual (The Rectangle). Each leg, even though hierarchically structured under the vBase has also been attributed as a body, but with one difference. The bodies’ Joint property has been set up to include a UserJoint with a breaking force of 120. The user joint consists of 2 Constraints which limit the child’s movement (the Leg) to the parent (the Moon Lander). The FixedLinearConstraint limites up/down/left/right movement and the FixedAngularConstraint limit any rotational movement. These 2 constraints placed under the one user joint basically make a fixed joint, fixing the child to its parent. Now, if you have played the Lander game you would have noticed the legs are very flexible. This "stiffness" is defined by the Stiffness property on the constraint. A value of 1 would mean solid (no flexing at all), and 0.01 very flexible. The FixedLinearConstraint also has a Pivot point property which is the point where it applies it’s constraining force. The Direction property is the Direction of the fixed constraining force that would be applied to hold the joint in place (Yes it's a bit tricky. The Direction is important though. The Z axis should point out along the child body. More amount this in Part 2). Both are local coordinates to the child body (the Leg). The ForceAverageSampleCount is used the specify how many samples of the acting forces to be sampled and averages the force value out over the sample count to reduce quick shocking forces which would normally rip the legs off. An example would be the initial contact with the ground. The force would be much larger than when the Lander is at rest. Before I added this property the legs broke off quite unexpectedly sometimes. One case was the thrust force. If applied to quickly it ripped the Lander's legs off. Hooray for realistic physics simulation ;-). (You'll notice I increment the force applied by the thruster. I wasn't trying to be a smart person. Just had to provide a more realistic simulation.)
<ModelVisual3D x:Name="vMoonLander" ...>
    <newton:World.Body>
        <newton:ConvexBody3D Mass="100" AlignToGeometryCenter="0,0,0" />
    </newton:World.Body>
    <ModelVisual3D x:Name="vBase">
    ...
        <ModelVisual3D x:Name="vLeg1">
            <newton:World.Body>
                <newton:ConvexBody3D Mass="1" AlignToGeometryCenter="0,0,0">
                    <newton:Body.Joint>
                       <newton:UserJoint MaxForce="150">
                           <newton:FixedLinearConstraint Stiffness="0.01" ForceAverageSampleCount="10"
                                                            PivotPoint="0.27,0.6,-0.28" Direction="-0.23,-0.97,-0.02" />
                           <newton:FixedAngularConstraint Stiffness="0.01" ForceAverageSampleCount="10" />
                       </newton:UserJoint>
                    </newton:Body.Joint>
                </newton:ConvexBody3D>
            </newton:World.Body>
        <ModelVisual3D.Content>
     <Model3DGroup>
     ...
So...as you can see, there’s quite a few little things the Newton Extensions take care of for you, allowing you to focus more on playing games than head-bashing the keyboard trying to write lines and lines of code setting up forces and calculating joint stop forces and whot not.Anyway, I'll be explaining the joints more in Part 3.
2D and 3D into 1D?... or was that 5D?
I wanted a weird retro feel to the game so I incorporated 3D for the Lander to take advantage of the 3D effects, and used 2D (A Canvas and Polygon control with a Fill and a thick-ish Stroke) for the ground giving it a more cartoonier feel. I achieved the 2D-3D meshing by placing a Canvas over theViewport3D and linking the 3D viewport's matrix to the Canvas' 2D matrix so the coordinate system would be the same. (Going to any complex Matrix detail here is beyond this article. There are plenty of tutorials on the net about Matrix transformations which is another mathematical monster)However if asked nice enough I’m sure I could be convinced to write something relating to this project. ;-)
private void Update2DPlane()
{
    Matrix3D matrix = MathUtils.GetWorldToViewportTransform(_viewport);

    _2DPlane.RenderTransform = new MatrixTransform(matrix.M11, matrix.M12, matrix.M21, matrix.M22, matrix.OffsetX, matrix.OffsetY);

    Point3D point = _groundVisual.Transform.Value.Transform(new Point3D());
    Canvas.SetLeft(_polyGround, point.X);
    Canvas.SetTop(_polyGround, point.Y);
}
Basically what this code does is get the viewport's Matrix3D and convert it to a Matrix2D.The ground was a
PointCollection resource which contained a 2D collection of points defining the ground from left to right stored in the “Source\Models\land.xaml” file.
<PointCollection x:Key="landPoints">
    0,0 3,4, 6,4, 6,6 10,4, 13,4 14,5 17,14 22,15 25,14, 30,10 35,13 40,6 40,0
</PointCollection>
This resource was merged into the game's resources as a merged resource in the “Source\GamePage.xaml” file.Now with the points nicely packaged up and separated they can be loaded into the Polygon control. Easy enough.
<Polygon x:Name="_polyGround"
           Points="{Binding ElementName=groundCollision, Path=Points}"
           Stroke="Black" StrokeThickness="0.05">
But how to make the 2D point collection stuff 3D and collidable!? I hear you ask!I also added a Visual to the
Viewport3D which also linked to the same points.<ModelVisual3D x:Name="_groundVisual">
<newton:World.Body>
<newton:Visual3DBody x:Name="_landBody">
<newton:Visual3DBody.CollisionMask>
<newton:CollisionCloud x:Name="groundCollision" Points="{StaticResource landPoints}" Depth="5" />
</newton:Visual3DBody.CollisionMask>
</newton:Visual3DBody>
</newton:World.Body>
But this time a linked a Visual3DBody body on to the visual and attached a CollisionCloud to the bodies' CollisionMask. The model data is this time is not coming from the ModelVisua3D itself, but rather the 2D points collection, and that was another thing. The mesh source are 2D points, and a collision mesh is 3D. This is where sneakiness comes in. Instead of automatically building a Convex collision around a visual with a ConvexBody3D which wouldn't have worked because the visual does not contain any model data, I attached a generic Visual3DBody to the visual and used a special Terrain collsion mask called a CollisionCloud with a Depth of 5. What this class does is takes a flat 2D polygon definition and builds a 3D collision mesh with the specified Depth. And Taa daa, a 3D terrain to crash into.Next I had to limit the Z motion of the Lander so it would stay kinda 2D on me. The terrain is only a thin trip of ground and the camera is a
ProjectionCamera so there is no need for Z (or depth).The
BodyTransforming event on the World object is called for each body after it is about to be placed at it's new position, so all I needed to do was override the translations of the Lander and keep it from coming closer to or further from the camera (Z translation) or rotating if a funny direction. Basically, only the Z rotation is allowed.void _world_BodyTransforming(Body sender, BodyTransformEventArgs e)
{
if ((sender == World.GetBody(_moonLander)))
{
e.TranslationZ = 0;
e.RotationX = 0;
e.RotationY = 0;
if ((e.TranslationX < -20) || (e.TranslationX > 20) ||
(e.TranslationY < -14) || (e.TranslationY > 30))
{
Reset();
}
}
}
Also if the Lander went out of the scene at would reset the game back to the title screen.The Lander itself has a key testing event to add thrust and Torque to the body to allow you to move it around.
The one difference is the thrust visual is attach and detach from the scene to give a cool thrust-y effect. Check it out.
OMG we’re going to crash
Next to make it easier to come in for a safe landing I added an effect of zooming into the scene (by tweaking theProjectionCamera’s Width property) when the Lander come close to the ground. The smaller the width the more it zooms into the center of the scene.To determine how far the Lander is from the ground you have to cast a ray out from a point in the lander and see how far it um…beams out before it hits something. This is functionality is provided for by the
Ray class which is a visual you can attach to something. You can then query it and see how far away something is. This is called Ray Casting and the Newton Extensions Framework tries to make it easy to use. In the “Models\MoonLander.xaml.cs” file I created the Ray, set it's length to 6 units and added it to the Lander visual. What is means is it stops looking for something more that 6 units away and would return a
null hit test result if nothing is within range. The Ray was attached to the Lander so when queried it would be relative to the Lander. Also it was set to World origin and its direction is straight down._ray = new Ray();
_ray.DirectionOrigin = ObjectOrigin.World;
_ray.Direction = new Vector3D(0, -1, 0);
_ray.RayLength = 6;
this.Children.Add(_ray);
All that’s left is to do is query the ray and set the camera zoom.// query the ray to see how far it is from the land object _moonLander.Ray.Update(_world, World.BodyFilterType.IncludeBodies, _landBody); if (_moonLander.Ray.HitResult != null) // something was hit { var newFactor = _moonLander.Ray.HitResult.IntersectFactor; if (newFactor < 0.6) // near to ground _targetZoomFactor = 1; // full zoom else if (newFactor < 1) // far from ground _targetZoomFactor = 0.5; // medium zoom } else _targetZoomFactor = 0;The zoom is limited to 3 zoom factors 0 = all the way out, 0.5 = zoomed in a bit, and 1 = full zoom. As close as ya' going to get.
Other Visual Effects
The rest of the math in the source just simulates the camera following the Lander as the zoom gets closer.The lens flare is an image control which is repositioned every frame just under the center of the Lander and has its opacity set to a random value when the thruster is firing. (i.e when the up key is been pressed).
There is also a background
Canvas with a tiled ImageBrush as the star field. It's translated a bit when the camera moves to give a better motion effect. Flicking the ON switch
_world.InitialiseBodies();
_world.IsPaused = false;
Currently the engine isn't totally auto start. The best thing to do it set everything up in the Xaml and tell the world to initialise its bodies.By default the world will start paused. After everything is setup, un-pause it.
Conclusion
The library is still a far way from been perfect, but I wanted to get it out there now so anyone who might find it useful. You know to build that better Moon Lander Game. ;-).I know the article is a bit incomplete but I plan on writing more if people are interested.
So if you'd like to know more about something in this project, ask me, and I'll write more articles
If I have referenced something of yours without mentioning you, please drop me a message and I'll give you the credit you deserve.
Also, please tell me if you spot any mistakes. I'm a hideous typ-o-er.
History
2008/07/05: Initial version2008/07/08: Fixed a whole buncha typos.