
Module Installer
3.94/5 (6 votes)
A DotNetNuke style framework that allows you to upload modules to enable an end-user to easily update and enhance a web application.

Why use a Module Installer?
One of the best things about DotNetNuke is its ability to allow you to simply upload a .zip file that contains a "module package" and instantly add features to your website. If you need a Message Board for your website, you simply upload it and configure it. You don't have to create the code yourself. You upload code that someone else created, and it will simply work.
The SilverlightDesktop.net project needed a method to allow developers to create modules for the framework, we copied the proven DotNetNuke method. We have posted the code here as a non-Silverlight application because we felt the code may be useful to others.
The Application
The application uses code from another CodeProject application we created, A Web based application configuration wizard, that provides a wizard to allow you to easily configure the application. We later used this code in the SilverlightDesktop.net project.
First, you create a SQL database:
![]()
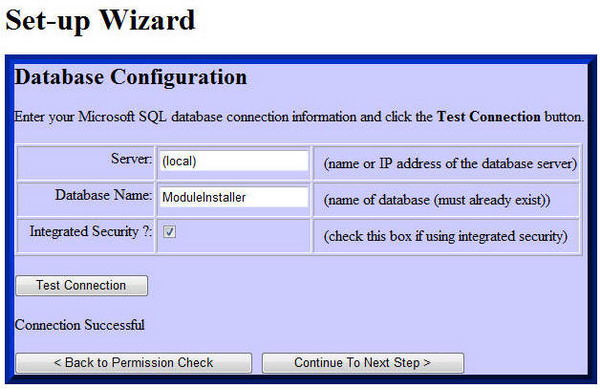
Configure the Web application:

Navigate to the website and configure the application using the installer:

After the application is set-up, click on the link to navigate to the Module Administration.

Upload the HelloWorldModule.zip file (the link to download this is at the top of this article):

After clicking the Continue link, the page will refresh and the module will be configured.

The HelloWorld module will display in the drop-down list on the main page, and clicking the Load Module button will dynamically inject the module into the page and display its contents.

The Module Package
The exploration of the installation process begins with the module package. This is a .zip file containing the program, database scripts (.sql scripts), and configuration information:

- HelloWorldModule.dll - The program code.
- uninstall.sql - Contains a database script that removes all the database tables when the module is uninstalled. The script is initially placed in the uninstall field of the Modules table. It is run when the administrator clicks on the Delete button to uninstall the module.
- module.config - This contains the configuration information for the module.
- HelloWorld.ascx and HellowWorld.ascx.cs - Additional program files for the module.
- 01.00.00.sql - The script that is run on module installation that creates the needed database objects.
The files are zipped in the relative position they will need to be placed in when they are installed. The HelloWorldModule.dll file needs to be placed in the "bin" directory so it is placed in the "bin" directory when it is zipped up. The remaining files will be placed in the application's root directory. Note, the .sql and .config files will be deleted after installation, and will not remain in the application.
The Module.config File
The module.config file has the following format:
<SilverlightDesktop>
<configversion>1.0</configversion>
<configtype>Module</configtype>
<modulename>HelloWorld</modulename>
<description>A simple module that says Hello World</description>
<assembly>HelloWorld.dll</assembly>
<version>01.00.00</version>
<removefiles>
<file>
<name>HelloWorld.ascx</name>
</file>
<file>
<name>HelloWorld.ascx.cs</name>
</file>
<file>
<name>bin\HelloWorldModule.dll</name>
</file>
</removefiles>
</SilverlightDesktop>
SilverlightDesktop- Identifies the configuration file.configversion- Identifies the version of the configuration file. This allows you to later change the format yet still process modules in the old format.configtype- This is important because you could have different types of configuration files for elements other than modules (for example, skins).modulename- This is the key name that other data (such as the file names and paths stored in the ModuleFiles table) will use.description- This is the description that is displayed for the module on the module configuration screen.assembly- In the SilverlightDesktop.net project, we need this to indicate the first assembly to load. This is not really needed for a normal ASP.NET application.version- This allows you to indicate a new version of the module. The installer will compare this version number to the current version if the module is already installed. It will prevent an older version from being installed. If it is a newer version, it will upgrade the module.removefiles- Allows you to indicate files that are no longer needed. They will be removed before the module is installed. The files in this example do not need to be removed because they will simply be overwritten. They were included only as an example of the format (it also does not cause an error to remove them since they are being replaced).
The Installer
The ModuleAdmin.aspx.cs file contains all the logic for installing the module. First, a temporary directory is created, and the .zip file is unzipped into that directory. SharpZipLib is used to unzip the file.
string strZipFilename = File1.PostedFile.FileName;
strZipFilename = System.IO.Path.GetFileName(strZipFilename);
File1.PostedFile.SaveAs(strTempDirectory + strZipFilename);

UploadMessage.Add(String.Format("File saved to {0}",
                  strTempDirectory + strZipFilename));
UnzipFile(strTempDirectory + strZipFilename);
Next, LINQ to XML is used to read the configuration file and to build a list of possible files to remove:
// Load the config file
XElement doc = XElement.Load(strTempDirectory + @"\Module.config");

string strconfigversion = doc.Element("configversion").Value;
string strconfigtype = doc.Element("configtype").Value;
string strmodulename = doc.Element("modulename").Value;
string strdescription = doc.Element("description").Value;
string strassembly = doc.Element("assembly").Value;
string strversion = doc.Element("version").Value;

// Build a list of files to remove
List<string> colFilesToRemove = new List<string>();
foreach (XElement Element in doc.Element("removefiles").Elements())
{
    colFilesToRemove.Add(Element.Value);
}

colFilesToRemove.Sort();
LINQ to SQL is used to determine if the module version is appropriate:
// Get the current module version if any
int intCurrentModuleVersion = 0;
var result = from Module in DataClassesDataContext.Modules
             where Module.ModuleName.ToLower() == strmodulename.ToLower()
             select Module.ModuleVersion;

intCurrentModuleVersion = (result.FirstOrDefault().ToString() == "") ?
          intCurrentModuleVersion : result.FirstOrDefault();

int intModuleVersion = Convert.ToInt32(strversion.Replace(".", ""));

if (intModuleVersion <= intCurrentModuleVersion)
{
    UploadMessage.Add(String.Format("Current module version is {0}. " +
        "Installing module version is {1}. Aborting installation.",
        intCurrentModuleVersion.ToString(), intModuleVersion.ToString()));
    lbUploadMessage.DataSource = UploadMessage;
    lbUploadMessage.DataBind();
    return;
    // Exit
}
else
{
    UploadMessage.Add(String.Format("Current module version is {0}. " +
      "Installing module version {1}.",
      intCurrentModuleVersion.ToString(),
      intModuleVersion.ToString()));
}
Based on the current module version number (if any), the appropriate .sql scripts are located and executed. The LINQ to SQL method "ExecuteCommand" allows you to pass a .sql string that will be executed against the currently configured data source.
// Get a list of all .sql scripts
List<string> colSQLScripts =
  Directory.GetFiles(strTempDirectory, "*.sql").ToList();
colSQLScripts.Sort();

foreach (string strFile in colSQLScripts)
{
    string strFileName = Path.GetFileNameWithoutExtension(strFile);
    if (strFileName.ToLower() != "uninstall")
    {
        int intVersion =
          Convert.ToInt32(strFileName.Replace(".", ""));
        if (intVersion <= intModuleVersion)
        {
            try
            {
                string strSqlScript = GetSQLScript(strFile);
                DataClassesDataContext.ExecuteCommand(strSqlScript);
                File.Delete(strFile);
                UploadMessage.Add(String.Format("SQL Script processed: {0}", strFileName));
            }
            catch (Exception ex)
            {
                UploadMessage.Add(String.Format("SQL Script error " +
                      "in script: {0} - {1}", strFileName, ex.ToString()));
                lbUploadMessage.DataSource = UploadMessage;
                lbUploadMessage.DataBind();
                return;
            }
        }
    }
}
The modules table is updated:
// Delete record if it exists
Module ModuleEntry = (from Module in DataClassesDataContext.Modules
                      where Module.ModuleName.ToLower() == strmodulename.ToLower()
                      select Module).FirstOrDefault();

// // If the Module entry does not already exist, create it
if (ModuleEntry == null)
{
    ModuleEntry = new Module();
}

ModuleEntry.AssemblyName = strmodulename;
ModuleEntry.ModuleDescription = strdescription;
ModuleEntry.ModuleName = strmodulename;
ModuleEntry.ModuleVersion = Convert.ToInt32(strversion.Replace(".", ""));

//Read and insert the uninstall script
if (File.Exists(strTempDirectory + "uninstall.sql"))
{
    string strUninstall = GetSQLScript(strTempDirectory + "uninstall.sql");
    ModuleEntry.uninstall = strUninstall;
}

// If the Module entry does not already exist insert it
if (ModuleEntry.ModuleID == 0)
{
    DataClassesDataContext.Modules.InsertOnSubmit(ModuleEntry);
    UploadMessage.Add(String.Format("Created Module entry {0}", strmodulename));
}

DataClassesDataContext.SubmitChanges();
Unneeded files and processed files that will not be a part of the installed package are cleaned up:
//Delete files
foreach (string strDeleteFile in colFilesToRemove)
{
    File.Delete(strTempDirectory.Replace(@"\Temp", "") + strDeleteFile);
    UploadMessage.Add(String.Format("Removed File: {0}", strDeleteFile));
}

//Delete the .zip, .config and uninstall files
File.Delete(strTempDirectory + strZipFilename);
File.Delete(strTempDirectory + "uninstall.sql");
File.Delete(strTempDirectory + "Module.config");

//Delete any file details in the database
var colModuleFiles = from ModuleFiles in DataClassesDataContext.ModuleFiles
                     where ModuleFiles.ModuleName.ToLower() == strmodulename.ToLower()
                     select ModuleFiles;

DataClassesDataContext.ModuleFiles.DeleteAllOnSubmit(colModuleFiles);
DataClassesDataContext.SubmitChanges();
The remaining files are added to the ModuleFiles table (so they can be deleted when the module is uninstalled) and moved to their proper location:
//Add The Module File information to the database
List<string> colDirectories =
     Directory.GetDirectories(strTempDirectory).ToList();
colDirectories.Add(strTempDirectory);

foreach (string strDirectory in colDirectories)
{
    List<string> colFiles = Directory.GetFiles(strDirectory).ToList();
    foreach (string strFile in colFiles)
    {
        ModuleFile objModuleFile = new ModuleFile();
        objModuleFile.ModuleName = strmodulename.ToLower();
        objModuleFile.FileNameAndPath = strDirectory.Replace(strTempDirectory,
          "") + @"\" + Path.GetFileName(strFile);
        DataClassesDataContext.ModuleFiles.InsertOnSubmit(objModuleFile);
        DataClassesDataContext.SubmitChanges();

        // Move the file to it's destination
        File.Move(strFile, strFile.Replace(@"\Temp", ""));
    }
}
Just Use DotNetNuke
If you desire the functionality of an extensible framework, you should simply use DotNetNuke. However, when that is not an option, you may find that this code can provide a method to allow an end-user to easily update and enhance your application.
Implementing a framework such as this not only allows you to provide an easy way to implement enhancements, but it also allows others the opportunity to "extend" your application. This enhances the value of your application for your end-users.