
A Ken Burns Powered Photo Frame Control for WPF
Shows how to create a nice looking photo frame control in WPF and animate it using the Ken Burns effect

Introduction
Ever wanted to include a slideshow of images inside your app? Did the quick and dirty approach you cooked up look dull and boring?
Read this article to find out how to easily create a visually pleasing photo frame control that you can use in your WPF applications.
Background
The trick used by motion picture producers everywhere when showing still images is often called the Ken Burns Effect. The name comes from the American documentarian Ken Burns who used it extensively in his productions but the technique predates even him.
When the technique is used in films, the effect is carefully architected to what the director wants the audience to see. For example, in a photograph of a baseball team, the camera might slowly pan across the faces of the players and come to rest on the player who is the subject of the narrator.
In computer software, the effect is commonly used in screen savers and movie editors and it works remarkably well to create a more live feeling of otherwise static content. Since we want to apply it to arbitrary images, we'll have to resort to randomizing the parameters of the animation instead of carefully setting them based on the image content. But don't worry, the effect is quite nice anyway.
The Control
The XAML for our control is very simple. It contains two image controls with two transforms each - one for translation (panning) and one for scaling (zooming). The reason we need two is to enable a smoother transition when we're switching images since we want both images (old + new) to be visible at the same time while transitioning.
<Grid>
    <Image x:Name="c_image1" Stretch="UniformToFill" RenderTransformOrigin="0.5,0.5" >
        <Image.RenderTransform>
            <TransformGroup>
                <TranslateTransform />
                <ScaleTransform />
            </TransformGroup>
        </Image.RenderTransform>
    </Image>
    <Image x:Name="c_image2" Stretch="UniformToFill" RenderTransformOrigin="0.5,0.5">
        <Image.RenderTransform>
            <TransformGroup>
                <TranslateTransform />
                <ScaleTransform />
            </TransformGroup>
        </Image.RenderTransform>
    </Image>
</Grid>
Since WPF will apply translations in the order they are specified in the TransformGroup, we put the translate first so that the amount isn't affected by our scale.
While an image is being displayed, those transforms will be animated creating the desired zooming and panning effect described above. The actual target values for the animations will be randomized at runtime as explained further down, but we define the core of the storyboard in XAML.
<Storyboard x:Key="MoveStoryboard">
    <DoubleAnimation Storyboard.TargetProperty=
	"(UIElement.RenderTransform).(TransformGroup.Children)[0].(TranslateTransform.X)"
	 x:Name="moveX" />
    <DoubleAnimation Storyboard.TargetProperty=
	"(UIElement.RenderTransform).(TransformGroup.Children)[0].(TranslateTransform.Y)"
	 x:Name="moveY" />
    <DoubleAnimation Storyboard.TargetProperty=
	"(UIElement.RenderTransform).(TransformGroup.Children)[1].(ScaleTransform.ScaleX)"
	 x:Name="scaleX" />
    <DoubleAnimation Storyboard.TargetProperty=
	"(UIElement.RenderTransform).(TransformGroup.Children)[1].(ScaleTransform.ScaleY)"
	 x:Name="scaleY" />
</Storyboard>
The control has two configurable aspects:
- The folder to read images from -
ImageFolder(of typestring) - The interval between image changes -
Interval(of typeTimeSpan)
These are exposed as dependency properties to allow setting them from XAML.
And as a final trick, we set the ClipToBounds property to true so that images doesn't overflow the boundaries of the control when they are animated.
Loading Images
Internally, the control keeps a list of all the images that it should iterate over. Whenever it is time to switch photo, the next image is loaded from this list and rendered on one of the above mentioned Image controls.
The images are loaded from disk whenever the ImageFolder property is modified, and the code for doing that is in the LoadFolder method:
/// <summary>
/// Loads all images from the specified folder.
/// </summary>
/// <remarks>
/// This method, even though it parallelizes itself to multiple background threads,
/// still waits
/// for all results to complete at the end.
/// It should really be called done asynchronously to avoid blocking the UI
/// during this time.
/// (With big enough files, this method can take several seconds)
/// </remarks>
private void LoadFolder(string folder)
{
  c_errorText.Visibility = Visibility.Collapsed;
  if (!System.IO.Path.IsPathRooted(folder))
    folder = System.IO.Path.Combine(Environment.CurrentDirectory, folder);
  if (!System.IO.Directory.Exists(folder))
  {
      c_errorText.Text = "The specified folder does not exist: " +
                         Environment.NewLine + folder;
      c_errorText.Visibility = Visibility.Visible;
      return;
  }
  Random r = new Random();
  var sources = from file in new System.IO.DirectoryInfo(folder).GetFiles().AsParallel()
                where ValidExtensions.Contains
		(file.Extension, StringComparer.InvariantCultureIgnoreCase)
                orderby r.Next()
                select CreateImageSource(file.FullName, true);
  m_images.Clear();
  m_images.AddRange(sources);
}
Here, we're using LINQ to query all the files in the folder. The above query will fetch all files inside the folder, see if they match our list of supported extensions, order the results randomly and finally create a BitmapImage object based on the result.
You may also notice the .AsParallel() call at the end of the first line. This effectively tells LINQ to execute the rest of the query in parallel, on multiple threads. This turns out to be very useful because the CreateImageSource method is quite expensive and the speedup is dramatic:
| Image Count | Avg. image size | Load time (sequential) | Load time (parallel) |
|---|---|---|---|
| 6 | 2 MB | 4130 ms | 1196 ms |
| 14 | 0.9 MB | 1688 ms | 1211 ms |
| 8 | 0.2 MB | 401 ms | 155 ms |
One thing to keep in mind when doing multi threading in WPF is that graphical objects are normally not allowed to be shared between threads - they must only be accessed by the thread that created them. Fortunately, there is one exception to this rule and that is the Freezable class which is the basis of our BitmapImage object.
So the only thing we need to do to make sure we can load our images on the background thread is to freeze them before they are shared with the main thread.
/// <summary>
/// Creates an ImageSource object from a file on disk.
/// </summary>
/// <param name="file" />The full path to the file that should be loaded.
/// <param name="forcePreLoad" />if set to true the image file will be decoded
/// and fully loaded when created.
/// <returns>A frozen image source object representing the loaded image.</returns>
private ImageSource CreateImageSource(string file, bool forcePreLoad)
{
  if (forcePreLoad)
  {
    var src = new BitmapImage();
    src.BeginInit();
    src.UriSource = new Uri(file, UriKind.Absolute);
    src.CacheOption = BitmapCacheOption.OnLoad;
    src.EndInit();
    src.Freeze();
    return src;
  }
  else
  {
    var src = new BitmapImage(new Uri(file, UriKind.Absolute));
    src.Freeze();
    return src;
  }
}
As a side note, you'll notice the forcePreLoad parameter to the CreateImageSource method. This controls whether WPF should load the entire image and decode it directly. Otherwise, this is not done until the image is actually displayed. For small images, it doesn't really matter, but for larger ones, the decode can take a noticeable amount of time that makes the UI freeze in the middle of an image transition. In our scenario, since we know all images are going to be used and we absolutely want smooth transitions between them, we opt to pay the performance cost up front by setting this parameter to true in our LINQ query above.
Image Transitions
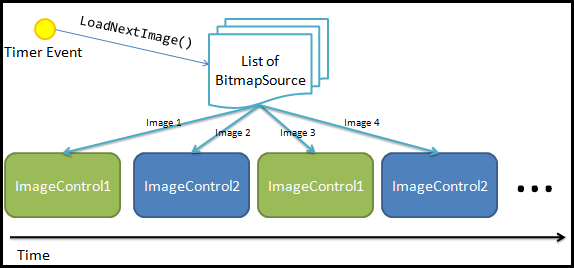
So we have now loaded and decoded all the images from the folder into a private list. The next step is to setup a dispatcher timer to switch photo at the time specified by the Interval property. In the event handler for the timer, the LoadNextImage method is called which is responsible for two things:
- Get the next
ImageSourcefrom the list and assign it to the currently unusedImagecontrol. - Start the transition effect and create + start the Ken Burns effect for the new image.
As mentioned earlier, the control has two Image controls defined in its XAML. The first loaded image will be assigned to the first control, and the next image to the second control and then the third will go on the first control and so on. The currently unused image control is faded out by getting its opacity animated to zero and then just waits around until the next image transition when it will get a new image source.
Creating the Effect
The actual Ken Burns effect is achieved by the transform animations defined in the control's XAML. To make the control slightly more interesting, the actual animation values (the From and To properties) are randomized each time a new image is being displayed.
/// <summary>
/// Creates the ken burns effect animations and applies them
/// to the specified image control.
/// </summary>
/// <param name="img" />The image control to apply the effect on.
private void CreateAndStartKenBurnsEffect(Image img)
{
    var rand = new Random();
    double scaleFrom = rand.Next(1100, 1500) / 1000.0;
    double scaleTo = rand.Next(1100, 1500) / 1000.0;
    foreach (var child in m_moveStoryboard.Children)
    {
        var dblAnim = child as DoubleAnimation;
        if (dblAnim != null)
        {
            // Randomize the translation to create a more live effect
            if (dblAnim.Name == "moveX" || dblAnim.Name == "moveY")
                dblAnim.To = rand.Next(-50, 50);
            else if (dblAnim.Name == "scaleX" || dblAnim.Name == "scaleY")
            {
                dblAnim.To = scaleTo;
                dblAnim.From = scaleFrom;
            }
            // make sure the child animations has the same duration as the storyboard
            // (since it could have changed since last time)
            dblAnim.Duration = m_moveStoryboard.Duration;
        }
        Storyboard.SetTarget(child, img);
    }
    m_moveStoryboard.Begin(img, true);
}
The scale is randomly set to a value between 1.1 and 1.5 (in other words, zooming between 10% and 50% in random direction - either from the larger to smaller or vice versa) and the transition is set to go at most 50 pixels in either direction (up or down, left or right).
You may want to tweak those values depending on your interval time and image size, but I found that these provide fairly good results on my test images.
Using the Code
The source code contains a test application which consists of a main window hosting the PhotoFrame control inside a grid along with a configuration panel that allows you to tweak the interval and change the folder where the images are loaded from.
The code to use the control from your application would look something like this:
<local:photoframe imagefolder="C:\Users\Public\Pictures\Sample Pictures"
	interval="00:00:10">
Points of Interest
- The use of PLINQ was not something I though about initially but it turned out this case is pretty much a text book example of where the power of parallel LINQ can really make a dramatic improvement with very little code change.
- The code that loads images from the folder should really be called on a background thread while showing a spinner to the user. I deliberately didn't do that in this article in order to keep the code simple.
- It is quite tricky to construct values for the Ken Burns animations that works on all image sizes. In some rare cases, the values provided in the source code above will move parts of the image outside the control's area, revealing the white background of the control. By using some clever math to bound the randomized animation values, this problem could be alleviated but I think this is good enough for this article.
History
- 2011-06-16 - Initial version