
Day 83 of 100 Days of VR: Endless Flyer – Adding A Score UI on the Plane
0/5 (0 vote)
We’re back to another day at creating the Cube Flyer again. In the last few posts, we added a basic sound effect to our game and it sure does make the experience better!
We’re back to another day at creating the Cube Flyer again. In the last few posts, we added a basic sound effect to our game and it sure does make the experience better! We will go in and add more as we go, but today, we’re going to look at implementing a new feature:
- Displaying our Coin UI
- Creating and displaying a scoring system
We’re not going to add any boring UI screen though, we’re going to try and do this the VR way! Specifically, we’re going to do this by adding the UI to be part of the plane that we’re moving!
Step 1: Showing a Coin UI
Before we go on, here’s the UI we intend to build at the end of the day:
It doesn’t look great, but it’s serviceable.
Step 1.1: Creating a UI on the plane
Like we have done so already with the game over canvas we need to make a canvas to display UI in the game world.
As we know at this point, we should never have the UI show up in front of the player’s camera, that just wouldn’t make sense in a VR game. Ideally, the best way of destroying UI in a VR app is to show it somewhere in the game itself.
Where might you ask? The only one place I can think of is on the plane itself!
We’ll need to do some adjustments on our positioning of the plane, but for the first step, let’s get the text on the plane.
- Grab our prefab Game Over Canvas from the Prefabs folder and then drag it to be under Player > PlaneContainer in our game hierarchy.
- Rename the Game Over Canvas to be Score Canvas, we’re going to convert this prefab to be a new prefab.
- Find the Game Over Text inside the Score Canvas and then drag it to be a child of the Score Canvas. Call it Score Text, and then we can get rid of everything else in that game object.
- Duplicate Score Text with Ctrl + D, and then call the new text Coin Text
We should have something like this:

Now let’s do some adjustment to the settings so that we can get it placed on the plane.
In Score Canvas, here are the settings I’ve made to the Rect Transform
- Position (X, Y, Z): 0, 1.62, 0.125
- Rotation (X, Y, Z): 111, 0, 0
- Scale (X, Y, Z): 01, 0.01, 1
It’s important to change the rotation because we want the text to naturally feel like it’s on the plane. Here’s a sneak preview of what I mean:
Next we need to make some adjustments for the Score Text:

- Position:4, -1.7, 0
- Width: 300
- Height: 150
- Text: Score:
And for Coin Text:
- Position:4, -21, 0
- Width: 300
- Height: 150
- Text: Coin
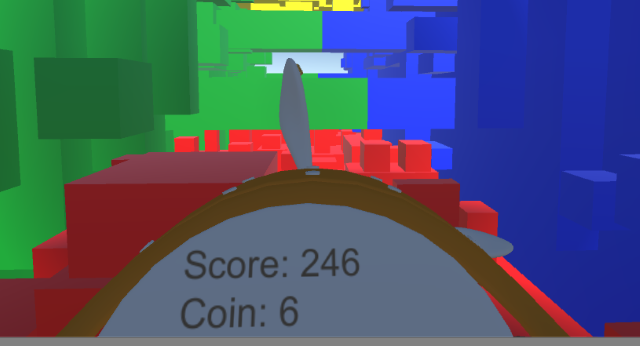
And with that, here is our result

Step 1.2: Move the Ship so we can see the dashboard
Now we have the text. This is great, however, the problem is that we can’t actually see the dashboard that we have in our game.
Specifically, we might be able to see it by looking down, but the problem is that by doing that we will force our plane to fly downward.
We’re going to fix this problem by raising the plane a bit so we can see the dashboard. Remember, the camera is stuck in a set location so we have to move the plane instead.
In Player > PlaneContainer we need to change the values to be:
- Position (X, Y, Z): 0, -1.15, 3.25
Now that we play the game, we can easily see our dashboard.

We still can’t see the Coin all the time, but we can if we look down a bit.
Step 2: Create a Score UI Manager
Awesome, we now have some UI text that we use to show our score, what’s next is that we need to create a manager that will allow us to write code that will change our score and coin.
Luckily for us, we already have a GameUIManager that we’re getting to do anything with the UI. We’re going to add in our UI to set our texts.
Step 2.1: Adding to the GameUIManager Script
Let’s update our GameUIManager to also change the Coin and Score text.
using UnityEngine;
using UnityEngine.UI;

public class GameUIManager : MonoBehaviour
{
    public static GameUIManager Instance;
    public GameObject GameOverCanvas;
    public Text ScoreText;
    public Text CoinText;

    void Start()
    {
        if (Instance != null)
        {
            // If Instance already exists, we should get rid of this game object
            // and use the original game object that set Instance
            Destroy(gameObject);
            return;
        }

        // If Instance doesn't exist, we initialize the Player Manager
        Init();
    }

    private void Init()
    {
        Instance = this;
    }

    ///

<summary>
    /// Sets the GameOverUIManager to be in the game over state.
    /// </summary>


    public void GameOver(GameObject player)
    {
        Instantiate(GameOverCanvas, player.transform.position, Quaternion.identity);
    }

    public void SetCoinText(int value)
    {
        CoinText.text = "Coin: " + value;
    }

    private void SetScoreText(int value)
    {
        ScoreText.text = "Score: " + value;
    }
}
Looking at the fields
We added 2 public functions to the script to allow us to access our Text.
- Private Text ScoreText – This is the text that displays our Score.
- public Text CoinText – This is the text that displays our Coin.
Walking through the code
We only added 2 public functions that allow us to set the text.
SetCoinText()takes in a value that we will use to set the coin value of our Coin Text UI.SetScoreText()takes in a value that we will use to set the coin value of our Coin Text UI.
Now that we have these functions available, we need a separate script that will call them to change our texts.
Setting up the script
Now that we have two public game objects, we need to add the game object to our script.
- Our
GameUIManagerscript is located inManager, we need to set ourScoreTextandCoinTextto both our slots. Just and drag and drop our Text UI element to the correct slots.
Step 2.2: Modifying the GameManager script to update our UI
Currently in the GameUIManager, we created public functions that allow us to update our texts, however, we have no one calling them.
We’re going to fix this by updating our score every time we increase it. So where was it again that we updated our Coin amount? In the GameManager!
We simply need to call the GameUIManager to update our score text. Here’s what our script looks like now:
using UnityEngine;

public class GameManager : MonoBehaviour
{
    public static GameManager Instance;

    private int _coin = 0;

    void Start ()
	{
	    if (Instance != null)
	    {
	        // If Instance already exists, we should get rid of this game object
	        // and use the original game object that set Instance
	        Destroy(gameObject);
	        return;
	    }

	    // If Instance doesn't exist, we initialize the Player Manager
	    Init();
	}

    private void Init() {
        Instance = this;
        _coin = 0;
    }

    // Called from outside function for when the player collects a coin.
    public void CollectCoin()
    {
        _coin++;
        GameUIManager.Instance.SetCoinText(_coin);
    }

    // Return the number of coins that we have collected.
    public int GetCoin()
    {
        return _coin;
    }
}
One thing I want to note in the code here is that I tried to save an instance of GameUIManager to a private field in Start() and access it.
Unfortunately, that didn’t work, because the script was null (specifically not created) when we try to access it at that time. However what I found was that if we were to try and access it at any other time, we would be able to successfully get a non-null instance of the code.
Now if we were to play the game, we will be able to see our score get updated every single time we collect some coins.
Check it out!

Step 3: Creating A Score System
Now that we have our Coin showing up correctly in our UI, the last thing we should do is create a Score system that we get for playing.
This will be a very simple score that increases over time.
Step 3.1: Writing a Score Manager
To keep track of our score as it increases over time, we’re going to create a new ScoreManager script. We could later add things like powerups that will increase our score or maybe make it increase faster as the game goes longer, but for now, it’s just going to keep track of our score.
- In
Manager, create a newScoreManagerscript that we can add to the game.
Here’s what the ScoreManager looks like:
using System.Collections;
using System.Collections.Generic;
using UnityEngine;

public class ScoreManager : MonoBehaviour {

    public static ScoreManager Instance;

    private float _score = 0;

    void Start()
    {
        if (Instance != null)
        {
            // If Instance already exists, we should get rid of this game object
            // and use the original game object that set Instance
            Destroy(gameObject);
            return;
        }

        // If Instance doesn't exist, we initialize the Player Manager
        Init();
    }

    private void Init()
    {
        Instance = this;
        _score = 0;
    }

    void Update()
    {
        // increase our score and then update our ScoreText UI.
        _score += Time.deltaTime * 10;
        GameUIManager.Instance.SetScoreText((int)_score);
    }
}
Looking at the fields
We have two fields:
public static ScoreManagerInstance – Like we’ve seen before Instance is used to make sure we only have one instance of score manager that we can call anywhere in our code.private float _score– This keeps track of our score, we will increase the value over time.
Walking through the code
There’s not really too much going on in the code.
- In
Start()we create an instance of ourScoreManagerthat other scripts can access otherwise we get rid of it. - In
Update(), we increase our score simply by using the flow of time. It’s important to note that we saved everything as a float so that we don’t lose precision in time (especially when working with values as small as deltaTime), however, we want to show round numbers so we cast the value to be an int so we won’t have any decimal values when we pass it to ourGameUIManager.
End of Day 84
And that’s it! Here’s a full animation of our game UI at work now!
Pretty neat right?!
Today we worked on display our already existing coin and we quickly added a scoring system that we can display that we can see when we play the game.
Well, it’s time for me to call it a day! Stay tuned for the next thing we’re going to implement in this game!