
Get Started With Writing Your Own jQuery PLUGIN in a Simple Way
3.86/5 (3 votes)
Get started with writing your own jQuery PLUGIN in simple way
You might have worked on projects where you had to make use of third party plugins such as timeline.min.js, autoComplete.min.js to fulfill the project’s requirements. These plugins are developed by some other developers. Most developers would not think much about developing their own custom jQuery Plugin and just focus on making use of available third party Plugin. This is a good approach in order to finish the project on time and satisfy the clients.
Imagine! What if you could develop such reusable jquery Plugin and make use of that Plugin in more than one project which will have similar requirements? That sounds cool, isn’t it?
Yes! Now let me start with a theory to make you understand when you can take a decision to write plugin. Let us consider a most popular jquery plugin jquery.autoSuggest.js. You might have used this plugin in multiple projects. It does Ajax call to the server and displays data in a beautiful way. You might have used the same plugin for different purposes such as displaying user names on one page and displaying some other data in a similar fashion in another page of the same project. Here, the common thing among two pages which you can observe is RE-USABILITY.
Similarly, you can write such reusable jquery functions to make use in different pages/projects for similar functionality. This can be achieved through writing jquery plugin.
What is jQuery Plugin?
A jQuery plugin is a JavaScript file (.js extension) which contains related methods which can be used along with methods of jquery library.
If you are familiar with jquery, you might have written such code, e.g.:
$(“#Some_ID”).autoComplete({Some parameters and other information needed to make use of this plugin method name});
The above snippet is to make use of jQuery.autocomplete.js plugin:
In a similar way, you can create your own jquery plugin and make use of it in a similar fashion, e.g.: $(“#some_ID”).myNewPlugin({required parameters, information for the plugin});
In the above snippet, myNewPlugin is a jquery method in jquery. myNewPlugin.js which is going to be created by us in simple steps.
- Create a file with name jquery.myNewPlugin.js (the extension of the file should be .js):

- Write the following lines of the code in the file. I will explain each and every line of the code:

The above code snippet is the syntax to write the plugin. We need to write our plugin methods within those two lines of code due to one of the major concerns. Let me explain about those two lines of code in detail:
- At the beginning, you can see the semi colon. We don’t need to add semicolon in our plugin but it is recommended to add semicolon because jquery plugin is nothing but a separate method written in a JavaScript file. Suppose you are working in a team and one of the developers didn’t put semicolon at the end of methods which he has written to achieve some functionality on the same page where you are going to make use of this plugin. In that scenario, your plugin may not work as expected. Sometimes, it will not call your plugin method name even though the code which you have written in the plugin is perfectly fine. So in order to avoid such issues, better use semicolon at the beginning
- The above two lines of code are written because of creating scope for methods which we will write in the plugin file and to protect
$alias. Within the function there, you can see dollar ($) variable as parameter.$is a very famous variable among JavaScript libraries. It is always assumed that$is the alias for jQuery function. So if we use other plugins and expect our plugin to work well with them and still use$as alias for jQuery function, then we need to put all of our jquery methods which we are going to write for our plugin inside of a function by passing the jQuery function after closing the curly bracket of that function and pass$as parameter to the function.
- Within those two lines of code, we need to write our jquery plugin. Remember, in general, a jquery plugin is nothing but a reusable jquery METHOD.

In line number 5, you can see the syntax of plugin method.
$is alias for jQuery function,fnrepresents that it is aFUNCTIONandmyNewPLuginis the method name which is our plugin. This is the syntax to start with jquery plugin. Usually, you define a function as shown below:
But in our case, you write in a different way, as shown below:

It gives a clear idea that we can pass the parameters to our method, right? Exactly!! We can even pass parameters to our plugin. It would look like shown below:

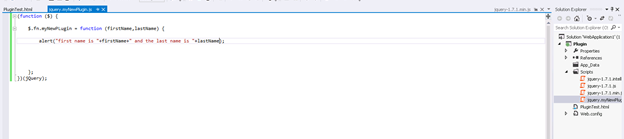
In the above screenshot, you can see that there are two parameters such as firstname, lastName. This is awesome, isn’t it? Okay ... I hope you have got my points which I have been explaining till here. Now it is not yet done!
Let me put an alert box inside the plugin method:

So, it is not yet done. Now let us test this by adding an alert box inside the plugin method and check whether this works properly or not. I have added an alert message and my code looks like this:

How do you use any jquery plugins in your solution? It is simple. You create an HTML page and give the reference of that third party plugin, right? We will do the same thing.
Note: We are writing JQUERY plugin. That means we need to add jquery.js library reference in our HTML page before adding our plugin reference on that page. Because our plugin makes use of jquery.js library’s methods and variables such as $, jQuery, etc.
- Here, I will use Visual Studio. I will add my plugin file under the script folder and add this custom plugin reference on the page PluginTest.html. In the previous steps, I used sublime editor. You can directly use Visual Studio for all the steps which I have explained earlier.

Inside the
bodytag, I have created onedivand added an ID to it. There is a reason for it. We need a reference on page on which we initiate the call for plugin method. In simple words, suppose you have to callautosearchontextbox. You will make use ofautosearchplugin and call thepluginmethod on theTEXTBOXfrom where you wanted to initiate search functionality. Here, thetextboxis the place from which we callautosearchplugin. Usually, we use ID of thetextboxas reference on which we callautosearchplugin.
In a similar way, in our example, I have used an ID of a div on which I will call my plugin.
- In the PluginTest.html file, I will initiate
readyevent ondocumentunder thescripttag:
- Now call the plugin under the
readyevent:
- Now execute the code by pressing F5:

Ok ... We have completed the first step of writing jquery plugin. Again, this is only the beginning !!.. We need to pass some parameters to our plugin, isn’t it? Because plugin itself refers that it is a REUSABLE code. In that sense, there can be different values we may need to pass with respect to different scenarios on similar functionality. Let’s begin with how to pass parameters.
Let me pass two parameters. First name: Pradeepa, last name: Achar. Now both the code would look as shown below:

And the output would be:

As a best practice, we need to return the node after the execution of jquery plugin:

NOTE
It's important to use each loop because our typical jQuery object will contain references to any number of DOM elements. If you want to manipulate specific element, then you must need each loop. So your code must always contain the following code:

Inside the loop, I have created a variable and storing current jquery object($(this)). This object will have reference to the element from which we have called this plugin. In our case, the div element’s id mainPanel. Check the Plugintest.html file for the reference. That element can have class, any attributes. It can be accessed through this object.
Now let us move on with some advanced concepts. Since plugin is a reusable code, it accepts parameter values. If we use this plugin in different pages, then the parameter values may vary from page to page depending on the requirement. As a good programmer, you need to assign some default value and override those default values with new values through parameters in different pages in which this plugin is going to be used. This is cool... isn’t it?
Let our code look like shown below:
- Let us create default variables and assign default values:

- There can be many parameters. In that case, if we pass multiple parameters to function, it is not a good idea. Rather, let’s keep all of the parameters in an object. So code will be changed as shown below:

In the above code snippet, observe that I am passing an object options and rather than declaring variables separately, I have kept them under an object defaults.
Defaults object’s variables have default value, empty string. You can even declare numeric, boolean as per your requirements. Now we need to assign new values from the page where we are going to use this plugin. This assignment is achieved through the following syntax:

In the above code snippet, you can see var opts=$.extend(defaults,options); Here, it will assign new values from options object to defaults objects. The new values will be in the object opts.
Now we need to learn how to pass values to the plugin and how to make use in the plugin.
- If there are more than one parameters, then it has to be passed as object or individual parameter as follows. In our example, we are passing parameter values from testPlugin.html page:

In the above code snippet, we are passing values within flower brackets and as key-value pair. The key is the variable name declared in the
defaultsobject in the plugin. Each key-value pair is separated by comma. Observe the code snippet again.Thekeyvariable’s name in the parameter should be the exact name of the variable declared in the plugin as shown below:
Okay. We are all set to complete the basics of writing jquery plugin. Remember one thing, you are going to write methods in the return this.each loop. Suppose you have to create an HTML layout and perform some other actions, then your code should be like this as shown below:

In the above code snippet, I am calling method createHTML by passing the reference element whose id is mainpanel which is created in the testPlugin.html page.
You can define some more methods in the plugin and call them whenever it is required .

Ok. We are all set to write custom jquery plugin now. Happy coding and teaching!