
Singleton Design Pattern in C#: Part 1
3.33/5 (11 votes)
This article covers Singleton Pattern in the most simplistic and easy to understand. The article will also talk about Static classes and the differences between singleton design pattern and static classes.
- Download 1.BasicSingleton.zip - 128.8 KB
- Download PDFArticle1.zip - 757.4 KB
- Download 2.ThreadSafeSingletonWithDoubleCheckLocking.zip - 129.1 KB
Contents
- Introduction
- The Pattern Itself
- Advantages of Singleton
- Guidelines
- Basic Singleton Implementation
- Thread-Safe Singleton Implementation
- Conclusion
Introduction
I always wanted to write about Singleton design pattern in C#. Though there already are many posts available on Singleton design pattern, I'll try to cover this topic in the most simplistic way and easy to understand. The article will also talk about Static classes and the differences between singleton design pattern and static classes. This is two article tutorial series to learn Singleton. Following is the link to next article.
Singleton Design Pattern - Part 2
The Pattern Itself
The Singleton design pattern is a creational type of design pattern. We have distinct categories of design patterns, out of which creational is the one which deals with instance creation and initialization. This pattern helps a programmer to write a program with more flexibility of creating objects subjective to various cases, the example of which are Singleton, Factory, Abstract factory etc. Covering design pattern types are out of the scope of this article, so let's focus on Singleton design pattern. A Singleton design pattern says or enables a developer to write code where only one instance of a class is created and the threads or other processes should refer to that single instance of the class. We at certain point in time might be in a situation where we need to write code where we only need one instance of a class and if some other class tries to create an object of that class, then the already instantiated object is shared to that class. One very common and suitable example is a log writer class. We might have a situation where we must maintain a single file for writing logs for requests coming to our .NET application from various clients like mobile client, web client or any windows application client. In this case there should be a class which takes this responsibility of writing the logs in a single file. Since requests come from multiple clients simultaneously, there should be a mechanism where only one request is logged at a time. Also, other requests should not be missed, and instead should be diligently logged, so that those requests when logged, do not override or conflict with the already logged requests. To achieve this, we can make a class singleton by following singleton pattern guidelines where a single thread-safe object is shared between all the requests which we'll discuss in detail in this article with practical examples.
Advantages of Singleton
Let's highlight the advantages of singleton class or pattern first before we jump into actual implementation. The first advantage that we can make out from the request logging example is that singleton takes care of concurrent access to shared resource, which means if we are sharing a resource with multiple clients simultaneously, then it should be well taken care of. In our case, our log file is the shared resource and singleton makes sure every client accesses it with no deadlock or conflict. The second advantage is that it only allows one instance of a class responsible for sharing the resource, which is shared across all the clients or applications in a controlled state.
Guidelines
Every pattern is based on certain guidelines which should be followed while implementing the pattern. These guidelines help us build a robust pattern and each guideline has its significance in the pattern that we'll discuss while creating singleton class. Stick to the following guidelines whenever you need to implement singleton design pattern in C#.
- Check that the implementation when done, creates only one instance of the class, and there should be only one point from where an instance is to be created.
- The singleton's class constructors should be private so that no class can directly instantiate the singleton class.
- There should be a static property/method that takes care of singleton class instantiation and that property should be shared across applications and is solely responsible for returning a singleton instance.
- The C# singleton class should be sealed so that it could not be inherited by any other class. This is useful when we dealing with nested class structure. We'll discuss this scenario as well later when we implement singleton.
Basic Singleton Implementation
A lot of theory covered, now let's practically implement the singleton pattern. We'll cover this step by step.
- Open Visual Studio and create a console application named Singleton (you can choose whatever name you like)

- Add a class named
Singletonand add the following code to log a request message to it. For now, we are not actually logging into file, but displaying the message at console.
Singleton.cs
using static System.Console;

namespace Singleton
{
  class Singleton
  {
    public void LogMessage(string message)
    {
      WriteLine("Message " + message);
    }
  }
}
Let's also add a public constructor in the class with a variable to hold the counter of number of objects created of this singleton class. We increment the instanceCounter variable whenever an instance of the Singleton class is created, so the best place to increment and print it is constructor.
using static System.Console;

namespace Singleton
{
  class Singleton
  {
    static int instanceCounter = 0;
    public Singleton()
    {
      instanceCounter++;
      WriteLine("Instances created " + instanceCounter);
    }
    public void LogMessage(string message)
    {
      WriteLine("Message " + message);
    }
  }
}
Note that we are not using any singleton guideline here and first we'll try to invoke this method from our main method (for example, in Program.cs class). So, go to Program.cs class and write the following code for calling that LogMessage method of singleton class by creating an object of that class. We assume that two clients or two classes (Manager class and Employee class) are creating the objects of Singleton class to log their request message. Let's name those instances as "fromManager" and "fromEmployee".
Program.cs
using static System.Console;
namespace Singleton
{
  class Program
  {
    static void Main(string[] args)
    {
      Singleton fromManager = new Singleton();
      fromManager.LogMessage("Request Message from Manager");

      Singleton fromEmployee = new Singleton();
      fromEmployee.LogMessage("Request Message from Employee");

      ReadLine();
    }
  }
}
When we run the application, we see the following output:

We see here that we created two instances of our class named Singleton and got the method invoked by both the objects separately. When the first time fromManager instance was created the counter was incremented by 1 and the second time at the time of fromEmployee instance creation, it is incremented again by 1 so 2 in total. Note that we have not yet implemented singleton guidelines and our aim is to restrict this multiple object creation.
- If we again refer the guidelines, it says that all the constructors of the singleton class should be private and there should be a property or method which takes responsibility of providing the instance of that singleton class. So, let's try that. Convert the public constructor in the
Singletonclass a private as the following:private Singleton() { instanceCounter++; WriteLine("Instances created " + instanceCounter ); }But when you go back to the Program.cs class where we were making the instance we see the error as follows which is a compile time error and appears as well when we compile the program at this point of time.

It says that the constructor could not be accessed and that's because we have made it private. So let's delegate those responsibilities of serving objects to a static property in the Singleton class. Add a new property in the Singleton class which makes use of a backing field to return the object.

The following is the code:
using static System.Console;
namespace Singleton
{
class Singleton
{
static int instanceCounter = 0;
private static Singleton singleInstance = null;
    private Singleton()
    {
      instanceCounter++;
      WriteLine("Instances created " + instanceCounter );
    }
public static Singleton SingleInstance
{
get
{
if (singleInstance == null)
{
singleInstance = new Singleton();
}
return singleInstance;
}
}
public void LogMessage(string message)
{
WriteLine("Message " + message);
}
}
}
If we go through the above code, we simply created a backing field named singleInstance and a public static property named SingleInstance. Whenever this property would be accessed, it will instantiate the backing field with a new Singleton instance and return it to the client, but not every time, and to ensure that we check that if the singleInstance is null then only it return the new instance and not every time the property is accessed. For all other times, it should return the same instance as was initially created. Since the constructor of this class is now private, it could only be accessed from within the class members and not from outside the class. Now go to the program.cs class and access this property for getting the instance as we now cannot directly create a Singleton instance due to private constructor.

The following is the code:
using static System.Console;
namespace Singleton
{
  class Program
  {
    static void Main(string[] args)
    {
      Singleton fromManager = Singleton.SingleInstance;
      fromManager.LogMessage("Request Message from Manager");

      Singleton fromEmployee = Singleton.SingleInstance;
      fromEmployee.LogMessage("Request Message from Employee");

      ReadLine();
    }
  }
}
Now when we run the application we get following output.

It clearly states that only one instance of the Singleton class was created, but our methods were called distinctly for both the callers. This is because at the first time the instance was created, but the second time when the property was accessed by fromEmployee the already created object was returned.
So, no doubt that we have implemented the single design pattern, and changed the object creation strategy of this Singleton class, but this is a very basic implementation of Singleton design pattern and it still do not take care of deadlock situations and accessing class in multithreaded environment. Let's see how we can make this class thread safe as well. Make the singleton class sealed before we proceed. We'll discuss why we made the class sealed later.
Thread-Safe Singleton Implementation
Problem
Our basic level implementation only would work in a single threaded system because our instance creation is lazily initialized which means we only create the instance when the SingleInstance property is invoked. Suppose there is a situation where two threads try to access the property at a same time, in that case it could be a situation that both the threads hit the null check at the same time and get access to new instance creation because they find the instance variable still null. Let's test this scenario in our current Singleton implementation.
Go to the Program.cs class and create two methods named LogEmployeeRequest and LogManagersRequest and move the logging code for both the instances to these methods as shown below.

Now, let's try to invoke these methods parallelly using Parallel.Invoke method as shown below. This method can invoke multiple methods parallelly and so we would get into a situation where both methods claim Singleton instance at a same time. Parallel is the class under System.Threading.Tasks namespace.
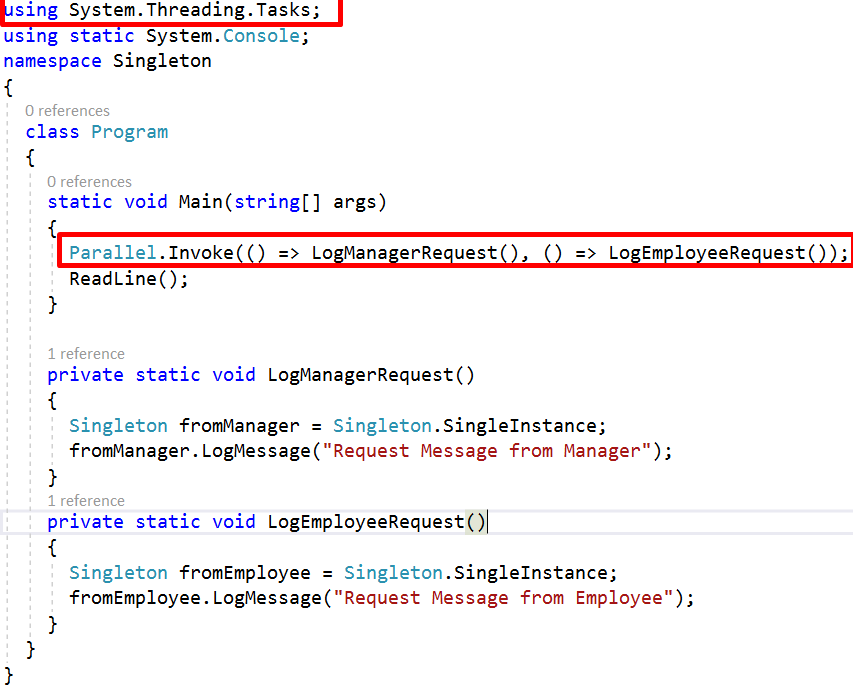
The following is the code:
using System.Threading.Tasks;
using static System.Console;
namespace Singleton
{
  class Program
  {
    static void Main(string[] args)
    {
      Parallel.Invoke(() => LogManagerRequest(), () => LogEmployeeRequest());
      ReadLine();
    }

    private static void LogManagerRequest()
    {
      Singleton fromManager = Singleton.SingleInstance;
      fromManager.LogMessage("Request Message from Manager");
    }
    private static void LogEmployeeRequest()
    {
      Singleton fromEmployee = Singleton.SingleInstance;
      fromEmployee.LogMessage("Request Message from Employee");
    }
  }
}
Now when we run the application we get the following output:

The above output clearly states that we ended up creating two instances of Singleton class as our constructor was called twice. That's because both the methods executed at the same time. Now to overcome this situation we can further enhance our Singleton class.
Solution
One of the way to overcome this situation is to use locks. We can use lock over an object if any thread tries to access the instance and in that case, the other thread waits until the lock is released. Let's implement this. Update your Singleton class in the following manner.

The following is the code:
using static System.Console;

namespace Singleton
{
  sealed class Singleton
  {
    static int instanceCounter = 0;
    private static Singleton singleInstance = null;
    private static readonly object lockObject = new object();
    private Singleton()
    {
      instanceCounter++;
      WriteLine("Instances created " + instanceCounter );
    }

    public static Singleton SingleInstance
    {
      get
      {
        lock (lockObject)
        {
          if (singleInstance == null)
          {
            singleInstance = new Singleton();
          }

        }
        return singleInstance;
      }
    }
    public void LogMessage(string message)
    {
      WriteLine("Message " + message);
    }
  }
}
In the above-mentioned source code we created a private static readonly object type variable and initialized it. Then in the SingleInstance property we wrapped the code of instance creation under the lock, so that one thread can enter the code at a time and other thread waits until first thread finishes its execution. Now let's run the application and check the output. Compile and Run.

So, now only one instance of Singleton class is created, that means our lock works fine. We still have a problem with the current implementation. The problem is that our lock object code will be called everytime the property of SingleInstance is accessed which may incur a huge performance cost on application as locks are quite expensive when we want good performance in our application. So, we can restrict this every time lock code access by wrapping is under the condition that it could only be accessed if singleInstance backing field is null. Therefore, our code for property be like as shown below:
public static Singleton SingleInstance
    {
      get
      {
        if (singleInstance == null)
        {
          lock (lockObject)
          {
            if (singleInstance == null)
            {
              singleInstance = new Singleton();
            }

          }
        }
        return singleInstance;
      }
    }
Now when we run the application, the lock code would not be executed every time but only for the first time when it is accessed because at the second time it will not find the singleInstance field as null. Complete class code is as following.
using static System.Console;

namespace Singleton
{
  sealed class Singleton
  {
    static int instanceCounter = 0;
    private static Singleton singleInstance = null;
    private static readonly object lockObject = new object();
    private Singleton()
    {
      instanceCounter++;
      WriteLine("Instances created " + instanceCounter );
    }

    public static Singleton SingleInstance
    {
      get
      {
        if (singleInstance == null)
        {
          lock (lockObject)
          {
            if (singleInstance == null)
            {
              singleInstance = new Singleton();
            }

          }
        }
        return singleInstance;
      }
    }
    public void LogMessage(string message)
    {
      WriteLine("Message " + message);
    }
  }
}
We call this null instance check locking as "double check locking", which is often asked in the interviews. In the next article we'll see ho to get rid of this double check locking and still keep our singleton functionality intact and thread safe.
Conclusion
In this article, we discussed what is Singleton design pattern, when is it needed and what problems does it solve. We also discussed how to create a basic singleton class step by step and how to enhance that class to be thread safe with the help of locking and performance effective with the help of double check locking. For the sake of not making the article too long, I have divided the learning Singleton topic in two parts. Please refer next part of this article where we discuss Lazy initialization, Eager initialization, creating singleton without double check lock and why to make singleton class a sealed class and what are the differences between singleton and static class. Next Article>>