
Day 5: Survival Shooter - Tutorial I
5.00/5 (3 votes)
Survival Shooter - tutorial I
Alright, we’re back at it again, with day 5 of working with Unity. We just finished the Unity Space Shooter tutorial from Day 2-4 and now today we’re going on to look at the next set of tutorials: the Survival Shooter tutorial!
Building up on what we already learned in our toolkit, we’re going to learn more about:
- Setting up the environments
- Using Unity’s built in AI system
Install
Just like the previous tutorial, download the resource assets through the Unity Store or through the Learn tab when you create a new project.
Once we have the package, just like what we did before, create a new project and import the Survival Shooter project so we can have our initial setup.
Environment Setup
The first thing to do is create a scene by hitting Ctrl + S.
I called my scene main, but it could be anything you want.
After that, go to the prefab folder and drag the environment prefab object to the game hierarchy and you’ll see something like this:

If you actually expand the Environment prefab, you’ll see that it’s just a container game object that contains multiple child game objects like walls, chairs, and other game objects.
The next step is to create a floor for our player to walk on, similar to the previous tutorial, we create a Quad and set the floor like so:

My settings for it are:
Position:0, 0, 0Rotation:90, 0, 0Scale:70, 70, 1
Disable the Mesh Renderer
The last part is to go to the Mesh Renderer component of quad and disable it.
We just need the floor to be there for its collider to detect when our mouse is clicking down later on. We don’t need to render the floor.
Set the Layout to Floor
Another important thing to do is to go to the inspector for our Quad and under Layout, select Floor.
We can see this used later on, but its main purpose is for us to be able to optimize our code searching when for the floor later on.
Add Background Music
The last thing we did in this video is create an empty Music GameObject and attach an AudioSource component to it and set Background Music as our AudioClip.
Normally, we would set our music to Play On Awake and Loop, but that would be annoying in the beginning, we just disabled it for now.
Player Character
Great! So now, we have our environment setup, the next thing we did was create the Player object. The tutorial has all of the models located inside the Model folder. Drag the Player model to the hierarchy.
You’ll see something like this:

Cool! We have a character. Make sure to set the Tag for our character to be Player.
Next up, we create something called an Animator Controller for our character, by right clicking on the project pane creating an Animator Controller.
An Animation Controller is described as a finite state machine. A state can be something like walking or idle. When you’re in one state, you can only go into a different state if:
- There’s a transition in your current state that allows you to move to another state.
- You meet the criteria set in your transition.
We’ll understand more as we move on in the video.
But first, what are we going to animate?
Each character models provided by Unity has their own animations provided!
For example, if you click on the Character model for Player in the project pane and look in the inspector, you’ll see what animation clips are attached to the model:

As you can see, we have a Move, Idle, and Death animation.
Creating the Animator Controller
They first thing to do is to go to the Animation folder, right click, and create a new Animator Controller.
We call it PlayerAC. After we created it, we double clicked it to open it up.

This will open up the Animator pane for us to use.
We want to create a state for each of the animation clips we have for our character.
We can easily add that in by dragging the animation clip from the character model into the Animator. You’ll see something like this:

Creating Transitions
Now notice that we have an arrow from Entry to Idle. Entry indicates our starting state. If your Idle state isn’t orange, that means it’s not the default state that the animation will enter. Right click Idle and make it the default state and you should see something like the above.
Creating Parameters to Change Between States
Noticed the circle parameter in the above image?
In the Parameters tab, we can create conditions that must be made to transition from one state to the next. We created 2 parameters:
IsWalking, a Boolean, a Boolean is as you expect, either if something is true or false.
Die, a Trigger, a Trigger is similar to a Boolean, but the moment it becomes true, it’s immediately changed into false.
Creating the First Transition with our Parameters
Currently, when we start the game, our character would only be idle.
What other states can a player transition to from idle? Move! (Technically they can die too, but we’ll do something else with that.)
Click Idle and create a transition and select Move as the selection target.
Next, we click on the transition arrow that we created. Look in the inspector under the Conditions tab, select IsWalking and select true for it.
![]()
Next, do the same thing from Move and select Idle and set the Conditions IsWalking to be false, which means if we’re walking and decide to stop, we go back to playing the Idle animation.
Once you’re done, you’ll see something like this:

Using the Any State
Now what about when the player dies?
We could create a transition from both Idle and Move to death, but, because we can die at any state, we use the Any State state.
As you can imagine, Any State allows us to create a transition no matter what state we’re currently in.
Create a transition from Any State to Death and set the Die as the parameter.

Adding RigidBody to the Player Container
Next, we add a RigidBody component to our Player GameObject. We set the Drag and Angle to Infinity¸ I’m not really sure what this does, but according to the documentation, it’s like friction slowing players down.
We also want to set Constraints to freeze positions to prevent them from moving:
- Freeze Y position – prevent player from going up and down (like jumping)
- Freeze X and Z rotation – prevent player from rotating in a weird angle
After adding the RigidBody, we also add a Capsule Collider and an Audio Source with the Player Hurt as the Audio Clip.
Player Movement Script
The next thing to do is that we attach the provided PlayerMovement Script to our Player. The code has been well commented, so I won’t delve too much into what it does.
using UnityEngine;

public class PlayerMovement : MonoBehaviour
{
    public float speed = 6f;            // The speed that the player will move at.

    Vector3 movement;                   // The vector to store the direction of the player's movement.
    Animator anim;                      // Reference to the animator component.
    Rigidbody playerRigidbody;          // Reference to the player's rigidbody.
    int floorMask;                      // A layer mask so that a ray can be cast
                                        // just at gameobjects on the floor layer.
    float camRayLength = 100f;          // The length of the ray from the camera into the scene.

    void Awake ()
    {
        // Create a layer mask for the floor layer.
        floorMask = LayerMask.GetMask ("Floor");

        // Set up references.
        anim = GetComponent <Animator> ();
        playerRigidbody = GetComponent <Rigidbody> ();
    }

    void FixedUpdate ()
    {
        // Store the input axes.
        float h = Input.GetAxisRaw ("Horizontal");
        float v = Input.GetAxisRaw ("Vertical");

        // Move the player around the scene.
        Move (h, v);

        // Turn the player to face the mouse cursor.
        Turning ();

        // Animate the player.
        Animating (h, v);
    }

    void Move (float h, float v)
    {
        // Set the movement vector based on the axis input.
        movement.Set (h, 0f, v);

        // Normalise the movement vector and make it proportional to the speed per second.
        movement = movement.normalized * speed * Time.deltaTime;

        // Move the player to it's current position plus the movement.
        playerRigidbody.MovePosition (transform.position + movement);
    }

    void Turning ()
    {
        // Create a ray from the mouse cursor on screen in the direction of the camera.
        Ray camRay = Camera.main.ScreenPointToRay (Input.mousePosition);

        // Create a RaycastHit variable to store information about what was hit by the ray.
        RaycastHit floorHit;

        // Perform the raycast and if it hits something on the floor layer...
        if(Physics.Raycast (camRay, out floorHit, camRayLength, floorMask))
        {
            // Create a vector from the player to the point on the floor the raycast from the mouse hit.
            Vector3 playerToMouse = floorHit.point - transform.position;

            // Ensure the vector is entirely along the floor plane.
            playerToMouse.y = 0f;

            // Create a quaternion (rotation) based on looking down the vector
            // from the player to the mouse.
            Quaternion newRotation = Quaternion.LookRotation (playerToMouse);

            // Set the player's rotation to this new rotation.
            playerRigidbody.MoveRotation (newRotation);
        }
    }

    void Animating (float h, float v)
    {
        // Create a boolean that is true if either of the input axes is non-zero.
        bool walking = h != 0f || v != 0f;

        // Tell the animator whether or not the player is walking.
        anim.SetBool ("IsWalking", walking);
    }
}
However some key points, I want to point out that I learned from the video was this:
Awake()
Similar to Start(), Awake() is called before the game starts, specifically, you can use it to initialize variables that the GameObject that the script attached to has, but not with other game objects.
Raycast
Part of Unity’s built in Physics system, a Raycast is a straight line that shoots forward and if you hit the target that you specified for it, the function call will return true.
You have to give the Raycast a RaycastHit reference to store the information of the object that was hit. You can think of this as another way of having a collider. In this case, we use our mouse.
So let’s break down our parameters:
Physics.Raycast (camRay, out floorHit, camRayLength, floorMask)
camRay: As described by the comments: “Create a ray from the mouse cursor on screen in the direction of the camera.”floorHit: A variable that stores the information of the object that we hit. Think of theother GameObjectwhen we have a collision with a collider.camRayLength: How far the raycast will go from the starting location. In this case: from the camera to the location that the player’s mouse is pointing to in the game.floorMask: Anintrepresentation of the layer that we only want to look for collisions. We use these floormasks to help us collide with only the object we want, helping us save precious processing power.
Normalized Movement
In part of the movement code, we normalized our value:
movement = movement.normalized * speed * Time.deltaTime;
According to the video, if we go horizontal or vertical, we’ll move 1 unit, however, if we were to move diagonally, we would move 1.4 unit or more, allowing the players to exploit the game. Normalizing prevents the diagonal 1.4 unit movement.
Quarternion
We learned this before, but Quarternion is the specific way that Unity works with Rotation. If you want to do anything with Rotation, we’ll need the Quarternion class.
Sidenotes
After this point, I found that I could move my character, but it wouldn’t rotate to my mouse. If this is happening to you, it’s probably, because you forgot to set your floor to have the layout Floor.

Camera Setup
Great, so now we have our player and we can move him around…. Except in our current game state, the game looks pretty 2Dish. Now the tutorial touches on this topic.
Setting Up the Camera
Go to our camera GameObject and make these changes:
- Set camera position to:
1, 15, -22 - Rotation to:
30, 0, 0 - Projection:
OrthagaonicfromPerspectivePerspectivehas depth,orthagonicdoesn’t
- Size:
4.5 - Background to
black
You should have something like this, but feel free to play around with the settings.

Adding the Camera Script
Now that we setup our camera, the next thing to do is to add the provided Camera Script from the script folder:
using UnityEngine;
using System.Collections;

public class CameraFollow : MonoBehaviour
{
    public Transform target;            // The position that the camera will be following.
    public float smoothing = 5f;        // The speed with which the camera will be following.

    Vector3 offset;                     // The initial offset from the target.

    void Start ()
    {
        // Calculate the initial offset.
        offset = transform.position - target.position;
    }

    void FixedUpdate ()
    {
        // Create a position the camera is aiming for based on the offset from the target.
        Vector3 targetCamPos = target.position + offset;

        // Smoothly interpolate between the camera's current position and it's target position.
        transform.position = Vector3.Lerp (transform.position, targetCamPos, smoothing * Time.deltaTime);
    }
}
Looking at the code, everything has already been provided to us nicely commented so I’ll leave this part as is.
Creating Enemy #1
Now that we have a character that we can control on the map, the next thing we have to add is the enemy that appears on the screen.
The first thing to do is drag the Zombunny character model into the scene.
The enemy also has their own animation clip.
Some things from the video that we need to do to our model…
Attach the particle effect prefab to our zombie that plays when it gets hit.

Set the Zombunny hurt sound to our model make sure it doesn’t Play On Awake.
Create a capsule collider for our enemy:
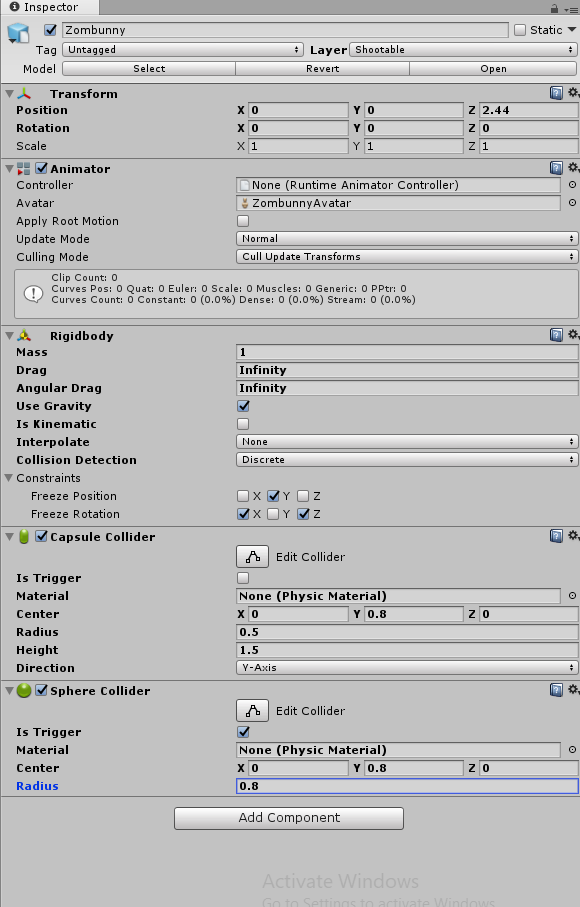
Set the Layer for our Zombie to be Shootable, if it doesn’t exist, create one.

Finally, attach a new Nav Mesh Agent to our GameObject.

A Nav Mash Agent is an AI that Unity provides for us that will allow our zombie to intelligently chase the player while avoiding obstacles.
Make sure that your setting is the same as above, specifically the radius and height.
Creating a Nav Mesh
What makes the AI efficient is that it doesn’t have to do the calculations to figure out what it can and can’t walk on.
We do this by creating a Nav Mesh that tells the AI if the object they’re on is something they can step on.
Reference the image below for an idea of what I’m talking about. The blue is the space that the enemies can navigate:

You can create the Nav Mesh by going to Unity > Window > Navigation.
In the Navigation pane next to your Inspector, select Bake.
There are 4 values that you need to know:
Radius– How close the AIs can move to a wallHeight– How high the AIs can something be before the player can’t pass itStep height– How tall the AIs go before the environment blocks the AIMax slope– How high of a slope an object can be before it becomes inaccessible to the player
Here’s the value of what you should have:

After you’re done, press Bake to create your Nav Mesh.
What’s important to mention is that if you want to include game objects to be baked, you have to make sure that they’re set to be static inside the inspector.
An easy way of doing this is to put everything in a parent container and make the parent static. This will make all the children static too.
Creating the Enemy AC
Now that we have an AI, we don’t have to write any complex AI scripts to figure out how to navigate.
We can just use the Nav Mesh Agent component. However, before we do that, we have to create the animation for our enemy.
Similar to our Player model, we have to create an Animator Controller for our Zombunny.
First we go to the animation folder, right click, and make a new Animator Controller, call it EnemyAC.
Open EnemyAC and then drag and drop the animation clips from the Zombunny model into the controller.
We need to make 2 triggers:
PlayerDeadDead
We have 3 animation clips:
MoveIdleDeath
Move is our main transition state.
The only time we want our zombie to be idle is when they win and our player is dead, so create a transaction from Move to Idle that’s caused by the PlayerDead trigger.
Similar to when the player dies, if the enemy dies, it doesn’t matter which state, we play the death animation. We create a transaction from Any State to Death that’s caused by the Dead trigger.
When we’re done, we should have something like this:

Enemy Movement Script
Nav Mesh Agent made? Check. Animation Created? Check. Let’s use everything!
In the Script folder, we’ll find an already made EnemyMovement script. Attach it to the Enemy.
using UnityEngine;
using System.Collections;

public class EnemyMovement : MonoBehaviour
{
Transform player;
//PlayerHealth playerHealth;
//EnemyHealth enemyHealth;
UnityEngine.AI.NavMeshAgent nav;

void Awake ()
{
player = GameObject.FindGameObjectWithTag ("Player").transform;
//playerHealth = player.GetComponent ();
//enemyHealth = GetComponent ();
nav = GetComponent ();
}

void Update ()
{
//if(enemyHealth.currentHealth > 0 && playerHealth.currentHealth > 0)
//{
nav.SetDestination (player.position);
//}
//else
//{
// nav.enabled = false;
//}
}
}
Note: At this point, it’s important to note that we don’t use everything in the code right now. Either copy the code from the video or manually comment out the lines.
The code itself is pretty straightforward. We instantiate our Player and Nav Agent Components and then make our Nav agent go to our player’s location in Update().
nav.SetDestination (player.position);
After we’re done with that, if we go back to the game and play, the enemy will start chasing us.

Conclusion
We made a lot of progress today, we setup the environment, added the player and enemy in, and then created a Nav Mesh Agent to help our enemy chase our player around.
I’ll try to finish the rest of the tutorial and finally move on to creating a simple game feature to display some level of mastery next!
Until then, I’ll see you all on Day 6!
Day 4 | 100 Days of VR | Day 6
The post Day 5: Survival Shooter Tutorial I appeared first on Coding Chronicles.