
.NET4.6AngularJsVisual Studio 2013HTML5Design / GraphicsArchitectBeginnerHTMLIntermediateDevJavascript.NETASP.NETC#
Angular2 in ASP.NET MVC & Web API - Part 2
4.94/5 (27 votes)
In this part, we will enhance our user management application to have search/filter, global error handling and debugging functionalities.
Articles in the Series
- Part 1: Angular2 Setup in Visual Studio 2017, Basic CRUD application, third party modal pop up control
- Part 2: Filter/Search using Angular2 pipe, Global Error handling, Debugging Client side
- Part 3: Angular 2 to Angular 4 with Angular Material Components
- Part 4: Angular 4 Data Grid with Export to Excel, Sorting and Filtering
Introduction
In ASP.NET MVC & Web API - Part 1, we learned basic Angular2 setup in ASP.NET MVC. In this part, we will learn:
- How we can implement search/filter functionality in
UserComponentto search user byFirstName,LastNameorGenderusing Angular2pipe? - How to implement global error handling by extending
ErrorHandlerclass? - How to debug the client code using Firefox debugger?
Let's Start
- First, go through the ASP.NET MVC & Web API - Part 1 and download the attached Angular2MVC_Finish.zip file. Extract it to your desired location in your computer and double click on Angular2MVC.sln to open the solution in Visual Studio (2015 with Update 3 or 2017).

- Since
Angular2MVCsolution doesn’t have the requiredNuGetandnode_modulespackages, go to Build menu and select Rebuild Solution. Visual Studio will download all the .NET packages listed in packages.config and client packages mentioned in package.json.
- You would find packages folder containing all required .NET packages and node_modules folder containing all client packages:


- Compile and run the application, you shouldn’t receive any error.
- Since all project dependiences are downloaded now, let's start implementing the Search/ filter the data functionality according to the user input, the final output page after filter implementation would be as follows:


- From screenshots, you might have gotten an idea how this search/filter functionality would work, as soon as user would start entering the text in Search textbox, the data would start being filtered on runtime in list after matching the user entered text with First Name, last Name and Gender fields. This is very handy and fast due to the client side filtering. I like this feature because it avoids ugly textbox with search button next to it and server side complex filtering query.
- So, in the next steps, we will learn how to achieve this functionality. We will user Angular2
pipeto filter the data but before jumping into the code, let’s learn what is thepipeand how to use it. - Though Angular2 docs have very easy and comprehensive explanation about
pipeshere, for my kind of lazy people, let me summarize it for you.pipetransforms the data into the meaningful representation, for example, you are getting the date12/03/2016from database and want to transform it toDec 03, 2016, You could do it throughpipe. Other built-inPipesareUppercase,lowercase,json, etc. that are self-explanatory by their names. Why it is calledpipe, because I think we use|sign to apply them to the variable or value. E.g.{{Value | uppercase}}. You can apply as manypipesas you want to the certain value delimiting by|sign, e.g.,{{ birthdate | date | uppercase }}. You can also specify the parameter to thepipeby: (colon)e.g. the date filter can take format parameter,{{birthdate | date : ‘MM/dd/yyyy’}}. - Now that we got the basic idea of
pipe, let’s implement the user search functionality throughpipe. Just like built inpipesavailable in Angular2, we can also implement our own custompipes, all we need is to implement thePipeTransforminterface and develop custom logic intransformmethod that takes two parameters,data(to be filtered from) andoptional arguments, e.g., user inputstringto be searched in the data. To read more about custompipes, click here. - Let’s create the
userfilter pipe, right click on theappfolder and selectAdd -> New Folder, name the folder asfilter(orpipe, whatever you prefer):
- Right click on newly created filter folder and select Add -> TypeScript File:

- Enter the name user.pipe.ts in Item name textbox and click on OK button:

- Paste the following code in newly added user.pipe.ts file:
import { PipeTransform, Pipe } from '@angular/core'; import { IUser } from '../Model/user'; @Pipe({ name: 'userFilter' }) export class UserFilterPipe implements PipeTransform { transform(value: IUser[], filter: string): IUser[] { filter = filter ? filter.toLocaleLowerCase() : null; return filter ? value.filter((app: IUser) => app.FirstName != null && app.FirstName.toLocaleLowerCase().indexOf(filter) != -1 || app.LastName != null && app.LastName.toLocaleLowerCase().indexOf(filter) != -1 || app.Gender != null && app.Gender.toLocaleLowerCase().indexOf(filter) != -1 ) : value; } } - Let’s understand what we just added in user.pipe.ts:
- In the first line, we are importing the
PipeTransformandPipeinterfaces that we are implementing to achieve filtering functionality. - In the second line, we are importing the
IUserinterface that we created in the first part to hold the list of users. Over here, we are also using it to hold the list of users that is the source data for filtering. - In the next line, we are specifying the pipe
selector/nameuserFilterthrough which we will use the pipe (you will find in future steps, how). - Next, we are creating the
UserFilterPipeclass that is implementing thePipeTransforminterface (implementing interface means providing the body to all methods mentioned in the interface). - Right click on
PipeTransformand select the option Go To Definition:
- You will be landed to the pipe_transform_d.ts file where you will find the nice brief description how to use the pipe with an example and
transformmethod that we must need to implement:
- So let’s go back to user.pipe.ts where can see we have
transformmethod with first argument asIUserarray and second is named asfilterthat is the inputstringto be searched in theIUserarray. - In
transformmethod, the first line is only to check if the filter is notnull. - The next statement is the actual implementation of search, if you are a C# developer, you can compare it to the
LINQ to Object. We are calling Array’sfiltermethod, checking through conditional operator that if any ofIUsermember (FirstName,LastNameorGender) is matching with user input searchstringand if YES, returning the filtered result.toLocaleLowerCasemethod is convertingstringto lower case, to read more about it, click here. If there is no matching record in User list, we are returning all rows.
- In the first line, we are importing the
- Now that we have our filter ready, let’s add it to the
AppModuleto use it in our application, double click on app.module.ts file in app folder to edit it:
- Update the
AppModuleaccording to the following screenshot:
- We added the
UserFilterPipereference byimportstatement and in the declaration section. Just for revision, components indeclarationsections know each other, that means, we can useUserFilterPipeinUserComponent(or in any other component) without adding the reference inUserComponentitself. We can declarecomponents,pipes, etc. indeclarationsection. - So, our user filter/search functionality is ready, the next step is to use it in
UserComponentbut instead of directly using it inUserComponent, let’s create the sharedSearchComponentthat all components can share, this will help us to understand the:- Interaction between
parent(UserComponent) andchild(SearchComponent) components. - How to send the input parameters through
@Inputand get the value back through@Outputaliases.
- Interaction between
- Right click on Shared folder in main app folder and select Add -> TypeScript File:

- Enter the Item name as search.component.ts and click on OK button:

- Copy the following code in search.component.ts file and let’s understand it step by step:
import { Component, Input, Output, EventEmitter } from '@angular/core'; @Component({ selector: 'search-list', template: `<div class="form-inline"> <div class="form-group"> <label><h3>{{title}}</h3></label> </div> <div class="form-group"> <div class="col-lg-12"> <input class="input-lg" placeholder="Enter any text to filter" (paste)="getPasteData($event)" (keyup)="getEachChar($event.target.value)" type="text" [(ngModel)]="listFilter" /> <img src="../../images/cross.png" class="cross-btn" (click)="clearFilter()" *ngIf="listFilter"/> </div> </div> <div class="form-group"> <div *ngIf='listFilter'> <div class="h3 text-muted">Filter by: {{listFilter}}</div> </div> </div> </div> ` }) export class SearchComponent { listFilter: string; @Input() title: string; @Output() change: EventEmitter<string> = new EventEmitter<string>(); getEachChar(value: any) { this.change.emit(value); } clearFilter() { this.listFilter = null; this.change.emit(null); } getPasteData(value: any) { let pastedVal = value.clipboardData.getData('text/plain'); this.change.emit(pastedVal); value.preventDefault(); } }- In the first line, we are importing
Input,Outputinterfaces andEventEmitterclass.InputandOutputinterfaces are self-explanatory, to take the input parameter fromUserComponent(in our case, the search string from user),Outputis to send the value back fromSearchComponentbut it is little interesting, the output is sent back through event usingEventEmitterclass. This will get more clear in the further steps. - In the next line, we are providing the
Componentmetadata, i.e.,selector(tag name through which we will useSearchComponentinUserComponent, e.g.,<search-list></search-list>).templateis the HTML part of component. You can also put it in a separate HTML file and specify thetemplateUrlproperty instead but since this is quite slim, I would prefer to have it in the same file. - In
SearchComponentclass, we are declaring one local variablelistFilterthat is searchstringwe will use to display here<div class="h3 text-muted">Filter by: {{listFilter}}</div>. That is only for cosmetic purposes to show what we are searching. - The second variable
titleis with@Inputdecorator, we will send searchtextboxtitle fromUserComponent. The third variablechangeis with@Outputdecorator and ofEventEmittertype. This is how we send data back to parent component.change EventEmitter<string>means change is an event that parent component needs to subscribe and will getstringargument type. We will explicitly callemitfunction (i.e.,change.emit(“test”)) to send the value back to the parent component. getEachChar(value: any): This function will be called for every character user will enter in search textbox. We are only callingthis.change.emit(value);that is sending that character to parent component where it is being sent to theUserFilterPipepipe to be filtered from User list. Just for revision, inUserPipeFilter, we are comparing that character withFirstName,LastNameandGenderand returning only those records where this character(s) exist. So as long the user would be entering characters in Search textbox, data would be filtering on runtime.clearFilter(): Will clear the filter to reset the User list to default without any filtering.getPasteData(value: any): This is a slightly interesting function that will take care if user would copy search string from somewhere and paste it in search textbox to filter the Users list. Throughvalue.clipboardData.getData('text/plain'), we are getting the pasted data and sending it throughchange.emit(value)function to parent component.- Now, we have some idea about these functions, if you jump back to
SearchComponent template(HTML). We are callinggetEachCharonkeyupevent that will trigger every time user would type in Search textbox,getPasteDatais being called onpasteevent that will occur when user would paste value in Search textbox,clearFilterfunction would be called on clicking the cross image that would only be visible if search textbox would have at least one character.
- In the first line, we are importing
- So we are done creating the
SearchComponentand hopefully you got an idea how it would work, let’s add it inAppModuleso that we can use it, double click on app -> app.module.ts to edit it:
- Add the following
importstatement:import { SearchComponent } from './Shared/search.component'; - Add
SearchComponentin declarations section to use it in any component:declarations: [AppComponent, UserComponent, HomeComponent, UserFilterPipe, SearchComponent],

- So now our
SearchComponentis ready to be used, let’s use it in ourUserComponent. Double click on app -> Components -> user.component.html to edit it:
- We will add
SearchComponenton top of the User list, so append the followingdivon top of Add button:<div> <search-list [title]='searchTitle' (change)="criteriaChange($event)"></search-list> </div>
- Let’s understand it, it looks like normal HTML but with
search-listtags. If you remember, this is theselectorproperty forSearchComponentthat we defined in search.component.ts file. If you remember in Part 1, we learned aboutProperty Binding [ ], that is used to send data from parent component to child component. We are assinging value to child's componenttitlevariable throughsearchTitlevariable that we defined inUserComponent. Second is event binding( ), we createdchangeevent inSearchComponentand we are providing the functioncriteriaChangeinUserComponentthat will execute every time when change event will occur.$eventwill hold any value thatchangeevent will send, in our case, we are sending each character user will enter in search text box (refer togetEachCharfunction inSearchComponent). This is how we get value back from child component. - Since we specified
criteriaChangefunction in event binding ofsearch-list, let’s add it in ourUserComponent. Double click on app -> Components -> user.component.ts to edit it:
- Add the following function in user.component.ts:
criteriaChange(value: string): void { if (value != '[object Event]') this.listFilter = value; } - You can see that we are getting the input parameter value (user entered text in search textbox) from
changeevent and assigning it tolistFiltervariable that we will use for ourpipefilter. Let’s go ahead and declarelistFiltervariable. Add the following line with other variable declaration statements:listFilter: string;
- So far, we have created the
SearchComponentthat has onetextboxwith cross image button next to it to clear the search along read-only display of user search text. In parentUserComponent, we subscribed thechangeevent and getting each character of user input in search textbox and assigning it tolistFiltervariable where it is getting cumulative (e.g. user enters character 'a', it would be sent to filter where all records containing 'a' would be filtered, after 'a' if user would any other character like 'f', then both 'a' and 'f' would be sent as "af" to filter and all records with both "af" combination would be filtered and so on). You will get it once you would start using it or you can debug it that I am explaining in upcoming steps). So, the final step is how to filter the user list according to search text entered in search textbox? So, refresh your pipe knowledge from previous steps and update<tr *ngFor="let user of users">in app->Components -> user.component.html to<tr *ngFor="let user of users | userFilter:listFilter">. WhereuserFilteris the filter we created in earlier steps andlistFilteris the input parameter to filter. - Since we used
[(ngModel)]forlistFiltervariable for two-way data binding that is defined inFormsModule, let’s add it inAppModule, update the:import { ReactiveFormsModule } from '@angular/forms';to:
import { FormsModule, ReactiveFormsModule } from '@angular/forms'; in AppModule. - Add the
formsModulein imports section.
- Compile and run the project in any browser (Firefox or Chrome is recommended). Go to
UserManagementPage, right now there may be few records, you can go ahead and add 15, 20 more. Start typing theFirst Name,Last NameorGenderin Search textbox and you would see records getting filtered in runtime:
- That’s all with our filtering.
- Next, we will learn about Error Handling in Angular2, I will keep it simple and wouldn’t go in every error type but would let you know how you can have custom error for each error type. For quick reference about Angular2
ErrorHandlerclass, click here. - For custom error handler class, we can extend
ErrorHandlerclass that hasconstructorandhandleErrormethod witherrorparameter. error parameter has complete error information, e.g.,status,error code,error text, etc. depends on error type (HTTP, Application, etc.). that really helps to customize the error message.ErrorHandlerhandles any kind of error, e.g., undeclared variable/function, any data exception or HTTP error. BesidesErrorHandler, I will also explain how you can debug the code in Firefox browser (You can also debug it in Chrome or Internet Explorer). - We will comment out error handling code from
UserServiceandUserComponentso that we can capture all errors inErrorHandlerclass, then we examine the error using Firefoxdebugger. So, let’s start. - First of all, let’s create custom error handler class. Right click on app -> Shared folder and select Add -> TypeScript File:

- Enter the name errorhandler.ts and click on OK button:

- Paste the following code in the newly created file:
import { ErrorHandler } from '@angular/core'; export default class AppErrorHandler extends ErrorHandler { constructor() { // We rethrow exceptions, so operations like 'bootstrap' will result in an error // when an error happens. If we do not rethrow, bootstrap will always succeed. super(true); } handleError(error: any) { debugger; alert(error); super.handleError(error); } } - The code is quite self-explanatory with comments, i.e., why we are calling
super(true)in constructor.AppErrorHandleris our custom class that is extending Angular2ErrorHandlerclass and implementing thehandleErrorfunction. InhandleError, I put debugger to show you what error will come and how you can customize it. We are showing the error message by simple JavaScriptalertfunction. - First, let’s see the
HTTPerror. Assume we have authentication logic before loading all users from database and request is somehow not authenticated, we will sendnot authorized (401)error to Angular2 from ASP.NET Web API. Let’s get this error inAppErrorHandlerand examine it. - Next, add the
AppErrorHandlerinAppModuleto capture the all error. Add the followingimportstatement:import AppErrorHandler from './Shared/errorhandler';
- Update the provider section to have
ErrorHandler:providers: [{ provide: ErrorHandler, useClass: AppErrorHandler }, { provide: APP_BASE_HREF, useValue: '/' }, UserService] - We are telling our module to use our custom error handler for any kind of error. Don’t forget to add the
ErrorHandlerclass reference in@angular2/coreimportstatement:
- Let’s comment the Error handling in UserComponent.ts file in app -> Components folder. Double click to edit it. Go to
LoadUsersfunction and update it as follows:LoadUsers(): void { this.indLoading = true; this._userService.get(Global.BASE_USER_ENDPOINT) .subscribe(users => { this.users = users; this.indLoading = false; } //,error => this.msg = <any>error ); } - You can see that I commented out the error statement that was saving in
msgvariable to show at the bottom of screen. - Next, let’s comment the error handling in user.service.ts file, find it in
app ->Service folder and double click on it to edit. Update thegetmethod as follows, I commented thecatchstatement:get(url: string): Observable<any> { return this._http.get(url) .map((response: Response) => <any>response.json()); // .do(data => console.log("All: " + JSON.stringify(data))) // .catch(this.handleError); } - Now our client code is ready to capture HTTP exception, let’s add the
unauthorizedexception code inUserAPIController(Basically, we will add it inBaseAPIControllerand call it inUserAPIController). - Go to Controllers folder and double click on BaseAPIController.cs to edit it:

- Add the following
ErrorJsonfunction that is actually the copy ofToJsonmethod but just withUnauthorizedstatus code (I just created it for sample, you should create more professional error handling code for HTTP calls):protected HttpResponseMessage ErrorJson(dynamic obj) { var response = Request.CreateResponse(HttpStatusCode.Unauthorized); response.Content = new StringContent (JsonConvert.SerializeObject(obj), Encoding.UTF8, "application/json"); return response; } - Since I do not have any authentication logic so far, so in
UserAPIController, I am only updating theGet()method as follows, just replaced theToJsonfunction toErrorJson, now API will always throwUnauthorizedexception when we will try to load the users:public HttpResponseMessage Get() { return ErrorJson(UserDB.TblUsers.AsEnumerable()); } - Compile and run the project, go to User Management page. After few moments, you would see an ugly alert message like the following:

- Great, so our test environment is successfully created. We sent this error from
UserAPIGet()method to client where it is being captured in our customAppErrorHandler. - Let’s debug the error, in errorhandler.ts file, click on gray bar next to
debuggerto setup the break point: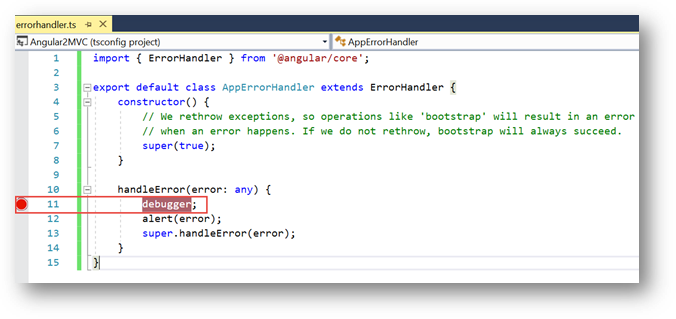
- Run the application in Firefox, press the Ctrl+Shift+S or click on open menu button => Developer => Debugger:

- You should end up with the following screen:

- Go to User Management page, after few moments, you would see the execution gets stopped at
debugger:
- Mouse hover on
errorand you would see all the parameters in error:
- Since this is an HTTP error, you can see the
HTTPStatusCodethat is401 (Unauthorized request), the body section still has data that definitely you are never going to send back, instead you can send user friendly error message here. - By considering these error parameters, we can extend our error handling by checking the status code. Let’s do it.
- Update the
handleErroras following in errorhandler.ts file:handleError(error: any) { debugger; if (error.status == '401') alert("You are not logged in, please log in and come back!") else alert(error); super.handleError(error); } - Compile
User Managementpage again. You would see the following user friendly error message now:
- The Firefox
debuggeris an awesome tool for debugging client code, spend some time exploring more useful features. You can step to next line, into the function or step out by highlighted buttons:
- Next, let’s mess up with our application and check what would be in error variable through Firefox debug. Double click on app => Components => home.component.ts to edit it.
- Enter the following HTML in template section:
<button class="btn btn-primary" (click)="IdontExist()">ErrorButton</button>
- Final template should be as follows:

- I added one button with click event that is calling
IdontExist()function that doesn’t exist inHomeComponent. - Let’s run the application and then run the debugger, you would see a stupid
ErrorButtonin the middle of the screen:
- Click on
ErrorButton, again you would see the execution stopped atdebugger(breakpoint), mouse hover on error, browse the parameter in pop up or click onwatchlink at bottom put the error variable on right sideVariablessection:
- You can see this whole bunch of new information, expand the
originalErrorsection and you would see the actual error:
- You can see very detailed information to dig down the complex error.
- Press the Resume button on the left side to continue the execution:

- You would see the brief error message:

- Debugging is a great tool to get complete information on the client side.
History
- 5/13/2017: Created