
Selenium Series: Chapter 2, By Types getting into the good stuff of Selenium
This is an article to demonstrate different uses of ByType Selectors within Selenium. This is the heart of the API, Finding Element(s) using By Types. Understanding these ByType's are key in navigating, selecting and using web elements to test. Lets get going in Automation Testing!
Introduction
This is an article which is going to take us from zero to hopefully hero in using all the different By Types and Find Element(s) API Methods within Selenium using MsTest and Shouldly too. This is at the heart of the API and if I was a betting man FindElement and FindElements must be the most used API method call when using Selenium.... so lets do it!
Background
If you need a recap of Selenium Series Chapter 1, you can find it at the below and see the dependacies required, source code is attached or can be found in my GitHub Account listed below too:
https://www.codeproject.com/Articles/1166904/Selenium-Series-Chapter-Getting-Started https://github.com/seanrand57/SeleniumSeriesWe're going to use Selenium and dive deeper into the Find Element and Find Elements API Methods accessing, menu items, textboxes, buttons, text, basically anything with the Browser we will be able to access. Now that sounds pretty cool and it really is as I find having developed and used Selenium for many a good year more than I can remember its the heart of what you do and how you access the browsers elements via the DOM (Document Object Model).
What is a, By Type?
By Types, these are ways of telling Selenium how you find an element on page. So that sounds pretty cool and is as there are many ways to do so, firstly though lets take a quick step back and look at the dom then get into this as we're starting slow and will work quicker in further chapters.
Firstly since we're using Firefox as our browser in tests, right now, open up Firefox browser on your machine and navigate to the page we'll be testing:
http://www.seleniumhq.org/Right click on the browser as shown below and select the menu item, what are we seeing, it should look like my image below with a bit of luck.
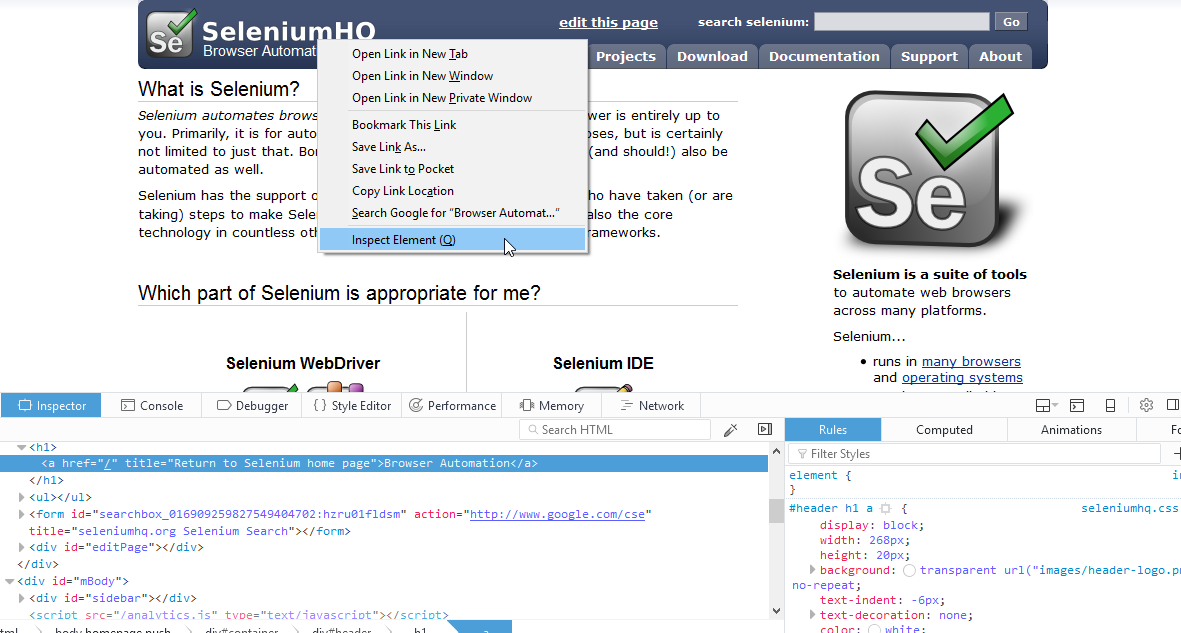
- We can now see the Selenium HQ Home Page, at the bottom you can see the inspection panel of the browser this shows us the DOM. Understanding the DOM and knowing how to grab elements is key in UI Web Automation tests I can't stress that enough, however its soooo easy to pick up you'll be there by the end of this chapter fingers crossed if I've done a good job!
- The inspection panel of the browser houses the source code or DOM of the page which the browser uses to construct the webpage for us to see. What does that mean?
- Notice that in the inspection panel where I clicked on it shows: <a href="/" title="Return to Selenium home page">Browser Automation</a>. In the webpage relates to the Browser Automation link which you can see takes you back to the home page by the href of "/". Now we can see how to right click on some element on a web page we're trying to test and inspect the element to use in Selenium, we now need to use the API to interact with it! This is where the fun begins, the slower bit is out of the way now!
The Selenium API allows us to use the FindElement or FindElements method to capture text boxes, icons, text, buttons using by types so lets see what they are looking at the below code snippet.
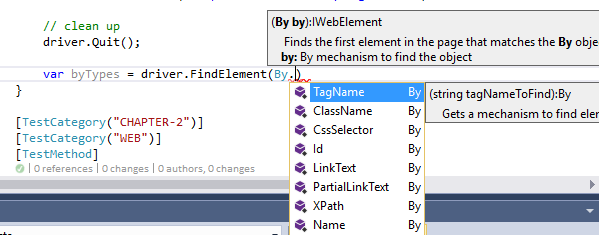
Below shows us every single way of grabbing WebElements using FindElement, which gives us a specifc item such as a Search Button. Or a List of Elements by using the FindElements method, which could give us all buttons on screen as an example. Also a really cool thing about the below is we see By.Id("") explicitly being used in element1, but take a look at element9... just awesome we can say FindElementById(""). I might say that as maybe coded this previously in Selenium but it takes away some thought from the tester and just focus on the string value needed for that method signature.
// Finding one Specific Element using a Specifc By type
var element1 = driver.FindElement(By.Id(""));
var element2= driver.FindElement(By.LinkText(""));
var element3 = driver.FindElement(By.PartialLinkText(""));
var element4 = driver.FindElement(By.ClassName(""));
var element5 = driver.FindElement(By.CssSelector(""));
var element6 = driver.FindElement(By.Name(""));
var element7 = driver.FindElement(By.TagName(""));
var element8 = driver.FindElement(By.XPath(""));

// Finding one Specific Element using new Selenium Methods
// Pretty cool we only have to supply a string value to given method
// signature
var element9 = driver.FindElementById("");
var element10 = driver.FindElementByLinkText("");
var element11 = driver.FindElementByPartialLinkText("");
var element12 = driver.FindElementByClassName("");
var element13 = driver.FindElementByCssSelector("");
var element14 = driver.FindElementByName("");
var element15 = driver.FindElementByTagName("");
var element16 = driver.FindElementByXPath("");

// Finding a List of WebElements using a Specific By Type
var elements18 = driver.FindElements(By.LinkText(""));
var elements19 = driver.FindElements(By.PartialLinkText(""));
var elements20 = driver.FindElements(By.ClassName(""));
var elements21 = driver.FindElements(By.CssSelector(""));
var elements22 = driver.FindElements(By.Name(""));
var elements23 = driver.FindElements(By.TagName(""));
var elements24 = driver.FindElements(By.XPath(""));

// Finding a List of WebElements using a Specific By Type
var elements25 = driver.FindElementsById("");
var elements26 = driver.FindElementsByLinkText("");
var elements27 = driver.FindElementsByPartialLinkText("");
var elements28 = driver.FindElementsByClassName("");
var elements29 = driver.FindElementsByCssSelector("");
var elements30 = driver.FindElementsByName("");
var elements31 = driver.FindElementsByTagName("");
var elements32 = driver.FindElementsByXPath("");
Lets Test!!!
Remember that in Chapter 1 we talked about traits, and since we're in Chapter 2 we're going to use Chapter 2 trait which houses all our tests for this article as shown below. Hopefully if you right click on Chapter-2 as shown below and run all those tests they'll turn Green and pass as per the screenshot below.
To sort by trait in the Test Explorer we right click in the test panel shown below -> Group By -> Traits.
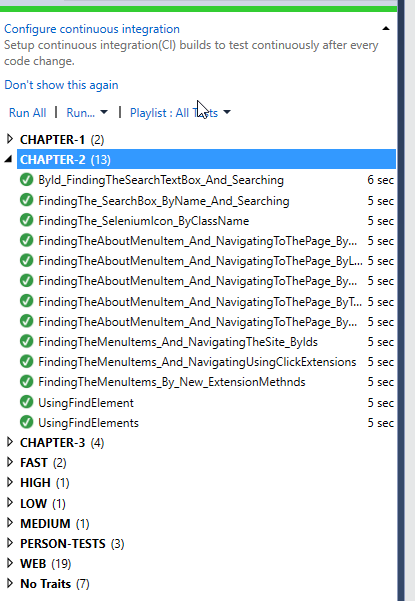
The test we're going to look at first and run through line by line is the test named: ById_FindingTheSearchTextBox_And_Searching
Lets dive in and do what we're hear to do, test, learn and push our Selenium knowledge!
The Arrange part of the test is what we used in Chapter 1 to initalise the web browser and navigate to the SeleniumHQ Website. This is a part we can skip over but wanted to mention this doesn't differ from Chatper 1.
The Act section of the test now this is what we're here for! Notice how the test is named ById, the rest of the tests are named as shown below. So we now have two elements captured, searchBox and SearchButton. A user now wants to enter text into that webelement Search Box we do that by Using SendKeys. Now we have filled into the Searchbox text we now want to Click the search button. This is really easy as we have the web element called searchButton so we just say searchButton.Click(). How easy, readable and brilliant is that? We've filled in a search box, and now performed a search. We want to then Assert we're on the google custom search page which the Selenium Site uses ensuring search has occurred. Of course we can extend this assertion to be more specific but our test is to highlight how we find elements and use them.
Really thats how simple it is to find elements, just use FindElement or FindElement by a type and if its available we can use that as the user can. Really powerful and simple stuff.
public void ById_FindingTheSearchTextBox_And_Searching()
{
     // Arrange
     var driver = new FirefoxDriver();
     driver.Manage().Window.Maximize();
     driver.Manage().Timeouts().ImplicitlyWait(TimeSpan.FromSeconds(10));
     driver.Navigate().GoToUrl("http://www.seleniumhq.org/");

     //Act - Clicking the Search Box, entering text and searching
     var searchBox = driver.FindElement(By.Id("q"));
     var searchButton = driver.FindElement(By.Id("submit"));

     // Send Text to the Search box and press the Search Button "Go"
     // more to come on Sending Keys and Click / Actions in a later Chapter ;-)
     searchBox.SendKeys("Selenium Find Elements");
     searchButton.Click();

     var wait = new WebDriverWait(driver, TimeSpan.FromSeconds(5));
     wait.Until(drv => drv.Url.Contains("google.com"));

     //Assert
     driver.Title.ShouldNotBeEmpty();
     driver.Title.ShouldBe("Google Custom Search");

     // clean up
     driver.Quit();

}
Lets Talk Tests in Chapter 2
The below is a list of tests in Chapter 2 which can be found in the class file in the solution,
Tests -> 005_Using_By_Types -> UsingByTypes.cs
The below section of tests in this chapter show you that we can execute the same tests but use different By Types to achieve the same thing.
Why might this be useful? Not ever element in the browser DOM has an Id, so we need to grab them by XPath, or Css or LinkText. This is the key and Selenium allows us to be flexible and nimble given our web implementation.
- FindingTheMenuItems_And_NavigatingTheSite_ByIds
- FindingTheAboutMenuItem_And_NavigatingToThePage_ByLinkText
- FindingTheAboutMenuItem_And_NavigatingToThePage_ByTag
- FindingTheAboutMenuItem_And_NavigatingToThePage_ByCss
- FindingTheAboutMenuItem_And_NavigatingToThePage_ByXPath
var aboutMenuItem = driver.FindElement(By.LinkText("About"));
var menuItem = driver.FindElement(By.CssSelector("li#menu_about"));
This test shows the FindElementById() API method executed which are really cool looking at the source code, see the below snippet.
- FindingTheMenuItems_By_New_ExtensionMethnds
The test also shows us that if we find an element and want to click it, we can do in one clean line of code, pretty cool! But remember thats getting ahead into Selenium Actions which are coming to an article near you soon :-)
//Act - This code snippet shows us how to find the menu items and click each of them in turn.
// 4 lines of code = 4 find and actions taken place. Really nice and clean.
driver.FindElementById("menu_projects").Click();
driver.FindElementById("menu_download").Click();
driver.FindElementById("menu_documentation").Click();
driver.FindElementById("menu_support").Click();
driver.FindElementById("menu_about").Click();
- FindingTheMenuItems_And_NavigatingUsingClickExtensions
- FindingThe_SeleniumIcon_ByClassName
- FindingThe_SearchBox_ByName_And_Searching
The below two tests show us how we find one element, or we find a lot of elements then find the specific one within that list. When we might use that FindElements option if we have a table in a webpage as its really hard to find a specifc table column at times and then capture all the table, iterate the elements looking for that text in a cell and make an assertion.
- UsingFindElement
- UsingFindElements - the below shows us that we use the FindElementsByTagName of "a" which is all hyperlinks in the site. Then we specifically look for the About us link and click it. This just shows how you can use a list of webelements which you'll need in up your sleeve for sure in your test career.
public void UsingFindElements()
{
     // Arrange
     var driver = new FirefoxDriver();
     driver.Manage().Window.Maximize();
     driver.Manage().Timeouts().ImplicitlyWait(TimeSpan.FromSeconds(10));
     driver.Navigate().GoToUrl("http://www.seleniumhq.org/");

     //Act - finding all anchor tags denoted by "a" which are links on the site.
     var allLinks = driver.FindElementsByTagName("a");

     // Find the link text which is About and click it
     foreach (var link in allLinks)
     if (link.Text.Equals("About"))
     {
         link.Click();
         break;
      }

      //Assert
      var wait = new WebDriverWait(driver, TimeSpan.FromSeconds(5));
      wait.Until(drv => drv.Title.Contains("About"));
      driver.Url.ShouldBe("http://www.seleniumhq.org/about/");

      // clean up
      driver.Quit();
}
Quick Tip
The FindElement() API method looks through the whole webpage and finds the first element and grabs it which matches our ByType condition. An example is if we have two links on the Site Named "Click Me". We may however want to grab the second "Click Me" link as it navigates us to a different web page when clicked. If we used the method FindElementByLinkText("Click Me") then Selenium will find the first link, think its a successful find and return that too you all while you wanted the 2nd Click Me link.
Keep that in mind when you have similar elements and get unexpected failures in tests as can catch you out. Thought I'd throw it out there and hopefully save you some time if you come across this as most people do!
Hope you execute all the tests and get stuck into the chapter 2 solution using these new by types!
What did we (hopefully) learn in this Chapter?
If you got this far thank you firstly, I hope we learnt:
- What all the By Types are and the uses of them.
- How to use By Types with Find Element and Find Elements
- How to use the new FindElementByType methods, my favourite new addition in Selenium 3.0+
- When to use FindElement vs FindElements
- A quick tip being careful Finding an Element when multiple of the same might exist and you don't want the first one.
- All the tests should run execute and pass locally in Visual Studio 2015, .NET C#
- Hopefully you've got the tools now to go create a test in the solution, and go find an element which I havent given you a test for such as Clicking A link in Page using this knowledge and watch it go!
As always please reach out anytime if you have questions or want me to expand on anything else as part of this article!
Cheers
Sean