
Switching Xamarin.Android Resources at Build-Time
5.00/5 (3 votes)
Using resource switching to support multiple deployment scenarios in Xamarin.Android projects.
Introduction
When you have a code base that you leverage for multiple customers, often you need to pull in different assets based on the particular customer. To achieve this in a Xamarin.Android solution, one approach is to use multiple class libraries, with each class library containing resources specific to a particular customer.
In the article you see how to use multiple class library projects to manage differing sets of resources for multiple deployment scenarios. You see how to use the Visual Studio Configuration Manager to create new build configurations. You look at adding conditional attributes to
ProjectReference elements in a .csproj file. Finally, you see how to reference the external resources within a view.Please note that this article is a little on the light side compared to my usual articles. I had intended this to be a blog post. In the end, however, I decided it would be better placed on CodeProject.
Follow the following steps to build a solution with switchable resource sets.
Step 1: Fire-up Visual Studio and create a Android class library project in Visual Studio, alongside your Xamarin.Android project. Populate the Resources subdirectories with deployment specific images, layouts, dimensions and so forth.
Repeat step 1 for each customer or deployment scenario. You end up with something like the solution shown in figure 1.
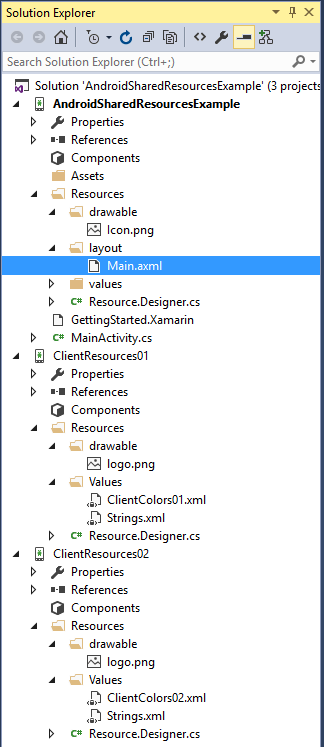
Figure 1. Example solution.
You see that each client has a unique set of resources within its respective class library.
Step 2: Create a build configuration for each deployment scenario. See figure 2.
You open the Configuration Manager by selecting ‘Configuration Manager’ from the build configuration drop down.
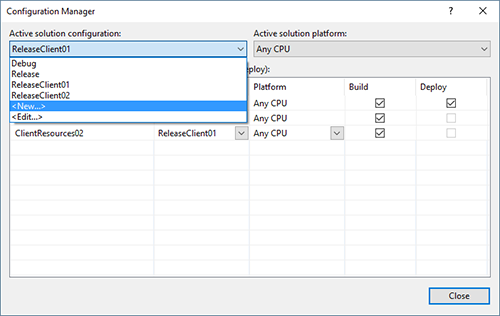
Figure 2. Create new build configurations using the Configuration Manager.
I based the configurations on the Release configuration, but you could quite as easily have both a set of configurations for debug and release.
Step 3: Unload and edit the App project’s .csproj file to include conditional project references, see listing 1.
Listing 1. Main project conditional project references.
<ItemGroup>
    <ProjectReference Include="..\ClientResources01\ClientResources01.csproj"
             Condition=" '$(Configuration)' == 'ReleaseClient01' ">
      <Project>{6e7d6a5c-a233-40a2-9178-47e389e6c438}</Project>
      <Name>ClientResources01</Name>
    </ProjectReference>
    <ProjectReference Include="..\ClientResources02\ClientResources02.csproj"
             Condition=" '$(Configuration)' == 'ReleaseClient02' ">
      <Project>{33BD954A-F926-4140-9DEF-0D4114FC2A08}</Project>
      <Name>ClientResources02</Name>
    </ProjectReference>
  </ItemGroup>
Please note the
Condition attributes in each ProjectReference, and how they correspond to the build configuration names you created in Step 2.Step 4: Reload your main project, set it as the start-up project and you’re good to go.
Note: You need to perform a clean or a rebuild when switching between build configurations, otherwise the new resources are not picked up.
In the downloadable example I place an
ImageView whose source is set to an image named logo.png. See listing 2. There’s a logo.png located in the Resources/drawable directory of each of the class libraries.Listing 2. Main.axml
<LinearLayout xmlns:android="http://schemas.android.com/apk/res/android"
    android:orientation="vertical"
    android:layout_width="match_parent"
    android:layout_height="match_parent"
    android:background="@color/main">
    <ImageView
        android:layout_width="wrap_content"
        android:layout_height="wrap_content"
        android:src="@drawable/logo" />
</LinearLayout>
The background color of the
LinearLayout is defined using a resource color named main. The deployment specific colors are placed in ClientColors01.xml and ClientColors02.xml.Note: I chose to give each color resource file a unique name merely for the sake of being able to more rapidly locate each one individually using Resharper.
Client 1 has a black background in the main view, defined like so:
<color name="main">#000</color>
While client 2 has a white background:
<color name="main">#FFF</color>
Similarly, the client 1 logo is designed for a dark background, while the client 2 logo is designer for a light background. You get the idea. See figure 2.
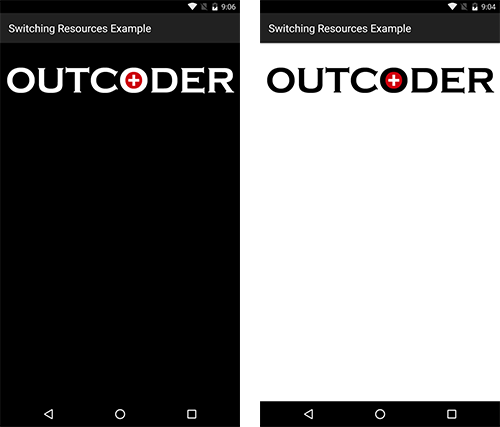
Figure 2. Client 1 and Client 2 Configurations in action
Conclusion
In the article you saw how to use multiple class library projects to manage differing sets of resources for multiple deployment scenarios. You saw how to use the Configuration Manager to create new build configurations. You looked at adding condition attributes to ProjectReference elements in a .csproj file. Finally you saw how to reference the external resources within a view.
I hope you find this project useful. If so, then please rate it and/or leave feedback below.
History
- November 12 2016
- First published