
Securing ASP.NET Web API when consumed by other .NET Application
4.93/5 (13 votes)
In this article we are going to have a look on how to secure WEBAPI.
- Download AllDatabaseScripts.rar - 2 KB
- Download SecureWEBAPI.rar - 9.7 MB
- Download bin.zip - 1.9 MB
- Download APIConsumer.rar - 9.4 MB
- Download bin.rar - 1.7 MB
In this article we are going to have a look on how to secure WEBAPI. Nowadays every developer can create API but few developers think of securing it. API are URI based which are easy to consume as anyone who knows this URI can misuse it, because we do not have any authentication on it and also we are not checking if the user who is sending request is valid or not.
Most payment gateways companies have their API toolkit which they provide for securing their API in that they register Client [Person / Company] who is going to implement Payment gateways. After that they provide you keys for encryption to send Request in encrypted format such that if someone intercepts it, they still will not able to read what real data is travelling in wires.

Process
In this process we are going to create 2 MVC web applications, one web application will Host [Host] Web API and another web application will Consume Web API [Client].
After that, we are going to have a look on how to secure Web API using custom token based authentication, along with this we use the TripleDES Algorithm for encryption and decryption of token and data which is going to travel.
In the process we are going to register Client at end [Host] and then we are going to provide keys (Encryption, Decryption) to [Client]. Along with that we will also provide [UniqueID, Token] to client because Token generation logic is given to client and they need to use these keys and tokens to generate tokens and send them to the host [Host Application] for authentication.
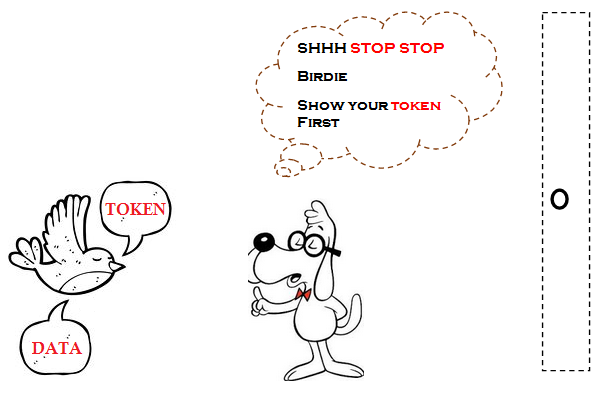
If you had looked on the above image you must have a clear idea of the working mechanism of the token.
The client application has the logic of generating token (it is in encrypted form) which it is going to send to the Host application. The host application will validate the token send from the client application if it is valid then only it has further access else in response it will send an error message.
Tools Required
- Visual studio 2012 express
- SQL server 2008 express
Structure
We are going to create two web applications
- SecureWEBAPI [Host]
- APIConsumer [Client]
Let’s start with creating the database first after that we are going to create a project.
Database
We are going to create Database with name AccountDB
In that database, we are going have 2 tables
- AccountDetails
In this table, we have data of customer’s bank account.
 Fig 2. AccountDetails Table
 - ClientRegistration
In this table, we are going to store data of all registered clients who are going to access WEB API.
Along with that this table contains [Token, EncryKey, IVKey, and UniqueID] which we are going to share with the client.
 Fig 3. ClientRegistration Table
After completing with understanding tables next we are going to create a new project.

Creating MVC project
For creating an MVC project, open Visual Studio IDE then from Menu select File -> then select New ->inside that select Project. After selecting a new dialog will pop up with name New project in this dialog, in the left side panel you will see Template ->then Visual C# -> inside that select web Template because we are going to create an MVC application. Then in the center panel you will see all the web Projects in it from that select "ASP.NET MVC 4 Web Application" and name the solution as "SecureWEBAPI" then final click on the OK button.


After that, a new dialog will pop up with name "New ASP.NET MVC 4 Project" in that it has various project templates to choose. We are going to choose the Basic project template and then finally click on ok button.
After clicking on the OK button it will generate a solution and a project with the name SecureWEBAPI.
Below is a snapshot of the project structure after creating

After creating a project and having looked at the project structure, next we are going to add ADO.NET entity framework to project.
You might think, "why do we need to add ADO.NET entity framework in this project?" Right? Ha! The answer for this question is we are going to register client in this application and store its keys and values in database, and when the request comes from client for WEB API (along with token and encrypted data) we are going to validate the token and key with database such that any valid person can access the data.
Adding ADO.NET Entity Framework to Project
For adding ADO.NET entity framework to project just right click on Model folder then select Add -> Inside that, select ADO.NET entity data Model. After choosing that a new dialog will pop up with the name "Specify Name for Item." In this dialog we need to provide a name to the entity framework and we are going to name it AccountData.

Then click on the OK button. After this it is going to take you to next step which is "Choose Model contents".
In this dialog, we have two options to choose
- Generate from database
- Empty model
For this project purpose, we are going to choose "Generate from database" because we already have created database and tables.

After choosing "Generate from database" just click on next button to move forward in this process.

And then another dialog will pop up for "Choose Your Data Connection." In this dialog we are going to choose the database which we have created and then we are going to choose "Yes" to allow it to add sensitive data in connection string in the Web.config file.

Then after "Choose Your Data Connection," next we are going click on the next button to move forward in this process.

After this, a new dialog will pop up with the name "Choose your database object and setting." In this dialog we are going to choose tables which we have created and finally click on Finish button.
After finally, click on the Finish button the diagram of chosen entities are created.
Have a look below for snapshot after generating entity

And also have look at the changes in the project structure after adding entity framework.

In the next step, we are going to create a simple controller and views to register a client and store it in the database.
For doing this I have added a simple controller with name "ClientRegistrationController" using scaffolding.

After clicking on Add button it will create ClientRegistrationController. Along with this it will also create an action method in the controller with giving names [Create, Delete, Details, Edit, and Index] and in the same way it will also add all Views to corresponding action methods.
Meanwhile, I have also added a bootstrap folder to the solution and made some design change such that view design look good.
Below is a snapshot of the Client Registration Controller and its Views and also a newly added a bootstrap folder.

Below is a snapshot of the Client Registration Create View.

Next step after ClientRegistration controller and its view is to add a repository folder in the project for performing some database operation in loose couple way.
Adding Repository Folder and repository pattern
You might think, "what are we going to add inside this folder?" Right? In this repository folder, we are going to add Interface and concrete classes.
Interfaces
IRegistrationIAccount
Let’s start with adding IRegistration Interface first.
Adding IRegistration interface
The IRegistration interface contains two methods in which the first method name is [AccountDetailsByAccountNo]. It takes the token as an input parameter.
The second method takes UniqueID as an input parameter, this token, and Unique ID are given to the client after registration only for accessing the host application.
Code snippet
using SecureWEBAPI.Models;
using System;
using System.Collections.Generic;
using System.Linq;
using System.Web;

namespace SecureWEBAPI.Repository
{
    public interface IRegistration
    {
        ClientRegistration ValidateToken(string Token);
        KeysValues GetEncryptionDecryptionKeys(string UniqueID);
    }
}
And finally this interface is going to be inherited by a concrete class which will implement these methods.
Next, we are going to have a look on IAccount Interface
Adding IAccount interface
The IAccount interface contains two methods in which first method name is [ListAccountDetail]. It gets a list of all account details.
The second method takes AccountNo as the input parameter. This AccountNo will be passed by the client application to get details of account according to AccountNo.
Code snippet
using SecureWEBAPI.Models;
using System;
using System.Collections.Generic;
using System.Linq;
using System.Web;

namespace SecureWEBAPI.Repository
{
    public interface IAccount
    {
        List<AccountDetail> ListAccountDetail();
        AccountDetail AccountDetailsByAccountNo(string AccountNo);
    }
}
We have completed with adding interface next step we are going to add Concrete classes which will implement this interfaces.
Adding RegistrationRepository Class
RegistrationRepository class will inherit IRegistration interface and implement all method inside it.
There are two methods which we are going to implement
ValidateTokenGetEncryptionDecryptionKeys
Validate Token
In this method, we are going to validate the token from the database which client has passed and in response we are going to get ClientRegistration Model according to Token which we have passed.
GetEncryptionDecryptionKeys
In this method, we are going to validate UniqueID from the database which client has passed and in response we are going to get KeysValues Model according to UniqueID which we have passed.
Code snippet
using SecureWEBAPI.Models;
using System;
using System.Collections.Generic;
using System.Linq;
using System.Web;

namespace SecureWEBAPI.Repository
{
    public class RegistrationRepository : IRegistration
    {
        AccountDBEntities _AccountDBEntities;
        public RegistrationRepository(AccountDBEntities AccountDBEntities)
        {
            _AccountDBEntities = AccountDBEntities;
        }


        public ClientRegistration ValidateToken(string Token)
        {
            ClientRegistration objcr = new ClientRegistration();

            var accountDetail = from ad in _AccountDBEntities.ClientRegistrations
                                where ad.Token == Token
                                select ad;

            if (accountDetail == null)
            {
                objcr = null;
                return objcr;
            }
            else
            {
                return accountDetail.FirstOrDefault();
            }

        }

        public KeysValues GetEncryptionDecryptionKeys(string UniqueID)
        {
            KeysValues objkv = new KeysValues ();

            var KeyDetail = (from ad in _AccountDBEntities.ClientRegistrations
                                where ad.UniqueID == UniqueID
                               select new
                                {
                                   ad.IVKey,
                                   ad.EncryKey
                                }).FirstOrDefault();

            if (KeyDetail == null)
            {
                objkv = null;
            }
            else
            {
                objkv.EncryKey = KeyDetail.EncryKey;
                objkv.IVKey = KeyDetail.IVKey;
            }
            return objkv;
        }


    }
}

Adding AccountRepository Class
Account Repository class will inherit IAccount interface and implement all method inside it.
There are two methods which we are going to implement
ListAccountDetailAccountDetailsByAccountNo
ListAccountDetail
In this method, we are going to get List of all accounts details from the database.
AccountDetailsByAccountNo
In this method, we are going to get Account Details by passing AccountNo which is sent from client in response we are going to return AccountDetail Model
Code snippet
using System;
using System.Collections.Generic;
using System.Linq;
using System.Web;
using SecureWEBAPI.Models;
namespace SecureWEBAPI.Repository
{
    public class AccountRepository : IAccount
    {
        AccountDBEntities _AccountDBEntities;
        public AccountRepository(AccountDBEntities AccountDBEntities)
        {
            _AccountDBEntities = AccountDBEntities;
        }

        public List<AccountDetail> ListAccountDetail()
        {
            return _AccountDBEntities.AccountDetails.ToList();
        }

        public AccountDetail AccountDetailsByAccountNo(string AccountNo)
        {
            var accountDetail = from ad in _AccountDBEntities.AccountDetails
                                where ad.AccountNo ==AccountNo
                                select ad;
            return accountDetail.SingleOrDefault();
        }
    }
}
After completing with adding Concrete class next we are going to move forward to add folder with name CryptoLibrary and then inside that folder we are going to add class which has Encryption and Decryption Methods.

Adding CryptoLibrary Folder and TripleDESAlgorithm class
For securing our Web API we are going to use TripleDES algorithms.
For adding this in the project we are going to add a new folder with name CryptoLibrary and in that folder, we are going to add a class with name TripleDESAlgorithm.
TripleDESAlgorithm class had three methods CreateDES, Encryption, and Decryption.
Code snippet
using System;
using System.Collections.Generic;
using System.IO;
using System.Linq;
using System.Security.Cryptography;
using System.Text;

namespace SecureWEBAPI.CryptoLibrary
{
    public static class TripleDESAlgorithm
    {

        private static TripleDES CreateDES(string key, string IV)
        {
            MD5 md5 = new MD5CryptoServiceProvider();
            TripleDES des = new TripleDESCryptoServiceProvider();
            des.Key = md5.ComputeHash(Encoding.Unicode.GetBytes(key));
            des.IV = Encoding.ASCII.GetBytes(IV);
            return des;
        }

        public static byte[] Encryption(string PlainText, string key, string IV)
        {
            TripleDES des = CreateDES(key, IV);
            ICryptoTransform ct = des.CreateEncryptor();
            byte[] input = Encoding.Unicode.GetBytes(PlainText);
            return ct.TransformFinalBlock(input, 0, input.Length);
        }

        public static string Decryption(string CypherText, string key, string IV)
        {
            byte[] b = Convert.FromBase64String(CypherText);
            TripleDES des = CreateDES(key, IV);
            ICryptoTransform ct = des.CreateDecryptor();
            byte[] output = ct.TransformFinalBlock(b, 0, b.Length);
            return Encoding.Unicode.GetString(output);
        }
    }
}
After adding TripleDES algorithms for securing WEB API next we are going to add ApiController.

Adding ApiController
We are going to add ApiController with name PersonalAccount.
PersonalAccount Web API is going to consume by the client application, for Inserting, updating and deleting person details.
Adding ApiController is similar to adding controller just right click on controller then select Add -> and inside that select controller, after selecting controller a new dialog will pop up with name Add Controller in this we are going to name ApiController as PersonalAccountController and in template I am going to choose "API controller with empty read/write actions" and finally click on Add button.

PersonalAccountController View after adding
This is default code snippet which comes when we add ApiController with "API controller with empty read/write actions" we need to make changes in this ApiController such that it can be accessed by only authorized persons.

Next, we are going to make a change in this ApiController.
Below is complete code snippet of ApiController.
Code snippet
using Newtonsoft.Json;
using SecureWEBAPI.CryptoLibrary;
using SecureWEBAPI.Filters;
using SecureWEBAPI.Models;
using SecureWEBAPI.Repository;
using System;
using System.Collections.Generic;
using System.Configuration;
using System.Net;
using System.Net.Http;
using System.Web.Http;
using System.Web.Script.Serialization;

namespace SecureWEBAPI.Controllers
{

    public class PersonalAccountController : ApiController
    {
        // GET api/personalaccount
        AccountRepository AccountRepository;

        public PersonalAccountController()
        {
            AccountRepository = new AccountRepository(new AccountDBEntities());
        }

        [HttpGet]
        public IEnumerable<AccountDetail> Get()
        {
            return AccountRepository.ListAccountDetail();
        }

        // GET api/personalaccount/5
        [HttpGet]
        public HttpResponseMessage Get(string id)
        {
            if (null != id)
            {
                var Response = AccountRepository.AccountDetailsByAccountNo(id);
                string SerializeData = JsonConvert.SerializeObject(Response);
                byte[] buffer = TripleDESAlgorithm.Encryption(SerializeData, ShareKeys.keyValue, ShareKeys.IVValue);
                return Request.CreateResponse(HttpStatusCode.OK, Convert.ToBase64String(buffer));
            }
            else
            {
                return Request.CreateErrorResponse(HttpStatusCode.NotFound, "AccountID not found");
            }
        }

        // POST api/personalaccount
        [HttpPost]
        public HttpResponseMessage Post(HttpRequestMessage Request)
        {
            if (null != Request)
            {
                var Responsedata = Request.Content.ReadAsStringAsync().Result;
                string data = TripleDESAlgorithm.Decryption(Responsedata, ShareKeys.keyValue, ShareKeys.IVValue);
                AccountDetail objVM = new JavaScriptSerializer().Deserialize
Let’s understand code snippet step by step
The first step we are going to add constructor of the class and inside that we are going to create object AccountRepository class for accessing all method inside this class.
Code snippet
public class PersonalAccountController : ApiController
{

    AccountRepository AccountRepository;

    public PersonalAccountController()
    {
        AccountRepository = new AccountRepository(new AccountDBEntities());
    }
}
HTTP GET methods
This method is used to get a list of data.
Http GET Method is going to return all Account details [IEnumerable <AccountDetail>], for accessing this API we need share URI as [“api/personalaccount”]
In this method, we are calling ListAccountDetail method from the AccountRepository class to get records from the database.
Code snippet
// GET api/personalaccount
[HttpGet]
public IEnumerable<AccountDetail> Get()
{
    //Getting All AccountDetail Data from Database.
    return AccountRepository.ListAccountDetail();
}
HTTP GET methods by ID
This method is used for retrieving records by passing an id.
To this method, we need to pass ID [AccountID] for retrieving a record from the database, and data related to that specific ID only will be returned in response.
For accessing this API we need share URI as ["api/personalaccount/5"]
In this method, we are calling the AccountDetailsByAccountNo method from the AccountRepository class to get records from the database related to ID [AccountID] passed and then we are encryption data which we have retrieved from the database using TripleDESAlgorithm finally we are sending a response to a client who consumes WEB API.
Code snippet
// GET api/personalaccount/5
[HttpGet]
public HttpResponseMessage Get(string id)
{
    if (null != id)
    {
        //Getting AccountDetail Data from Database According to AccountID Passed.
        var Response = AccountRepository.AccountDetailsByAccountNo(id);

        //Serializing Object which we have got from Database.
        string SerializeData = JsonConvert.SerializeObject(Response);

        //Encrypting Serialized Object.
        byte[] buffer = TripleDESAlgorithm.Encryption(SerializeData, ShareKeys.keyValue, ShareKeys.IVValue);

        //Sending Response.
        return Request.CreateResponse(HttpStatusCode.OK, Convert.ToBase64String(buffer));
    }
    else
    {
        return Request.CreateErrorResponse(HttpStatusCode.NotFound, "AccountID not found");
    }
}
After completing with getting account details by passing ID next we are going to work on HttpPost method of PersonalAccount Controller.
HTTP POST Methods of PersonalAccount Controller
This method is going to receive AccountDetail in encrypted string format for receiving that we have used HttpRequestMessage parameter next after receiving data we are going to decrypt it using key and IV and then that data we are going to Deserialize and cast to AccountDetail Model, again to send data response we are going encrypt data with Key and IV then convert it to ToBase64String and send it as Response.
Code snippet
// POST api/personalaccount
[HttpPost]
public HttpResponseMessage Post(HttpRequestMessage Request)
{
    if (null != Request)
    {
        // Receiving Object
        var Responsedata = Request.Content.ReadAsStringAsync().Result;

        // Decrypting received Object with Key and IV
        string data = TripleDESAlgorithm.Decryption(Responsedata, ShareKeys.keyValue, ShareKeys.IVValue);

        // Deserialize Decrypted data and casting to AccountDetail Model
        AccountDetail objVM = new JavaScriptSerializer().Deserialize<AccountDetail>(data);

        // For sending Response again SerializeObject Object
        string SerializeData = JsonConvert.SerializeObject(objVM);

        // Encrypting
        byte[] buffer = TripleDESAlgorithm.Encryption(SerializeData, ShareKeys.keyValue, ShareKeys.IVValue);

        // Sending Response
        return Request.CreateResponse(HttpStatusCode.OK, Convert.ToBase64String(buffer));
    }
    else
    {
        return Request.CreateErrorResponse(HttpStatusCode.NotFound, "AccountDetail not found");
    }
}
HTTP PUT Methods of PersonalAccount Controller
Mostly PUT method is used for updating data for doing that client need to pass ID along with data to update data.
The data which we are going receive is in encrypted string format for receiving that we have used HttpRequestMessage parameter next after receiving data we are going to decrypt it using key and IV and then that data we are going to Deserialize and cast to AccountDetail Model. Then this model can be sent to database to updating data along with id.
Code snippet
// PUT api/personalaccount/5
[HttpPut]
public HttpResponseMessage Put(string id, HttpRequestMessage Request)
{
    if (null != Request && !string.IsNullOrEmpty(id))
    {
        // Receiving Object
        var Responsedata = Request.Content.ReadAsStringAsync().Result;
        // Decrypting received Object with Key and IV
        string data = TripleDESAlgorithm.Decryption(Responsedata, ShareKeys.keyValue, ShareKeys.IVValue);
        // Deserialize Decrypted data and casting to AccountDetail Model
        AccountDetail objVM = new JavaScriptSerializer().Deserialize<AccountDetail>(data);
        // Sending Response
        return Request.CreateResponse(HttpStatusCode.OK, id);
    }
    else
    {
        return Request.CreateErrorResponse(HttpStatusCode.NotFound, "Error While Updating AccountDetail");
    }
}
HTTP Delete Methods of PersonalAccount Controller
The Delete method only takes one parameter as input which is ID and according to that ID, it will delete data from the database.
Code snippet
// DELETE api/personalaccount/5

[HttpPost]
public HttpResponseMessage Delete(string id)
{
    if (!string.IsNullOrEmpty(id))
    {
        return Request.CreateResponse(HttpStatusCode.OK, id);
    }
    else
    {
        return Request.CreateErrorResponse(HttpStatusCode.NotFound, "AccountID not found");
    }
}
After completing with adding and understanding WEB API next step we are going to add AuthorizeAttribute.

The main part of adding security to WEB API is to use Authorize Attribute.
In this part, we are going to create a new Authorize Attribute and write logic into it for secure WEB API.
Code Snippet
using SecureWEBAPI.CryptoLibrary;
using SecureWEBAPI.Models;
using SecureWEBAPI.Repository;
using System;
using System.Collections.Generic;
using System.Configuration;
using System.Linq;
using System.Net.Http;
using System.Text;
using System.Web;
using System.Web.Http;
using System.Web.Http.Controllers;

namespace SecureWEBAPI.Filters
{
    public class AuthoriseAPI : AuthorizeAttribute
    {
        IRegistration _IRegistration;

        public AuthoriseAPI()
        {
            _IRegistration = new RegistrationRepository(new AccountDBEntities());
        }


        protected override bool IsAuthorized(HttpActionContext actionContext)
        {
            try
            {
                IEnumerable<string> tokenHeaders;
                if (actionContext.Request.Headers.TryGetValues("APIKEY", out tokenHeaders))
                {
                    string tokens = tokenHeaders.First();
                    string key1 = Encoding.UTF8.GetString(Convert.FromBase64String(tokens));
                    string[] Data = key1.Split(new char[] { ':' });

                    if (tokens != null && Data != null)
                    {
                        string encry1 = Data[0]; //UniqueID
                        string encry2 = Data[1]; //DateTime with Ticks
                        string encry3 = Data[2]; //ClientToken + IPAddress +Ticks

                        if (_IRegistration.GetEncryptionDecryptionKeys(encry1) == null)
                        {
                            return false;
                        }
                        else
                        {
                            var KeysValues = _IRegistration.GetEncryptionDecryptionKeys(encry1);
                            //Hash Decryption
                            string DecryHash2 = TripleDESAlgorithm.Decryption(encry3, KeysValues.EncryKey, KeysValues.IVKey);
                            string[] Key2 = DecryHash2.Split(new char[] { ':' });

                            // 1)ClientToken
                            string ClientToken = Key2[0];

                            // 2)IPAddress
                            string IPAddress = Key2[1];

                            // 3)Ticks
                            long ticks = long.Parse(Key2[2]);

                            //ReValidating token Exists in Database or not
                            if (_IRegistration.ValidateToken(ClientToken.ToLower()) == null)
                            {
                                return false;
                            }
                            else
                            {
                                var Returndata = _IRegistration.ValidateToken(ClientToken.ToLower());

                                ShareKeys.IVValue = Returndata.IVKey;
                                ShareKeys.keyValue = Returndata.EncryKey;
                                DateTime currentdate = new DateTime(ticks);

                                //Comparing Current Date with date sent
                                bool timeExpired = Math.Abs((DateTime.UtcNow - currentdate).TotalMinutes) > 10;

                                if (!timeExpired)
                                {
                                    if (string.Equals(ClientToken.ToLower(), Returndata.Token.ToLower(), comparisonType: StringComparison.InvariantCulture) == true)
                                    {
                                        return true;
                                    }
                                    else
                                    {
                                        return false;
                                    }
                                }
                                else
                                {
                                    return false;
                                }
                            }
                        }
                    }
                    else
                    {
                        return false;
                    }
                }
                else
                {
                    return false;
                }
            }
            catch (Exception)
            {
                throw;
            }
        }

        protected override void HandleUnauthorizedRequest(HttpActionContext actionContext)
        {
            actionContext.Response = new System.Net.Http.HttpResponseMessage()
            {
                StatusCode = System.Net.HttpStatusCode.Unauthorized,
                Content = new StringContent("Not Valid Client!")
            };
        }
    }
}

The process of AuthorizeAPI Attribute starts when we receive a request from client along with encrypted header [token (APIKEY)] which we have told to send along with the request, this token is in an encrypted format.
- When we receive a request from the client we also receive header in this request after that we are going to search for a header which we want to use for authentication it is ["APIKEY"] Header which is going to be sent from the client.
- Next, after receiving token we are going and convert token it into Base64String and then we are going to get bytes as output from this now we want to string as final output for doing this we are going to use get string method and pass bytes to it [Encoding.UTF8.GetString (bytes)] and finally we get output value as a string.
- The string which we got as end product this string we are going to split using [':'] because the string which is sent from client is in this format [
CLientIDToken : IPAddress : ticks + UniqueID : ticks] for getting value we need to split it and after splitting values next we are going to check the values we have split are null or not - Then split value are assign to variable and from that variable we are going to take first value [
encry1] which isUniqueIDand then we are going to pass this value to theGetEncryptionDecryptionKeysmethod to get keys from database. If thisUniqueIDis not proper then it will not get any keys from database and the condition will we false and this attribute will throw a message "Not Valid Client!". - If it is true then further we are going to call the same method and get in [
EncryKey,IVKey] database and stores in variable - Then further we have encrypted string [
encry3] which we need to decrypt by using [EncryKey, IVKey] which we have got from database. - After decrypting we get a string which we need to split using colon ['
:'] [CLientIDToken: IPAddress: ticks] after splitting we get three values [CLientIDToken, IPAddress, ticks]. - From the value we got we are going to use
CLientIDTokenand pass it to Validate Token method. This method will check this token exists in the database or not. If yes, then it will return true values else it will return false value along with this it will get token and other values from the database. - Next, the values which we have received in that we also got ticks , now we are going to finally check that the ticks which we got are expired or not [the request is valid for only 10 minutes]
- If time is valid then further we are going to compare client token with a token which is there in the database if it is valid then we are going to return true else we are going to return false.
- If it is true then we are going to allow it to access action method else if it is false then won’t have access to the action method.
After completing with creating Authorize Attribute next step we are going to apply this attribute on PersonalAccount ApiController such that client which has valid token can only access this ApiController.
The below snapshot shows after creating attribute how to apply on controller.

After completing the host application part next we are going to work with on client application part.

In this part we are going to create a new MVC application with name APIconsumer this application is going to consume WEB API which we have created.
For creating these applications follow the same step which I have shown in creating host application [SecureWEBAPI].
Way this solution looks after creating new Application

The first step the consumer or client of the application has to do is to create a model which he is going to post to Web API.
Adding AccountDetail
For adding model just right-click on the Model folder and select Add -> inside that select class a new add new item dialog will pop up inside that with default class selected just enter the name of the class as AccountDetail and click on Add button.
After that, we are going add property inside that which is similar to Host application AccountDetail model.
Code Snippet
using System;
using System.Collections.Generic;
using System.Linq;
using System.Web;

namespace APIConsumer.Models
{
    public partial class AccountDetail
    {
        public int AccountID { get; set; }
        public string AccountNo { get; set; }
        public string Username { get; set; }
        public decimal? AccountBalance { get; set; }
        public string Mobilenumber { get; set; }
        public string PANNumber { get; set; }
        public string Aadhaarnumber { get; set; }
        public string EmailID { get; set; }
        public string CommunicationAddress { get; set; }
    }
}
Code Snippet

After adding a model in next step we are going to add a folder with name CryptoLibrary and inside that folder, we are going to add a class with name EncryptionDecryptorTripleDES.

Adding CryptoLibrary Folder and TripleDESAlgorithm class
For securing our Web API we are going to use TripleDES algorithms.
For adding this in the project we are going to add a new folder with name CryptoLibrary and in that folder, we are going to add a class with name TripleDESAlgorithm.
TripleDESAlgorithm class had three methods CreateDES, Encryption, and Decryption.
Code Snippet
using System;
using System.Collections.Generic;
using System.IO;
using System.Linq;
using System.Security.Cryptography;
using System.Text;

namespace APIConsumer.CryptoLibrary
{
    public static class TripleDESAlgorithm
    {

        private static TripleDES CreateDES(string key, string IV)
        {
            MD5 md5 = new MD5CryptoServiceProvider();
            TripleDES des = new TripleDESCryptoServiceProvider();
            des.Key = md5.ComputeHash(Encoding.Unicode.GetBytes(key));
            des.IV = Encoding.ASCII.GetBytes(IV);
            return des;
        }

        public static byte[] Encryption(string PlainText, string key, string IV)
        {
            TripleDES des = CreateDES(key, IV);
            ICryptoTransform ct = des.CreateEncryptor();
            byte[] input = Encoding.Unicode.GetBytes(PlainText);
            return ct.TransformFinalBlock(input, 0, input.Length);
        }

        public static string Decryption(string CypherText, string key, string IV)
        {
            byte[] b = Convert.FromBase64String(CypherText);
            TripleDES des = CreateDES(key, IV);
            ICryptoTransform ct = des.CreateDecryptor();
            byte[] output = ct.TransformFinalBlock(b, 0, b.Length);
            return Encoding.Unicode.GetString(output);
        }
    }
}
After adding TripleDESAlgorithm in next step we are going to add class with name GenerateToken this class will have logic for generating token which we are going to send to Host application

The first step we are going to create the GenerateToken class in that we are going to add a static method with name CreateToken. This method takes three parameters as input [string IPAddress, string Token, long ticks]

After receiving three parameter next we want to get (keyValue, IVValue, UniqueID) for creating token this values are provided by host application when we register client at [Host application] this value are stored in appSettings of the Web.config file because if any value changes in future we do not need to make change in entire application just make change in Web.config file and it’s done.


using APIConsumer.CryptoLibrary;
using System;
using System.Configuration;
using System.Text;

namespace APIConsumer.APIToken
{
    public class GenerateToken
    {
        public static string CreateToken(string IPAddress, string Token, long ticks)
        {
            string hashLeft = string.Empty;
            string hashRight = string.Empty;
            string encry1 = string.Empty;
            string encry2 = string.Empty;

            try
            {
                string key = Convert.ToString(ConfigurationManager.AppSettings["keyValue"]);
                string IV = Convert.ToString(ConfigurationManager.AppSettings["IVValue"]);
                string UniqueID = Convert.ToString(ConfigurationManager.AppSettings["UniqueID"]);

                // [encry1] CLientIDToken : IPAddress : ticks
                encry1 = string.Join(":", new string[] { Token, IPAddress, ticks.ToString() });

                // [encry2] UniqueID + ticks
                hashLeft = Convert.ToBase64String(TripleDESAlgorithm.Encryption(encry1, key, IV));
                hashRight = string.Join(":", new string[] { UniqueID, ticks.ToString() });

                // [CLientIDToken : IPAddress : ticks + UniqueID + ticks]

    var basestring =  Convert.ToBase64String(Encoding.UTF8.GetBytes(string.Join(":", hashRight, hashLeft)));

   return basestring;

            }
            catch (Exception)
            {
                throw;
            }
        }
    }
}
After getting (keyValue, IVValue, UniqueID), next we are going to join string. First we are going to join string with pair of [Token, IPAddress, and ticks] and second string we are going to join with pair of [UniqueID, ticks] and finally we going join both independent string into one string and convert it to bytes and then this byte into ToBase64String and this string this sent to host application.


After adding GenerateToken next we are going to add a controller.

Adding new controller in controller’s folder with name Homecontroller this controller has default action method in it with name Index.

After completing with adding Controller next we are going to post data to host application.

Here we are going to use index Action method for posting data to Host application and for doing this we are going to use WebClient.
Meanwhile we also need to send a token when we are going to post data. Sending tokens means we need to generate it right. For generating token we have created class which we are going to call and assign parameter which it needs such that it generates tokens and also we need some keys from appSettings [keyValue, IVValue, UniqueID, IPAddress, and Token] passing this all parameter will generate a base64string which we are going to send as token.
If you have a look on action result you will find different one it is async action result we are going to use in this part because this API may take time to respond and also if you see code snippet of action method you will see await keyword in it because it will wait till the server respond
Below Code Snippet of Account Object which we are going to Post
[NonAction]
public AccountDetail AccountObject()
{
    AccountDetail objad = new AccountDetail();
    objad.AccountNo = "A000007";
    objad.Username = "DotnetSai";
    objad.AccountBalance = 15000;
    objad.Mobilenumber = "9999999999";
    objad.PANNumber = "ASDSD12356";
    objad.Aadhaarnumber = "XXXX-XXXX-XXXX";
    objad.EmailID = "XXX@gmail.com";
    objad.CommunicationAddress = "Mumbai";
    return objad;
}
Code snippet of Post Method
public class HomeController : Controller
{
    string Token = ConfigurationManager.AppSettings["Token"].ToString();
    string keyValue = ConfigurationManager.AppSettings["keyValue"].ToString();
    string IVValue = ConfigurationManager.AppSettings["IVValue"].ToString();
    string IPAddress = ConfigurationManager.AppSettings["IPAddress"].ToString();


[HttpGet]
public async Task<ActionResult> Index()
{
    // we are using async task
    await Task.Run(() => PostAccountDetails());
    return View();
}

[NonAction]
public void PostAccountDetails()
{
    using (var client = new WebClient())
    {
        // Generating token
        var Tokentemp = GenerateToken.CreateToken(IPAddress, Token, DateTime.UtcNow.Ticks);
        // URI where we are going to post data
        Uri URI = new Uri(ConfigurationManager.AppSettings["AuthURI"].ToString());
        // Content-Type
        client.Headers.Add("Content-Type:application/json");
        // Setting Token For sending from header
        client.Headers.Add("APIKEY", Tokentemp);
        client.Headers.Add("Accept:application/json");
        //Setting Callback
        client.UploadStringCompleted += new UploadStringCompletedEventHandler(Callback);
        //Serializing Object
        string SerializeData = JsonConvert.SerializeObject(AccountObject());
        // Encryption of object which is going to be sent
        byte[] buffer = TripleDESAlgorithm.Encryption(SerializeData, keyValue, IVValue);
        //return URI
        client.UploadStringAsync(URI, Convert.ToBase64String(buffer));
    }
}

}
Now after calling PostAccountDetails method in action result we are going to understand working of PostAccountDetails method we already generated token now we are going to send this key in header [client.Headers.Add("APIKEY", Tokentemp);] with Content-Type : application/json then we are calling UploadStringAsync method to post this data to host application meanwhile for receiving a response we need to set Callback method it will receive both errors as well as response .
In this process, we are also going to serialize an object which we are going to send and then this object is going to be encrypted and convert ToBase64String and send to host application.
Below Code Snippet of Call back method
This method is used for receiving both errors as well as a response which will be returned by Host application.
If its error [Error] will enter in if block [if] and if its result [Result] then will enter else if [else if] block.
[NonAction]
void Callback(object sender, UploadStringCompletedEventArgs e)
{
    if (e.Error != null)
    {

    }
    else if (e.Result != null || !string.IsNullOrEmpty(e.Result))
    {
        string finalData = JToken.Parse(e.Result).ToString();
        string data = TripleDESAlgorithm.Decryption(finalData, keyValue, IVValue);
        AccountDetail AccountDetail = JsonConvert.DeserializeObject<AccountDetail>(data);
    }
}
Below Snapshot of sending Token and encrypted data to Host application
Real-time debugging while sending Token and object to Host Application.
AccountDetails object which we are going to send


Below Snapshot of Host Application while receiving Token and validating it
Real-time debugging of AuthoriseAPI Attribute while it receives Token from the client application.


Below Snapshot of Host Application while receiving request and decrypting data
Real-time debugging of HTTP Post request while receiving request from client application

Till now we have seen only post method now let’s have looked on how to get data in a secure way.

Getting Data by Passing AccountID to Host application
In this part, we are going to get AccountDetail details from host application by calling Get method and in this method, we are going to pass Account ID for getting AccountDetail.
Below Code Snippet while calling GetAllAccountDetails Method
In this part, we are going to call GetAllAccountDetails Method.
[HttpGet]
public async Task<ActionResult> IndexAsync()
{
    // We are using async task
    await Task.Run(() => GetAllAccountDetails());
    return View();
}
Below Code Snippet of Call back method
In this code snippet we first have to set URI which is get one for getting data from Host application. Along with this, we have passed Account ID because we need to get data of only that Account ID which we have passed. In the same way we are going to pass APIKEY Token for authentication which will recognize that request came from is a valid client and finally we need to set call back method which will receive Response [AccountDetails object] which have been sent from Host application.
[NonAction]
public void GetAllAccountDetails()
{
    using (var client = new WebClient()) //WebClient
    {
        // URI
        Uri URI = new Uri("http://localhost:1505/api/personalaccount/" + "A000005");
        client.Headers.Add("Content-Type:application/json");
        // Generating token
        client.Headers.Add("APIKEY", GenerateToken.CreateToken(IPAddress, Token, DateTime.U
        client.Headers.Add("Accept:application/json");
        //Setting Callback
        client.DownloadStringCompleted += new DownloadStringCompletedEventHandler(DownloadS
        client.DownloadStringAsync(URI);
    }
}
Below Code Snippet of Call back method
This call back method which will receive Response which might be error or result, if it is error then it will enter in if block there we can log the error which we have received from Host application, if it enters in else block then we are going to receive [AccountDetails] which we need to Decrypt it by passing Key and Value pair and then DeserializeObject and cast to AccountDetails object for using it.
[NonAction]
void DownloadString_Callback(object sender, DownloadStringCompletedEventArgs e)
{
    if (e.Error != null)
    {
        object objException = e.Error.GetBaseException();

        Type _type = typeof(WebException);
        if (_type != null)
        {
            WebException objErr = (WebException)e.Error.GetBaseException();
            WebResponse rsp = objErr.Response;
            using (Stream respStream = rsp.GetResponseStream())
            {
                StreamReader reader = new StreamReader(respStream);
                string text = reader.ReadToEnd();
            }
        }
        else
        {
            Exception objErr = (Exception)e.Error.GetBaseException();
        }
    }
    else if (e.Result != null || !string.IsNullOrEmpty(e.Result))
    {
        string finalData = JToken.Parse(e.Result).ToString();
        string data = TripleDESAlgorithm.Decryption(finalData, keyValue, IVValue);
        AccountDetail AccountDetail = JsonConvert.DeserializeObject<AccountDetail>(data);
    }
}

Getting Data by AccountID from host application in secure way


Completed code snippet of Home controller [Client Application]


Conclusion
In this way, we are going to protect Web API when it is going to be consumed by another .NET application.
Note: This process of logic generation which is given to client in this article is for understanding in reality it will be [. DLL] which we are going to share with client for hiding logic of it for security.