
Generic WPF CRUD Control (Getting Started)
3.78/5 (14 votes)
A generic CRUD control implemented based on the MVVM pattern.
Introduction
This article covers step by step a guid to use the WPF CrudControl which is a generic CRUD control implemented based on the MVVM pattern. The control abstracts both the UI and business logic to achieve a foundation for a complete CRUD operations implementation. In the solution design article we explain the WPF CrudControl in details.
Problem Definition
Is to develop a reusable control that serves all CRUD operations and related aspects (like validation and resetting) and facilitate developing a lookup data management module with minimum code.
Northwind Demo
The demo is applied on Northwind database for two modules Suppliers and Products. In the demo we used Unity as a IoC/DI container, MVVMLight toolkit, and WPF Modern UI library for styling the main window and navigation.
To run the demo:
- Restore packages using NuGet packages manager.
- Install Sql Server LocalDB.
Getting Started
Installation using Nuget
WPF CrudControl is available on NuGet, you can install it using nuget manager or run the following command in the package manager console.
PM> Install-Package WPFCRUDControl
WPF CrudControl assemblies
- Add the following dlls to your project:
- GenericCodes.Core.dll
- GenericCodes.CRUD.WPF.dll
- Add the following resource dictionary reference to App.xaml file:
<ResourceDictionary>
    <ResourceDictionary.MergedDictionaries>
        <ResourceDictionary Source="/GenericCodes.CRUD.WPF;component/Resources/CRUDResources.xaml"/>
    </ResourceDictionary.MergedDictionaries>
</ResourceDictionary>
Or install WPF CrudControl package using NuGet manager, automatically it will add the assemblies and modify the App.xaml file.
Supplier Lookup
Now we will work step by step to create a Suppliers Lookup like the below figure. We will use Northwind database as referred in the Demo section.
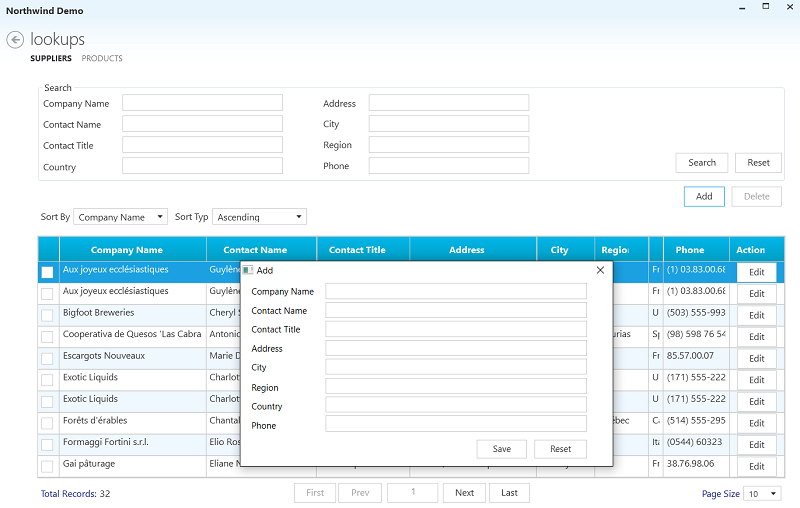
Step 1
The Entity Model:
- The
Suppliermodel must inherit fromEntityclass. - You must raise property changed for all properties used in UI by using the implemented
NotifyPropertyChanged()method inEntityclass or using Fody like we did in the code below or by any other way.
    [ImplementPropertyChanged]
    public partial class Supplier: Entity
    {
        public Supplier()
        {
            Products = new HashSet<Product>();
        }

        public int SupplierID { get; set; }

        [Required]
        [StringLength(40)]
        public string CompanyName { get; set; }

        [StringLength(24)]
        [Required]
        public string Phone { get; set; }
       ...
       ...
       ...
}
Step 2
The Crud Views & ViewModels:
In this step we need to create Supplier Lookup Search , Add/Edit popup, and listing views and viewModels as the following :
1. Supplier Search:
First we will create SupplierSearchView.xaml that will define the UI of all supplier search fields Like the xaml below:
<UserControl x:Class="Northwind.Demo.Views.Suppliers.SuppliersSearch"
             xmlns="http://schemas.microsoft.com/winfx/2006/xaml/presentation"
             xmlns:x="http://schemas.microsoft.com/winfx/2006/xaml"
             xmlns:mc="http://schemas.openxmlformats.org/markup-compatibility/2006"
             xmlns:d="http://schemas.microsoft.com/expression/blend/2008"
             mc:Ignorable="d"
             d:DesignHeight="300" d:DesignWidth="700">
            <Grid>
              <Grid.ColumnDefinitions>
                 <ColumnDefinition Width="Auto"/>
                 <ColumnDefinition Width="Auto" />
                 <ColumnDefinition Width="Auto"/>
                 <ColumnDefinition Width="*" />
              </Grid.ColumnDefinitions>
              <Grid.RowDefinitions>
                 <RowDefinition/>
                 <RowDefinition/>
              </Grid.RowDefinitions>
              <TextBlock Grid.Column="0"  Grid.Row="0" Text="Company Name" VerticalAlignment="Center"
                         Margin="2,2,16,4"  />
              <TextBox   Grid.Column="1"  Grid.Row="0" Width="220" HorizontalAlignment="Left"
                         VerticalAlignment="Center"  Margin="2,2,5,4"
                         Text="{Binding CompanyNameFilter, Mode=TwoWay}" />
              <TextBlock Grid.Column="2"  Grid.Row="0" Text="Phone" VerticalAlignment="Center"
                         Margin="50,2,16,4" />
              <TextBox   Grid.Column="3"  Grid.Row="0" Width="220" HorizontalAlignment="Left"
                         VerticalAlignment="Center"  Margin="2,2,5,4"
                         Text="{Binding PhoneFilter, Mode=TwoWay, UpdateSourceTrigger=PropertyChanged}"/>
...
...
...

           </Grid>
 </UserControl>
Then we will create the SupplierSearchViewModel.cs like the code below. This class should inherit from the abstract class SearchCriteriaBase<Supplier> and must implement its two main methods :
GetSearchCriteria(): In this method you will define your business search criteria. In our example we filterSupplierwith CompanyName and Phone. If search criteria fields are left empty, the control will return all records, otherwise it will return records that match the search criteria.ResetSearchCriteria(): In this method you will define the default values of search properties
public class SuppliersSearchViewModel : SearchCriteriaBase<Supplier>
    {
        public SuppliersSearchViewModel()
            : base()
        {

        }

        #region Public Properties

        private string _companyNameFilter = string.Empty;
        public string CompanyNameFilter
        {
            get { return _companyNameFilter; }
            set { Set(() => CompanyNameFilter, ref _companyNameFilter, value); }
        }

        private string _phoneFilter = string.Empty;
        public string PhoneFilter
        {
            get { return _phoneFilter; }
            set { Set(() => PhoneFilter, ref _phoneFilter, value); }
        }

        // other Properties
        ...
        ...
        ...
        #endregion
        public override System.Linq.Expressions.Expression<Func<Supplier, bool>> GetSearchCriteria()
        {
            return (supplier => (string.IsNullOrEmpty(_companyNameFilter) ||
                                 supplier.CompanyName.ToLower().Contains(_companyNameFilter.ToLower())) &&
                                (string.IsNullOrEmpty(_phoneFilter) ||
                                 supplier.Phone.ToLower().Contains(_phoneFilter.ToLower())));
        }

        public override void ResetSearchCriteria()
        {
            CompanyNameFilter = string.Empty;
            PhoneFilter = string.Empty;
        }
    }
2. Supplier Add/Edit popup:
First we will create SupplierAddEditView.xaml that will define the UI of all add/edit supplier fields like the follwing xaml view:
<UserControl x:Class="Northwind.Demo.Views.Suppliers.SuppliersAddEdit"
             xmlns="http://schemas.microsoft.com/winfx/2006/xaml/presentation"
             xmlns:x="http://schemas.microsoft.com/winfx/2006/xaml"
             xmlns:mc="http://schemas.openxmlformats.org/markup-compatibility/2006"
             xmlns:d="http://schemas.microsoft.com/expression/blend/2008"
             mc:Ignorable="d"
             Height="210" Width="500">
    <Grid>
        <Grid.RowDefinitions>
            <RowDefinition Height="Auto"/>
            <RowDefinition Height="Auto"/>
            <RowDefinition Height="Auto"/>
            <RowDefinition Height="Auto"/>
        </Grid.RowDefinitions>
        <Grid.ColumnDefinitions>
            <ColumnDefinition Width="Auto"/>
            <ColumnDefinition Width="*"/>
            <ColumnDefinition Width="30"/>
        </Grid.ColumnDefinitions>

        <TextBlock Grid.Row="0"
                           Grid.Column="0"
                           VerticalAlignment="Center"
                           Margin="5,0,16,4"
                           Text="Company Name"/>
        <TextBox Grid.Row="0"
                         Grid.Column="1"
                         VerticalAlignment="Center"
                         Margin="0,0,5,4"
                         Text="{Binding Entity.CompanyName}"/>

        <TextBlock Grid.Row="1"
                           Grid.Column="0"
                           VerticalAlignment="Center"
                           Margin="5,0,16,4"
                           Text="Phone"/>
        <TextBox  Grid.Row="1"
                           Grid.Column="1"
                           VerticalAlignment="Center"
                           Margin="0,0,5,4"
                           Text="{Binding Entity.Phone}"/>
..
..
..
    </Grid>
</UserControl>
Note: All UI fields will be bound to Entity.PropertyName like xaml below
<TextBox Text="{Binding Entity.CompanyName}"/>
Then we will create the SupplierAddEditViewModel.cs like code below. This class should inherit from the abstract class AddEditEntityBase<Supplier> that will handle those functionalities (Saving, resetting and validating) Entity and you can override them.
public class SuppliersAddEditViewModel : AddEditEntityBase<Supplier>
    {
        public SuppliersAddEditViewModel()
            : base()
        {

        }
    }
3. Supplier Listing:
First we will create SuppliersUC.xaml. In this file we will do the follwing:
- Define crud name-space
- Use default styles or customize them to match your application style, like ( DataGridStyle, DataGridColumnHeaderStyle, SearchButtonStyle and etc) .
- Show/Hide features like enable (Add, search, and Delete) using EnableAdd, EnableDelete, EnableSortingPaging and EnableSearch properties in xaml.
- Define the sorting columns using
SortingPropertiescollection. - Define the listing columns using
Columnscollection andColumnTypedefault type is TextColumn. - Define View DataContext
<UserControl x:Class="Northwind.Demo.Views.Suppliers.SuppliersUC"
             xmlns="http://schemas.microsoft.com/winfx/2006/xaml/presentation"
             xmlns:x="http://schemas.microsoft.com/winfx/2006/xaml"
             xmlns:mc="http://schemas.openxmlformats.org/markup-compatibility/2006"
             xmlns:d="http://schemas.microsoft.com/expression/blend/2008"
             xmlns:crud="https://genericcodes.com/crud"
             mc:Ignorable="d"
             d:DesignHeight="300" d:DesignWidth="1000"
             DataContext="{Binding Suppliers,Source={StaticResource Locator}}">
    <Grid>
        <Border Style="{DynamicResource BorderStyle}">
            <ScrollViewer Margin="5,10,0,10">
                <StackPanel MinWidth="200">
                    <crud:GenericCrudControl
                          x:Name="SupplierCrudControl"
                          EnableSortingPaging="{Binding EnableSortingPaging,Mode=TwoWay}"
                          DataGridStyle="{StaticResource CRUDDataGridStyle}"
                          DataGridColumnHeaderStyle="{StaticResource customDataGridColHeader}"
                          DataGridRowHeaderStyle="{StaticResource customDataGridRowHeader}"
                          DataGridRowStyle="{StaticResource DataGridRowStyle}"
                          DataGridCellStyle="{StaticResource DataGridCellStyle}"
                          SearchGroupBoxStyle="{StaticResource SupplierSearchGroupBoxStyle}"
                          SearchButtonStyle="{StaticResource CRUDSearchButtonStyle}"
                          SortingByComboBoxStyle="{StaticResource SortingByComboBoxStyle}"
                          SortingByLabelStyle="{StaticResource SortingByLabelStyle}"
                          SortingTypeComboBoxStyle="{StaticResource SortingTypeComboBoxStyle}"
                          SortingTypeLabelStyle="{StaticResource SortingTypeLabelStyle}"
                          ResetButtonStyle="{StaticResource CRUDResetButtonStyle}"
                          AddButtonStyle="{StaticResource CRUDAddButtonStyle}"
                          DeleteButtonStyle="{StaticResource CRUDDeleteButtonStyle}"
                          PagerTotalRecordLabelStyle="{StaticResource TotalRecordLabelStyle}"
                          PagerPageSizeLabelStyle="{StaticResource PageSizeLabelStyle}"
                          PagerFirstPageBtnStyle="{StaticResource PagerFirstPageButtonStyle}"
                          PagerLastPageBtnStyle="{StaticResource PagerLastPageButtonStyle}"
                          PagerNextPageBtnStyle="{StaticResource PagerNextPageButtonStyle}"
                          PagerPreviousPageBtnStyle="{StaticResource PagerPreviousPageButtonStyle}"
                          PagerCurrentPageTextBoxStyle="{StaticResource PagerCurrentPageTextBoxStyle}"
                          PagerPageSizeComboBoxStyle="{StaticResource PagerPageSizeComboBoxStyle}">
                        <crud:GenericCrudControl.SortingProperties>
                            <crud:SortingProperty DisplayName="Company Name" PropertyPath="CompanyName"/>
                            <crud:SortingProperty DisplayName="City" PropertyPath="City"/>
                            <crud:SortingProperty DisplayName="Country" PropertyPath="Country"/>
                        </crud:GenericCrudControl.SortingProperties>
                        <crud:GenericCrudControl.Columns>
                            <crud:CustomDataGridColumn Header="Company Name" BindingExpression="CompanyName"/>
                            <crud:CustomDataGridColumn Header="Country" BindingExpression="Country" Width="*"/>
                            <crud:CustomDataGridColumn Header="Phone" ColumnType="TemplateColumn">
                              <crud:CustomDataGridColumn.DataGridColumnTemplate>
                                  <DataTemplate>
                                      <TextBlock Text="{Binding Phone}"></TextBlock>
                                  </DataTemplate>
                              </crud:CustomDataGridColumn.DataGridColumnTemplate>
                            </crud:CustomDataGridColumn>
                        </crud:GenericCrudControl.Columns>
                    </crud:GenericCrudControl>
                </StackPanel>
            </ScrollViewer>
        </Border>
    </Grid>
</UserControl>
Then we will create SuppliersViewModel.cs class. This class should inherit from the abstarct class GenericCrudBase<Supplier>. This class's constructor requires SuppliersSearchViewModel and SuppliersAddEditViewModel objects. That will provide all CRUD functionalities like (Add, Edit, Listing, paging, and sorting). And also if you want to add some business logic before opening the Add/Edit popup window or after the entity is saved successfully, or after retrieving the data. Check this section Delegates. In our code below we defined the PostDataRetrievalDelegate to do some business on the the retrieved data which is preventing the user from selecting some entities that match certain business conditions.
public class SuppliersViewModel : GenericCrudBase<Supplier>
{
    public SuppliersViewModel(SuppliersSearchViewModel supplierSearch,ISuppliersService supplierService,
                              SuppliersAddEditViewModel suppliersAddEdit)
        : base(supplierSearch, suppliersAddEdit)
    {
        PostDataRetrievalDelegate = (list) =>
        {
            supplierService.UpdateCanSelect(list);
        };
    }
}
Now we will create the resource dictionary SuppliersTemplates.xaml and add two DataTemplate(s) to define the presentation of SupplierSearch and SupplierAddEdit. Check the code below:
<ResourceDictionary xmlns="http://schemas.microsoft.com/winfx/2006/xaml/presentation"
                    xmlns:x="http://schemas.microsoft.com/winfx/2006/xaml"
                    xmlns:supplierViewModels="clr-namespace:Northwind.Demo.ViewModel.Suppliers"
                    xmlns:supplierViews="clr-namespace:Northwind.Demo.Views.Suppliers">

    <DataTemplate DataType="{x:Type supplierViewModels:SuppliersSearchViewModel}">
        <supplierViews:SuppliersSearch/>
    </DataTemplate>

    <DataTemplate DataType="{x:Type supplierViewModels:SuppliersAddEditViewModel}">
        <supplierViews:SuppliersAddEdit/>
    </DataTemplate>

</ResourceDictionary>
Then you should add this resource dictionary reference to App.xaml:
<ResourceDictionary>
 <ResourceDictionary.MergedDictionaries>
   <ResourceDictionary Source="/GenericCodes.CRUD.WPF;component/Resources/CRUDResources.xaml"/>
   <ResourceDictionary Source="/Resources/SuppliersTemplates.xaml"/>
 </ResourceDictionary.MergedDictionaries>
</ResourceDictionary>
Step 3
IoC Container Registration:
In this step you need to register your project DbContext, IUnitofWork, IRepository<T>, IDialogService and ViewModels into your container. In our Demo we use Unity container. Check code below:
 public class ViewModelLocator
    {
        static ViewModelLocator()
        {

            IUnityContainer container = new UnityContainer();

            #region register DataContext & UnitOfWork
            Database.SetInitializer<NorthwindContext>
                                    (new System.Data.Entity.NullDatabaseInitializer<NorthwindContext>());

            container.RegisterType<ApplicationDbContext, NorthwindContext>();
            container.RegisterType<IUnitOfWork, UnitOfWork>();

            #endregion

            #region Register Repositories
            container.RegisterType<IRepository<Supplier>, Repository<Supplier>>();
            container.RegisterType<IRepository<Product>, Repository<Product>>();
            container.RegisterType<IRepository<Category>, Repository<Category>>();
            #endregion

            #region Register App Services
            container.RegisterType<IDialogService, DialogService>();
            #endregion

            #region Register Business Services
            container.RegisterType<ISuppliersService, SuppliersService>();
            container.RegisterType<IProductService, ProductService>();
            //container.RegisterType<IService<Category>, Service<Category>>();
            #endregion

            #region Register ViewModels

            container.RegisterType<MainViewModel>();

            container.RegisterType<SuppliersViewModel>();
            container.RegisterType<SuppliersSearchViewModel>();
            container.RegisterType<SuppliersAddEditViewModel>();

            container.RegisterType<ProductsListViewModel>();
            container.RegisterType<ProductsSearchViewModel>();
            container.RegisterType<ProductAddEditViewModel>();

            #endregion

            ServiceLocator.SetLocatorProvider(() => new UnityServiceLocator(container));
        }

        public SuppliersViewModel  Suppliers
        {
            get
            {
                return ServiceLocator.Current.GetInstance<SuppliersViewModel>();
            }
        }
    }
Note:
Your App DBContext should inherit from ApplicationDbContext.
public partial class NorthwindContext : ApplicationDbContext
    {
        public NorthwindContext()
            : base("name=NorthwindContext")
        {
        }
       public virtual DbSet<Supplier> Suppliers { get; set; }
..
..
..
}
Conclusion
Using WPF CrudControl gives a huge productivity boost for straight forward Crud opertions. It requires relatively minimal coding effort, while keeping it possible to customize its behavior.
You can enhance the WPF CrudControl in this repository and use it directly through this NuGet package.