
CRUD Using Scaffolding And Entity Framework
4.96/5 (16 votes)
In this article, we will see in detail how to create a simple Student Master CRUD (Create/Read/Update and Delete) using scaffolding.
Introduction

What is Scaffolding?
CRUD is very easy and simple using Scaffolding. Yes, Scaffolding will automatically generate code on the controller and view for performing our CRUD operation, by selecting our MVC Model and DBContext. It saves the developer time by eliminating the need to write a single line of code for creating CRUD pages. Scaffolding will use Model and our DBContext for generating automatic code for our CRUD operations. We will see in detail in this article how to add Scaffolding in our project for our Student Master CRUD.
Reference
Prerequisites
- Visual Studio 2015: You can download it from here.
- ASP.NET 5 /Core 1.0: Download ASP.NET 5 RC from this link https://get.asp.net/
Using the Code
After installing both Visual Studio 2015 and ASP.NET 5, click Start, then Programs, and select Visual Studio 2015 -- click Visual Studio 2015. Click New, then Project, select Web, and select ASP.NET Web Application. Enter your Project Name and click OK.

Select Web Application under ASP.NET 5 Template and click OK.

Create a Database
We will be using our SQL Server database for our CRUD operation. First, we create a database named StudentsDB, and a table, StudentMaster. Here is the SQL script to create the database table and a sample record insert query in our table.
USE MASTER

GO

-- 1) Check for the Database Exists .If the database is exist then drop and create new DB

IF EXISTS (SELECT [name] FROM sys.databases WHERE [name] = 'StudentsDB' )

DROP DATABASE StudentsDB
GO

CREATE DATABASE StudentsDB
GO

USE StudentsDB

GO

-- 1) //////////// StudentMasters

IF EXISTS ( SELECT [name] FROM sys.tables WHERE [name] = 'StudentMasters' )

DROP TABLE StudentMasters
GO

CREATE TABLE [dbo].[StudentMasters](
        [StdID] INT IDENTITY PRIMARY KEY,
        [StdName] [varchar](100) NOT NULL,
        [Email]  [varchar](100) NOT NULL,
        [Phone]  [varchar](20) NOT NULL,
        [Address]  [varchar](200) NOT NULL
)

-- insert sample data to Student Master table
INSERT INTO [StudentMasters]   ([StdName],[Email],[Phone],[Address])
     VALUES ('Shanu','syedshanumcain@gmail.com','01030550007','Madurai,India')

INSERT INTO [StudentMasters]   ([StdName],[Email],[Phone],[Address])
     VALUES ('Afraz','Afraz@afrazmail.com','01030550006','Madurai,India')


INSERT INTO [StudentMasters]   ([StdName],[Email],[Phone],[Address])
     VALUES ('Afreen','Afreen@afreenmail.com','01030550005','Madurai,India')

       select * from [StudentMasters]

To change the default connection string with our SQL connection, open the “appsettings.json” file. Yes, this is a JSON file and this file looks like the below image by default.

Now, the default connection string will be something like this:
"ConnectionString": "Server=(localdb)\\mssqllocaldb;Database=aspnet5-MYASP.NET5DemoTest-afb3aac0-d181-4278-8436-cafeeb5a8dbf;
Trusted_Connection=True;MultipleActiveResultSets=true"
Now, we change this to our SQL Connection like below:
"ConnectionString":  "Server=YourSQLSERVERNAME;Database=StudentsDB;user id=SQLID;password=SQLPWD;
Trusted_Connection=True;MultipleActiveResultSets=true;"
Here, you can change as per your SQL Connection and save the “appsettings.json” file. The updated JSON file will look like this:

Creating Our Model
We can create a model by adding a new class file in our Model folder.

Right click the Models folder and click Add New Item. Select Class and enter your class name as “StudentMasters.cs”.

Here, our class will look like the below image. Here, we will add our model field property.

Add the header file using System.ComponentModel.DataAnnotations; and add all our table field names as property in this model class, as in the following:
using System;
using System.Collections.Generic;
using System.Linq;
using System.Threading.Tasks;
using System.ComponentModel.DataAnnotations;

namespace MYASP.NET5DemoTest.Models
{
    public class StudentMasters
    {
               [Key]
               public int StdID { get; set; }

               [Required]
               [Display(Name = "Name")]
               public string StdName { get; set; }

               [Required]
               [Display(Name = "Email")]
               public string Email { get; set; }

               [Required]
               [Display(Name = "Phone")]
               public string Phone { get; set; }

               public string Address { get; set; }
       }
}
Now, we have created our Model; the next step is to add DBContext for our model.
Creating DbContext
Now, we need to create a DBContext for our Entity Framework. Same as with Model Class; add a new class to our Models folder.
Right click the Models folder and click Add New Item. Select Class and enter your class name as “StudentMastersAppContext.cs”.

Here, our class will look like the following screenshot:

Now, first we need to add the header file for Entity framework using Microsoft.Data.Entity;
Next, inherit the DbContext to our class, and then create object for our DBContext like the below code.
using System.Collections.Generic;
using System.Linq;
using System.Threading.Tasks;
using Microsoft.Data.Entity;

namespace MYASP.NET5DemoTest.Models
{
    public class StudentMastersAppContext : DbContext
       {
               public DbSet<StudentMasters> Students { get; set; }
       }
}
Now, we can create our DB context, and the next step is to add a Service for our Entity Framework.
Adding Entity Framework Service in Startup.cs
Next, we need to add our Entity Framework service in Startup.cs. We can find the Startup.cs file from our solution explorer.

Open the Startup.cs file, and we can see by default the ApplicationDBContext will be added in the ConfigureServices method.
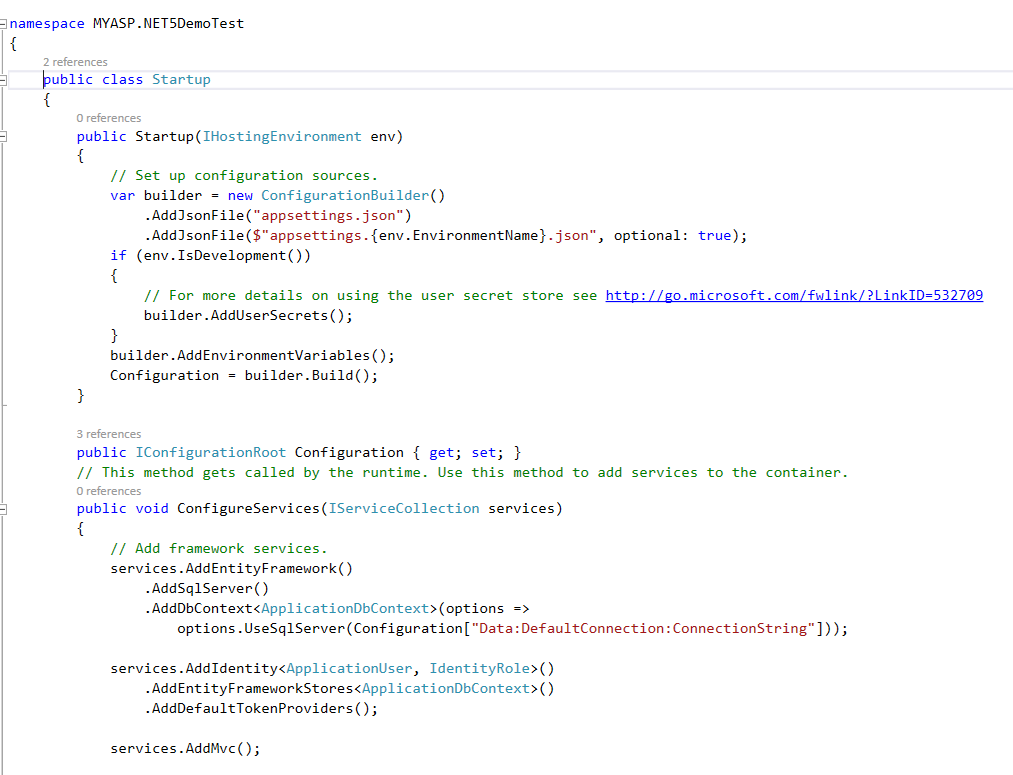
Now, we can add one more DBContext for our StudentMastersAppContext as in the below code:
// Add Entity Framework
                      services.AddEntityFramework()
                     .AddSqlServer()
                     .AddDbContext<StudentMastersAppContext>(options =>
                       options.UseSqlServer
                       (Configuration["Data:DefaultConnection:ConnectionString"]));
In ConfigureServices method, we add code like this below:
public void ConfigureServices(IServiceCollection services)
        {
            // Add framework services.
            services.AddEntityFramework()
                .AddSqlServer()
                .AddDbContext<ApplicationDbContext>(options =>
                    options.UseSqlServer
                    (Configuration["Data:DefaultConnection:ConnectionString"]));

            services.AddIdentity<ApplicationUser, IdentityRole>()
                .AddEntityFrameworkStores<ApplicationDbContext>()
                .AddDefaultTokenProviders();

            services.AddMvc();

                      // Add Entity Framework
                      services.AddEntityFramework()
                                 .AddSqlServer()
                                 .AddDbContext<StudentMastersAppContext>(options =>
                        options.UseSqlServer
                        (Configuration["Data:DefaultConnection:ConnectionString"]));

                      // Add application services.
                      services.AddTransient<IEmailSender, AuthMessageSender>();
            services.AddTransient<ISmsSender, AuthMessageSender>();
        }
Next step is to add Scaffolding.
Adding Scaffolding
For adding the Scaffolding, right click Controller folder and click Add -> new Scaffolding Item.

Select MVC 6 Controller with Views, using Entity Framework and click Add.

Now, we need to select our newly created Model class and our Data Context Class.
Model Class: In Model Class, select our Model Class which we created as “StudentMasters”.
Data Context Class: In Data Context, select our DBContext class which we created as “StudentMastersAppContext”.

Yes, we have completed it now. We can see a new Controller class “StudentMastersController.cs” will be created inside our Controllers folder.

We can see this “StudentMastersController.cs” controller class will have auto generated code for our Student Master CRUD operations.

In the Views folder, we can see our StudentMasters automatic view will be created for our CRUD operation. Here, we have no need to write any code for our CRUD operation. But we can customize this controller and view if required.

Yes, everything is finished now, and we need just run our application and Create/Edit/Delete and View Student Master details.
Add Student Menu
Before that, we must create a new menu to see our Students page.
For adding a menu, click Views Folder -> Open Shared Folder and Open layout.cshtml page.

In layout.cshtml file, we can find the following code:
<div class="navbar-collapse collapse">
      <ul class="nav navbar-nav">
          <li><a asp-controller="Home"
          asp-action="Index">Home</a></li>
          <li><a asp-controller="Home"
          asp-action="About">About</a></li>
          <li><a asp-controller="Home"
          asp-action="Contact">Contact</a></li>
       </ul>
                    @await Html.PartialAsync("_LoginPartial")

 </div>
We can remove the About and Contact menu and add our Student menu with the controller name like the following code:
<div class="navbar-collapse collapse">
        <ul class="nav navbar-nav">
             <li><a asp-controller="Home"
             asp-action="Index">Home</a></li>
             <li><a asp-controller="StudentMasters"
             asp-action="Index">Student</a></li>
        </ul>
             @await Html.PartialAsync("_LoginPartial")
 </div>
Run the Program
Yes, everything is completed now, and your simple Student CRUD using ASP.NET 5 is completed. Now press F5 and run the project -- you can see the output as in the following image:

Here, we will add a new test student details and also we can see the changes updated in SQL Server.

History
- 2016/03/01: Initial version