
WebGrid in ASP.NET MVC
Webgrid in ASP.NET MVC
Introduction
In this article, we will be talking about Webgrid in ASP.NET MVC. As an ASP.NET Webforms developer, we are aware of the DataGrid server controls (gridview/datagrid) which we use usually when we want to display records to the user. So as we know right now, we have ASP.NET WebForms and ASP.NET MVC. In ASP.NET MVC, there are no server controls(toolbox) as in ASP.NET Web Forms. But as Microsoft can understand the pain of developer long running time in making table and looping to it and then handling the same using jQuery, they have provided us with WebGrid class. So why wait, just grab your PC/laptop, start your Visual Studio and let’s get started.
Simple Example
Basically, the grid contains the list of records, i.e., Collection in MVC that need to strongly typed list, etc. So here, we are going to display the records into the WEB Grid.
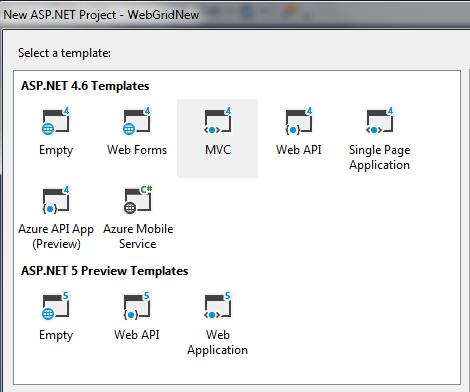
STEP 1: Create a New MVC Project

STEP 2: Select MVC
STEP 3: Add a new Empty MVC Controller

Name it as per your understanding, here I am naming it by Meeting because this Controller will handle request of Meeting.
Here below, I am showing Meeting details records of the Table from the database as shown below:

Now we will create our Model class which contains the properties which are the same as the Table shown above.
STEP 4: Creating Meeting Class

Now, we will declare the properties for the class as shown below, we will using Entity framework for retrieving data from the table, in order to do that we need to set the key that is needed to be defined for entity framework as shown below.
using System.Data.Entity;
using System.ComponentModel.DataAnnotations;
namespace WebGridNew1.Models
{
    public class Meeting
    {
        [Key]
        public int MeetingId { get; set; }
        public string MeetingName { get; set; }
        public string Format { get; set; }
        public string Location { get; set; }
    }
}
We will be retrieving data from DB Schema using Entity Framework. In order to do the same, we have to download Entity Framework from NuGet Packages.


Install the same.
Now, we will add one more class and name it DataAccessLayer.cs. This class will contain all the mapping code with the tables and DbContext.
STEP 5: Adding DAL Class and adding the properties as shown below
using System;
using System.Collections.Generic;
using System.Data.Entity;
using System.Linq;
using System.Web;
namespace WebGridNew1.Models
{
    public class DataAccessLayer:DbContext
    {
        public DbSet<Meeting> MeetingMaster { get; set; }
        protected override void OnModelCreating(DbModelBuilder modelBuilder)
        {
      modelBuilder.Entity<Meeting>().ToTable("tblMeetingMaster");
            base.OnModelCreating(modelBuilder);
        }
    }
}
Write the Mapping code, Dbset MeetingMaster will return a collection of Meetings and modelBuilder.entity will Map Model and Database schema table.
Now, we will add the web config file and add a connection string.
STEP 6: Go to Server Explorer and add a new Connection

Choose your database

Right click on Data Connection and then go to properties, copy connection string and add a connection string in Web.Config file:

<connectionStrings>
    <add name="DataAccessLayer"
connectionString="Data Source=.;Initial Catalog=Demos;Integrated Security=True"
      providerName="System.Data.SqlClient" />
  </connectionStrings>
Make sure you name <add name="_"> same as your Data Access layer class name.
Now, we will add one more class called ViewModel, ViewModel is type of layer between our model and view, which will communicate between view and model and will, contains view logic, basically ViewModel helps us for maintaining Separation of Concern between our View and Controller.
So what we are going to do, Here is the actual theme of project our DAL Layer will fetch the data from table, which will be consumed by ViewModel and assigned to the list and the list object will be sent to the strongly typed view of ViewModel class where it will display the data into WebGrid. In order to check whether the list of meeting is null, we have added a property in ViewModel called Status which will check if list of Customers is null, if it’s null then in View, we will hide the WebGrid, otherwise it will show.
Below is the MeetingViewModel Class:
using System.Web;
using WebGridNew1.Models;
namespace WebGridNew1.Models
{
    public class MeetingVM
    {
        public Meeting  MeetingObj { get; set; }//contains single meeting details
        public List<Meeting> MeetingsObj { get; set; }//list of meeting
        public string  Status { get; set; }//This will help us to handle the view logic
    }
}
Now in Controller, we will create object of DAL Class and retrieve all records from database and will return the object of ViewModel to view.
using System.Web.Mvc;
using WebGridNew1.Models;
namespace WebGridNew1.Controllers
{
    public class MeetingController : Controller
    {
        public ActionResult Index()
        {
            DataAccessLayer objDAL = new DataAccessLayer();
            MeetingVM objMeetingVM = new MeetingVM();
            objMeetingVM.MeetingsObj = new List<Meeting>();
            objMeetingVM.MeetingsObj = objDAL.MeetingMaster.ToList<Meeting>();
            return View(objMeetingVM);
        }
    }
}
Adding a View Named index and creating it strongly typed view of MeetingViewModel class.
STEP 5: Adding Index View


Now copy the below code and copy the same:
@model WebGridNew1.Models.MeetingVM
@{
    Layout = null;
}
<!DOCTYPE html>
<html>
<head>
    <meta name="viewport" content="width=device-width" />
    <title>Index</title>
</head>
<body>
    <div style="display:'@Model.Status'">
        @{
            WebGrid objWebGrid = new WebGrid(Model.MeetingsObj);
        }
        @objWebGrid.GetHtml()
    </div>
</body>
</html>
We can see that WebGrid is a class that contains in System.Web.Helpers.WebGrid, here we created object of WebGrid Class and assign our list of Meeting Model.
@objWebGrid.GetHtml();
This function returns HTML markup that is used to render the object we created above specified paging.
Now, we will run our program and see how the WebGrid renders the model and displays the model data, by default paging and sorting is true in WebGrid and the same can be disabled.

Now we will go ahead and do some styling to our WebGrid. In order to style our headers, we need to create <style> in our head section, I am selecting rows per page as 5 and defining classes as shown below and their respective style.
<div style="text-align:center;display:@Model.Status">
        @{
            WebGrid objWebGrid = new WebGrid(Model.MeetingsObj,rowsPerPage:5,canPage:true);
        }
        @objWebGrid.GetHtml(
       tableStyle:"Grid-table",
       headerStyle:"Grid-Header",
       alternatingRowStyle:"Grid-alt",
       selectedRowStyle:"Grid-selected",
       rowStyle: "Grid-rowstyle",
       mode: WebGridPagerModes.All //Specifies flags that describe the methods
       // that are provided for moving between the pages of a WebGrid instance.
       // source msdn.microsoft.com
  )
</div>

Now we will pass empty null model and will try to handle the in view model so now I will be sending an empty model and will handle view logic in ViewModel class as shown below.
namespace WebGridNew1.Models
{
    public class MeetingVM
    {
        public Meeting  MeetingObj { get; set; }//contains single meeting details
        public List<Meeting> MeetingsObj { get; set; }//list of meeting
        public string  Status {
            get
            {
                if (MeetingsObj.Count > 0)
                {
                    return "block";
                }
                else
              { return "none";  }
            }
                }//This will help us to handle the view logic
    }
}
In controller:
public ActionResult Index()
        {
            DataAccessLayer objDAL = new DataAccessLayer();
            MeetingVM objMeetingVM = new MeetingVM();
            objMeetingVM.MeetingsObj = new List<Meeting>();
            //objMeetingVM.MeetingsObj = objDAL.MeetingMaster.ToList<Meeting>();
    // commented the code for records retrieval and returning empty object
            return View(objMeetingVM);
        }
Now let’s see how it works step by step, I have inserted a break point in status property as well as controller.

Here, we are creating a null object and will return the same:

Now when in View, we want to get the value of Status property, it will check the status property value as shown above:

Here the status will return, so the div will not be displayed now.
Now what if you want to have your Custom Headers in WebGrid, so in order to achieve that, we have to add the following code:
  <div style="display:@Model.Status">
        @{
            WebGrid objWebGrid = new WebGrid(Model.MeetingsObj,
            rowsPerPage:5,canPage:true);//allowing rowsperpage,paging allow or not
        }
        @objWebGrid.GetHtml(

     tableStyle:"Grid-table",
       headerStyle:"Grid-Header",
       alternatingRowStyle:"Grid-alt",
       selectedRowStyle:"Grid-selected",
       rowStyle: "Grid-rowstyle",
       footerStyle: "Grid-Footer",
       mode: WebGridPagerModes.All, //Specifies flags that describe the methods
       // that are provided for moving between the pages of a WebGrid instance.
       // source msdn.microsoft.com
    columns:
       objWebGrid.Columns
       (
           objWebGrid.Column(columnName: "MeetingID", header:"Meeting ID"),
           objWebGrid.Column(columnName: "MeetingName", header: "Name of Meeting"),
           objWebGrid.Column(columnName: "Format", header: "Name of Fomat"),
           objWebGrid.Column(columnName: "Location", header: "Location at")
           )
       )
   </div>

Generally in project, we have to export the whole grid to Excel, so now we will export the same to Excel.
In order to achieve the same, we will just create a form and insert a submit button as shown below.
I created a form with method type Post, which hit the action called ExportHeade.
<form id="exportWebGrid" action="Meeting/ExportHeade" method="post">
AND add a submit button:
  <input id="Submit1" type="submit" value="Export to Excel" />
    </form>
Now we will write an ActionResult method as shown below which will export the grid to Excel.
DataAccessLayer objDAL = new DataAccessLayer();
            MeetingVM objMeetingVM = new MeetingVM();
            objMeetingVM.MeetingsObj = new List<Meeting>();
            objMeetingVM.MeetingsObj = objDAL.MeetingMaster.ToList<Meeting>();
            WebGrid grid = new WebGrid
            (source: objMeetingVM.MeetingsObj, canPage: false, canSort: false);
            string gridData = grid.GetHtml(
                columns: grid.Columns(
                        grid.Column("MeetingID", "Meeting ID"),
                        grid.Column("MeetingName", "Name of Meeting"),
                        grid.Column("Format", "Name of Fomat"),
                        grid.Column("Location", "Location at")
                        )
                   ).ToString();
            Response.ClearContent();
            Response.AddHeader("content-disposition",
            "attachment; filename=MeetingDetails.xls");
            Response.ContentType = "application/excel";
            Response.Write(gridData);
            Response.End();
            return View(objMeetingVM);
Now, I can do the same when I don’t want any Header formatting by simply sending passing the list of meeting to GridView object and then export the same as shown below:
        public ActionResult ExportHeade()
        {
            DataAccessLayer objDAL = new DataAccessLayer();
            MeetingVM objMeetingVM = new MeetingVM();
            objMeetingVM.MeetingsObj = new List<Meeting>();
            objMeetingVM.MeetingsObj = objDAL.MeetingMaster.ToList<Meeting>();
            GridView obj = new GridView();
            obj.DataSource = objMeetingVM.MeetingsObj;
            obj.DataBind();
            Response.AddHeader("content-disposition",
            string.Format("attachment; filename={0}", "Meeting.xls"));
            Response.ContentType = "application/ms-excel";
           System.IO.StringWriter sw = new StringWriter();
            HtmlTextWriter htw = new HtmlTextWriter(sw);
            obj.HeaderRow.Style.Add("background-color", "#FFFFFF");
            for (int i = 0; i < obj.HeaderRow.Cells.Count; i++)
            {
                obj.HeaderRow.Cells[i].Style.Add("background-color", "#507CD1");
            }
            int j = 1;
            foreach (GridViewRow gvrow in obj.Rows)
            {
                gvrow.BackColor = Color.White;
                if (j <= obj.Rows.Count)
                {
                    if (j % 2 != 0)
                    {
                        for (int k = 0; k < gvrow.Cells.Count; k++)
                        {
                            gvrow.Cells[k].Style.Add("background-color", "#EFF3FB");
                        }
                    }
                }
                j++;
            }
            obj.RenderControl(htw);
            Response.Write(sw.ToString());
            Response.End();
           return View(objMeetingVM);
        }
Image showing after user clicks on generate to Excel:

Now what if Users want to perform operation like delete on the WebGrid Details. For that, we can achieve the same by using the below code:
<form id="exportWebGrid" action="Meeting/ExportHeade" method="post">
        <div name="webView" style="display:@Model.Status">
            @{
                WebGrid objWebGrid = new WebGrid(Model.MeetingsObj, rowsPerPage: 5, canPage: true);
            }
            @objWebGrid.GetHtml(
       tableStyle: "Grid-table",
       headerStyle: "Grid-Header",
       alternatingRowStyle: "Grid-alt",
       selectedRowStyle: "Grid-selected",
       rowStyle: "Grid-rowstyle",
       footerStyle: "Grid-Footer",
       mode: WebGridPagerModes.All, //Specifies flags that describe the methods that are provided for moving between the pages of a WebGrid instance. source msdn.microsoft.com
    columns:
       objWebGrid.Columns
       (
           objWebGrid.Column(columnName: "MeetingID", header: "Meeting ID"),
           objWebGrid.Column(columnName: "MeetingName", header: "Name of Meeting"),
           objWebGrid.Column(columnName: "Format", header: "Name of Fomat"),
           objWebGrid.Column(columnName: "Location", header: "Location at"),
           objWebGrid.Column(format:@<text><a href=""
           onclick="DeleteME('@item.MeetingID')">Delete</a></text>)
           )
    )
        </div>
 <input id="Submit1" type="submit" value="Export to Excel" />
    </form>
In Header section:
<script>
         function DeleteME(id)
            {
                debugger;
                $.ajax({
                    type: 'POST',
                    url: 'http://localhost:18175/meeting/DeleteMeeting',
                    data:{
                        MeetingId:id
                    }
            }); //e
        }
</script>
We will create an Action Result which will handle the post request and will delete the data from the database and will return the new records.
[HttpPost]
        public ActionResult DeleteMeeting(Meeting objMeeting)
        {
            MeetingVM obj = new MeetingVM();
            DataAccessLayer objDAL = new DataAccessLayer();
          objDAL.MeetingMaster.RemoveRange
          (objDAL.MeetingMaster.Where(c => c.MeetingId == objMeeting.MeetingId));
            objDAL.SaveChanges();
            obj.MeetingsObj = objDAL.MeetingMaster.ToList<Meeting>();
            return View(obj);
        }
Here, we have created object of Meeting and the meeting id will be passed from ajax call, we can pass more properties as required, this meeting id will be compared with list of Meetings and the same will be removed from the list and changes will be made to the db as well. As shown below:


Once the User clicks on delete of a specific row DeleteMeeting action method will be called as shown below, note I have clicked on 4 Meeting Id.

Going further, this meeting id will be deleted form the DB and changes will be made, after that we fetch the updated list of Meeting records and pass the same to the View.

As you can see, 4th Meeting ID is deleted.
In case you want to Learn MVC from scratch you can see the below video
