
Using auto-layout to Span the Entire Width of the Underlying View
4.80/5 (2 votes)
Using auto-layout to position two buttons that span the entire width of the underlying view
Introduction
While auto-layout significantly simplifies the way we layout user interface, it is not always easy to figure out how to use it.
In this tutorial, we will walk through the basic steps needed to position two buttons so that they span the entire width of the underlying view.
Background
Auto-layout was introduced in iOS 6 and is becoming more and more an integral part of iOS development (especially with the introduction of new screen sizes for iPhone 6).
Instead of defining a fixed position for each view, auto-layout is using constraints to uniquely position each element on the screen.
The big advantage of using the auto-layout is that it allows us to create an interface that responds in a predictable manner to changes in screen size (including device orientation).
While it is possible to create constraints programmatically, in this tutorial, we will only be using the Interface Builder.
1. Adding Views and Controls to the Interface
We will create a simple iOS project by going to File -> New -> Project and choosing "Single View Application" under iOS/Application.

We will name it SFTwoButtonLayout.

2. Adding Views and Controls
Open the Main_iPhone.storyboard file.
We will drop two buttons (UIButton) into the main view and will try to position them approximately where they should be.
The buttons can be dragged from the object library located at the bottom-right corner of XCode.

3. Adding Left Button Constraints
In the storyboard, select the left button and in the bottom right corner click on the pin (+) button. We want to add 4 constraints - pin to the left & top and set width & height.

4. Adding Right Button Constraints
In the storyboard, select the right button and in the bottom right corner, click on the pin (+) button. We want to add 4 constraints - pin to the right & top and set width & height.

5. Set the Space Between the Buttons
The next thing we want to do is to set the spacing between the two buttons.

6. Adjust the Space Between the Buttons
Now we want to adjust this spacing to 10pt. We do it by selecting the two buttons by holding the command key and clicking on the buttons. And then choosing the correct constraint on the right.

7. Set the Buttons to be of Equal Width
We want the buttons to have the same width.

8. Adjust the Width of Each Button
Let's make sure that the width of the buttons grows as with the view. To do so, we select width constraint of each button and set it to "Greater Than or Equal."

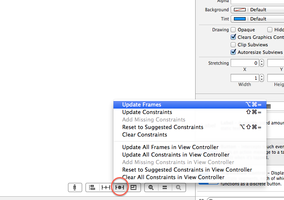
9. Update the Frames
Update the frames so that the layout looks like in the real world by selecting each button and clicking the big fat dot in the bottom-right part of the screen.
The End Result
The buttons span the entire width of the view and are attached to the top, left, and right corners.

Resizing the Screen
And it looks beautiful even if we flip the phone.

Some Points of Interest
While that was a simple tutorial, in the real world, we will probably encounter at least some issues with constraints, such as ambiguous or conflicting constraints.
For instance, if by mistake in step 6, we were to set the constraint to 400pt instead of 10pt, the auto-layout would not be able to satisfy all the constraints because the screen width is 320pt.
So XCode would give us an error that we would have to fix.
Also in the real world, we would probably need to implement another set of constraints for an iPad.
History
- v1.0