
Two Way Binding using JavaScript in ASP.NET MVC With Database
4.47/5 (4 votes)
Two way binding using JavaScript
Introduction
This tip explores two-way data binding and illustrates how you can use the feature. The sample application that accompanies the tip walks you through the process for implementing two-way data binding in ASP.NET MVC.
Before proceeding, we should understand the two way binding.
TwoWay – When source property changes, it will update target property and when target property changes, it will update source property. For example, if you bind customer name property with TextBox’s Text property using twoway binding mode, then whenever user changes text in textbox will update CustomerName property and similarly whenever CustomerName property changes will update Textbox’s text property.
In my application, I have used JavaScript for two way binding and a database where the value will be saved. For two way binding, the different technology is available like angular js , knockout js. But here, I am using JavaScript only.
Background
To implement this application, I used the Ajax method at user interface for sending and retrieving the data. So to understand this application, the user must have knowledge of JavaScript, Ajax, and ADO.NET.
Design
Following are the steps to create the application:
- Open Visual Studio and select the new Project.
- Within the Web template, select ASP.NET MVC4 WEB Application with empty template.
- Now add a Home Controller and a view Page for Index Action Method.
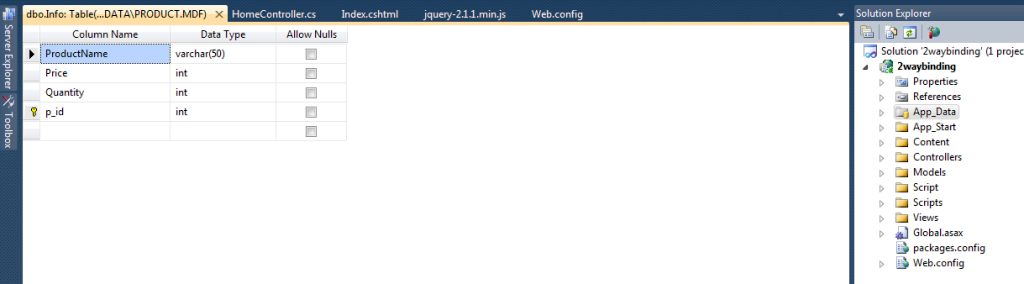
- Now add a database file .mdf file in your project. This can be added by right clicking on App_data folder and add a database file.
- In the database file, add a table by the name of
Infoand create 4 columns,Productname,Price,Quantity,Identitycolumn that isP_id
Here are the screen shots that will show the different files that are used in my application.

Using the Code
This is the home controller which contains the logic for retrieving the data from the database and to store the data into the database.
using System;
using System.Collections.Generic;
using System.Linq;
using System.Web;
using System.Web.Mvc;
using _2waybinding.Models;
using System.Data.SqlClient;
using System.Data.Sql;
using System.Configuration;
using System.Data;

namespace _2waybinding.Controllers
{
    public class HomeController : Controller
    {
        string connection = ConfigurationManager.ConnectionStrings["DBCS"].ConnectionString;
        public ActionResult Index()
        {
            return View();              //first request come to this action method
        }

        public JsonResult getdata()     //logic for fetch the data from database
        {
            string[] data = new string[9]; int i = 0;
            using (SqlConnection con = new SqlConnection(connection))
            {
                con.Open();
                SqlCommand cmd = new SqlCommand("selectall", con);
                cmd.CommandType = CommandType.StoredProcedure;
                SqlDataReader dr = cmd.ExecuteReader();
                while (dr.Read())
                {
                    for (int j = 0; j < dr.FieldCount; j++)
                    {
                        data[i] = dr[j].ToString();
                        i++;
                    }
                }
            }
            return Json(data, JsonRequestBehavior.AllowGet);    // return json data to UI
        }
        [HttpPost]
        public JsonResult Index(string[] content) //posting action method
        {
            string msg="";
            foreach(string check in content)   //condition to check wether array is null
            {
                if (check == "")
                {
                    msg = "Data Must Required !";
                    return Json(msg, JsonRequestBehavior.AllowGet);
                }
            }
            int i = 0, count=0;
            int total = content.Length;

            using (SqlConnection con = new SqlConnection(connection))
            {

                for (; i < total; i++)    //logic for saving the data into database
                {
                    count++;
                    SqlCommand cmd = new SqlCommand("SP", con);
                    cmd.CommandType = CommandType.StoredProcedure;
                    SqlParameter pname = new SqlParameter()
                    {
                        ParameterName = "@PName",
                        Value = content[i].ToString()
                    };
                    cmd.Parameters.Add(pname);
                    ++i;

                    SqlParameter price = new SqlParameter()
               {
                   ParameterName = "@Price",
                   Value =Convert.ToInt32(content[i])
               };
                    cmd.Parameters.Add(price);
                    ++i;
                    SqlParameter quantity = new SqlParameter()
                   {
                       ParameterName = "@Quantity",
                       Value =Convert.ToInt32(content[i])
                   };
                    cmd.Parameters.Add(quantity);
                    SqlParameter id = new SqlParameter()
                    {
                        ParameterName = "@id",
                        Value = count
                    };
                    cmd.Parameters.Add(id);
                    con.Open();
                    cmd.ExecuteNonQuery();
                    con.Close();
                    msg = "the data has been updated";
                }

                return Json(msg, JsonRequestBehavior.AllowGet); // return the json result
            }
        }
    }
}
Now, I am going to show the UI that I have created for it.
<html>
<head>
<h2>Index</h2>
<meta http-equiv="X-UA-Compatible" content="IE=9" />
<script src="../../Scripts/jquery-2.1.1.min.js"
type="text/javascript"></script>
<script src="../../Script/MicrosoftAjax.debug.js"
type="text/javascript"></script>
<link href="../../Content/Style.css"
rel="stylesheet" type="text/css" />   //including css file

  var products = [];

function datafill(data)         //4th step- json data fill into array object

 {  for (var i = 0; i < data.length; i++) {
 pro = { productname: data[i], price: data[++i], quantity: data[++i] };
 ? products.push(pro);
}}

function pageLoad() {

var rootUrl = '@Url.Content("~/")';
 var url = rootUrl + 'Home/getdata/';
  getdata(url);    }                        // step1-on pageload this function will call

function SaveFunction(alldata, path) {

 var content = JSON.stringify(alldata);
 $.ajax({ type: 'POST',
          url:path,
          dataType: 'json',     //step6- ajax call send the data to Index Post method
          cache: false,
          data: content,
          contentType: 'application/json;
          charset=utf-8',
          success: function (data) {    alert(data); //on success it will have the status msg.
           }
          });
       }

function getdata(url) {   //2nd step-this ajax call get the data from database
$.ajax({ type: 'GET',
          url: url,
          dataType: 'json',
           cache: false,
        contentType: 'application/json;
         charset=utf-8',
         success: function (data) {

           datafill(data);               // 3rd step- on success this function will call

  var tableview = Sys.create.dataView("#products");         //5th step- table view will create
 tableview.set_data(products);                           //6th step-we set the data in tableview
 var detailview = Sys.create.dataView("#details");       //7th step-create a detail view
  Sys.bind(detailview, "data",
  tableview, "selectedData");  //bind the table view and detail view

           }
        });
     }

 $(function () {

var rootUrl = '@Url.Content("~/")';
var templatesUrl = rootUrl + 'Home/Index/';

 $("#btn").click(function () {              //once the user click on submit button

var alldata = [];
var rowCount = $('#table >tbody >tr').length;

 $('#table >tbody >tr').each(function () {
 $(this).find('td').each(function () {
  $(this).find('input').each(function(){
alldata.push($(this).val());              // step:4-find all the data from the table

 }); });  });

SaveFunction(alldata, templatesUrl);   //step5- this function will be call

 }); });

</script>
</head>
<body xmlns:sys="javascript:Sys"> // predefined system file of javascript
<div>
<table id="table" cellpadding="0" border="1">
<thead>
<tr>
<th>ProductName</th>
<th>Price</th>
<th>Quantity(kg)</th>
</tr>
</thead>
<tbody id="products" class="sys-template">
<tr sys:command="select">
<td><input sys:value="{binding productname}" /></td>  // 2 way binding
<td><input sys:value="{binding price}" /></td>      // 2 way binding
<td><input sys:value="{binding quantity}" /></td>  // 2 way binding
</tr>
</tbody>
</table>
<br /><br />
<div id="bttndiv">
<input id="btn" type="button" value="Submit" />
</div>
</div>
<br />
<div id="details" class="sys-template">
<fieldset>
<legend>Product Details</legend>
<label for="Productnametext">Product Name</label>
<input id="Productnametext" sys:value="{binding productname}"/>  // 2 way binding
<label for="Pricetext">Price</label>
<input id="Pricetext" sys:value="{binding price}"/>         //2 way binding
<label for="QunatityText">Quntity</label>
<input id="QunatityText" sys:value="{binding quntity}"/>  // 2 way binding
</fieldset>
</div>
</body>
</html>
Final Step
After these codes, if we will run our application, it will look like the below image. Now, in this application, we have a table where we can edit the contents and these values will be reflected to the details view (Products details) and if we make changes in the detail view, the table view will change as well. This shows the two way binding. After changes, user can also save the data by clicking on submit button.

Points that are Important to Run this Application
 <connectionStrings>
 <add name="DBCS" connectionString="Data Source=.\SQLEXPRESS;
 AttachDbFilename=E:\Rahul Rai\VisualStudio\2waybinding\2waybinding\App_Data\Product.mdf;
 Integrated Security=True; User Instance=True"/>
   </connectionStrings>  // change the connection string
Step 2: To change the connection string, right click on mdf file -> properties->copy the address and replace the attachDbfilename.
Step 3: Always try to run this application in Google Chrome or Internet Explorer 9 or above.
Now in this application, you can modify and can add some extra features like for validating the user data, dynamic new row creation, delete method, etc.
I hope you enjoyed it and got some idea about two way binding using JavaScript from this post. I will try next time to implement the same application using knockout js.
If some error or wrong concept is there, please comment below as it will be helpful for me.