
Structure of 3D
5.00/5 (4 votes)
This tip describes how 3D images are converted to 2D images.

Introduction
You know that our visual world has three dimensions. Our eyes can determine the X, Y, Z axis of materials. Have you ever thought of how we see three dmension images on TV, on the computer, etc. Although they are two dimensional? How does this happen? It's a technique. In fact, in two dimension images, there is a function that converts the (x,y,z) set to the (x,y) set. It means that in the new set, the x,y axis is related to the x,y,z in the old set. Sure you see the 3D games and even the movies, you see them in a 2D TV or LCD although they are 3D. We almost can say that is the Foundation of the 3D engine and even OpenGL, etc. This means that we can make and design those. Also, we can use this algorithm for simulating sets, labs, ideas. That's why it can reduce time and cost.
In this tip, we'll check these events.
Background
To get information on this subject, you can read or search about 3-dimension. For a basic introduction, you have to know the mathematical relations and functions.
Algorithm
In fact, the base of this article is mathematical. That means we have to find the suitable relations to convert the three dimensions to two dimensions. Let's start.
To realize this matter, first we work on the chart and 2D. First of all, put the virtual axis in front of your eyes. Imagine the point q (1,1) in 2D set. You know that's equivalent to the point p (1,1,0) in the 3D set. After that, we want plus the value of Z of p and set p (1,1,1). Now imagine the point p . You see that far away from axis center and that's more up and right although that still has position (x,y)=(1,1) whatever you increase the value of Z you see the point p is going higher and on the right side. Next set the p(1,1,-1). You sure see the point p is nearing to the axis center and that is a little less than X,Y in the 2D set. And whatever you decrease, the value of Z like -extreme, the point p is going to the axis center. You can test it with real materials.
So we find out the X,Y in 2D set are related to the Z in 3D set. Like the below chart:
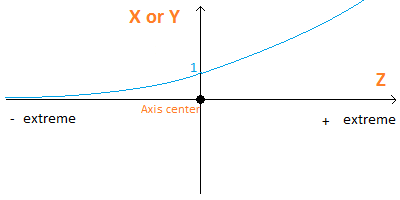
Look at these real images and compare them with the chart:


So we have these functions to get this chart:
                                                      sgn(z)
X in 2D set = f(x,y,z) in 3D set = x * | (z + sgn(z))      |
                                                     sgn(z)
Y in 2D set = f(x,y,z) in 3D set = y * | (z + sgn(z))      |
These are true when the axis center is (0,0) and when we want to have a global function and draw (x,y,z) with a (xo,yo,zo) axis center, we find these functions:
                                                      sgn(z)
X in 2D set = f(x,y,z) in 3D set = xo + x * | (z + sgn(z)) |
                                                     sgn(z)
Y in 2D set = f(x,y,z) in 3D set = yo + y * | (z + sgn(z)) |
We can adjust the focus of the camera. To do this, adjust the lens of camera. We Dim:
zm = z / lens
                                                      sgn(z)
X in 2D set = f(x,y,z) in 3D set = xo + x * | (z + sgn(z)) |
                                                     sgn(z)
Y in 2D set = f(x,y,z) in 3D set = yo + y * | (z + sgn(z)) |
To use these functions, we have to write these in the OnPaint() event. The above functions are used to draw and display the vertex from 3D set to 2D set. And for rotating the point p(x,y,z) around its center po(xc,yc,zc), we have the below three states.
These are used to 3D set.
Turning the point around Z axis, that means X,Y are rotating and Z is constant, use this function:
x = (x - xc) * cos(teta) - (y - yc) * sin(teta) + xc
y = (x - xc) * sin(teta) + (y - yc) * cos(teta) + yc
Turning the point around Y axis, that means X,Z are rotating and Y is constant, use this function:
z = (z - zc) * cos(teta) - (x - xc) * sin(teta) + zc
x = (z - zc) * sin(teta) + (x - xc) * cos(teta) + xc
Turning the point around X axis, that means Z,Y are rotating and X is constant, use this function:
z = (z - zc) * cos(teta) - (y - yc) * sin(teta) + zc
y = (z - zc) * sin(teta) + (y - yc) * cos(teta) + yc
Using the Code
To dismount the above relations, we need to code those. First of all, declare an object of 3D Point and then declare an array of that for a quad's vertex. So this is the structure of 3D point:
class three_dimension_point{
public:
    three_dimension_point();
    void SetPoint(float x,float y,float z);
    float x,y,z;            //coordinates
    float xc,yc,zc;            //center of the point. it used to rotation
    void XY(int t);
    void XZ(int t);
    void ZY(int t);
};

three_dimension_point::three_dimension_point(){
x=y=z=xc=yc=zc=0;
}

void three_dimension_point::SetPoint(float X,float Y,float Z){
x=X;y=Y;z=Z;
}

void MoveX(int t){
for(char i=0;i<=24;i++){
    point[i].x+=t;point[i].xc+=t;
}
}

void MoveY(int t){
for(char i=0;i<=24;i++){
    point[i].y+=t;point[i].yc+=t;
}
}

void MoveZ(int t){
for(char i=0;i<=24;i++){
    point[i].z+=t;point[i].zc+=t;
}
}

void RotX(int t/*degree*/){//around x axis
float teta=t*pi/(float)180;
for(char i=0;i<24;i++){
    float c=cos(teta),s=sin(teta);//use once these functions to reduce calculating
    float zt=(point[i].z-point[i].zc)*c-(point[i].y-point[i].yc)*s+point[i].zc;
    float yt=(point[i].z-point[i].zc)*s+(point[i].y-point[i].yc)*c+point[i].yc;
    point[i].z=zt;
    point[i].y=yt;
}
}

void RotY(int t/*degree*/){//around y axis
float teta=t*pi/(float)180;
for(char i=0;i<=24;i++){
    float c=cos(teta),s=sin(teta);//use once these functions to reduce calculating
    float zt=(point[i].z-point[i].zc)*c-(point[i].x-point[i].xc)*s+point[i].zc;
    float xt=(point[i].z-point[i].zc)*s+(point[i].x-point[i].xc)*c+point[i].xc;
    point[i].z=zt;
    point[i].x=xt;
}
}

void RotZ(int t/*degree*/){//around z axis
float teta=-t*pi/(float)180;
for(char i=0;i<=24;i++){
    float c=cos(teta),s=sin(teta);//use once these functions to reduce calculating
    float xt=(point[i].x-point[i].xc)*c-(point[i].y-point[i].yc)*s+point[i].xc;
    float yt=(point[i].x-point[i].xc)*s+(point[i].y-point[i].yc)*c+point[i].yc;
    point[i].x=xt;
    point[i].y=yt;
}
}
In the OnPaint() event, we draw the points and axis coordinates. To see the object in the scene, we draw
a line (edge) between every vertex.
//to Render the edges by points
float zm,xn,yn;
for(int i=0;i<23;i++){//connect two points and draw an edge
    zm=yn=xn=0;
    zm=point[i].z/(float)lens;
    float d=abs(pow(zm+sgn(zm),sgn(zm)));
    xn=xo+(point[i].x)*d;
    yn=yo-(point[i].y)*d;
    dc.MoveTo(xn,yn);
    i++;
    zm=yn=xn=0;
    zm=point[i].z/(float)lens;
    d=abs(pow(zm+sgn(zm),sgn(zm)));
    xn=xo+(point[i].x)*d;
    yn=yo-(point[i].y)*d;
    dc.LineTo(xn,yn);
}
Of course, to use this more easily, we make buttons on the scene and put theme rectangles and their codes. And in the OnInitDialog() event, we set
the first value and initial the button's area. And in the Timer(), we do automatically repaint the scene.
Points of Interest
I wrote these algorithms about four years ago. But it's funny that I became dizzy as to what I wrote and what it means!! Also my handwriting is not good and sometimes I myself can't read that!!