
Using JavaServer Faces with Oracle
5.00/5 (1 vote)
This article explains creating a JSF application using NetBeans 7.2.1 and Oracle 11G.

Introduction
This article shows how you can create data based web applications using JSF. To demonstrate the use of JSF, I have created a JSF application using NetBeans 7.2.1 IDE and Oracle Database XE 11.2 RDBMS.
Background
JavaServer Faces (JSF) is a part of the Java Platform, Enterprise Edition. It is a Java specification to create component-based user interfaces for web applications. JSF uses Facelets as its templating system. Facelets support all JSF UI components.
Using the Code
The sample application consists of a JSF login page (index.xhtml) which accepts the Login and Password of a user. A managed bean (LoginBean.java) is used to validate the user.
LoginBean.java
Following is the code of the managed bean:
package beans;

import javax.faces.bean.ManagedBean;
import javax.faces.bean.RequestScoped;

@ManagedBean
@RequestScoped
public class LoginBean
{
    private String login;
    private String password;

    public String getLogin()
    {
        return login;
    }

    public void setLogin(String login)
    {
        this.login = login;
    }

    public String getPassword()
    {
        return password;
    }

    public void setPassword(String password)
    {
        this.password = password;
    }

    public String checkLogin()
    {
        if(login.trim().toUpperCase().equals
        ("AZIM")&&password.trim().toUpperCase().equals("AZIM"))
        {
            return "success";
        }
        else
        {
            return "failure";
        }
    }
}
The above code defines the accessor and mutator methods for the login and password properties and a checkLogin() method to validate the user. The checkLogin() method returns the outcome as "success" or "failure" depending on whether the user enters valid login details or not.
index.xhtml
Following is the code of the login page:
<html xmlns="http://www.w3.org/1999/xhtml"
      xmlns:h="http://java.sun.com/jsf/html">
    <h:head>
        <title>Login Page</title>
    </h:head>
    <h:body>
        <h:form>
            <h1>Enter Login Details</h1>
            <h2>
                Login: <h:inputText value="#{loginBean.login}"/><br/>
                Password: <h:inputSecret value="#{loginBean.password}"/><br/>
                <h:commandButton value="Login" action="#{loginBean.checkLogin}"/>
            </h2>
        </h:form>
    </h:body>
</html>
The above code uses the JSF HTML library to define the user interface of the login page. It calls the checkLogin() method of the managed bean using the action attribute of the command button to validate the user.
Employee.java
A model class (Employee.java) is used to store the empno, ename, sal and deptno columns from the sample emp table of Oracle.
Its code is as follows:
package model;

public class Employee
{
    private int empno;
    private String ename;
    private int sal;
    private int deptno;

    public int getEmpno()
    {
        return empno;
    }

    public void setEmpno(int empno)
    {
        this.empno = empno;
    }

    public String getEname()
    {
        return ename;
    }

    public void setEname(String ename)
    {
        this.ename = ename;
    }

    public int getSal()
    {
        return sal;
    }

    public void setSal(int sal)
    {
        this.sal = sal;
    }

    public int getDeptno()
    {
        return deptno;
    }

    public void setDeptno(int deptno)
    {
        this.deptno = deptno;
    }
}
EmpBean.java
A managed bean (EmpBean.java) is used to read the employee details from the emp table and add the details in a linked list using the model class.
Its code is as follows:
package beans;

import java.sql.Connection;
import java.sql.DriverManager;
import java.sql.ResultSet;
import java.sql.SQLException;
import java.sql.Statement;
import java.util.LinkedList;
import java.util.List;
import javax.faces.bean.ManagedBean;
import javax.faces.bean.RequestScoped;
import model.Employee;

@ManagedBean
@RequestScoped
public class EmpBean
{
    public List<Employee> getEmpData()
    {
        List<Employee> emplist=new LinkedList<Employee>();
        try
        {
            Class.forName("sun.jdbc.odbc.JdbcOdbcDriver");
            Connection con=DriverManager.getConnection
            ("jdbc:odbc:AzimOracleDSN","azim","azim");
            Statement st=con.createStatement();
            ResultSet rs=st.executeQuery("select empno,ename,sal,deptno from emp");
            while(rs.next())
            {
                Employee e=new Employee();
                e.setEmpno(rs.getInt(1));
                e.setEname(rs.getString(2));
                e.setSal(rs.getInt(3));
                e.setDeptno(rs.getInt(4));
                emplist.add(e);
            }
            rs.close();
            st.close();
            con.close();
        }
        catch(ClassNotFoundException ex)
        {
            System.out.println("Invalid Driver..."+ex.getMessage());
        }
        catch(SQLException ex)
        {
            System.out.println("SQL Exception..."+ex.getMessage());
        }
        return emplist;
    }
}
The above code uses JDBC to connect to Oracle using a data source name (DSN). It then retrieves the data from the emp table and adds the data to a linked list and returns the linked list.
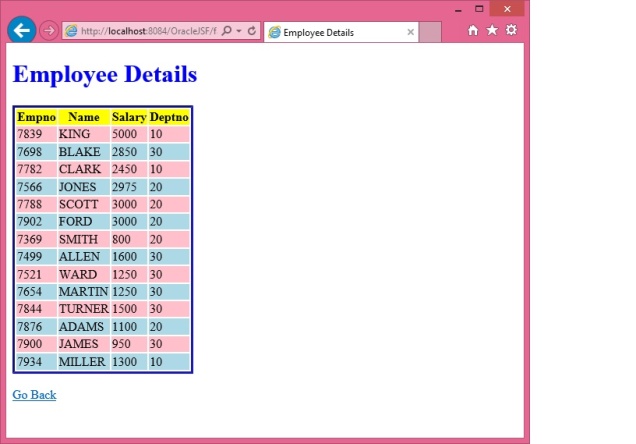
empdata.xhtml
The getEmpData() method of the bean is used to display the employee details on a JSF page (empdata.xhtml) if the login of the user is successful.
Its code is as follows:
<?xml version='1.0' encoding='UTF-8' ?>
<!DOCTYPE html PUBLIC "-//W3C//DTD XHTML 1.0 Transitional//EN"
"http://www.w3.org/TR/xhtml1/DTD/xhtml1-transitional.dtd">
<html xmlns="http://www.w3.org/1999/xhtml"
      xmlns:h="http://java.sun.com/jsf/html"
      xmlns:f="http://java.sun.com/jsf/core">
    <h:head>
        <title>Employee Details</title>
        <h:outputStylesheet library="css" name="style.css"/>
    </h:head>
    <h:body>
        <h:form>
            <h1><h:outputText styleClass="title" value="Employee Details"/></h1>
            <h:dataTable value="#{empBean.empData}" var="emp"
                         styleClass="table" headerClass="header"
                         rowClasses="oddrow,evenrow">
                <h:column>
                    <f:facet name="header">Empno</f:facet>
                    #{emp.empno}
                </h:column>
                <h:column>
                    <f:facet name="header">Name</f:facet>
                    #{emp.ename}
                </h:column>
                <h:column>
                    <f:facet name="header">Salary</f:facet>
                    #{emp.sal}
                </h:column>
                <h:column>
                    <f:facet name="header">Deptno</f:facet>
                    #{emp.deptno}
                </h:column>
            </h:dataTable><br/>
            <h:commandLink action="gotoLoginPage">Go Back</h:commandLink>
        </h:form>
    </h:body>
</html>
The above code uses the dataTable element of the JSF HTML library to display the data in tabular format.
Following are the attributes of the dataTable element:
value: Specifies the bean method which returns the data to be displayedvar: Specifies the variable name to be used to display the attributes of employeesstyleClass: Specifies the style class from the CSS stylesheet for the tableheaderClass: Specifies the style class from the CSS stylesheet for the header of the tablerowClasses: Specifies the style class from the CSS stylesheet for the odd and even rows of the table
style.css
Following is the code of the CSS stylesheet (style.css):
.title
{
    color: blue;
}

.table
{
    border: blue;
    border-style: inset;
}

.header
{
    background: yellow;
}

.evenrow
{
    background: lightblue;
}

.oddrow
{
    background: pink;
}
Note: The style.css file must be in resources/css folder in Web Pages folder.
The commandLink element is used to navigate back to the login page using a link.
error.xhtml
The following JSF page (error.xhtml) is displayed if the login is unsuccessful.
<?xml version='1.0' encoding='UTF-8' ?>
<!DOCTYPE html PUBLIC "-//W3C//DTD XHTML 1.0 Transitional//EN"
"http://www.w3.org/TR/xhtml1/DTD/xhtml1-transitional.dtd">
<html xmlns="http://www.w3.org/1999/xhtml"
      xmlns:h="http://java.sun.com/jsf/html">
    <h:head>
        <title>Error Page</title>
    </h:head>
    <h:body>
        <h:form>
            <h1>Invalid Login or Password</h1>
            <h:commandLink action="gotoLoginPage">Try Again</h:commandLink>
        </h:form>
    </h:body>
</html>
Navigation
In order for the above pages to function as per our requirement, we need to specify navigation scenarios. For example, we need to specify where to navigate on successful and unsuccessful logins. To specify the navigation scenarios, the faces-config.xml file is added to the project. faces-config.xml is the configuration file of JSF. It contains configuration entries for managed beans, navigation rules, navigation cases, etc.
faces-config.xml
Following is the code of the faces-config.xml file.
<?xml version='1.0' encoding='UTF-8'?>

<!-- =========== FULL CONFIGURATION FILE ================================== -->

<faces-config version="2.1"
    xmlns="http://java.sun.com/xml/ns/javaee"
    xmlns:xsi="http://www.w3.org/2001/XMLSchema-instance"
    xsi:schemaLocation="http://java.sun.com/xml/ns/javaee
    http://java.sun.com/xml/ns/javaee/web-facesconfig_2_1.xsd">
    <navigation-rule>
        <from-view-id>/index.xhtml</from-view-id>
        <navigation-case>
            <from-outcome>success</from-outcome>
            <to-view-id>/empdata.xhtml</to-view-id>
        </navigation-case>
        <navigation-case>
            <from-outcome>failure</from-outcome>
            <to-view-id>/error.xhtml</to-view-id>
        </navigation-case>
    </navigation-rule>
    <navigation-rule>
        <from-view-id>/error.xhtml</from-view-id>
        <navigation-case>
            <from-outcome>gotoLoginPage</from-outcome>
            <to-view-id>/index.xhtml</to-view-id>
        </navigation-case>
    </navigation-rule>
    <navigation-rule>
        <from-view-id>/empdata.xhtml</from-view-id>
        <navigation-case>
            <from-outcome>gotoLoginPage</from-outcome>
            <to-view-id>/index.xhtml</to-view-id>
        </navigation-case>
    </navigation-rule>
</faces-config>
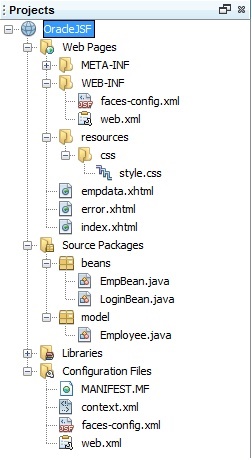
Following is the structure of our NetBeans project after adding all the required files:
Points of Interest
I hope this article will be helpful in understanding the basics of JavaServer Faces.