
Getting Started with Playwright using Visual Studio 2022/C# and NUnit
0/5 (0 vote)
Get started with Playwright using VS 2022/C# and NUnit
1. Introduction
In this walkthrough, we use Visual Studio 2022 Community Edition with C# and NUnit to get started with Playwright. We develop a simple example to introduce the basic features of Playwright, using a Windows 11 machine. The same example should work on MacOS and Linux machines as well.
2. Background
When it comes to automated web testing, users are confronted with a myriad of tool choices. One tool that has long dominated the automation landscape is Selenium. Recently, Playwright has also been gaining popularity, which leads nicely to the topic of this guide. For newcomers to test automation or those transitioning from the Selenium family, this guide offers a gentle introduction to Playwright.
3. Install Playwright
Visual Studio manages many components essential for Playwright development. However, some Playwright commands, like the code generator – CodeGen, which we will be using later to record our test case, depend on the Playwright CLI library. Therefore, it is recommended to install the following components on your machine.
3.1 Install Node.js
Let us verify that node.js is installed on our machine.
- Open a CMD or PowerShell window and enter
node -vto check if node.js is installed. If it is installed, it will display the version installed. - If node.js is not installed, download it and install it from the following link: https://nodejs.org/en/download.
3.2 Install Playwright Browsers
Let us install the Playwright browsers on our machine. By default, Playwright installs the following three browsers: Chromium, Firefox, and Webkit.
- Open a CMD or PowerShell window from a working directory.
- Execute the following command, which installs Playwright browsers and their dependencies.
npx playwright install
4. Install Visual Studio
In this section, we provide the steps for installing Visual Studio, creating an NUnit, and installing NuGet packages for Playwright.
4.1 Install Visual Studio 2022 (Community edition)
For those of you who are new to the .NET environment, start by installing Visual Studio 2022 Community Edition from this link.
Once the installation is complete, configure your environment to use C#. If you already have any version of Visual Studio installed on your machine, you are all set!
4.2 Create a New Folder for the Test Project
To follow along, let us create a folder called PlaywrightDemo on our machine to host the playwright test project.
4.3 Open Visual Studio and Create a New NUnit Project
To create the test project, start Visual Studio and create a new project using the NUnit template. The basic structure of the generated project should include a single test case called UnitTest1.cs, as shown below, in Figure 1.

4.4 Install NuGet packages for Playwright
Next, install the NuGet packages for Playwright. To do so, right-click on the test project (PlaywrightDemo) and select Manage NuGet Packages…. Once the NuGet Package Manager window opens, search for the following packages, shown in Figure 2, and install them.
Microsoft.PlaywrightMicrosoft.Playwright.NUnitMicrosoft.Playwright.TestAdapter

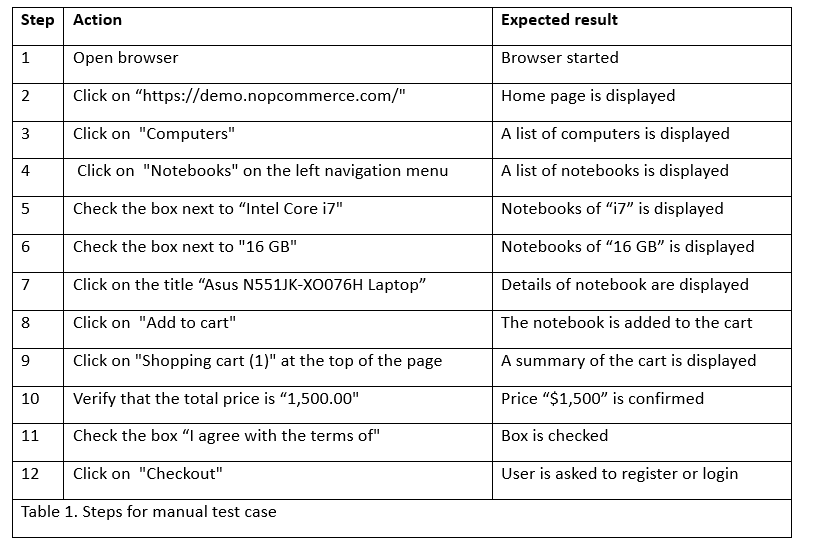
4.5 Create a Test Case and Run It Manually
Before embarking on the automation phase, let us first familiarize ourselves with the steps of the test case slated for automation. The primary objective of this test case is to validate the functionality of a given scenario, by manually executing the steps. The complete steps are shown below, in Table 1.
We selected this site due to its comprehensive set of features, mirroring those of a fully operational ecommerce platform.
5. Code Generation
Playwright offers a GUI called Codegen to record test cases from start to finish, including various types of assertions such as assert visibility, assert text, and assert value. We found Codegen to be a great tool for automating test cases due to its visual and intuitive interface. Additionally, it can serve as a documentation tool for manual testers to capture the steps of the test case, enhancing communication between manual testers, developers, and automation testers.
We illustrate the features of Codegen by recording the sample test provided earlier and generating code for C# using NUnit.
6. Recording Tests - Codegen
To record tests in Playwright, we execute the following command in PowerShell window.

This command starts the recorder and opens 2 windows, (1) a Playwright Inspector window, as shown in Figure 1, and (2) a browser window showing the home page of the site, as shown in Figure 2.
Note that when Codegen starts, Node.js is selected by default. So, if you are using Node.js, you are good to go. In our case, we are using NUnit, so make sure to select that option from the dropdown.

The browser window displays five options at the top. If these options are not visible, ensure that you have the latest Playwright version installed by running 'npx playwright --version' in your terminal.

6.1 Playwright Code Generator Actions
- Record
- Initiates the test recording process, allowing users to interact with the browser to perform actions for the test scenarios.
- Pick Locator
- Upon completing the recording process, press the Record button to stop recording. At this point, the Pick Locator button becomes available and other assertion options are greyed out, to guide users to the relevant choice for efficient element identification.
- Click on Pick Locator to identify and highlight locators for elements in the browser window.
- Select a locator by clicking on an element, and the corresponding code appears for that locator at the bottom of the inspector window.
- Edit the locator in the field for fine-tuning or use the copy button to copy it for pasting into your code.
- Assertions
- Use these options for asserting conditions based on recorded interactions:
- 'Assert Visibility'
- Verify that an element is visible on the page.
- Other assertion options are greyed out when Assert Visibility is selected.
- 'Assert Text'
- Verify that an element contains specific text.
- Other assertion options are greyed out when Assert Text is selected.
- 'Assert Value'
- Verify that an element has a specific value.
- Other assertion options are greyed out when Assert Value is selected.
- 'Assert Visibility'
- Use these options for asserting conditions based on recorded interactions:
These actions help users create and validate their tests with specific interactions and assertions.
We are now ready to record the test case by interacting with the browser. The tool captures our interactions and generates the code in the Inspector window.
Here is the code that we generated for the test case above:
using Microsoft.Playwright.NUnit;
using Microsoft.Playwright;
using System.Text.RegularExpressions;

namespace PlaywrightDemoTests
{
    [Parallelizable(ParallelScope.Self)]
    [TestFixture]
    public class PurchaseNotebooks_Asus : PageTest
    {
        // The following code is generated by Playwright's Codegen
        // using a terminal window command.
        // "npx playwright https://demo.nopcommerce.com/"
        [Test]
        public async Task ShouldSuccessfullyPurchaseAsusI7NotebookWith16GBRam ()
        {
            await Page.GotoAsync("https://demo.nopcommerce.com/");
            await Page.GetByRole(AriaRole.Link,
                  new() { Name = "Computers" }).ClickAsync();
            await Page.GetByRole(AriaRole.Link,
                  new() { Name = "Notebooks" }).First.ClickAsync();
            await Page.GetByLabel("Intel Core i7").CheckAsync();
            await Page.GetByLabel("16 GB").CheckAsync();
            await Page.GetByRole(AriaRole.Link,
                  new() { Name = "Asus N551JK-XO076H Laptop",
                  Exact = true }).ClickAsync();
            await Page.Locator("#add-to-cart-button-5").ClickAsync();
            await Page.GetByRole(AriaRole.Link,
                  new() { Name = "Shopping cart (1)" }).ClickAsync();
            await Expect(Page.Locator
                        ("#shopping-cart-form")).ToContainTextAsync("$1,500.00");
            await Page.GetByLabel("I agree with the terms of").CheckAsync();
            await Page.GetByRole(AriaRole.Button,
                  new() { Name = "Checkout" }).ClickAsync();;
        }
    }
}
The generated code is verbose, hard to read, and uses many hard-coded values, but it is a good start. It works out of the box, and it gives us the freedom to improve the structure and readability of our tests.
7. Executing the Test Case
Once the code is generated, simply copy and paste it into your test case, and run the test. The test should pass, but you will notice that there is no browser. By default, the test runs in headless mode using the "Chronium" browser. In order to see the browser and use Firefox instead of Chronium, we created a file called Headless.runsettings.
Here are the steps to create this file:
- Right-click on the project name (
PlaywrightDemo) in the solution - Select Add -> New Item
- Select XMLFile.xml (change the file name to Headless.runsettings)
- Any name with the extension (.runsettings) should work.
- Paste the code shown below in Figure 6:
<?xml version="1.0" encoding="utf-8"?>
<!-- Playwright Settings-->
<RunSettings>
  <Playwright>
    <BrowserName>firefox</BrowserName>
    <LaunchOptions>
      <Headless>false</Headless>
    </LaunchOptions>
  </Playwright>
</RunSettings>

<!--Figure 6. Headless.runsettings-->
Next, from the Test menu in Visual Studio, select:
Test -> Configure Run Setting -> Select Solution Wide runsettings File,
then select the XML file we just created (i.e., Headless.runsettings)

Finally, build the solution and run the test. This time, it should run with a visible Firefox browser. The three types of browsers that you can experiment with are: Chronium, Firefox, and Webkit.
You can find the complete solution on GitHub. Remember, the best way to learn is to practice. Happy testing!
8. Conclusion
Playwright is a great tool for end-to-end testing, offering testers the ability to automatically generate code, ready for execution. It offers a good starting point for automation projects. Beyond its testing capabilities, Playwright can also serve as a communication platform among manual testers, automation specialists, developers, and other stakeholders. In this guide, we demonstrated its use with C# and the NUnit framework. However, Playwright was designed to support various languages and testing frameworks, out of the box, providing flexibility for a wide range of testing scenarios.
Points of Interest
- Make sure to create a *.runsettings file to make the browser visible for execution
- To use a different browser, specify the browser type (are: Chronium, Firefox, and Webkit) in the runsettings file.
- Using Codegen gives us a quick start with test automation, but this is just a starting point. Refactoring the code and using the Page Object Model is the next logical step in the development.
History
- 6th February, 2024: Initial version: A01_02042024