
Client Certificates in Azure Websites
5.00/5 (1 vote)
In this tip, we will learn how to enable the Certificates in the Azure Web Sites
Introduction
This tip will help to enable the certificate for an Azure Web Site or a Web API. It targets the Azure Developers, Architects who are willing to do certificate based authentication in their Web Applications.
Background
Azure websites are very much likely to have security and authentication.
In most of the implementations, the custom handlers are written. Another way to achieve this in any web application is by embedding the certificates in the requests and then performing the necessary checks on the certificate according to the business logic.
For Azure Web site which is hosted in the cloud, we are not having access to the system configurations which we used to have in the On Premises servers. So, allowing the web application to accept the certificate is a tricky activity.
Resolution
This can be done with the help of:
- Azure RM template, when we are provisioning the Web Application
- Another way is to go in manually to Azure web application’s config which is equivalent to machine.config in the On Premises server
VIA Azure Resource Manager Template
In a best practice, all the Azure Resources shall be provisioned from an ARM template. This is a complete automated provisioning with the help of a json that is prepared. For creating the AzureWebsite, we are supposed to use the below sort of Json:
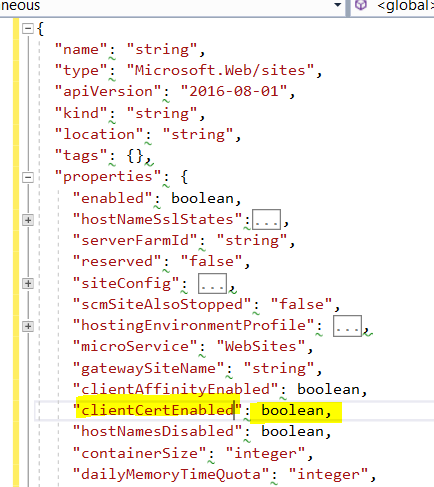
For enabling the client certificates, the property highlighted shall be set to TRUE.
Once this is done, and the json file is executed with the help of Powershell, the Web Site will be certificate enabled. Also, we have to note that the site shall not be in STANDARD or FREE Tier because certificates are not supported on those tears. So before provisioning the App service, plan needs to be chosen wisely.
NO SSL Support:

With SSL Support:

VIA Updating the config in the Web Site
For this, the below steps need to be followed once the Provisioning is done.
- Login to Resources.azure.com.
- Go to the subscription where the Web Apps are created and selected Read /Write.

- On the left, a tree structure is available, open it at the site level (follow the screenshot for the same).

- Selected EDIT.
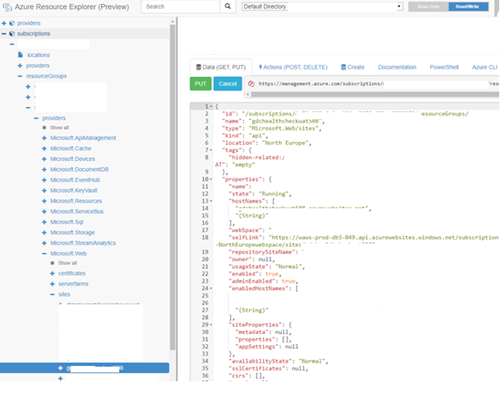
- Locate the property
clientCertEnabled, make the same totrueand then press Put button available on the top.


- This step needs to be repeated for all the sites where Certificate needs to be enabled.
Verification
Once these steps are performed, the verification of the certificate enablement can be done by browsing the HTTPS URL for the site in any Web Browser. There will be a prompt of below sort:

Points of Interest
Enabling the certificate on the web application is the best way of authentication on the first place. Further to this, the business validation rules for authorization can be implemented. For Azure IOT hub when the device is supposed to send its certificate to the EndPoint for creating identity, this is the way the handshake between Device and Endpoint is done in an ideal situation.
Also the Azure Resource Manager Template is a beautiful utility which provides a lot of things just by using the JSON file. The same can be found here.