
A Basic Introduction to Sqoop Import & Export for MySql Table to be Used as Hadoop Distributed File System (HDFS) in Cloudera
5.00/5 (1 vote)
This tip gives basic commands to import table from Mysql to Hadoop File system and Import the files from HDFS back to Mysql.
Introduction
Sqoop is basically used to Import data from RDBMS system to Hadoop distributed File system (HDFS). And for Exporting data from HDFS back to RDBMS, Sqoop is used. This tip shows some basic steps involved in this process.
Background
This tip uses Cloudera VM V5.8.0. This VM can be downloaded from the Cloudera website. In this example, no settings have been changed so the existing credentials should just work fine.
Import MySql Table to HDFS
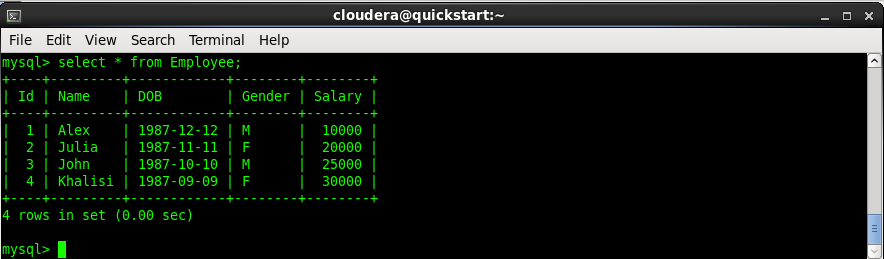
For the Import job, we will create an Employee table in MySql database. The table will have a primary Key as ID with datatype integer. Further, we will insert few records into the table.
Open a terminal in Cloudera VM and type in the below commands. First, we need to fire the terminal for mysql.
Enter "mysql -u root -p" in the terminal and password as "Cloudera". Now the below commands directly go to mysql terminal just opened.
create database demo;
use demo;

CREATE TABLE Employee (Id int Not NULL,  Name VARCHAR(20),DOB  DATE, _
Gender char(1), Salary int, PRIMARY KEY (Id));

insert into Employee values (1, 'Alex', '1987-12-12','M', 10000);
insert into Employee values (2, 'Julia', '1987-11-11', 'F', 20000);
insert into Employee values (3, 'John', '1987-10-10', 'M', 25000);
insert into Employee values (4, 'Khalishi', '1987-9-9', 'F', 30000);
Now run the select query on the table to view the records.
Open another terminal to run the Sqoop command.
The following command inserts the table into Hadoop file system (HDFS).
sqoop import --connect jdbc:mysql://localhost/demo --username root --password cloudera --table Employee
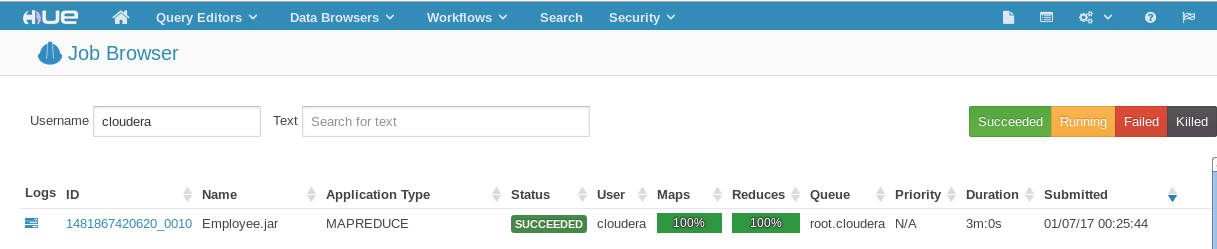
This might take few seconds depending upon the VM configuration. It will internally create Employee.Jar and run a Map-Reduce job to import the records. This job can also be viewed in the Hue->Job browser which comes with the Cloudera VM.
Once the import is complete, it's time to view the files
>hadoop dfs -ls
We must see a folder named Employee (the table name we imported from mysql).
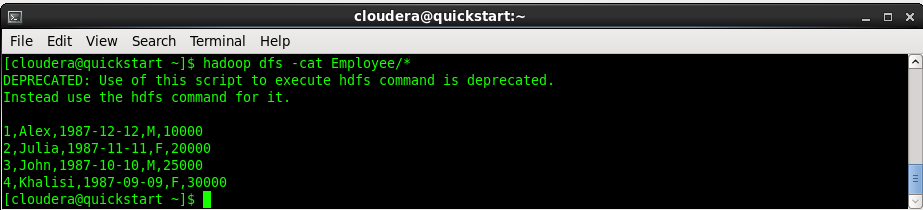
>hadoop dfs -cat Employee/*
This should show us the records present inside the Employee folder. Actually records are distributed in files (part-m-0000*). So the above command lists out all the records reading from all the files.
To see the list of files, type the command "hadoop dfs -ls Employee".
Now let's insert few more records to the mysql table in the other terminal:
insert into Employee values (5, 'JonSnow', '1987-8-9', 'M', 35000);
insert into Employee values (6, 'Arya', '1993-7-7', 'F', 40000);
We can insert the newly added records to the HDFS by using the insert mode in the command. Type the command in the Sqoop window.
sqoop import --connect jdbc:mysql://localhost/demo --username root
--password cloudera --table Employee --incremental append --check-column id --last-value 4
Once the command is completed, now we can run the below command to see all the records:
>hadoop dfs -cat Employee/*
Now these files in HDFS, we will export back to mysql into new table.
Exporting HDFS Data to MySql Table
In the mysql terminal, let us create another table EmployeeNew with the same schema as that of Employee.
CREATE TABLE EmployeeNew (Id int Not NULL,  Name VARCHAR(20),DOB  DATE, _
Gender char(1), Salary int, PRIMARY KEY (Id));
In the Sqoop terminal, type the export command to export the records to the EmployeeNew Table. Thing to note here is the HDFS path for the Employee table.
sqoop export --connect jdbc:mysql://localhost/demo --username root
--password cloudera --export-dir /user/cloudera/Employee --update-mode allowinsert --table EmployeeNew
Once the Sqoop job is completed, move to the MySql terminal and run the select query to view the 6 records.
Select * from EmployeeNew;
Points of Interest
This tip should be an easy guide to write basic sqoop commands to Import and Export data from HDFS.