
Header Comment Visual Studio AddIn for C#
1.69/5 (4 votes)
Application to add a file header comment at the start of every human-created code file
Introduction
This document will discuss creating header comments in C# code file. Coding Standards document and one of the recommendations is to add a file header comment at the start of every human-created code file. We can rewrite the Visual Studio code templates to customize the templates as per requirements but I found it is a bit time consuming process so I developed my own small AddIn application which will do the same and thought of sharing this with the community.
Header Comment
Header comments should be written at the top of files and functions to explain the purpose, author, dates and modification history. This will help understand what is being done in the file, even if there is no source control used.
////////////////////////////////////////////////////////////////////////////////////////////////////////
//FileName: DBOperations.cs
//FileType: Visual C# Source file
//Size : 26206
//Author : Your Name
//Created On : 7/8/2015 9:56:39 AM
//Last Modified On : 8/9/2015 11:53:23 AM
//Copy Rights : your company
//Description : Class for defining database related functions
////////////////////////////////////////////////////////////////////////////////////////////////////////
How to Create a Visual Studio AddIn
To create an add-in in Visual Studio .NET, open File->New->Project from the menu and choose the Other Projects tab. Pick the Extensibility Projects Folder, and inside this folder, choose the Visual Studio .NET Add-in. Change the name to the desired add-in and click OK.

The next step brings up the Add-In wizard. Click Next when the Welcome wizard screen comes up and this brings up the language choice screen shown below:

This Wizard screen gives the choice of writing your add-in in either C#, VB, or Visual C++. We choose C# being mainly a fan of this language. The next wizard screen allows us to run the add-in either in the VS.NET IDE or the Macro IDE or both.

The next screen allows you to add a name and description of your add-in. This will appear later in the Add-In manager dialog located in the Tools menu.

Clicking Next brings us to a screen that allows us to set certain options for our add-in using various checkboxes. The screen is shown below in Figure 5.

The Options screen allows options for the following:
- Create an additional menu item with a happy face in the Tools Menu for activating the Add-in
- Determine when your add-in loads, for example when the VSIDE starts.
- Setup the availability of the add-in, whether all users can use it, or only the person who is currently logged on to the computer.
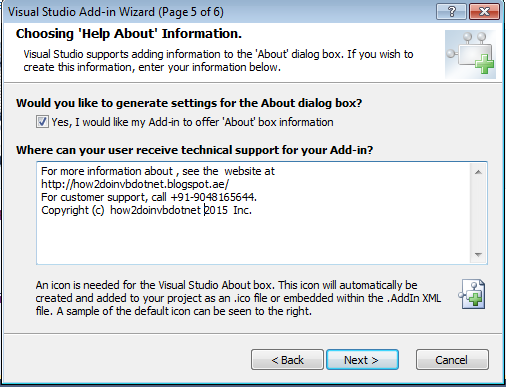
The last screen is the Summary screen and displays a summary of all of the options the programmer has chosen for our custom add-in. Click Finish to generate a Solution containing an add-in CodeProject and an add-in setup project. The next screen gives the programmer the option of adding an about box and some technical support information of who to contact should the add-in produce strange results.

The results of clicking finish are shown below. Only one class is produced in C# called the Connect class. This class is where you can make your initial changes to the addin.

All the steps are completed. You will to able to see a comment generation tool in Visual Studio which will generate comments as shown below:

Using the Code
The Exec method in the Connect class of the Add-In
public void Exec(string commandName, vsCommandExecOption executeOption,
                 ref object varIn, ref object varOut, ref bool handled)
{
            handled = false;
            if(executeOption == vsCommandExecOption.vsCommandExecOptionDoDefault)
            {
                if(commandName == "HeaderComment.Connect.HeaderComment")
                {
                    CreateTheHeaderComment();
                    handled = true;
                    return;
                }
            }
}
Now we are ready to write our code that will bring up a code page and add copyright information to it. To execute functionality inside the IDE, we need to rely on the IDTExtensibility2 interface. This interface extends the IDE to allow the programmer to take control of its user interface functionality. The add-in wizard creates an object that help us in this endeavor. The declaration for this object is shown below:
private _DTE applicationObject;
The Application object allows us to access all of the hierarchy objects of the extensibility interface. Below is the code that utilizes the application object to create a new code file and inserts the copyright lines into our code.
Using the CreateTheHeaderComment() to Create a Header Comment
     private void CreateTheHeaderComment()
        {
            string fullFileName = _applicationObject.ActiveDocument.FullName;

            string path = fullFileName.Substring(0, fullFileName.LastIndexOf("\\"));

           string Ext = Path.GetExtension(fullFileName);

           string Type = GetDescription(Ext);

           string user = System.IO.File.GetAccessControl(path).GetOwner(
                          typeof(System.Security.Principal.NTAccount)
                          ).ToString();

           FileInfo f2 = new FileInfo(fullFileName);
           long lsize = f2.Length;

           DateTime dtpCreated = File.GetCreationTime(fullFileName);
           DateTime dtpModified = File.GetLastWriteTime(fullFileName);
           DateTime dtpAccessed = File.GetLastAccessTime(fullFileName);

           FileOwner = user;
           FileType = Type;
           Filesize = lsize.ToString();
           createddate = dtpCreated.ToString();
           Modifieddate = dtpModified.ToString();
           AccessedDate = dtpAccessed.ToString();
           FileCopyrights = string.Empty;

           if (FileOwner.Contains("\\"))
           {
               FileCopyrights = FileOwner.Substring(0, FileOwner.LastIndexOf("\\"));
           }
           else
           {
               FileCopyrights = FileCopyrights;
           }

           ModifyFile(fullFileName);

        }
Acknowledgement
- Created using .NET 4.0 framework using C# in Visual Studio IDE
- Tutorial: Creating Visual Studio Add-Ins
History
- 11th August, 2015: Initial version
- 13th September 2015: Updated version with Visual Studio AddIn