
Using Intel® RealSense™ Technology in combination with the Intel® Edison Development Platform
In this article are two examples of such applications, one using the Intel RealSense 3D Camera as input and the Intel® Edison board as output, the SDK triggers an LED light on the board.
Get access to the new Intel® IoT Developer Kit, a complete hardware and software solution that allows developers to create exciting new solutions with the Intel® Galileo and Intel® Edison boards. Visit the Intel® Developer Zone for IoT.
Introduction
In the post mobile phone adoption world, we are now seeing the advent smart devices connected to things we never imagined, building a world some call the "Internet of Things", or IoT. IoT devices are still in their infancy, with things from a watch with a pedometer to your car being turned on from your phone. The interesting part about IoT devices is that they can be equipped with a variety of low-cost sensors that can read temperature, humidity, heart rate, and so on not found on our phones or computers, making this information readily accessible for the first time in our lives. And with the Intel® Edison platform and Intel® Quark™ processors we can easily build prototypes that gather sensor information and create innovative products.
Another Intel innovation is Intel® RealSense™ technology. With the Intel RealSense 3D Cameras and SDK, applications can perform gesture detection, facial analysis, background segmentation, voice recognition, voice synthesis, and more, functioning almost like a super sensor that’s able to detect many things. Combined with the versatile uses of the Intel® Edison kit and its output, we can build many creative applications that are both useful and entertaining.
In this article are two examples of such applications, one using the Intel RealSense 3D Camera as input and the Intel® Edison board as output, the SDK triggers an LED light on the board. In the second example, which uses the Intel® Edison board as input and the Intel RealSense 3D Camera as output, voice synthesis is used to speak the sensor data from the board.
Hardware
- Intel® Edison board with the Arduino* breakout board
- Seeed Grove* – Starter Kit Plus - Intel® IoT Edition
- 4th generation (or later) Intel® Core™ processor
- 8GB free hard disk space
- USB 3.0
- An Intel® RealSense™ 3D Camera F200 (system-integrated or peripheral version)
- (optional) Intel® NUC (Next Unit Computing) with a 4th generation Intel Core processor
Software
- Arduino IDE: https://software.intel.com/en-us/articles/install-arduino-ide-on-intel-iot-platforms
- Microsoft Visual Studio* 2010-2013 with service pack 1 or newer https://www.visualstudio.com/
- Intel RealSense SDK https://software.intel.com/en-us/intel-realsense-sdk
What is the Intel® RealSense™ SDK?
The Intel RealSense SDK offers facial analysis, hand and finger tracking, voice recognition, voice synthesis, augmented reality object tracker, background segmentation, augmented reality and many more functionalities through a combination of hardware, software, and a 3D camera. The current SDK supports Microsoft .NET 4.0 framework, Unity* Pro 4.1.0 or higher, Processing* 2.2.1 or higher, and JDK 1.7.0_11 or higher. In our example, we’ll use .NET and C#.
Typical applications that can be developed with the Intel RealSense SDK include immersive collaboration, games, natural interaction, interactive storytelling, and Intel® Capture and Share, but these only scratch the surface of possibilities.
For more information about Intel RealSense technology, go to http://www.intel.com/content/www/us/en/architecture-and-technology/realsense-overview.html.
You can download the free SDK from https://software.intel.com/en-us/realsense/home/download.
A Closer Look at the Hardware
The Intel® Edison board is one of the first in a proposed series of low-cost, general-purpose compute platforms. It’s designed to allow for quick and easy prototyping of IoT projects while providing a product-ready path for commercialization.
The Intel® Edison board uses a 22nm dual-core Intel® Atom™ SoC running at 500MHz. It supports 40 GPIOs and includes 1GB LPDDR3 RAM, 4 GB EMMC for storage, dual-band Wi-Fi*, and Bluetooth*, all in a tiny form factor.
It runs a full Linux* kernel, and to get the best performance, you’ll want to write hardware-level Linux code.
In addition, the Intel® Edison board’s version of Linux contains an Arduino implementation as a Linux program. Simply put, this means you can write familiar Arduino sketches and run them on the board. And that’s exactly what we’ll do.
Learn more about the Intel® Edison board here: http://www.intel.com/content/www/us/en/do-it-yourself/edison.html
Arduino* Breakout Board
The Arduino breakout board serves two purposes. First, it provides a larger prototyping platform for easy access to the IO pins. And second, it provides an Arduino-compatible hardware platform, meaning we can use standard Arduino shields with the Intel® Edison board. Figure 1 shows the board mounted to the Arduino breakout board.

Grove Starter Kit Plus
The kit’s full name is "Grove Starter Kit Plus - Intel® IoT Edition" and was originally designed for the Intel Galileo 2nd generation board. Fortunately, it’s fully compatible with Intel® Edison board via the Arduino breakout board.
The kit (shown in Figure 2) is designed to simplify working and prototyping with sensors, actuators, and shields. It contains an Arduino-compatible shield with standardized four (4) pin connectors. These connectors feed to the IO ports that connect with the included cables that also easily attach to the sensors and controls in the kit. This means you can build projects without needing to mess with small wires and pull-up/pull-down resistors, or worry about polarity.
Learn more or purchase the kit here: http://www.seeedstudio.com/depot/Grove-starter-kit-plus-Intel-IoT-Edition-for-Intel-Galileo-Gen-2-p-1978.html
The creator of the Grove Kit, Seeed Studios, has a number of useful resources online.
I recommend cloning or downloading the Sketchbook Starter repo here: http://Github.com/Seeed-Studio/Sketchbook_Starter_Kit_V2.0
And bookmark the Grove Wiki page here:
http://www.seeedstudio.com/wiki/index.php?title=Main_Page#Grove

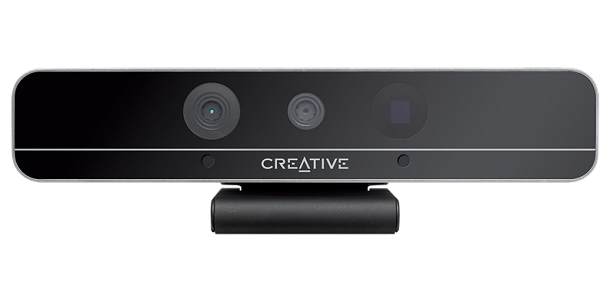
An Intel® RealSense™ 3D Camera F200
Either system-integrated or a peripheral version, Intel RealSense 3D Camera is built for game interactions, entertainment, photography, and content creation. The 3D camera is a complex sensor that, in a way, is part of IoT (after all, it’s named RealSense). The camera’s minimum requirements are a USB3, a 4th generation Intel® Core™ processor, and 8GB of hard drive space.
The camera (shown in Figure 3) features full 1080p color and an in-depth sensor and gives the PC a 3D vision and immersive experience.
You can purchase the complete developer kit, which includes the camera, at https://software.intel.com/en-us/realsense/devkit.
Intel® Next Unit Computing (Intel® NUC) Powered by 4th Generation Intel® Core™ Processors or later
The Intel NUC is an optional device that can be used as a centralized hub for the Intel RealSense 3D Camera and the Intel® Edison module, as well as process additional functions such as storing and retrieving data to/from the cloud and performing further analysis on it. It is not required for development as you can connect the camera and the Intel® Edison breakout board kit through the USB serial port. However, if used, the information received from the camera can be processed and sent to the board to activate outputs such as alarms, motors, LEDs, etc. The information received from sensors on the board can be sent to the Intel NUC to activate voice synthesis using the Intel RealSense SDK.
As the camera requires USB3, 8GB RAM, and a 4th generation (or later) Intel Core processor, the Intel NUC (shown in Figure 4) easily meets these requirements. Another advantage is its user interface, with an HDMI port, making it easy to use as a computer if required. If you do not have a PC with the required software, an Intel NUC can be a relatively inexpensive option for owning one.
For more details on the Intel NUC, go to: http://www.intel.com/content/www/us/en/nuc/products-overview.html

Installing the Software and Getting Ready to Code
We’ll be working with two code examples:
- Capturing gestures from the Intel RealSense 3D Camera to control the LEDs on the Intel® Edison board.
- Using data from the Intel® Edison board’s temperature sensor to activate Intel RealSense SDK voice synthesis.
Arduino IDE for Intel® IoT Platforms
You need to download the specially prepared version of the Arduino IDE in order to deploy Sketches to your board. The current version is 1.6.0 and is available here:
https://software.intel.com/en-us/articles/install-arduino-ide-on-intel-iot-platforms
Drivers for the Intel® Edison Board
You also need to download and install drivers for the Intel® Edison board from:
https://software.intel.com/en-us/iot/hardware/edison/downloads
It should be the last link on the page listed under "Driver Software." The current version is 1.2.1.
For further instruction, refer to the Getting Started Guide:
https://software.intel.com/en-us/iot/library/edison-getting-startedVisual Studio
Visual Studio is a comprehensive collection of developer tools and services to help you create apps for the multiple platforms. The Intel RealSense SDK requires Visual Studio and Windows 8.1 as minimum software requirement. Visual Studio supports C, C++, VB.NET, C#, F#, M, Python*, Ruby, JavaScript* and many other languages. This specific guide uses C#.
You can download Visual Studio Express Edition for free. The commercial version of Visual Studio can be obtained at no cost through programs such as DreamSpark* for students and BizSpark* for startups.
You can find more information about Visual Studio at https://www.visualstudio.com/ and about C# at https://msdn.microsoft.com/en-us/default.aspx
Intel® RealSense™ SDK
The Intel RealSense SDK allows developers to leverage 3D capabilities with the functionalities described earlier. The current version is 4.0.0.112526 (or the Gold R2 release) and is available here:
https://software.intel.com/en-us/intel-realsense-sdk/download
Testing the Intel® Edison Board
Before starting the walk-through below, please make sure you’re able to run the Blink example sketch. It’s included in the Arduino IDE download package in the examples -> 01.Basics -> Blink folder.
https://software.intel.com/en-us/blinking-led-with-arduino-ide-on-intel-edison-board
Installing Visual Studio* and the Intel® RealSense™ SDK
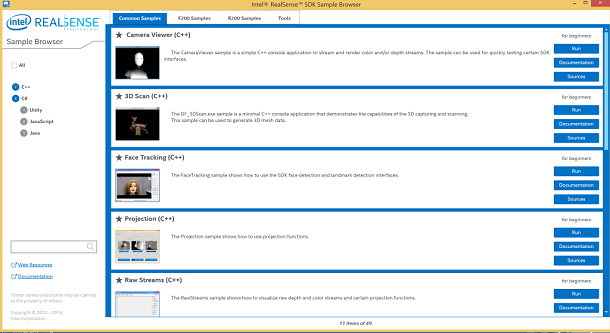
Installing Visual Studio should be very straight forward, the Intel RealSense SDK, however, requires a 3D Camera to be plugged into USB3 in order for it to install. You’ll know it’s been successfully installed when you see the Intel RealSense SDK Sample Browser (Figure 5) on your desktop, where you can browse through the C++ and C# examples. Camera-specific examples are also available; we’ll be using the Hand Viewer example.
The F200 Depth Camera Manager must be downloaded separately after installing the SDK. It is located at:
https://software.intel.com/en-us/intel-realsense-sdk/download.
Without the camera manager, the code samples will not initialize correctly.
Example #1, Sending Signals from the Intel® RealSense™ 3D Camera to the Intel® Edison Board
For the first example we’ll build a simple app that uses hand gestures to send signals from the camera to control the LEDs on the board.
Code for the Intel® Edison Board
We’ll first have to build the receiving end of the code. We’ll connect the Grove kit to the Arduino breakout board and take the LED socket kit v1.3 and connect it to D2 as shown in Figure 6.

Connect the USB port to your PC or Intel NUC, use the Windows* Device Manager to find which serial port the Intel® Edison board is using. From Figure 7 we can see it is "COM16" in this case. Windows automatically detects the board and assigns the port when we connect the board to our PC.

In the Arduino IDE under Tools, we’ll select "Intel® Edison" as the board and "COM16" as the Port as shown in Figures 8 and 9.


Finally, we get to do some programming. Since the board is used as an output device, the following few lines of code will control its serial port, where 1 turns on the light and 0 turns off the light.
const int ledPin = 2;     // the number of the pushbutton pin
void setup() {
  // initialize the LED pin as an output:
  pinMode(ledPin, OUTPUT);
  Serial.begin(9600);
}

void loop() {
  if (Serial.available()>0)
  /* read the most recent byte */
  {
    int tmp = Serial.parseInt();
    if(tmp == 0)
    {
      // turn LED off:
      digitalWrite(ledPin, LOW);
    }
    else if (tmp == 1)
    {
        // turn LED on:
        digitalWrite(ledPin, HIGH);
    }
  }
}
We are now finished with the code sample for the Intel® Edison board.
Code for the Intel® RealSense™ App
Under the C# F200 Samples, is the Hand Viewer app. Click the source on the right and open the RSSDK/FF_HandsViewer.cs folder. Copy this entire folder to the desktop so we can modify this project.
The specific gesture we are going to use is spread fingers. You can always switch to another gesture if you want. Figure 10 shows selecting the spreadfingers gesture for this example.

Under MainForm.cs modify and add the following code. The program is relatively simple, as we are simply declaring the serial port and tracking the last gesture. When the gesture is not the same, we change the flag for the LED. UpdateInfo is where existing sample code updates the user’s gesture. We can use the variable status to track whether the spreadfingers gesture is being given. When it is, we set the SerialPort’s flag to 1 and turn on the LED. When the gesture is finished, we send a 0 to the flag to turn off the LED.
using System.IO.Ports;
…
public partial class MainForm : Form
{
	private SerialPort _serialPort;
private int _lastGesture;
	…
public MainForm(PXCMSession session)
{
	…
	_serialPort = new SerialPort();
_serialPort.PortName = "COM16"; //Serial port Edison is connected to
            _serialPort.BaudRate = 9600;
            _serialPort.ReadTimeout = 500;
            _serialPort.WriteTimeout = 500;
}

private void WriteToSerialPort(int value)
{
            if (_lastGesture != write)
            {
                Console.WriteLine(write.ToString());
                _serialPort.Write(write.ToString());
            }
            _lastGesture = write;
}

public void UpdateInfo(string status,Color color)
{
…

            if (status.Contains("spreadfingers") || status.Contains("spreadfingers"))
            {
                WriteToSerialPort(1);
            }
            else
            {
                WriteToSerialPort(0);
            }
 }

        private void Start_Click(object sender, EventArgs e)
        {
            …
            _serialPort.Open();
        }

       private void Stop_Click(object sender, EventArgs e)
        {
            …
            _serialPort.Close();
        }
If everything works correctly, click the start button, place tracking to spread fingers. Then, when fingers are spread, the LED should light up as shown in Figure 11.

Example #2, Reading data from the Intel® Edison Board and using an Intel® RealSense™ app for the output
In this example we use the temperature sensor connected to the Intel® Edison board as input and speech synthesis in an Intel RealSense app to make the sensor data more humanized.
Code for the Intel® Edison Board
The Grove* - Temperature sensor v1.1 is an analog sensor that we can plug in to A0 on the board through the Grove kit. The following Arduino code reads the temperature in Celsius. The code has a delay every 15 seconds so the text-to-voice portion through the speaker has time to complete. You can adjust the delay according to your needs. You can write additional logic to send out warnings when the temperature is too high or too low as well.
#include <math.h>
int a;
float temperature;
int B=3975;                  //B value of the thermistor
float resistance;

void setup()
{
  Serial.begin(9600);
}

void loop()
{
  a=analogRead(0);
  resistance=(float)(1023-a)*10000/a; //get the resistance of the sensor;
  temperature=1/(log(resistance/10000)/B+1/298.15)-273.15;//convert to temperature via datasheet ;
  Serial.print("Current temperature is ");
  Serial.print(temperature);
  Serial.println(" celcius");

  delay(15000);
}
The Intel® RealSense™ App
Under Common Samples you’ll see Speech Synthesis. Copy the source folder "ambitious, persistence, resilient risk taker," just like we did in the previous Hand Viewer example. The interface might not change, but the goal is to use speech synthesis to speak the sensor data from the board. We are still using "COM16".
Change the MainForm.cs file as follows:
using System.IO.Ports;
…
public partial class MainForm : Form
{
        private SerialPort _serialPort;
        private static bool _continue;
        protected static string curr_module_name;
        protected static uint curr_language;
        protected static int curr_volume;
        protected static int curr_pitch;
        protected static int curr_speech_rate;

        Thread readThread = new Thread(Read);

        static public void Read()
        {
            while (_continue)
            {
                try
                {
                    string message = _serialPort.ReadLine();
                    Console.WriteLine(message);
                    VoiceSynthesis.Speak(curr_module_name, (int)curr_language, message, curr_volume, curr_pitch, curr_speech_rate);
                }
                catch (TimeoutException) { }
            }
        }

        public MainForm(PXCMSession session)
        {
            …
            _serialPort = new SerialPort();
            _serialPort.PortName = "COM16"; //Serial port Edison is connected to
            _serialPort.BaudRate = 9600;
            _serialPort.ReadTimeout = 500;
            _serialPort.WriteTimeout = 500;

            _serialPort.Open();
            _continue = true;
            readThread.Start();
        }
        private void MainForm_FormClosing(object sender, FormClosingEventArgs e)
        {
            _continue = false;
            readThread.Join();
            _serialPort.Close();
        }
        …
}
If everything runs correctly, the program will speak the temperature sensor data every 15 seconds. Feel free to modify the program for your individual needs, such as changing the interface or simply copy VoiceSynthesis.cs and VoiceOut.cs into your own project.
Going Forward
I hope these two examples help developers and entrepreneurs to expand their thinking and come up with more ideas that utilize the power of both technologies. One prototype I came up with was Anti-Snoozer, where the Intel RealSense 3D Camera detects when a driver is getting drowsy and sends alarms through the Intel Edison board to give additional warnings to wake the driver up. Thousands of combinations of using the power of both technologies are possible. So, what will you make?
About the Author
Peter Ma has over 14 years of experiences developing web, mobile, and IoT applications. He previously worked in five startup companies, specializing in database, web backend, web frontend, mobile (Android* and iOS*), and IoT development. He is an Intel® Software Innovator, building various demos using Intel® technologies.
Peter currently lives in San Francisco and works as a Rapid Prototype Specialist, consulting for both large corporations and startups. He attends many hackathons in his free time and often wins (!). People describe him as ambitious, persistence, resilient and a risk taker.
Copyright 2015 Peter Ma
Licensed under the Apache License, Version 2.0 (the "License"); you may not use this file except in compliance with the License. You may obtain a copy of the License at
http://www.apache.org/licenses/LICENSE-2.0
Unless required by applicable law or agreed to in writing, software distributed under the License is distributed on an "AS IS" BASIS, WITHOUT WARRANTIES OR CONDITIONS OF ANY KIND, either express or implied. See the License for the specific language governing permissions and limitations under the License.
Start inventing today with the Intel® IoT Developer Program which offers knowledge, tools, kits and a community of experts to quickly and easily turn your innovative ideas into IoT Solutions.
Dream it, Build it with the Intel® IoT Developer Kit for Intel® Edison and Intel® Galileo platforms. These kits are versatile, performance-optimized and fully integrated end-to-end IoT solutions supporting a variety of programming environments, tools, security, cloud connectivity and hardware.
For more resources and to learn how the new Intel® IoT Developer Kit v1.0 can help streamline your IoT projects:
- Download the Intel® IoT Developer Kit
- Visit the Intel® Developer Zone for IoT
- Attend one of our Roadshows for hands-on training in creating your own IoT projects