
The First Chrome Extension - A "How-to"
4.84/5 (16 votes)
A simple first-step Extension for the Chrome Browser with a How-to of event-hooks in JavaScript, as the Google security policy does not allow inline-scripts and events.
Introduction
I started my first steps with JavaScript and the web not long ago, which was an entire new world for a backend-database-C# guy like me, who spent most of his developer-life in background programs and services.
So please don't judge the "quality of JavaScript" in this article, I am a beginner here and it's very likely that this could be written in a much nicer/shorter way. Well, I'd appreciate any tips here, if you are better in JavaScript than me (which isn't very hard! :))
Background
I had a little tool in JavaScript, written for my daughter for the school, which helps in calculating, what we call in German a "Schlussrechnung" - best translation I found on the web was "rule of three".
While I was able to host it on my webs pace, I thought, it would be much more elegant to have this as a little popup-window in the top right corner of Chrome as an extension. Unfortunately, the "First Extension" tutorial from the Google Sites does not explain how to work with event handlers and what "inline-script" really means. So I had to dig a little bit deeper. After searching through some tutorials and putting pieces together, I finally had a working "X-Calc" extension for Chrome, which I want to share with you today.
How to Start
It doesn't take much to write your own Chrome Extension. The minimum files you need are:
- A file called "manifest.json" which defines your extension (I'll come to that in a moment).
- Your main HTML file, in my example here, this is the file "xr.html".
- Your JavaScript file (keep it separated from the html!), here we go with "xr.js".
- A .png File, which is the toolbar icon for your extension. Dimension: 19x19px.
- A 128x128px .png file which is the Web Store Icon of your extension.
- If you plan an "Options" page, you will need a separate .html file for the options.
Put those files together in a new folder on your hard disk. That's it!
In my case, I even added a small .CSS style sheet file, but that was more a product of my learning phase.
So your directory will look like this:

manifest.json
This file is the link between Chrome and your html/js files. It holds the name, the description, locale, icon, policies, permissions, main-file (the file to launch when the extension button is clicked) and all that technical stuff your extension needs to run.
This file here shows the minimum content of that file:
- Name, Description, Icon
- Main File to start
- Code needed to add an "Options..." menu item when right-clicked
{
  "manifest_version": 2,

  "name": "X-Calc",
  "description": "Calculates the missing value. Enter 3 values,
                  leave any text box blank. X-Calc will calculate the missing value.",
  "version": "1.0",
  "offline_enabled": true,
  "icons": {
    "128": "xr128.png"
  },
  "options_ui": {
    "chrome_style": true,
    "page": "xroptions.html"
  },
  "browser_action": {
    "default_icon": "xr.png",
    "default_popup": "xr.html"
  }
}
Let's discuss this, line-by-line so you get an idea of what you are doing here:
- "manifest_version": 2 -- This is the current manifest version, set by Google
- "name": "X-Calc" -- The name of your extension, as it will appear in Web Store
- "description": "free-text...", -- Enter a brief description of your Extension. 132 chars max. No Html allowed.
- "version": "1.0", -- Your Version string.
- "offline_enabled": true, -- If your extension does not need internet connectivity, set this to true
- "icons": {
- "128": "xr128.png" -- The filename of the Web Store icon file.
- },
- "options_ui": {
- "chrome_style": true,
- "page": "xroptions.html" -- The html file for your options page. Produces a nice Chrome Popup
- },
- "browser_action": {
- "default_icon": "xr.png", -- This icon is shown in Chrome top right in the extension area. 19x19px
- "default_popup": "xr.html" -- This is the html page that will load when the extension button is clicked.
- }
The "options_ui" section is optional, of course. My extension doesn't need any options, I just included it here as a show case. When you right-click my extension, an "Options" menu item appears (caused by this "options_ui" flag) and the options page is opened in a neat Chrome-style popup window:

Your second choice here, if you do not want such a chrome-style options page, is to add a line like this instead of "options_ui" to your manifest.json file:
"options_page": "xroptions.html",
Then your options dialog will open as a new tab in Chrome.
If you do not add any "options" in your manifest, the extension will have no "Options" menu item, which is fine for many small extensions, too.
To see, what is allowed/possible with the manifest.json file, take a look at the Google manifest file format, which I found a bit long, but still quite useful.
xr.htm and xr.js
One thing I had to learn was that you have to separate your JavaScript code from the HTML, no matter how "tiny" your app is. Google does not allow inline-scripts, that is, scripts placed directly in the .html file.
There is no way to soften that policy.
It is also not allowed to use the onclick="buttonClicked" syntax when defining a button or control in HTML. You have to hook your events in a different way. Same is true for onkeypress and all other easy-to-connect JavaScript events. The solution to this (which is one of my main reasons for this tutorial-article) can be found at the end of the xr.js file.
After removing the scripts, there was not much left in my xr.html file, just the Text boxes, the Buttons and some basic styles (I am no Pro in CSS, please forgive me :)).
Feel free to design any HTML page you want, Chrome will open it.
The scripting part is nothing complicated, so I stripped out the code here to keep the file smaller, because I want to focus on this most important part: Hooking the events.
Take a look at how this is done:
function CheckKey(e) {
    // Just waiting for ENTER key...
}

function Clear() {
    // Clear all text boxes and set the background color back to white...
}

function Calculate() {
    // Calculate the rule of three...
}

// This is, what we want to focus on:
function onLoad() {

  // This is, how you hook to events in a Chrome Extension:
  // Basically, like document.getElementById, just put a hash # in front of your control's id
  document.querySelector('#calc' ).addEventListener('click', Calculate);
  document.querySelector('#clear').addEventListener('click', Clear);

  document.querySelector('#LT').addEventListener('keypress', CheckKey);
  document.querySelector('#RT').addEventListener('keypress', CheckKey);
  document.querySelector('#LB').addEventListener('keypress', CheckKey);
  document.querySelector('#RB').addEventListener('keypress', CheckKey);
}

// You have to hook on 'DOMContentLoaded' which is raised, when the extension has
// loaded your page. I call my method "onLoad" here.
document.addEventListener('DOMContentLoaded', onLoad);
You have to add your event listeners manually after the page has loaded. No inline allowed in the .html file.
Loading the Extension into Chrome
To load/test your extension, you have two choices:
- Put your Chrome in "Developer mode". This is done by opening chrome://extensions/ and checking the "Developer mode" checkbox on top.

- Get the Chrome Apps and Extension Developer Tool from the Chrome Web Store which help you a bit when it comes to reloading and looking at error messages.

In this article, I will work with the Apps and Extension Developer Tool as I really found this a useful little thing.
(I will refer to this loooong tool name from now on as Apps-Tool.)
When you open the Apps-Tool for the first time, it presents you two tabs on Top: Apps and Extensions.

Select the Extensions Tab and click on the "Load unpacked" Button. This allows you to load any folder (that contains at least a manifest.json file) directly into Chrome.
If you have any errors in your manifest file, they will be presented to you instantly.
When you have successfully loaded your Extension, the Apps-Tool will show it as "unpacked" like this:

See that puzzle tile at the top left edge? This is how your extension looks like, if you omit the "icons" "128" section in the manifest file! As soon as you add it (and have the image file in the folder of course), you will see what your extension will look like when loaded from the Web Store:
![]()
Now open your Chrome Browser. Maybe there's a warning about "deactivating unpacked extensions" - Of course, you choose to not deactivate them :). Your Extension should appear in the top right corner, the Extension Toolbar of Chrome:

The icon displayed is the one you put in the manifest file as "default_icon" of the "browser_action".
Now try it out! Right-click the icon to see the Options menu item, or just click the button to have the Extension open its "default_popup" page from the manifest file.

Handling Errors
This is the point where I found the Apps-Tool very useful. For demonstration, I added some errors to my JavaScript program. When any error occurs while the Extension runs, the Apps-Tool will keep a log of the errors and even provide a "View details" link that jumps directly into code and shows you the error-line in red!
That's why I like this tool, even more as it helped me, as a total Noob in JavaScript, to figure some things out.
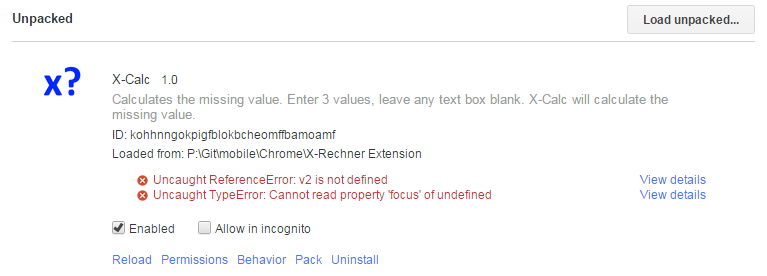
The error is shown when you click on "View details":

I hope this little tutorial can help you a bit with your first steps in doing your own Chrome extension. For me, it is just the beginning, I kind of tasted blood, and now want more.... more more more... but maybe out there is somebody with similar thoughts, thinking about how to start, and maybe this will help that somebody!
How to Proceed From Here...
Well, if you finished your Extension, it's time to pack it (into a .zip File) and upload it to the Web Store, so other people can download and use it.
For this step, it is necessary to register a Google Developer Account and to pay a one-time fee of $5.
There are lots of articles out there whether it is better to create a dedicated Developer Account or to use your personal account. I strongly recommend that you query the web a bit and get information about what fits your needs best.
I neither say "make a dedicated account" nor do I say "use your personal account". To be honest, I haven't decided for myself yet, too. Still thinking about what would be the best. Should I create a developer account and register it for both, Chrome and Android? Should I keep it simple and use my personal account? But I have a really huge amount of data and files in the Google Cloud, my entire Family is there in the cloud, we protected the Accounts with phone-codes (double authentication) and I do not think that I want the account to be public known. On the other hand, it's a mess when I have to switch between accounts every time I want to do something as my "developer-self"...
It's a topic you should take your time and really think about it, in my opinion. Publishing itself is not hard - it's the step before you publish. The decisions you have to make.
I wish you all the best and maybe drop a link here to your first published extension!
Feel free to discuss and leave a note, how your approach was. Did you create a dedicated account? Share your thoughts, maybe they help other newbies too, when they need to find their decision.
History
- 2015-05-04 Published
- 2015-05-05 Fixed some typos and repaired a missing image link