
Amazon Web Services part 3 - How to point your domain to your AWS hosted site
4.40/5 (3 votes)
Point your domain to your AWS hosted site using Route 53
Introduction
This is part 3 of a series of articles about deploying your site to Amazon Web Services (AWS), Amazon's counterpart to Windows Azure.
In parts 1 and 2, we implemented a simple web site with a database, corresponding to the green and blue bits below.
In this part, we'll point your own domain to this web site. This corresponds to the red bit.

This article assumes you have a web site deployed to AWS with a load balancer, as described in part 1. This is because your domain will actually point at the load balancer, which takes requests coming in from the outside world and distributes them to the web servers.
About the domain name system
The objective here is that if someone enters your domain in their browser, the browser requests a page from the load balancer, which then passes on the request to one of the web servers.
The problem is that to reach any machine on the Internet, including your load balancer, you need its IP address. So the browser needs to somehow translate the domain entered by the user into an IP address. It does this through the Domain Name System (DNS):
This is essentially a large database that maps domain names such as "yourdomain.com" onto a set of DNS records. Of the many types of records, you'll be most likely to work with these:
| Type | Description |
|---|---|
| A (Address) | Maps a domain name to an IP address |
| CNAME (Canonical Name) | Creates an alias of a domain name |
| NS (Name Server) | Lets you point at the name server of a sub domain, such as "admin.yourdomain.com" |
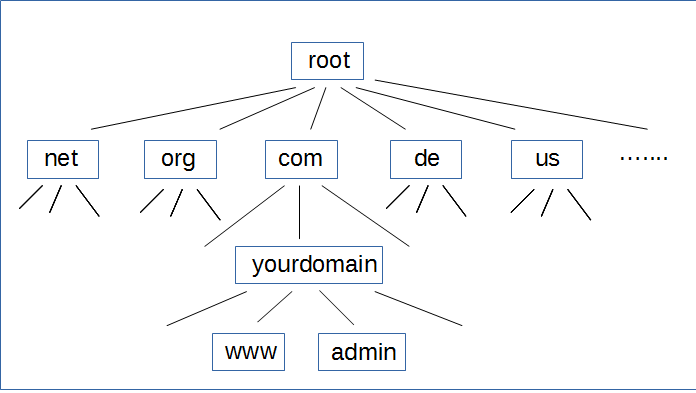
One way of building this database would be to simply put it on a computer somewhere in the world. But this wouldn't work well for several reasons. For example, if that computer went down, nobody would be able to use domain names anymore. To overcome this, the DNS is implemented as a distributed system, organized as a hierarchy of name servers.
Here is how a browser finds the IP address of some domain "yourdomain.com":
- The browser has a list of DNS root servers. These sit at the top of the tree shown above. It asks a root server for the IP address of "yourdomain.com".
-
Every domain name consists of labels separated with periods. "yourdomain.com"
has the labels "yourdomain" and "com". The right most label is a Top Level Domain (TLD).
The root server has the IP addresses of the name servers for the TLDs. It forwards the request to the name server for "com".
The name server for "com" has the IP addresses of the name servers for all its sub domains, such as
"mydomain.com", "yourdomain.com", etc.
It forwards the request to the name server for "yourdomain.com".
- The name server for "yourdomain.com" has the A record with the IP address for the domain. This makes it the authoritative name server.
Who controls the IP addresses of the name servers of your domain? You do. If you registered "yourdomain.com" with a registrar such as GoDaddy, you can log into your account with them and change the name server IP addresses.
One problem with this sequence is that it still has every browser in the world hit the root servers each time they need to resolve a domain name. All those servers talking to each other also takes time.
To prevent this, browsers and the DNS servers cache the results of DNS lookups. To ensure that these caches don't go stale, the authoritative name server sets a Time To Live (TTL) in seconds, after which the caches evict the old results. This means that when you make a change to a record in a name server, it can take a while for browsers to pick up your change.
One last term you'll come across is DNS zone. This is a part of the tree controlled by a given administrator. If you control "yourdomain.com", "www.yourdomain.com" and "admin.yourdomain.com", than they are in your DNS zone.
Your own name server with Route 53
What this all means is that in order to point your domain name to your load balancer, you need your own name server. Then you can create a record in your name server that points at your load balancer.
You can easily create a name server through the AWS Route 53 service. This gives you a name server plus 3 duplicates, spread over several locations in the world. That gives you great availability. It's named after port 53, the well known port for DNS servers.
Costs
Route 53 is cheap but not free (pricing).
Point your domain to your load balancer
The following assumes you already have a domain registered with a registrar such as GoDaddy.
- Log into AWS.
- Click Services | Route 53 | Get Started Now under DNS Management | Create Hosted Zone. This takes you to the Hosted Zones page.
- Click Create Hosted Zone. A panel opens at the right hand side of the page.
- Fill in your domain name, such as "yourdomain.com" (without quotes). Click Create. This gives you your own name servers (all duplicates of each other).
-
In addition to normal DNS records,
Route 53 also lets you use
Alias
record sets,
which are AWS specific.
Essentially, these are a cheaper and quicker way to associate your domain with your load balancer.
Create an Alias:
- Click Create Record Set (panel opens at the right)
- Set Alias to Yes
- Click in the Alias Target control. A drop down will appear. Click the domain of your load balancer.
- Click Create.
-
The 4 domains in the NS record are your name servers.
Log into your registrar (such as GoDaddy) and look for an area where you can manage your domains.
This should include the name servers of your domain.
Replace the domains you find there with those of your new AWS name servers.
The domains in the NS record have a period at the end. Leave those off when you enter them in your registrar account.
It may take some time for the DNS and your browser to pick up the change in name servers. But once that's happened, your domain will be pointing at your AWS hosted site.
Next Parts
In subsequent parts, you'll see how to use a certificate to give your site a secure connection (https instead of http).