
Amazon Web Services part 2 - Adding a database to your web site
5.00/5 (2 votes)
Add a database to your web site on AWS with automatic fail over using RDS
Introduction
This is part 2 of a series of articles about deploying your site to Amazon Web Services (AWS), Amazon's counterpart to Windows Azure.
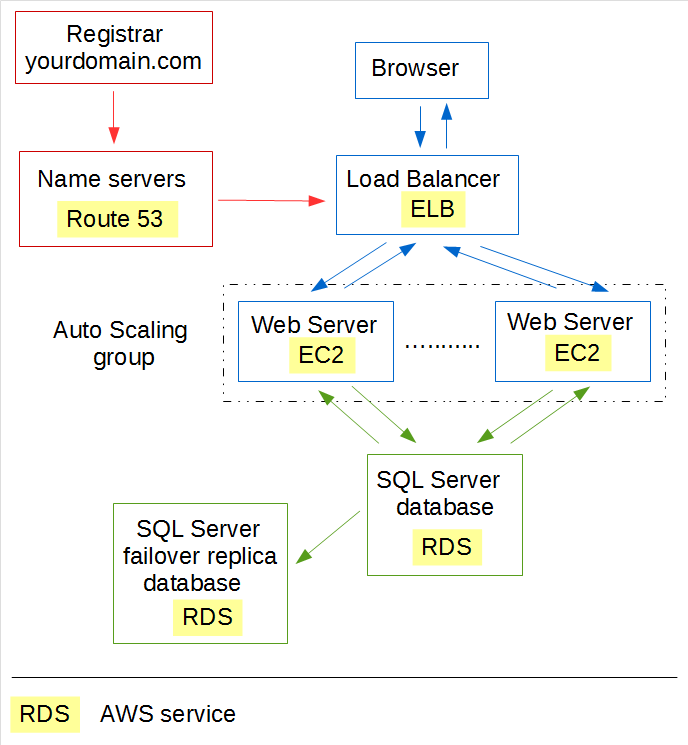
In part 1, we looked at the architecture of a web site with load balanced web servers and a SQL Server database with automatic fail over. We then implemented a simple site without a database. In this part, we'll add the database. That is, we'll do the green bit below. The red bit (DNS name servers so your site uses your own domain) we'll leave for another part.
This article assumes you have a web site deployed to AWS with Elastic Beanstalk application, as described in part 1. We'll first create the database, and then deploy a new version of the web site that uses that database.
Automatic fail over aka Multi-AZ deployment
AWS refers to the automatic fail over feature as a Multi-AZ deployment. AZ stands for Availability Zone. An AZ is essentially a data centre, with its own power supply, etc.
With a Multi-AZ deployment, AWS creates a backup database server in another availability zone within the same region. Modifications to your main database server are continuously mirrored to the other server. If your main database server goes down, the other server is automatically made the main server (fail over). Because it has the same DNS name as the main database, your application doesn't need a new connection string.
The fail over process may take a few minutes. During that time, your application will see a broken database connection. AWS will automatically spin up a new backup database server.
Because the backup server is in another data centre, it is highly unlikely that both your main and backup servers go down at the same time. Because they are in the same region, moving data from main to backup is still fast.
Note that automatic failover for SQL Server databases is currently only available in the US East (N. Virginia), US West (Oregon), and EU (Ireland) AWS regions.
Database with fail over costs money
If you are using the AWS Free Tier, you can use a database server running SQL Server Express for free (as of March 2015).
The problem is that Amazon have implemented fail over for SQL Server servers using the SQL Server Mirroring feature. This feature is not available on SQL Server Express.
Your cheapest option that supports mirroring would be a SQL Server Standard Edition database on a db.m1.small instance (pricing).
Because of this, I've discussed installation of both SQL Server Express (no fail over) and SQL Server Standard Edition (with fail over, costs money) below.
Creating an SQL Server Express database
- Select Engine - Click Services (top of the page) | RDS | Get started now | SQL Server logo | Select for SQL Server Express.
-
Specify DB Details - Here is where you enter most of the details of your database.
Field Value DB Instance Class db.t1.micro Allocated Storage The free tier gives you 20GB max, so keep it at that. Note that SQL Server Express needs 20GB or more, so 20GB is exactly the sweet spot. Db Instance Identifier Must be unique amongst your databases in this region. Maybe something boring like "dbinstance1". Username, Password SQL Server databases hosted on RDS can only use SQL Server Authentication, not Windows Authentication. The username and password you enter here will also have to be used in the connection strings used by your application on AWS. Click Next Step (bottom right).
- Configure Advanced Settings - You can leave all defaults. Click Launch DB Instance. Click View Your DB Instances to get to where you really want to be.
- You're now on the RDS page showing your database servers. It will show your server spinning up, which will take a while.
Creating a SQL Server Standard Edition database
- Select Engine - Click Services (top of the page) | RDS | Get started now | SQL Server logo | Select for SQL Server SE.
- Production? - Seeing that you're here for automatic fail over (that is, Multi-AZ Deployment), it makes sense to say Yes here. Click Next Step.
-
Specify DB Details - Here is where you enter most of the details of your database.
Field Value License Model Unless you bring your own SQL Server license, you'll want AWS to take care of the license: license-included. DB Instance Class db.m1.micro would be the cheapest option, but it may not be powerful enough for you (compare instances). Allocated Storage You'll need 200GB or more for Standard Edition. Db Instance Identifier Must be unique amongst your databases in this region. Maybe something boring like "dbinstance1". Username, Password SQL Server databases hosted on RDS can only use SQL Server Authentication, not Windows Authentication. The username and password you enter here will also have to be used in the connection strings used by your application on AWS. Click Next Step (bottom right).
- Configure Advanced Settings - You can leave all defaults. Click Launch DB Instance. Click View Your DB Instances to get to where you really want to be.
- You're now on the RDS page showing your database servers. It will show your server spinning up, which will take a while.
Adding a database while creating an Elastic Beanstalk application
In part 1, while going through the wizard to create the web servers and load balancer, there was a step Additional Resources where the wizard offered to create a database.
It would certainly have been possible to create a database at that point in time. The wizard will ask you your username, password, database instance, etc., and even whether you want a Multi-AZ Deployment.
However, if you say yes to that, Elastic Beanstalk throws an error when it actually tries to create the application. This is because a Multi-AZ Deployment for SQL Server requires that an option group is created and attached to the SQL Server database server that switches on mirroring. Elastic Beanstalk fails to do this though. As a result of this bug, it is easier to create the database directly from the RDS dashboard.
Note that if you created a SQL Server Standard Edition database server with Multi-AZ Deployment, you can see its option group here: Services | RDS | Instances | click your database (database details appear) | click option group in the details section.
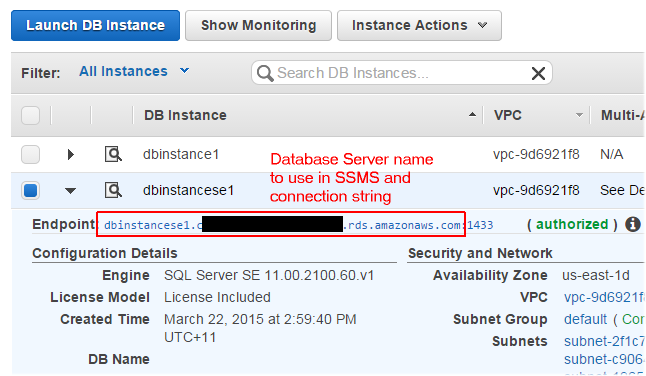
Find the database server name
When you create a connection string for your new database server, and also when you try to connect to it with SSMS, you need to know the server name.
That name is listed on the RDS dashboard as the "Endpoint":
Copy your current schema and data to your new database
As an aside, there is nothing stopping you from accessing your new database on AWS from SQL Server Management Studio (SSMS). Simply create a new connection with the database name you found earlier and the username and password you specified whilst creating the new database.
If your site uses Entity Framework Code First and you don't have any data yet, things are easy. This is because EF Code First will create the database schema when it first runs against an empty server.
My trial site SimpleSiteWithDb (on Github) uses EF Code First. So if you're using this, you're done already!
If your application doesn't use Entity Framework Code First, or if you need to preload data before starting your site, you will want to copy the schema of your existing database to your new AWS database, and then the data.
An issue here is that AWS doesn't allow you to log into an RDS database server. That means that you can't simply take a backup of your existing database and restore it on your new database server in AWS.
However, you can easily copy the schema with SQL Database Migration Wizard, a tool that ironically was created inside Microsoft to transfer databases to Microsoft Azure.
- Download SQL Database Migration Wizard. This gives you a .zip file.
- Expand the .zip file. The result will contain a file SQLAzureMW.exe.
- Run SQLAzureMW.exe. A wizard appears.
- Select Process - Set Analyze / Migrate to Database. Set Target Server to SQL Server. Leave everything else unchecked. Click Next.
- Connect to Server dialog - Enter the details of the source database.
- Going through the wizard, it will let you save a script that creates the schema. You could use SSMS to use that, but if you click Next, it will apply the script for you.
- Setup Target Server Connection - Connect to Server dialog - Enter the details of your new database at AWS. Leave Database at Master DB. Click Connect.
- Setup Target Server Connection - click your target database. Click Create Database. It now transfers the schema. Click Exit.
Once that's done, you can use the SQL Server Import and Export Wizard to copy your data from your current database to your new AWS database:
- Open SQL Server Management Studio;
- Connect to your current server;
- Right click your current database | Tasks | Export Data.
Trial site that uses the database
If you have a web site project lying around that uses a SQL Server database, you can use that. MVC and WebForms are both fine.
Otherwise feel free to get my trial site SimpleSiteWithDb from Github.
I'm assuming that you'll want to run this site locally on your computer first, with a local database, before attempting to deploy it to AWS. In that case, do the following steps before running it on your computer:
- Make sure you have access to a SQL Server database server. If you don't, install SQL Server Express for free.
- Edit the connection string in the web.config file, so it points at your database server.
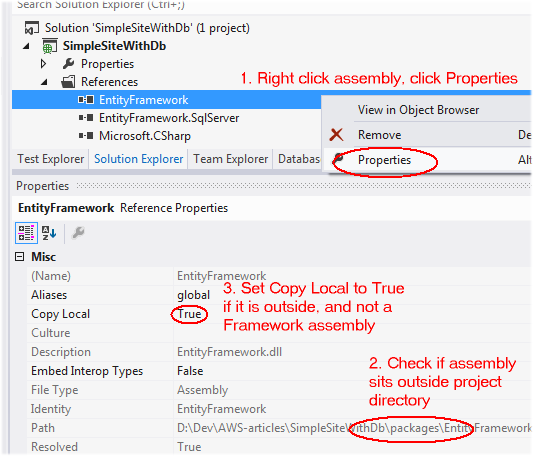
If you use your own site, make sure that all references pointing to outside your web application have Copy Local set to True (I've already done this for my trial site). This goes in particular for NuGet packages, because these normally sit in a packages directory that sits outside your project directory. Framework dlls should be fine, because the AWS EC2 web server will have the .Net framework installed.
Lastly, make sure that the Release version of your site has a connection string pointing at the AWS database server, not your local database server.
You can make this happen through Web.config transformations, by adding a Web.Release.config file in the same directory as your Web.config file. The Web.Release.config file contains XSLT to transform the Web.config file to the Release version.
My trial site already has such a file. Be sure to modify it, to give it your own database name, username and password.
Otherwise, this Web.Release.config file would do the trick:
<?xml version="1.0"?>
<configuration xmlns:xdt="http://schemas.microsoft.com/XML-Document-Transform">
    <connectionStrings>
      <add name="<connection string name used in web.config>"
        connectionString="Data Source=........rds.amazonaws.com;Initial Catalog=....;User Id=.....;
Password=.......;"
        xdt:Transform="SetAttributes" xdt:Locator="Match(name)"/>
    </connectionStrings>

</configuration>
Don't forget to fill in your server name, username and password.
Some connection strings use Integrated Security=SSPI;. Do not use this with an AWS hosted site. It will cause AWS to try to log into your database with the NT AUTHORITY\ANONYMOUS LOGON account rather than your own account - which will fail.
Deploying your site
- Create an application source bundle for your site;
- Open Elastic Beanstalk dashboard: click Services | Elastic Beanstalk | your application (that you created in part 1).
- If you stopped the web servers, get your application operational again: Actions | Rebuild Environment
- Click Upload and Deploy on the Elastic Beanstalk dashboard to deploy your application source bundle.
- Once your site has been deployed, click the Url of your new environment (right next to the header with your environment name) to see your web site appear.
Next Parts
In subsequent parts, you'll see how to point your own domain to your AWS hosted web site, and how to use a certificate to give your site a secure connection (https instead of http).