
Home Book-keeping with Excel 2007
4.00/5 (2 votes)
This article proposes a way to do book-keeping for home use.
Introduction
This article proposes a simple way to do book-keeping for the home. Only Excel is needed. It is based on the double-entry book-keeping system. In this system, every transaction has two accounts, the first is subtracted and the second is added. For example, when you buy something from the grocery store, 10 Euros are subtracted from the wallet account, and 10 Euros are added to the food account. When you receive your salary, 1.000 Euros are subtracted from the income account (which represents the services you provided to your employer), and 1.000 Euros are added to your bank account. When you buy gazoline with the credit card, 50 Euros are subtracted from the credit card account, and 50 Euros are added to the mobility account. When the credit card bill is paid, 200 Euros are subtracted from the bank account, and 200 Euros are added to the credit card account. When all transactions are recorded, it is easy to get the total amounts spent in each account, and the balance of the accounts. The balance in the accounts may be compared to the actual balance in the bank accounts. The provided Excel sheet has two rows for each transaction. A user form is provided to edit and add transactions, a pivot table is included to show income versus expenses and a second pivot table shows the balance. The following snapshot gives an overview:

The provided Excel sheet may also be an example of how to build user forms and pivot tables.
Chart of Accounts
The accounts consist of three levels. The accounts tree is called the chart of accounts. A chart of accounts has usually 5 top level accounts: Assets, Liabilities, Equity, Income and Expenses. At the beginning of the year, the following equation holds:
Assets = Liability + Equity
or the equivalent:
Equity = Assets - Liability
At the end of the year, the Net Gain or Loss is transferred to the Equity. The Net Gain or Loss is calculated as:
Net Gain or Loss = Income - Expenses
When the above value is positive, there is a gain, if it is negative, a loss has resulted.
In the provided Excel sheet, Liability, Equity and Income have negative values. Therefore, the above formulas have to be changed to:
Assets = -Liability - Equity
or the equivalent:
Equity = -(Assets + Liability)

        Net Gain or Loss = -(Income + Expenses)
Everybody can create his own chart of accounts. In the provided Excel sheet, a chart of accounts has been built for a couple John and Kate:
- Asset
- Bank ABC
- Account 123456
- Bank DEF
- Account 234567
- Cash
- Wallet John
- Cash
- Wallet Kate
- Bank ABC
- Equity
- Opening balance
- Opening balance
- Opening balance
- Expense
- Car John
- Gasoline
- Car Kate
- Gasoline
- Communication
- Fixed phone
- Mobile phone John
- Mobile phone Kate
- Food
- Carrefour
- Delaize
- Grocery
- Recreation
- Gym John
- Gym Kate
- Hotel
- Museum
- Restaurant
- Utility
- Electricity
- Mortgage Intereset
- Mortgage 1
- Car John
- Income
- John
- Salary
- Kate
- Salary
- John
- Liability Mortgage
- Bank ABC
- Mortgage 1
- Bank ABC
- Liability Short
- Bank ABC
- Visa John
- Bank DEF
- Visa Kate
- Bank ABC
The top level Liability account has been split into Liability Mortgage and Liability Short. The reason is that it is useful to see the mortgage payments in the income and expenses pivot chart. One can see at once in the pie chart, if the income slice is more than the half circle. If this is the case, the income is enough to cover expenses and mortgage payments.
Transactions
A transaction consists of the following items:
- Nr: Unique nr of transaction
- Date: Date of transaction
- First Account: Account from which money flows out
- Second Account: Account into which money flows in
- Description: A description of the transaction
- Amount: The amount involved in the transaction
I prefer to use first and second account than debit and credit account used in accounting, because for non-accountants, debit and credit is a bit confusing. For example, in accounting terms, when buying food with cash, the Cash account is credited, and the Food account is debited. The provided Excel sheet has two rows for each transaction. The first row contains the account from which money flows out, and the second row contains the account into which money flows in. The two rows have the same transaction number, same amount but with opposite sign, and the same description.
Opening Balance
The equation Equity = -(Assets + Liability) means that, the Equity is distributed to Assets and Liability. At the beginning of the year, the Equity is transferred to the different Asset and Liability accounts. For example, to set the opening balance of a bank account, the following transaction is written:
| Date | Level 1 | Level 2 | Level 3 | Description | Amount |
| 1/1/2015 | Equity | Opening balance | Opening balance | Opening balance | -1.000,00 |
| 1/1/2015 | Asset | Bank ABC | Account 123456 | Opening balance | 1.000,00 |
That means, that from the Equity, the amount of 1.000 is added to the account 123456 at Bank ABC. For the opening balance of the mortgage, the following transaction is written:
| Date | Level 1 | Level 2 | Level 3 | Description | Amount |
| 1/1/2015 | Equity | Opening balance | Opening balance | Opening balance | 100.000,00 |
| 1/1/2015 | Liability Mortgage | Bank ABC | Mortgage 1 | Opening balance | -100.000,00 |
Expense Transactions
To record a museum visit paid in cash, the following transaction is written:
| Date | Level 1 | Level 2 | Level 3 | Description | Amount |
| 1/1/2015 | Asset | Cash | Wallet John | Archeological museum | -30,00 |
| 1/1/2015 | Expense | Recreation | Museum | Archeological museum | 30,00 |
To record gasoline purchase with a credit card, the following transaction is written:
| Date | Level 1 | Level 2 | Level 3 | Description | Amount |
| 16/1/2015 | Liability Short | Bank ABC | Visa Kate | 20 litres | -40,00 |
| 16/1/2015 | Expense | Car Kate | Gasoline | 20 litres | 40,00 |
Mortgage Payments
A mortgage payment consists of a principal part and an interest part. Therefore two transactions are written. The principal part, reduces the mortgage liability, whereas the interest part, increases the expenses:
| Date | Level 1 | Level 2 | Level 3 | Description | Amount |
| 31/1/2015 | Asset | Bank ABC | Account 123456 | Jan 2015 | -900,00 |
| 31/1/2015 | Liability Mortgage | Bank ABC | Mortgage 1 | Jan 2015 | 900,00 |
| 31/1/2015 | Asset | Bank ABC | Account 123456 | Jan 2015 | -100,00 |
| 31/1/2015 | Expense | Mortgage Interest | Mortgage 1 | Jan 2015 | 100,00 |
Income Transactions
An Income transaction reduces the income account and increases the bank account. If there are several clients, or projects, an account may be built for each client or project, so that at the end of the year it is possible to break down the revenue streams to the different clients and projects. For a monthly salary, the following transaction is written:
| Date | Level 1 | Level 2 | Level 3 | Description | Amount |
| 28/2/2015 | Income | John | Salary | Feb 2015 | -1.000,00 |
| 28/2/2015 | Asset | Bank ABC | Account 123456 | Feb 2015 | 1.000,00 |
User Form UI
Transactions may be added just by filling-in the cells as described above. It is not necessary to define a chart of accounts. The chart of accounts is built implicitly by the distinct values entered in columns Level 1, 2 and 3. The user must pay attention to enter the same values in the columns Nr, Description, and the opposite value in column Amount. A user form is provided to edit, add and delete transactions more easily. To show the user form, click the "Edit" button at the top of the sheet.
![]()
The user form displays the transaction at the current active cell:
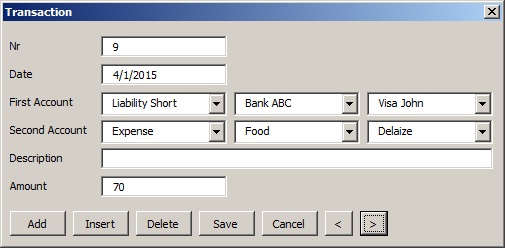
The combo-boxes are filled with the distinctive values from columns Level 1, 2 and 3 respectively. However, the combo-boxes allow to enter values not in the list.
Add
By clicking the button Add, the transaction Nr is set to the last transaction Nr plus 1. The rest of the fields remain the same. The fields may be modified, and upon pressing Save, the transaction will be saved after the last transaction.
Insert
By clicking the button Insert, the current transaction is copied and inserted after the current transaction. All transaction numbers after the current transaction are increased by 1.
Delete
By clicking the button Delete, the current transaction is deleted and all subsequent transactions are moved up and their transaction numbers are decreased by 1.
Save
Saves the current values in the user form to the Excel sheet. The first row will have the Amount column equal to the Amount field with opposite sign, whereas the second row will have the Amount column equal to the Amount field with same sign.
Cancel
Unloads the form, same as clicking on the X button of the window.
First, Prev, Next, Last
- <<: Moves to the first transaction
- <: Moves to the previous transaction
- >: Moves to the next transaction
- >>: Moves to the last transaction
User Form Code
The code is written in VBA. To view the code:
- Office button/Excel Options/Popular: check "Show Developer tab in the Ribbon"
- Developer tab/Visual Basic: opens Visual Basic editor
- Double click on VBA Project/Forms/UserFormTransaction: opens user form
- Double click on any of the buttons: opens the code window
A brief description of the methods is given here:
UserForm_ActivateExecutes when the form is loaded. If the active cell is in the second row of a transaction, the active cell is moved up one row. The active cell is always set to the first column. The form variable
currentCellholds the position of the current transaction shown in the user form.SheetToFormCopies the sheet cells of the transaction at the
currentCellto the fields of the user form.ComboboxDL1is filled with the distinct values of the even rows of columnLevel1.ComboboxDL2is filled with the distinct values of the even rows of columnLevel2for whichLevel1equals to the value inComboboxDL1.ComboboxDL3is filled with the distinct values of the even rows of columnLevel3for whichLevel2equals to the value inComboboxDL2.ComboboxCL1is filled with the distinct values of the odd rows of columnLevel1.ComboboxCL2is filled with the distinct values of the odd rows of columnLevel2for whichLevel1equals to the value inComboboxCL1.ComboboxCL3is filled with the distinct values of the odd rows of columnLevel3for whichLevel2equals to the value inComboboxCL2. The buttons first, previous, next and last are enabled or disabled accordingly.FormToSheetCopies the fields in the form to the sheet cells of the transaction at the
currentCell.FillComboBoxFills the
comboboxitems collection with values from the sheet.parentText: The text of the parentcomboboxparentColNr: The parent column numberchildColNr: The child column number, that means, the column nr of the combobox to fillcombobox1: Thecomboboxto fillstartRowNr: The row number from which to start to take the distinct values
When the
comboboxhas no parent, theparentTextandparentColNrare left empty. While filling thecombobox, the form variablefillingComboBoxis set toTrue. The problem is, that when callingcombobox1.Clear, the change event on thecomboboxis triggered which causes the childcomboboxto be filled. However, nothing should be done before the parentcomboboxis filled. This is achieved by setting this variable. The values in thecomboboxes are sorted alphabetically by the methodQuickSort.QuickSortSorts an array in-place with the
Quicksortalgorithm. Copied the code from Konrad Rudolph's answer in StackOverflow.CommandButtonAdd_ClickFinds the last cell through
currentCell.CurrentRegion.End(xlDown). SetsTextBoxNr.Textto the last cell's value plus1. Sets the active cell andcurrentCellto the next line of the last cell.CommandButtonInsert_ClickSelects the region from the
currentCellup to the end and copies it two rows down. Sets the transaction nr (Nr column) in the copied region.CommandButtonDelete_ClickSelects the two rows of the current transaction, and deletes them by specifying to move the other cells up. If the deleted transaction was not the last one, renumbers the transaction nr (Nr column).
CommandButtonSave_ClickCopies the data in the user form to the sheet by calling
SheetToForm.FormToSheetis also called, to refresh the items in thecomboboxes, because they might have changed by the save action. Also, a loop is done through all pivot tables in the current sheet, to update the datasource of the pivot tables.
Pivot Tables
The sheet contains a pivot chart and a pivot table. Both have as datasource the transactions in columns A through G.
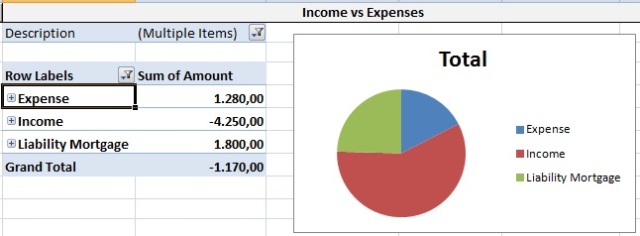
Income vs Expenses
The Income vs Expenses pivot chart looks as follows:
By clicking in one of the cells of the pivot table, the "PivotTable Tools" button appears at the top of the ribbon, and by clicking on that button, the appropriate ribbon appears. By clicking on the "Field List" the "PivotTable Field List" appears:

As row labels are defined the columns Level 1, 2, and 3, and as summary values is defined the sum of the Amount column. In the Report Filter area, the Description column is defined. In the Excel sheet, the Description filter has all items checked, except the Opening Balance:

The Row Labels filter has the items Expense, Income, and Liability Mortgage checked. Therefore, this pivot chart shows the income versus the expenses and the mortgage payments.
Balance
This is a normal pivot table without any filters. The sum must be 0. If the sum is not 0, that means that one transaction has not the same amount on both sides. The pivot table can be drilled down up to level 3. In this pivot table, the bank accounts, the wallet, and the mortgage can be reconciled:

Opening a New Year
I propose to create a sheet for each year. To copy a sheet, right click on the sheet name, choose "Move or Copy", in the dialog choose "(move to end)" and "Create a copy". Rename the newly created sheet to the year you want.

The pivot tables still refer to the data in the original sheet. To change the pivot tables' datasource in the newly created sheet, click on the Edit button to show one transaction, and click Save. The Save action will update the datasource in the pivot tables to the data in the current sheet.
The opening balances of the asset and liability accounts will be the closing balances of the previous year. The closing balances are given in the pivot table Balance. In the new year, the opening balances transactions have to be written, similar to the opening balances transactions of the previous year, but with the amounts given in the pivot table Balance.
Conclusion
Home book-keeping can be done with a simple Excel sheet. The advantage is that no additional software must be installed and it is easily tailored to one's specific needs.
History
- Excel sheet with each transaction on two rows, with user form and two pivot tables.
- Corrected saving of amount, and filling of combo-boxes.