
Android Character Recognition
Optical Character Recognition with Android
Introduction
In this article, i will present an OCR android demo application, that recognize words from a bitmap source.
There is an open source OCR library that supports android: Tesseract.
This demo project contains in addition other parts, like accessing the camera, handling bitmaps, making a camera focus box view, internal storage access etc.
Background
OCR can be used in many purposes: reading text from images, scaning numbers or codes for specific services...
Content
-
Preparing Tesseract
-
Adding tess-two to Android Studio Project
-
Tesseract library usage
-
Android implementation
Using the Code
The demo project in developed on a windows pc, using android studio IDE.
-
Preparing Tesseract
- Install the tesseract source-code from github
- extract content in a tesseract folder
- Requires Android 2.2 or higher
- Download a v3.02 trained data file for a language (english data for example).
- On the mobile side, data files must be extracted to a subdirectory named
tessdata.
To import tesseract to your android project, yu must build it first:
- You must have the android NDK, if you don't install it from here.
- After installing the android ndk, you must add its install directory to the environement variables under Path
- Go to Control Panel\System and Security\System - advanced system settings - environement variables:
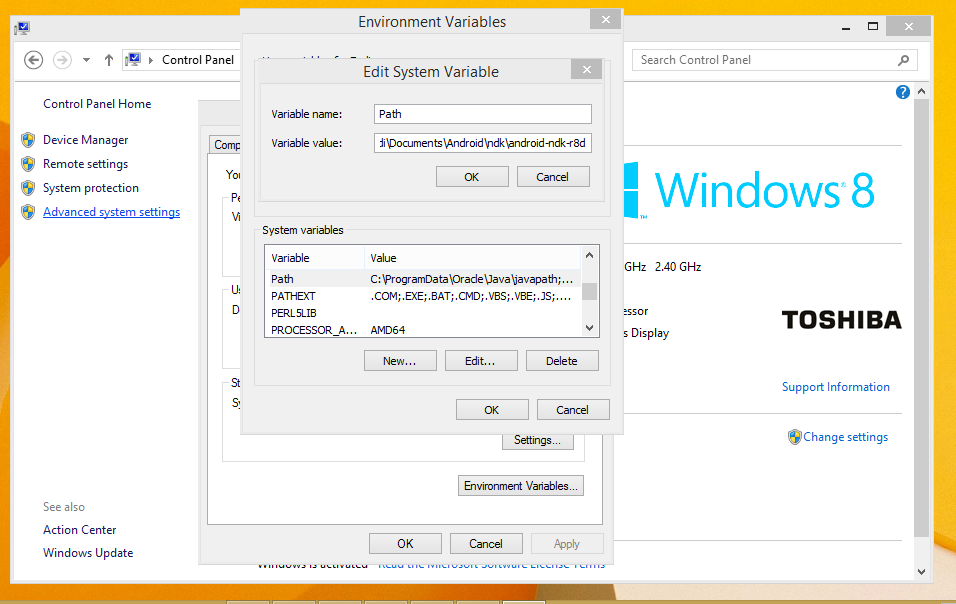
- After adding the android directory to the path, we can use ndk command in the cmd.exe in other directory.
- Now build the tesseract ocr library using the cmd window, (this process may take some time ~30 mins):
- Go the the tess-two folder and open cmd window, (press Shift + Right Click):
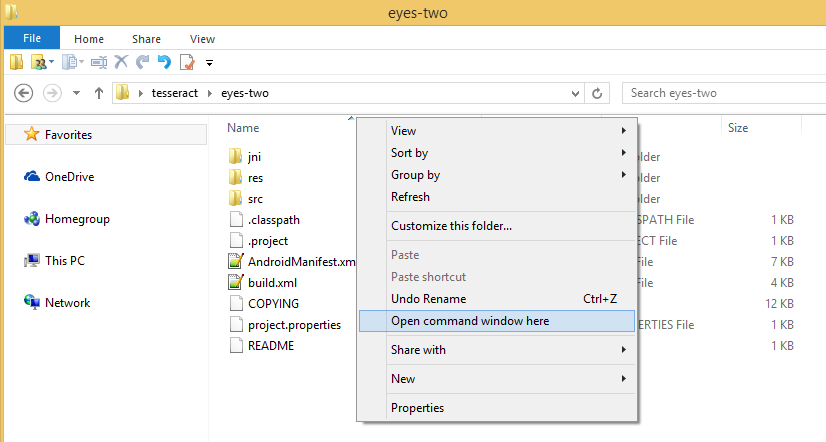
- Build the project using:

-
ndk-build
android update project --path C:\...\tess-two
ant release
- Go the the tess-two folder and open cmd window, (press Shift + Right Click):
-
Adding Tess-Two to Android Studio Project
After we have build the tess-two library project, we must import it to the android application project in android studio.
- In your android studio project tree, add a new directory "libraries", then add a subdirectory name it "tess-two".
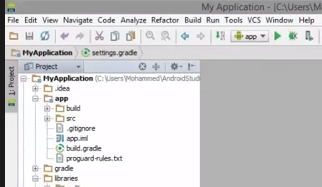
- In windows explorer, move the content of the tess-two build project to the tess-two direcctory in libraries android studio.
-
You must add a build.gradle [new file] in the libraries\tess-two folder:
- Make sure all build.gradle files in application project have same targetSdk version
- Make sure that the tess-two library has build.gradle file
buildscript {
    repositories {
        mavenCentral()
    }
    dependencies {
        classpath 'com.android.tools.build:gradle:0.14.0'
    }
}

apply plugin: 'com.android.library'

android {

    compileSdkVersion 21
    buildToolsVersion "21.0.2"


    defaultConfig {
        minSdkVersion 15
        targetSdkVersion 21
    }

    sourceSets.main {
        manifest.srcFile 'AndroidManifest.xml'
        java.srcDirs = ['src']
        resources.srcDirs = ['src']
        res.srcDirs = ['res']
        jniLibs.srcDirs = ['libs']
    }
}
- Next add to the main settings.gradle include the tess-two library:
include ':app', ':tess-two' include ':libraries:tess-two' project(':tess-two').projectDir = new File('libraries/tess-two') - Next add the tess-two as module dependency to the app module in project structure(ctrl+alt+shift+s)

-
Now the tesseract library can be used in our android project:
    public String detectText(Bitmap bitmap) {

        TessDataManager.initTessTrainedData(context);
        TessBaseAPI tessBaseAPI = new TessBaseAPI();

        String path = "/mnt/sdcard/packagename/tessdata/eng.traineddata";

        tessBaseAPI.setDebug(true);
        tessBaseAPI.init(path, "eng"); //Init the Tess with the trained data file, with english language

        //For example if we want to only detect numbers
        tessBaseAPI.setVariable(TessBaseAPI.VAR_CHAR_WHITELIST, "1234567890");
        tessBaseAPI.setVariable(TessBaseAPI.VAR_CHAR_BLACKLIST, "!@#$%^&*()_+=-qwertyuiop[]}{POIU" +
                "YTREWQasdASDfghFGHjklJKLl;L:'\"\\|~`xcvXCVbnmBNM,./<>?");


        tessBaseAPI.setImage(bitmap);

        String text = tessBaseAPI.getUTF8Text();

        Log.d(TAG, "Got data: " + result);
        tessBaseAPI.end();

        return text;
    }
-
Android side
Still have to take a photo from the camera, or load a it from a file.
We will make a CameraEngine class that loads the camera hardware, and show live streaming on a SurfaceView.
In the CameraUtils:
    //Check if the device has a camera
    public static boolean deviceHasCamera(Context context) {
        return context.getPackageManager().hasSystemFeature(PackageManager.FEATURE_CAMERA);
    }

    //Get available camera
    public static Camera getCamera() {
        try {
            return Camera.open();
        } catch (Exception e) {
            Log.e(TAG, "Cannot getCamera()");
            return null;
        }
    }
In the CameraEngine:
public class CameraEngine {

    static final String TAG = "DBG_" + CameraUtils.class.getName();

    boolean on;
    Camera camera;
    SurfaceHolder surfaceHolder;

    Camera.AutoFocusCallback autoFocusCallback = new Camera.AutoFocusCallback() {
        @Override
        public void onAutoFocus(boolean success, Camera camera) {

        }
    };

    public boolean isOn() {
        return on;
    }

    private CameraEngine(SurfaceHolder surfaceHolder){
        this.surfaceHolder = surfaceHolder;
    }

    static public CameraEngine New(SurfaceHolder surfaceHolder){
        Log.d(TAG, "Creating camera engine");
        return  new CameraEngine(surfaceHolder);
    }

    public void requestFocus() {
        if (camera == null)
            return;

        if (isOn()) {
            camera.autoFocus(autoFocusCallback);
        }
    }

    public void start() {

        Log.d(TAG, "Entered CameraEngine - start()");
        this.camera = CameraUtils.getCamera();

        if (this.camera == null)
            return;

        Log.d(TAG, "Got camera hardware");

        try {

            this.camera.setPreviewDisplay(this.surfaceHolder);
            this.camera.setDisplayOrientation(90);//Portrait Camera
            this.camera.startPreview();

            on = true;

            Log.d(TAG, "CameraEngine preview started");

        } catch (IOException e) {
            Log.e(TAG, "Error in setPreviewDisplay");
        }
    }

    public void stop(){

        if(camera != null){
            //this.autoFocusEngine.stop();
            camera.release();
            camera = null;
        }

        on = false;

        Log.d(TAG, "CameraEngine Stopped");
    }

    public void takeShot(Camera.ShutterCallback shutterCallback,
                         Camera.PictureCallback rawPictureCallback,
                         Camera.PictureCallback jpegPictureCallback ){
        if(isOn()){
            camera.takePicture(shutterCallback, rawPictureCallback, jpegPictureCallback);
        }
    }

}
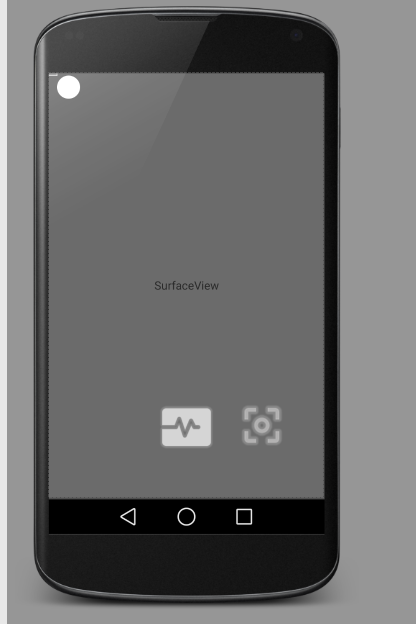
Now in the MainActivity, we will have to:
- Show the camera preview on a SurfaceView [On Resume]
- Stop the camera preview and release the camera resource to let other apps use it. [On Pause]
- Add two button: one for taking a shot (middle), another to focus(right).
- Add a custom FocusBoxView to crop camera preview region, where text need to be extracted from.
The layout xml:
<FrameLayout xmlns:android="http://schemas.android.com/apk/res/android"
    xmlns:tools="http://schemas.android.com/tools"
    android:layout_width="match_parent"
    android:layout_height="match_parent"
    tools:context=".MainActivity">

    <SurfaceView
        android:id="@+id/camera_frame"
        android:layout_width="fill_parent"
        android:layout_height="fill_parent" />

    <engenoid.tessocrdtest.Core.ExtraViews.FocusBoxView
        android:id="@+id/focus_box"
        android:layout_width="fill_parent"
        android:layout_height="fill_parent" />

    <Button
        android:layout_width="100dp"
        android:layout_height="100dp"
        android:id="@+id/shutter_button"
        android:layout_gravity="center_horizontal|bottom"
        android:layout_marginBottom="50dp"
        android:background="@drawable/shutter_layout" />

    <Button
        style="?android:attr/buttonStyleSmall"
        android:layout_width="75dp"
        android:layout_height="75dp"
        android:id="@+id/focus_button"
        android:layout_gravity="end|bottom"
        android:layout_marginRight="50dp"
        android:layout_marginEnd="50dp"
        android:layout_marginBottom="65dp"
        android:background="@drawable/focus_layout" />

</FrameLayout>
For the FocusBoxView, create class that extends View, we will need a Rect, that will represente to focus box, and change it dimension on the event, after that when the onDraw is called it will draw the focus box rectangle (design, frame, border and corners...) where the cropped photo will take place.
public class FocusBoxView extends View {

    private static final int MIN_FOCUS_BOX_WIDTH = 50;
    private static final int MIN_FOCUS_BOX_HEIGHT = 20;

    private final Paint paint;
    private final int maskColor;
    private final int frameColor;
    private final int cornerColor;

    public FocusBoxView(Context context, AttributeSet attrs) {
        super(context, attrs);

        paint = new Paint(Paint.ANTI_ALIAS_FLAG);
        Resources resources = getResources();

        maskColor = resources.getColor(R.color.focus_box_mask);
        frameColor = resources.getColor(R.color.focus_box_frame);
        cornerColor = resources.getColor(R.color.focus_box_corner);

        this.setOnTouchListener(getTouchListener());
    }

    private Rect box;

    private static Point ScrRes;

    private  Rect getBoxRect() {

        if (box == null) {

            //FocusBoxUtils class contains some helper methods
            ScrRes = FocusBoxUtils.getScreenResolution(getContext());

            int width = ScrRes.x * 6 / 7;
            int height = ScrRes.y / 9;

            width = width == 0
                    ? MIN_FOCUS_BOX_WIDTH
                    : width < MIN_FOCUS_BOX_WIDTH ? MIN_FOCUS_BOX_WIDTH : width;

            height = height == 0
                    ? MIN_FOCUS_BOX_HEIGHT
                    : height < MIN_FOCUS_BOX_HEIGHT ? MIN_FOCUS_BOX_HEIGHT : height;

            int left = (ScrRes.x - width) / 2;
            int top = (ScrRes.y - height) / 2;

            box = new Rect(left, top, left + width, top + height);
        }

        return box;
    }

    public Rect getBox() {
        return box;
    }

    private void updateBoxRect(int dW, int dH) {

        ...
        .... UPDATE THE FOCUS BOX DIMENSIONS
        ...
    }

    private OnTouchListener touchListener;

    private OnTouchListener getTouchListener() {

        if (touchListener == null)
            touchListener = new OnTouchListener() {

                int lastX = -1;
                int lastY = -1;

                @Override
                public boolean onTouch(View v, MotionEvent event) {
                    switch (event.getAction()) {
                        case MotionEvent.ACTION_DOWN:
                            lastX = -1;
                            lastY = -1;
                            return true;
                        case MotionEvent.ACTION_MOVE:
                            int currentX = (int) event.getX();
                            int currentY = (int) event.getY();
                            try {
                                 ...
                                 ... updateBoxRect(dx, dy);
                                 ...
                                }
                            } catch (NullPointerException e) {
                            }

                            return true;
                        case MotionEvent.ACTION_UP:
                            lastX = -1;
                            lastY = -1;
                            return true;
                    }
                    return false;
                }
            };

        return touchListener;
    }

    @Override
    public void onDraw(Canvas canvas) {

        Rect frame = getBoxRect();

        int width = canvas.getWidth();
        int height = canvas.getHeight();

        ...
        .... DRAW FOCUS BOX
        ...

        paint.setColor(cornerColor);
        canvas.drawCircle(frame.left - 32, frame.top - 32, 32, paint);
        canvas.drawCircle(frame.right + 32, frame.top - 32, 32, paint);
        canvas.drawCircle(frame.left - 32, frame.bottom + 32, 32, paint);
        canvas.drawCircle(frame.right + 32, frame.bottom + 32, 32, paint);

        ...
        ...
    }
}
Note that you must add in the AndroidManifest.xml permission to use the camera, and other used features:
 <uses-permission android:name="android.permission.CAMERA"/>
    <uses-feature android:name="android.hardware.camera.autofocus" />
    <uses-feature
        android:name="android.hardware.camera.flash"
        android:required="false" />
    <uses-feature android:name="android.hardware.camera" />
Now let's return to the MainActivity, when the focus button is clicked, we will request a focus from the camera,
when the camera button is clicked, the camera will take a photo, and callback the onPictureTaken(byte[] data, Camera camera) where we will decode the byte array to bitmap and resize, perform the image crop in Tools.getFocusedBitmap(this, camera, data, focusBox.getBox()), and call the TesseractBaseApi under the Async class TessAsyncEngine to extract and show a dialog that holds the text and show cropped photo.
For your custom use, you will change or update you code given your needs.
public class MainActivity extends Activity implements SurfaceHolder.Callback, View.OnClickListener,
        Camera.PictureCallback, Camera.ShutterCallback {

    static final String TAG = "DBG_" + MainActivity.class.getName();

    Button shutterButton;
    Button focusButton;
    FocusBoxView focusBox;
    SurfaceView cameraFrame;
    CameraEngine cameraEngine;

    @Override
    protected void onCreate(Bundle savedInstanceState) {
        super.onCreate(savedInstanceState);
        setContentView(R.layout.activity_main);
    }

    @Override
    public void surfaceCreated(SurfaceHolder holder) {

        Log.d(TAG, "Surface Created - starting camera");

        if (cameraEngine != null && !cameraEngine.isOn()) {
            cameraEngine.start();
        }

        if (cameraEngine != null && cameraEngine.isOn()) {
            Log.d(TAG, "Camera engine already on");
            return;
        }

        cameraEngine = CameraEngine.New(holder);
        cameraEngine.start();

        Log.d(TAG, "Camera engine started");
    }

    @Override
    public void surfaceChanged(SurfaceHolder holder, int format, int width, int height) {

    }

    @Override
    public void surfaceDestroyed(SurfaceHolder holder) {

    }

    @Override
    protected void onResume() {
        super.onResume();

        cameraFrame = (SurfaceView) findViewById(R.id.camera_frame);
        shutterButton = (Button) findViewById(R.id.shutter_button);
        focusBox = (FocusBoxView) findViewById(R.id.focus_box);
        focusButton = (Button) findViewById(R.id.focus_button);

        shutterButton.setOnClickListener(this);
        focusButton.setOnClickListener(this);

        SurfaceHolder surfaceHolder = cameraFrame.getHolder();
        surfaceHolder.addCallback(this);
        surfaceHolder.setType(SurfaceHolder.SURFACE_TYPE_PUSH_BUFFERS);

        cameraFrame.setOnClickListener(this);
    }

    @Override
    protected void onPause() {
        super.onPause();

        if (cameraEngine != null && cameraEngine.isOn()) {
            cameraEngine.stop();
        }

        SurfaceHolder surfaceHolder = cameraFrame.getHolder();
        surfaceHolder.removeCallback(this);
    }

    @Override
    public void onClick(View v) {
        if(v == shutterButton){
            if(cameraEngine != null && cameraEngine.isOn()){
                cameraEngine.takeShot(this, this, this);
            }
        }

        if(v == focusButton){
            if(cameraEngine!=null && cameraEngine.isOn()){
                cameraEngine.requestFocus();
            }
        }
    }

    @Override
    public void onPictureTaken(byte[] data, Camera camera) {

        Log.d(TAG, "Picture taken");

        if (data == null) {
            Log.d(TAG, "Got null data");
            return;
        }

        Bitmap bmp = Tools.getFocusedBitmap(this, camera, data, focusBox.getBox());

        Log.d(TAG, "Got bitmap");

        new TessAsyncEngine().executeOnExecutor(AsyncTask.SERIAL_EXECUTOR, this, bmp);

    }

    @Override
    public void onShutter() {

    }
}
For bitmap crop in Imaging.Tools class:
 public static Bitmap getFocusedBitmap(Context context, Camera camera, byte[] data, Rect box){
        Point CamRes = FocusBoxUtils.getCameraResolution(context, camera);
        Point ScrRes = FocusBoxUtils.getScreenResolution(context);

        int SW = ScrRes.x; //SCREEN WIDTH - HEIGHT
        int SH = ScrRes.y;

        int RW = box.width(); // FOCUS BOX RECT WIDTH - HEIGHT - TOP - LEFT
        int RH = box.height();
        int RL = box.left;
        int RT = box.top;

        float RSW = (float) (RW * Math.pow(SW, -1)); //DIMENSION RATIO OF FOCUSBOX OVER SCREEN
        float RSH = (float) (RH * Math.pow(SH, -1));

        float RSL = (float) (RL * Math.pow(SW, -1));
        float RST = (float) (RT * Math.pow(SH, -1));

        float k = 0.5f;

        int CW = CamRes.x;
        int CH = CamRes.y;

        int X = (int) (k * CW); //SCALED BITMAP FROM CAMERA
        int Y = (int) (k * CH);

        //SCALING WITH SONY TOOLS
        // http://developer.sonymobile.com/2011/06/27/how-to-scale-images-for-your-android-application/

        Bitmap unscaledBitmap = Tools.decodeByteArray(data, X, Y, Tools.ScalingLogic.CROP);
        Bitmap bmp = Tools.createScaledBitmap(unscaledBitmap, X, Y, Tools.ScalingLogic.CROP);
        unscaledBitmap.recycle();

        if (CW > CH)
            bmp = Tools.rotateBitmap(bmp, 90);

        int BW = bmp.getWidth();   //NEW FULL CAPTURED BITMAP DIMENSIONS
        int BH = bmp.getHeight();

        int RBL = (int) (RSL * BW); // NEW CROPPED BITMAP IN THE FOCUS BOX
        int RBT = (int) (RST * BH);

        int RBW = (int) (RSW * BW);
        int RBH = (int) (RSH * BH);

        Bitmap res = Bitmap.createBitmap(bmp, RBL, RBT, RBW, RBH);
        bmp.recycle();

        return res;
    }
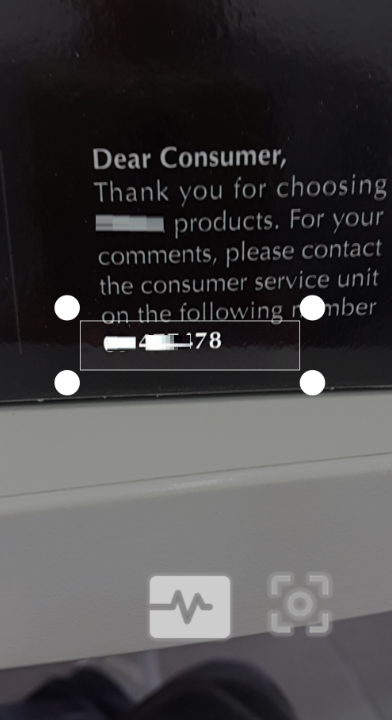
In the end here is a result photo:

Points of Interest
If you are interested in using OCR engines, i hope this simple article will help you. Thanks.