
Getting Started With Arduino
5.00/5 (4 votes)
Absolute Beginner's Guide to Arduino
Background
If you’re reading this article means you want to do some crazy thing with some embedded device. Before buying any device like Pi or Arduino first make sure that your idea for your project is clear. Once you know what you want build, like building printer or some crazy robot or crazy car then start think about your hardware, device and development language etc.
I would say that first understand your project and what is your requirement? If you did that half of your work is done because embedded project are different from software related project.
Once your idea is clear then do some research about device and which operating system you need use. Because in embedded project devices and operating system will play very key role in your project. Example if you select some un popular OS you may not get enough support from operation system groups so It will be very difficult to overcome project hurdles.
Selecting your Board.
I hope you have clear idea about your project if you don’t go back, and start work on that. Before selecting your device make sure that you have clear idea.
Some embedded boards
- Arduino Due
- Maple
- Pinguino
- Rascal
- BeagleBoard
- Intel MinnowBoard Max
- Above mentioned are few different types boards. So you need select one of the best board to suit your self.
How can I select my board.
There are two types are there, first type is Single board Microcontroller and second one is Single board computer.
Single Board Microcontroller
As per wikipedia
A single-board microcontroller is a microcontroller built onto a single printed circuit board. This board provides all of the circuitry necessary for a useful control task:microprocessor, I/O circuits, clock generator, RAM, stored program memory and any support ICs necessary. The intention is that the board is immediately useful to an application developer, without them needing to spend time and effort in developing the controller hardware.
For layman Arduino is programmable microcontroller and you can do with microcontroller is you can give commands to work. These kind of boards designed to read data from sensors and calculate the data or send information to pc or any other device or output to LCD.
These kind of board mainly useful for pure electronic based project like musical application or robotics, interactive art exhibitions, gaming gadgets.
Example:- Arduino, Maple, Pinguino, Rascal.
Single Board Computer
As per wikipedia
A single-board computer (SBC) is a complete computer built on a single circuit board, with microprocessor(s), memory, input/output (I/O) and other features required of a functional computer. Single-board computers were made as demonstration or development systems, for educational systems, or for use as embedded computer controllers. Many types of home computer or portable computer integrated all their functions onto a single printed circuit board.
Single board computer completely opposite to single board microprocessor board. We can indirectly say that single board computer cpu of desktops. Because its contain SD slot which store the OS(like customized Linux). It also contains ports to audio, HDMI, video output, Ethernet port. These port allows you connect to computer monitor, TV , keyboard, mouse, browsing internet etc.
These boards mainly used to software based project Like basic Linux computer (we can build Basic computer using single board computer it will cost less than 90$),media centers, music players , writing games or you can create your own webserver. Or bitcoin mining rig.
Example:- BeagleBoard,Banana PI,Raspberry Pi,THE PCDUINO.
If you’re new user my suggestion is you can select either Arduino or Raspberry Pi. You may ask why because these two devices provides more number of tutorials available in market and many community members are there to help you to build your own device.
Difference between Raspberry Pi vs Arduino
Raspberry Pi is 40 times faster than Arduino in clock speed and its 128,000 faster than ram. Using Raspberry pi we can build computer it has support for USB ports and Ethernet port.
By seeing these feature don’t assume that Raspberry pi is greater than Arduino. As mentioned earlier Raspberry pi is faster and will use full in software application but if you designing electronic related embedded device than Arduino will be superior

Arduino simple design and its flexibility allows, to connect to any kind of sensor or chips and it ports will be useful to reading analog sensor and another major advantage with Arduino is its IDE, using this IDE we can easily develop application and it will support C language. So it’s perfect choice for hardware project.
Selecting your Operating System.
Thrid main task to build your project is to select OS. Now for our project we can find many different OS available like Tiny OS, RIOS OS, Contiki OS, Raspian, ArdOS etc.
You can find complete list different OS http://en.wikipedia.org/wiki/List_of_real-time_operating_systems
Each OS have his own feature advantages and different uses and some OS are designed for specific purpose example is Tiny OS and Contiki OS are best OS for network related projects. Vxworks and Qnx kind of OS mainly designed for complex embedded systems.
So based on your project you need select your OS. And some OS will support different program languages.
Suggestions to select OS.
1) Check whether OS is in development/build phase or standardized.
2) How many people using your selected OS, if more people are using than you will find more support and more help from developing communities
3) Don’t select complex OS for small project.
4) Selected OS will support your programming language. Now few OS’s are supporting C++ also.
5) If your planning developing complex than check that OS supporting multi thread , modularity Real- time( example Tiny OS Partial supporting modularity and multi thread).
6) Some OS designed to work on specific board like Raspian is mainly used for Raspberry Pi base boards and ArdOS is designed for Arduino based boards. But Tiny OS and RIOT OS will work both Raspberry Pi and Arduino boards.
If you select on both OS and board then now you can jump into programming and designing you board.
I personally love to developed hardware base project so I will explain about how to setup Arduino board and how to do programming with Arduino.
Arduino
Arduino was developed by Massimo Banzi and released in 2005. It is an open source platform. Arduino is single board micro controller and using its Arduino IDE, which can install in Linux, windows and Mac to write and upload code into Arduino boards.
Arduino Boards
Arduino have different set of board for different purpose you can find Arduino product from here
most popular Arduino boards are Arduino Uno and ATmega328 LilyPads.
ArdOS is the OS for the ATmega168/328/1280/2560 series of microcontrollers( Ard OS). It was released in 2013 and have full support for multitasking, and communication, Mutex, message queues.
Power Supply
Arduino device are very less power consumption device using USB interface or barrel jack. we can power up. So using A-to-B USB Cable we can start power up
Arduino IDE
Arduino is popular because of two thing one its hardware and another one its IDE.
We can install Arduino IDE in different desktop OS like windows, Linux, Mac etc. we can write code in either C or C++. We can easily setup Arduino IDE in our desktop OS( I will explain below) and loaded program into board.
Arduino Architecture
I will explain Arduino board based on Arduino Uno .

USB connector
Using USB connector we can supply power and we can load code into Arduino board.
Barrel jack.
You can power up Arduino board using Barrel jack.
Note:- don’t use more than 20 volts. The recommended voltage Arduino model is 6 to 12 volts.
Analog
The analog ins(A0 to A5) used to read single from analog sensor like temperature or heat sensor to convert into digital value so that we can read.
Digital
These Digital pins (o to 13) used for digital inputs and digital outputs(LED)
Reset Button
Based on name we can say that it will temporarily connect to reset pin and using this button we can restart code in Arduino board.
LED indicator
Using this LED indictor we can tell that your Arduino is working .
Main IC
Main IC is key part in Arduino software its attacks brain to Arduino.using IDE we will load code into Main IC.
Voltage Regulator
It’s one of the important part in Arduino. Its controls the amount of voltage that is let into the Arduino board.
It will normalize up to 20 Volts if the powers supply greater than 20 volts it will break the regulator.

more info about http://arduino.cc/en/Main/arduinoBoardUno
Enough for the theory let start programming.
Arduino IDE Setup
Installing IDE in any Desktop is very easy in the below tutorial will show how to install IDE in windows 7.
http://arduino.cc/en/main/software
You can download IDE from this link. After downloading Arduino zip file then extract in your my machine. You can download installer also but I have preferred to download non installer software kit.
Setting up Arduino board.
Setting up Arduino board was very easy than Raspberry PI.
Hardware requirements
1) Arduino Uno
2) Type B USB cable
- Plug type B cable to Arduino and other side (USB ) to your laptop.
- Once you are plugged to windows it will start installing drivers
- After few minutes it will fail the process so we need install manually.
- Open device manager (start search device manager in search box)
- In device manager look under ports(COM & LPt) you should see an open port name Arduino UNO (COMxx). if you don’t have com & LPT section then look under other devices.

- Right click on the Arduino UNO (COMxx) and go driver tab and click on the Update driver button

- Select browse my computer for driver software option. Now navigate to the uno’s driver file ArduinoUNO.inf”, located in the “Drivers” folder of the Arduino Software download.
Hello Blink.
Generally if you learning programming languages your first program will be "hello world" but in embedded world your first program is "Hello Blink".
Required items.
1) Arduino Uno
2) Type B USB cable
3) Arduino IDE,
4) And LED.
Hardware Setup
1) Plug your Type B usb cable between board and your computer.
2) if you see LED indicator (read light) then your board is ready.
3) Put your LED two prongs into GND and pin 13 on the Arduino.

Note:- the shorter leg of LED will goes in GND.
Software Setup
Go the IDE folder which you loaded and open Arduino exe file( I am using non installer) so it will open automatically If you downloader installer than it will install like normal software.
File-> Examples-> 1.Basics-> Blink
Arduino already have some sample program in its IDE.

Select Arduino board by Tools -> Board -> Arduino Uno.

Select serial port that you attached board Tools -> Port -> COM.
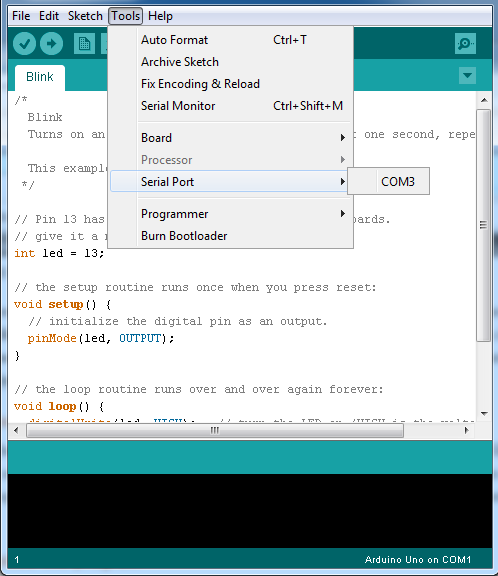
If you’re not sure which port your device is connected than you remove your board from laptop check the ports in your IDE. The one that disappeared is your Arduino port.
Once you port selected then press Upload button.

After few second you can see LED light is flashing on your board in your IDE you can see message ‘Done Uploading’ .
Lets review code.
/*
  Blink
  Turns on an LED on for one second, then off for one second, repeatedly.

  Most Arduinos have an on-board LED you can control. On the Uno and
  Leonardo, it is attached to digital pin 13. If you're unsure what
  pin the on-board LED is connected to on your Arduino model, check
  the documentation at http://arduino.cc

  This example code is in the public domain.

  modified 8 May 2014
  by Scott Fitzgerald
 */

// the setup function runs once when you press reset or power the board
void setup() {
  // initialize digital pin 13 as an output.
  pinMode(13, OUTPUT);
}

// the loop function runs over and over again forever
void loop() {
  digitalWrite(13, HIGH);   // turn the LED on (HIGH is the voltage level)
  delay(1000);              // wait for a second
  digitalWrite(13, LOW);    // turn the LED off by making the voltage LOW
  delay(1000);              // wait for a second
}
void setup() function used to intallize your stuff.
void loop() function used to loop your things
pinMode(13, OUTPUT); it will initialize pin 13 as outpin.
In the main loop, you turn the LED on with the line:
digitalWrite(13, HIGH);
This supplies 5 volts to pin 13. That creates a voltage difference across the pins of the LED, and lights it up. Then you turn it off with the line:
digitalWrite(13, LOW);
That takes pin 13 back to 0 volts, and turns the LED off. In between the on and the off, you want enough time for a person to see the change, so the delay() commands tell the Arduino to do nothing for 1000 milliseconds, or one second. When you use the delay() command, nothing else happens for that amount of time.
Not only in hardware projects we can do network releated projects using Arduino.
HTTP Client in Arduino.
If you want connect to your web server and get the data is very simple in Arduino and similar like Java program
#include <Bridge.h>
#include <HttpClient.h>

//In setup() start Bridge, and wait for a serial connection before going into loop().

void setup() {
  pinMode(13, OUTPUT);
  digitalWrite(13, LOW);
  Bridge.begin();
  Serial.begin(9600);
  while(!Serial);
}
//In loop(), create a named instance of HttpClient, and call a URL with client.get(url).

void loop() {
  HttpClient client;
  client.get("http://arduino.cc/asciilogo.txt");

//As long as there are bytes from the server in the client buffer, read the bytes and print them to the serial monitor. Repeat every 5 seconds.

  while (client.available()) {
    char c = client.read();
    Serial.print(c);
  }
  Serial.flush();
  delay(5000);

}
//In setup() start Bridge, and wait for a serial connection before going into loop().
void setup() {
  pinMode(13, OUTPUT);
  digitalWrite(13, LOW);
  Bridge.begin();
  Serial.begin(9600);
  while(!Serial);
}
In loop(), create a named instance of HttpClient, and call a URL with client.get(url).
void loop() {
  HttpClient client;
  client.get("http://arduino.cc/asciilogo.txt");
//As long as there are bytes from the server in the client buffer, read the bytes and print them to the serial monitor. Repeat every 5 seconds.
 while (client.available()) {
    char c = client.read();
    Serial.print(c);
  }
the above program will download asciilogo.txt from arduino.cc website and display data in the serial monitor.
Arduino Uno won’t work here so you need use any Ethernet enable Arduino board like Arduino Yún or Arduino Ethernet Shield.
You can find many these kind of examples here
http://arduino.cc/en/Tutorial/HomePage
If you’re looking about advance programing (like multitasking, mutex locks, and semaphores. message queues) then go with ArdOS.
You can download install ArdOS from this location.
Best coding partices
· Try to use int data type.
· Don't ever use recursion. Always use looping.
· Don't pass too much of function parameters. Try use global variables.
· Always try use int or fixed point operation try to reduce the arithmetic operation.
· Initialize variable before use.
· Validate sensor data before assign into variables.
· Don’t expose all variable and functions it may lead to name conflicts.
· Be careful with dynamic memory allocations. If your using new keyword delete using free command.
Reference
https://bitbucket.org/ctank/ardos/wiki/build
http://arduino.cc/en/Tutorial/HomePage