
Stage 2:Raspberry Pi as IoT Node: Installing OS and Working with Raspberry Pi Over LAN without Monitor and Keyboard With Home File Server Case Study
4.92/5 (13 votes)
Configure Raspberry Pi in LAN with a Laptop, Install OS over LAN, Programming in Pi, Web Server in Pi
Contents:
1. Background
2. Installing Operating System in Pi
2.1 Prerequisite
2.2 Operating System for Raspberry Pi
2.3 Preparing SD Card
2.4 Installing Operating System in SD Card
3. Networking Pi and Laptop over ethernet
3.1 Crossover Cable
3.2 Configuring Network and Sharing Internet Connectivity
3.3 Obtaining Pi's intranet IP address
4. Working With Pi
4.1 Remote Login to Pi
4.2 Updating Pi
4.3 Editing and Running Your First C program in Pi
4.4 Accessing Internet from Graphics Mode
5. Configuring FTP Server and Web Server in Pi
5.1 Setting up Webserver in Pi
5.2 Configuring FTP in Pi
5.3 Uploading Files using a FTP CLient Software

Figure 1.1 Conventional v/s Proposed Model of Working with Pi
Raspberry Pi is a smart piece of Hardware which runs on Linux. It provides general purpose input output pins which can be used to control hardware like Motors and relays. It has an Ethernet interface which can be used to connect it to LAN. It has USB host ports and supports deceives like keyboard and mouse through USB port. The Pi also comes with HDMI port through which it can be connected to external monitor. Due to LAN capabilities, it can be easily configured as an IoT device.
Alright, most of the above stated facts about Pi are well known so what are we writing this article for? Raspberry Pi website suggests an Operating System called Noobs. Noobs is basically like a jukebox for other operating system. So while installing Noobs, Pi must be attached to monitor and keyboard in order to see the options and to be able to select appropriate actions during installation.
A Pi can be accessed using remote commands from a Laptop through SSH it it's Ip address is known. For knowing the IP address of Pi one would need to have a monitor and keyboard( for generating command). Most of the LAN interfaces changes the ip addresses of the connected devices dynamically which makes it difficult to work without monitors as one might need to extract the address in future too.
Several alternatives are suggested as a solution to this problem.One is to allocate fixed IP address to Pi, by editing it's config file. But practically you do not want to do that for an IoT device. Because you might want to plug the device to existing network for the device to work. So if you are plugging the device to any other network which has a different domain address than your current network then again you would need to connect Pi with monitor and keyboard to change the IP settings.
Requirement of external hardware severely dents the mobility of the Pi device. Secondly as Pi is a solution for low cost- low space consumption system, additional hardware like Keyboard, Mouse dents the objective of using Pi. Thirdly programming a device with all external hardware reduces the efficiency.
Therefore in this article we suggest an alternative way of using Pi as in figure 1.1b unlike conventional configuration of 1.1. It is not that nobody has talked about using Pi from a LAN, but no online resource I could find which showed how to completely eliminate external hardware and yet complete OS installation in Pi along with accessing it. Few resources which pointed out the solution elaborates that this is possible when you know Pi's IP address which you can know without login to Pi only if you are using a router device for LAN connection. So for a simple LAN of Computer and Raspberry Pi with a Cross Network Cable offered solution and bleak.
So the objective of the article is to:
1) Make Raspberry Pi programming more efficient like Arduino programming by proposing a method to access Pi only with a LAN cable. We will cover installation, Login and executing commands through SSH and operating GUI software through X11 protocol using Xming server.
2) To demonstrate how to update Pi and install new software
3) How to access internet from PI
4) Show how Simple C Programs are executed in Pi.
5) How to configure a Web Server and FTP server in PI
So this article will help us in using Pi as an independent device which can boot without any extra hardware. Also it will show how to configure Pi as a Sever over local Intranet.
2. Installing Operating System in Pi
2.1 Prerequisite
For this article you need
1) Windows 7 ( It is tested on windows 7 and I can't guarantee that I will work in Windows 8)
2) A Crossover Network cable
3) Raspberry Pi ( whatever build)
4) SD Card ( Preferably 8GB or abover)
5) Internet Connection ( USB modem for connectivity)
6) A Serial Cable ( USB3-USB). We do not really need any external power source for Pi here as Pi needs minimum power. You can power up the pi from your Laptop's usb using cable!
2.2 Operating System for Raspberry Pi
If you open the download section of Raspberry Pi website you will find that they suggest you to download an Operating System called Noobs. It is more of a Jukebox of OSs than an OS itself. Pi can't boot directly from Noobs. You need to select the distribution you want to install. But we do not want that. We want a plug and play device. So instead of Noobs, we will go for Raspbian OS for the Pi. You can download Raspbian Wheezy Distribution from Pi's download page either through torrent or direct download.
The downloaded file is a compressed image file. You can uncompress it using software like WinRar. Once unzipped, you will see an image file like bellow.

Figure 2.1: Raspbian Wheezy Image File.
We will now prepare our SD card and then use this image to install Raspbian into our SD card.
2.3 Preparing SD Card
Raspberry Pi boots from SD card. So it's OS should be on SD card. Raspberry Pi website recommends 4GB card. However I personally feel 4GB is too less if you want to install some good software and work with the card.I therefore recommend you to get at least a 8GB card. I am using a 16GB card.
One thing I would discuss before moving ahead. Once you install any Raspberry Pi OS in your SD card your windows will see about 50-80MB space and you can not get full quota back even after formatting . That is because Pi operating system uses a Linux partition which is hidden from windows. So if you want to reuse your card ( say reformat and put another OS) then you need a good partition manager.
I recommend you to use Ease US partition Manager. Most of the features that we need are free and it's unlimited free version. Also the manager identifies even linux partitions. Another great feature is that it can automatically detect your SD card and external memory sticks, so quite a handy tool.
Download Ease US Partition Manager from here. Install EaseUS and run it.
Insert your SD card and select Partition Manager. You will see SD card at the bottom on the center pane. Select it and create partition. Partition type must be FAT32, Primary. Now apply the changes . You will see that the card is partitioned.
In figure bellow you can see that after installation of OS ( which we will shortly see), the card shows only 50 MB. There your partition manager really comes handy. While partitioning, don't worry about the volume name as this will be changed after OS installation. Ensure that you applied changes and that My computer recognizes entire quota for the card.

Figure 2.2 Partitioning SD card with EaseUS partition Manager
2.4 Installing Operating System in SD Card
As our Raspbian is available as image, we need an Image burner software. I recommend that you use Win32DiskImager. It's a wonderful piece of stable and easy software to install Pi's OS.
Download Win32DiskImager from here
Install and run Win32DiskImager. On the top there is a browse icon. Browse your image file using this. Select your SD card drive letter from the bottom drive selection icon. This is an awesome software as it automatically detects your SD card. But you must be very careful for this operation. If you by mistake select any other drive other than SD card ( say an USB memory stick), entire content of that drive will be gone for ever and can not be recovered. Once selected both, click on Write button. The OS burning is time consuming process. Once burnt successfully it will give you a message that write is successful.
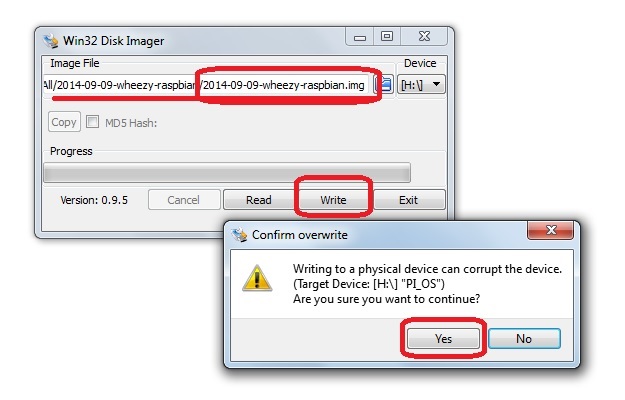
Figure 2.3: Installing Raspbian Image into SD card using Win32DiskImager
Once the OS is installed, remove and reinsert your card. You will see that the volume is renamed as boot and is about 60MB. This is because only boot sector is visible and rest of the file system is hidden from the user. When you explore the content of the card, you will see files as shown bellow. This should tell you that your OS installation has been successful.

Figure 2.4 Post OS Installation view of the SD Card.
Okey now our OS is installed. However to work with Pi, we need to set up our computer network. Once network is configured, we can work with our pi. In the next section we will deal with setting up LAN Connection between Pi and your Laptop.
3. Networking Pi and Laptop Over Ethernet
3.1 Crossover Cable
There are basically two ways to connect two nodes ( devices or computers) in ethernet LAN: 1) Using a cable where One end's transmitter is connected with other end's receiver pin and vice versa ( called cross over cable) 2) Using a router: where both nodes are connected to a router or a switch device using normal ethernet cable.
As this tutorial is developed to minimize the hardware requirement for Pi, we will focus on connecting the devices using first method. A crossover cable as shown in bellow figure is 8 color network cable with RJ45 connector on both end. Tx and Rx pins of both ends are interchanged so that nodes can send and receive data directly without and router.

Figure 3.1: Crossover Cable
You can buy ethernet co-axial cable and RJ45 connectors and hook up the cable by yourself. If you are not comfortable with that, you can get the cable of desired length in most of computer shops near by to your place. You can also order it in Amazon or eBay.
Let's first plug in the cable and test if network is working or not. We would then formally work towards setting up TCP/IP network. We will also share our internet connection so that Pi can access internet.

Figure 3.2: Raspberry Pi Connections
The above figure should clear as what should be the connections like. When you power up Pi from laptop's USB (You may also power up the pi from Smartphone charger if you so wish) PWR led will be glowing.
When LAN cable is connected between Pi and the Laptop, LINK led will be blinking. Figure 3.3 is another view which shows all the connections more clearly.

Figure 3.2: Another View of Pi and Laptop connectivity
3.2 Configuring Network and Sharing Internet Connectivity
When two devices are connected through LAN, dynamic IP address is not assigned to them. They need to have fixed and static IP address manually assigned to them. As we can not log in to the Pi, we can not assign it any IP address. So we have to somehow come up with a hack that bypasses this problem.
In order to overcome this problem, we would take the help of internet connection sharing. We will share our internet connection through the LAN that connects Pi and the Device. If we do that, internet gateway dynamically assign the network and their devices IP address. So our role is then to find a means to find out IP address of the Pi as we can easily see the IP address of our Laptop.
First thing we must do for internet connection sharing is to ensure that our internet connection is not currently shared. If you had a Hotspot or dithering software running in your PC which shares your computer's internet connection through WiFi, then your internet connection is already shared. First you have to disable this sharing.
Open Start->Control Panel->Network and Internet->Network and Sharing Center
Click on "Change Adapter Settings" on the left. It will open up an explorer which should display all your network adapters or interfaces.
First I assume that you are connected to internet using a USB modem. Find the interface, right click and open properties. Go to sharing section and uncheck "Allow Other Computers to Connect to Internet through this adapter" option as shown in figure bellow.
Remember to disconnect your modem before doing this. Sharing settings are not changed if the connection is active.

Figure 3.4: Disable Internet connection sharing in your main internet gateway interface
If sharing was already turned off for your main interface then do not bother to do anything. You are perfectly fine with settings. However few systems which are not updated might not have latest drivers. To be absolutely sure that you can go ahead, just click on "Select a Network Connection" combo box and ensure that you see your Local Area Network.
In case you are connected to internet through WiFi, your internet gateway will be Atheros adapter. So you must share Atheros adapter through LAN. Hence you need to ensure that your WiFi Atheros adapter is not shared to start with.

Figure 3.5: Remove Sharing from WiFi Atheros Adapter
After resetting the sharing preferences, it is now time to share our internet connection through LAN. Right click on your primary internet interface ( here MBlaze USB Modem), select sharing , from combo box select Local Area Network and check allow internet sharing option as in Figure 3.6. When you hit Ok, it will give you a message that certain IP address will be assigned to computer.

Figure 3.6: Activating Internet Sharing Option
You can now view the IP address of your computer for intranet LAN which has Pi and your Laptop as two devices.
Right click on LAN adapter, select TCP/IP and click on properties: you will see an IP address in the range of 192.168.x.y where 192.168.x is your domain prefix. That means all the other devices in the network will have their IP address starting from 192.168.x and only y will vary.

Figure 3.7 Obtaining IP address of the Computer in LAN
You should remember here that it is absolutely perfect for the computer to have two IP addresses, one for internet and one in intranet. We are more concerned with the intranet address here.
I advise you to restart your computer after changing connection sharing settings to ensure that they are applied correctly.
Note down your computers intranet IP address. Now it's turn to find out the IP address of the Pi.
3.3 Obtaining Pi's intranet IP address
If you were able to login to Pi and generate command, you could possibly generate a command like ifconfig to see the ip address. But you can't. I have checked many tutorials online and I could not manage to get a definate answer. So I decided to use a simple command to do it.
First turn off your internet connection. It is important becuse we will use ARP protocol and if internet is active then you will get a lot of garbage response.
Now open your command prompt and generate a command
arp -a
This will return range of IP addresses from devices connected to this computer in LAN ( because your internet is turned off, only active connection is LAN).
You will see at least two IP address having your domain prefix. Considering your domain address is 192.168.137 ( your domain prefix may differ as mentioned above), one address will be 192.168.137.255 which is the broadcast address and another one will be 192.168.137.y. This one is the address of your Pi. You will also note that this address is classified as dynamic.
If you do not see any dynamic address having prefix of your domain, remove cable from both computer as well as from Pi and replug. Generate the command. ARP may not respond first time to a query. You can generate the same command few more times. If connection is perfect, your Pi is powered on and it's Link LED is blinking and if LAN interface icon is bright blue ( which means active) and you still do not see Pi's IP address, turn off your windows firewall.
If even after switching off firewall you do not see Pi's address, then you must cross check all the stepsto see if all steps were corectly followed.
See the following figure for understanding the concept we discussed here.

Figure 3.7: Finding IP Address of the Pi
In my case the IP address of my Pi device is: 192.168.137.96. But how to know the device is active? Simple! Ping it. So when you ping the device, it should respond, simultaneously the link LED will be blinking in synchronization with the packet trnasmission. That tells that everything is working perfectly.

Figure 3.8: Pinging Pi
4. Working With Pi
4.1 Remote Login to Pi
Having ensured that our computer can communicate with Pi, finally it's time to login to our Pi. We will perform remote login using SSH ( Secured Shell). But the problem is SSH only supports text mode. Therefore if we want to access any GUI package in Pi, we can't. This drawback can be overcome with the help of X11 Protocol which allows remote graphical interface operations. In order to use SSH, we need a software called PuTTY and for interpreting X11 protocol we need a X protocol interpreting server. We will use Xming for this.
First install Xming and run it. It' is a server software. So when you run it, you only see a tray icon.
PuTTY is a single exe software. So you just need to run it. Once PuTTY is run, on the left panel go to SSH section and enable X11 forwarding. Your X11 server is running in the same system as that of PuTTY. Therefore in server address you must specify localhost:0
Now click on the Session tab. In the IP address field specify the IP address of your Pi and click Open.

Figure 4.1: Setting up Xming and SSH to Support X-Protocol
Once you click open, it will open a terminal which would ask for username followed by password. Default username and password for Pi are:
username:pi
password:raspberry
(As this is unix shell, while typing password you would not see any character. So do not worry)

4.2 Login to Pi through SSH ( click on the image to see full image)
If and should everything goes as par plan, you should be able to logged into the Pi from your laptop.
4.2 Updating Pi
Most of the unix based OS has package manager which is a repository of resources. Different software can be downloaded and installed just from command prompt ( Shell). For an effective system we need the Pi to be updated. Also you need enable GUI support and extend SD card's partition.
Generate a command:
sudo raspi-config
It will open a configuration screen as below. First selct to expand the file system. Then Open the advanced tab and select Update. Update process is quite time consuming as it will update the entire repository. Remember to keep your internet connection active.

Figure 4.3: Updating PI using raspi-config
After updating the package manager, upgrade your OS such that all the software are up to date:
sudo apt-get upgrade
In unix if you want to work with Shell script/C programs etc, you need a graphical text editor. Unix has a very good graphics editor called gedit. You can install gedit which you can use for creating simple documents as well as as a text editor for c, c++.
sudo apt-get install gedit
Will install gedit. So far we have only worked with commands. Let us now actually run some GUI and see how it works. We will see how to access GUI using a simple C program which guides us with how to run and compile c program and how we can work with GUI software in PI.
4.3 Editing and Running Your First C program in Pi
Let us create a simple hello world ce program by name my.c. You can create and open a program for edit by
gedit FILENAME
(Observe there is no suo part here. Super user does not work with Graphical mode). You will see Graphical editor will get opened. If you look at the icon , you will see Xming's 'X' icon on the graphics window. You will also see that command prompt is blocked in SSH window. For all GUI software this will be true. You can close the GUI from file->Exit option or using Ctrl+C from SSH command prompt.
Now type your c program. use Ctrl+S ( most of the other shortcuts are same as windows) and come out.

Figure 4.4 Graphical Genome Editor
compile your program:
cc -o myOP my.c
Where myOP is the output exe file name. If you do not specify -o followed by filename, it creates the outout by name a.out.
You can execute your program simply by typing:
./myOP

Figure 4.5: Compiling and Running the C program
4.4 Accessing Internet from Graphics Mode
Raspbian comes with a very good light weighted browser called Epiphany. You may sometimes need to access a website and download certain selected software which are not available with your package manager. You may also want to download certain movies/music/games etc. For this you need graphical internet.
You can trigger Graphical internet by command:
epiphany-browser
Note it's not (./epiphany-browser as browser is not part of your current directory)

Figure 4.6: Epiphay browser in Raspberry Pi
5. Configuring FTP Server and Web Server in Pi
5.1 Setting up Webserver in Pi
Our topic could have been concluded in section 4 as it covered everything from installing OS to getting the GUI working in PI. But can not restrain myself from sharing with you as to how to turn a Pi into a home file server. Home automation and home server are two of the widely used Pi's application.
Configuring web server in pi is easy.
First install Apache 2 server.
sudo apt-get install apache2
Once the server is installed, it's directory is /var/www . That means if you want to put any document, you need to put it inside this folder.
Once apache is installed, restart the service with:
sudo service apache2 restart
Interestingly there are two nodes in your Intranet where you have run a web server. First is the Pi where web server is running and the second one is your laptop. So use your laptop as clicent. In your laptop browser type the ip address of the pi and enter. If everything is fine you will see a "It works" message.

Figure 5.1:Testing Raspberry Pi Web Server
5.2 Configuring FTP in Pi
Let us assume that the internet public folder i.e. /var/www will be your ftp folder too. In that case first you have to acquire the ownership of that folder.
sudo chown -R pi /var/www
Having ownership of web folder, you can now install VSFTPD File Server :
sudo apt-get install vsftpd
But the problem is be default the FTP server does not allow a file writing, it does not support accessing files from local internet and is set to anonymous mode. This needs to be changed.
For changing the configuration of the FTP server we need to edit /etc/vsftpd.conf file. Because it is server configuration file, we need super user elevation with sudo to run. But sudo can't be used for GUI services. So we can't use gedit. Default vi editor is to trickey to be used in Pi. The best text editor is nano. So edit the aforementioned file with nano editor:
sudo nano /etc/vsftpd.conf
All the needed commands are listed at the bottom of the editor. For example for Saving you need to press Ctrl+o, for Exiting Ctrl+x and so on. Once the editor opens your ftp configuration file:
find anonymous_enable=YES and Change To anonymous_enable=NO
find #local_enable=YES remove the comment by deleting and # thusChange To local_enable=YES
#write_enable=YES remove the comment by deleting and # thusChange write_enable=YES
Also you might want to use dotted files like .htaccess files. So go to the end of the file and add:
force_dot_files=YES
Save and exit using Ctrl+o and then Ctrl+x. If it asks your permission to overwrite existing file, type y and enter.
Now we want to create a Symbolic link of of /var/www in your home folder such that we can easily access the files.
First know your current directory by pwd command, lets call it CURD.
Now create the symbolic link using :
ln -s /var/www CURD/www
Ideally CURD should be /pi/home.
Having created www directory in home which is link to actual web directory, you need to take the ownership of the directory.
chmod a-w CURD/www
Great now your user pi with password raspberry has ownership of the web public folder as well ftp folder. Move some files in the web folder www.
like our web server, let us restart the service:
sudo servce vsftpd restart
For testing, type ftp.192.168.137.96 replace the ip address part with the address of your pi device. It will prompt you for username and password which is ofcourse pi, raspberry. Once credentials are verified you can see list of files which you can as ususal open in broser or download.

Figure 5.2: Testing Ftp in Laptop web browser
5.3 Uploading Files using a FTP CLient Software
So we have successfully implemented ftp server in Pi and are able to browse the files. All we need a Ftp client software to connect to the server which will also allow us to upload files in Pi.
I recommend using FileZilla. It is a great piece of software which I have been using since lat 8 years without ever being crashed. As I maintain lot of websites, this comes as quite a handy tool.
Install and run the client. Click on File->Site manager. Add a new site by name say Raspberry. In the ftp address field specify the ip address of the Pi. ( please don't use ftp:// ot ftp. , it should be pure ip address). Leave the port blank which by default is port 21. Change login type from anonymous to Normal with username as pi and password as raspberry.
Now when you connect, you will see the File server's file system on right and your file system in left. You can drag and drop files in either direction.
Enjoy your own web and file server.

Figure 5.3: Working with FileZilla Client
You can further install php, MySql, Eclipse to turn your Pi into a development machine. You can actually host your wordpress/drupal sites in pi and test them before deploying in production.
6. Conclusion
Raspberry Pi is now quite a popular platform for DIY projects. This is not only a fun device, but at the same time a very powerful IoT device. In this article we have seen how to work with Pi without keyboards and monitors. You can easily build your home automation system with pi as server. I also covered some basics of how to compile and run programs so that you can start with your Pi-coding. We learn't about making File server and getting it to work. You can try all other services like email server, media streaming and so on.
I want to conclude with something that I want to share with this article. This article was composed after few days of work and when I had hit 'Publish' option a bug had destroyed the entire article, with it's images, data. Generally CP articles creates multiple copies while composing. But unfortunately everything was flashed off. This version had to be rewritten entirely from scratch. I wanted to do this because I found no article on internet which elaborates every step of working with Pi from LAN with clarity. It needed a lot of mental strength to rewrite it. I hope you will forgive me for some glitches here, some mistakes there :)
Hope the walk through would be helpful to you.