
Gigabit File uploads Over HTTP
4.80/5 (5 votes)
Large file uploads how do I love thee? Let me count the ways. These days having to deal with large file uploads is rather common place in IT environments, and by large file uploads I mean files that are over 500MB in size. Sure we have replication technologi
Gigabit File uploads Over HTTP
Large file uploads how do I love thee? Let me count the ways. These days having to deal with large file uploads is rather common place in IT environments, and by large file uploads I mean files that are over 500MB in size. Sure we have replication technologies that can help us to keep our data in sync, but there is still that need to move large amounts of data on a regular basis.
Most of the times that I had to move anything over 500MB in size I would typically split the file into several smaller files using a file compression utility and then upload these smaller files via ftp or secure shell (ssh). Once all of the smaller files have been uploaded I would use the file compression to recreate the original file. However that required the setup of an FTP server or a Secure Shell server and the use of a third party file compression utility.
So I asked "With the prevalence of web browsers and web servers in the IT environment could I accomplish the same thing using the HTTP protocol?"
A quick search on the Internet showed that web servers will typically limit the maximum file size that can be uploaded to anywhere between 2GB and 4GB, and in addition to that most web browsers will allow you to upload around 2GB. I suppose the reason for that is that the Content-Length header is being treated as a signed 32-bit integer in the web browser and the maximum size of a signed 32-bit integer is 2,147,483,647.
As I continued to search I began to look at the HTML 5 specification and the APIs that are a part of that specification because the indication was that these new APIS would allow me to upload files greater than 2GB in size over the HTTP protocol. I also came across examples of code on the Internet that indicated what could be done, but not a complete example of how it could be done.
A probable solution?
The HTML 5 API Specifications include several pieces of interesting technologies that have been implemented in modern web browsers and these include:
- The File API specification - This specification provides a standard way for interacting with local files on my computer. The specification allows me to place multiple files from my computer into an array and also allows me slice a file into byte ranges.
- The Web Worker API specification - This specification allows me to spawn background scripts that run in parallel with the main page. Think threading in JavaScript. The benefit of this is that I can pass off a long running task to a web worker without blocking the UI on my main page or other scripts.
- The XMLHttpRequest Level 2 specification - This specification provides new capabilities for transferring data between the web browser and the web server. The capability that I am most interested in is to be able to send data to the server in a variety of formats. This will allow me to upload data to the server using FormData objects.
By combining these technologies together I will be able to upload files greater than 2GB to a web server by:
- Using the File API specification to select one or multiple files in the web browser.
- Passing the selected file or files to one or more web worker that is dedicated to processing the file.
- In the web worker that is dedicated to processing the file we will use the File API specification to slice the file into chunks . This would be similar to splitting a large file into smaller files using a file compression utility. We will use the SparkMD5 library to generate the MD5 checksum for the file and then send the chunk back to the main page (parent page form now on). Note that generating the MD5 checksum for the file and uploading the file should happen in parallel.
- In the parent page we will send the chunk to a web worker that is dedicated to the task of sending the file chunks to the web server.
- In the web worker that is dedicated to sending the file chunks to the web server we will create a pool of XMLHttpRequest Level 2 objects that will use FormData objects to POST the file chunk to the web server as multipart/form-data. In the case where the web browser does not support the FormData object we will manually create the multipart/form-data request and convert the file chunk to a base64 string.
- At the web server we will receive each chunk from the client and save each chunk as an individual file. The web server will continue to do this until it receives a command to merge all of the individual chunks into a single file. Once the file is created on the web server it will send a success message to the web browser that includes the MD5 checksum of the saved file.
Let's Get Started
Now that we have identified how we are going to go about implementing large file uploads over the HTTP protocol let's get to work. However before we write any code we need to download the jQuery 2.x library from http://code.jquery.com/jquery-2.1.1.min.js and the SparkMD5 from https://github.com/satazor/SparkMD5/archive/master.zip.
The jQuery 2.x library will be used to provide client side JavaScript functionality and the SparkMD5 library provides an MD5 algorithm, written in JavaScript, that will be used to generate an MD5 checksum for local files on the client side.
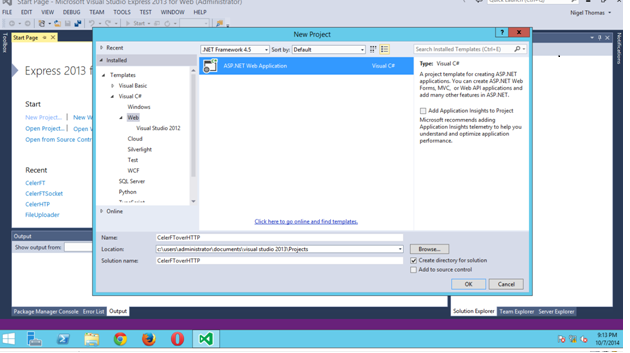
We will be using Visual Studio Express 2013 for Web as the development environment and we start off by creating a new project and then select an ASP.NET Web Application.
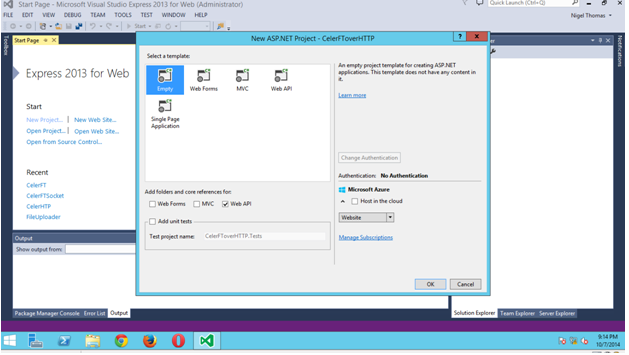
In the next screen we will select the template for an empty project and select the option to add folders and core references for a Web API project.
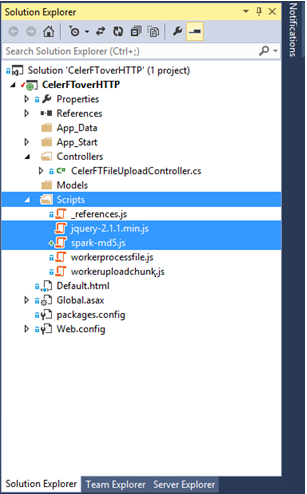
After our project has been created go to the Solution Explorer and add a new folder and name it Scripts. We will place the jQuery 2.x and the SparkMD5 libraries in the Scripts folder.
The Client Side
The next stage is to actually start creating the file upload application, and since this is a web based application we need to have a client side application and a server side application. The client side application will be a browser based application that should run in the latest versions of all major web browsers.
We will add a new HTML file to our protect and name it "Defaul.html". We will set "Default.html" as the startup page in our project. We are going to use the "Default.html" page to achieve a few things and these are:
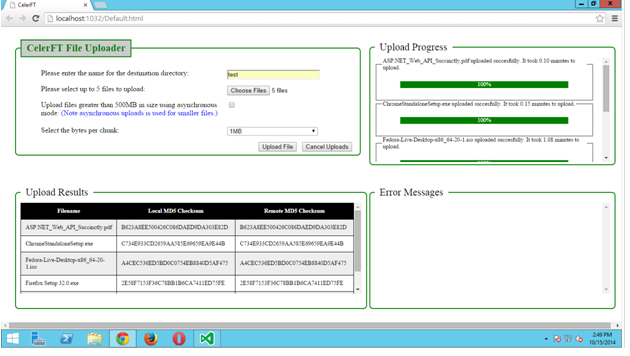
- The Default.html page will host the HTML form that provides the standard
<input type="file">element that will be used to select the files from the local file system. - The Default.html page will provide status information on the file upload progress using the XMLHttpRequest object upload event.
- The Default.html page will display a table that shows the checksum of the file that is to be uploaded on the local file system, and checksum of the file after it has been uploaded on the remote system.
- The Default.html page will display any error messages that occur either on the client side or on the server side.

The following figure shows the Default.html page being displayed in the Chrome web browser. Please note that I have used the <div> and <fieldset> tags to create the layout that is shown on the page. I don't believe that what I did with the <fieldset> tag is necessarily the standard way of using this tag, but it achieved the result that I wanted.

The HTML code shows that all that we have is a simple HTML form that has a file input element and this element has a multiple option that allows us to select any number of files from the local file system to be uploaded.
<formname="CelerFTFileUpload">
     <fieldsetclass="top">
       <legendid="legend_uploadfileform">CelerFT File Uploader</legend>
        <ol style="list-style:none">
         <liclass="form">
           <labelfor="select_directory" style="float:left;width:410px">
            Please enter the name for the destination directory:
           </label>
           <inputtype="text" id="select_directory" name="directoryname" style="width:200px" />
           <li />
           <li class="form">
             <labelfor="select_file" style="float:left;width:410px">
                Please select up to 5 files to upload:
             </label>
             <inputtype="file" id="select_file" name="files[]" multiple style="width:200px" />
           </li>
           <liclass="form">
            <labelfor="select_asyncstate" style="float:left;width:410px">
                Upload files greater than 500MB in size using asynchronous mode:
               <fontcolor="blue">(Note asynchronous uploads is used for smaller files.)</font>
             </label>
             <inputtype="checkbox" id="select_asyncstate" name="asyncstate" />
           </li>
           <liclass="form">
             <p></p>
           </li>
           <liclass="form">
            <labelfor="select_bytesperchunk" style="float:left;width:410px">
                Select the bytes per chunk:
                </label>
             <selectid="select_bytesperchunk" name="bytesperchunk" style="width:200px">
               <optionvalue="1">50MB</option>
               <optionvalue="2">20MB</option>
               <optionvalue="3">10MB</option>
               <optionvalue="4">5MB</option>
               <optionvalue="5">2MB</option>
               <optionselected="selected" value="6">1MB</option>
               <optionvalue="7">500K</option>
               <optionvalue="8">256K</option>
               <optionvalue="9">128K</option>
               <optionvalue="10">64K</option>
             </select>
           </li>
           <liclass="form">
             <inputtype="button" id="cancel_workers" value="Cancel Uploads" style="float:right;margin-left: 10px" />
             <inputtype="submit" id="upload_file" value="Upload File" style="float:right" />
           </li>
       </ol>
     </fieldset>
   </form>
As an added measure we will use the jQuery $(document).ready(function (){}); to check that the browser supports all of the HTML 5 API specifications that we need to use in the file upload tool.
<!-- Check browser compatability -->
      <script type="text/javascript">
          $(document).ready(function() {
              if(!(window.File && window.Blob && window.FormData)) {
                  alert("Please upgrade your browser to one that supports
                 the HTML5 file api.");
                  return;
              }

              if(typeof Worker == "undefined") {
                  alert("Please upgrade your browser to one that supports
                 the HTML5 Webworker api.");
                  return;
              }
          });
      </script>
A click event is tied to the "Upload File" button and when it is fired some basic checks are done to ensure that we have provided the mandatory input that the form requires. Once all of the validation checks are completed two sets of web workers are created.
The first set of web worker that is created is the one that will be used to upload the file chunks to the web server. The upload worker is created by calling the Worker() constructor and providing the URI of the script that is to be executed in the worker thread. In this instance the URI is "Scripts/workeruploadchunk.js".
In addition the upload worker's onmessage property is set so that the parent page can receive notifications from the upload worker. The parent page and the web worker communicates by passing messages. The types of messages that can be sent between the upload worker and the parent page are "checksum", "status", "progress", and "error" messages, and when the parent page receives any of these message types it will update the appropriate element on the parent page. This is because the upload worker does not have access to the DOM of the parent page .
The onerror property of the upload worker is set to write all errors to the Error Messages area of the Default.html page. All of the upload workers are pushed into an array after they have been created.
// Create the upload workers
for(var i = 0; i < files.length; i++) {

        var uploadworker = newWorker("Scripts/workeruploadchunk.js");

             uploadworker.onmessage = function(e) {
                  var data= e.data;
                  switch (data.type) {

                   // Update the checksum value in the table
                   case 'checksum':
                         $("#remote" + data.id).text(data.message);
                         break;

                  // Update legend of the progressbar
                  case 'status':
                        $("#file_name" +
                        data.id).children('legend:first').text
                       (data.message);
                        break;

                   // Update the progressbar itself
                   case 'progress':
                         progress(data.percentage, data.id);
                         break;

                  // Show error messages and stop the worker
                  case 'error':
                       $("#errormessage").append('<p>' + data.message +
                       '</p>');
                       for (var j = 0; j < workers.length; j++) {
                           workers[j].terminate();
                       }

                       for (var i = 0; i < uploadworkers.length; i++) {
                                uploadworkers[i].terminate();
                          }
                          break;
                  }

      }
     uploadworker.onerror = function (e) { $("#errormessage").append(e.message); }
     uploadworkers.push(uploadworker);
}
The creation of the web worker that will carve the file into chunks and create the local MD5 checksum of the file is very similar to the creation of the upload worker. The only difference is that the URI for the web worker is "Scripts/workerprocessfile.js".
In addition to this the web worker passes additional message types to the parent page and these are the "upload"and "merge" messages. So when the parent page receives an upload message from the file processing worker it does not change any element in the DOM, instead it passes the data that is sent in the message to the upload worker.
The upload worker will then send file chunk to web server. Similarly when the file processing worker has creaked the last file chunk it will send a merge message to the parent page, and the parent page will send this message to the upload worker.
This message passing system between the file processing worker and the upload worker is based on the fact that when the worker is created it is assigned an ID ranging from 0 - 4. This ID is used to associate a file processing worker with an upload worker. So file processing worker with ID 0 will be associated with the upload worker with ID 0. Along with this each element of the page that is to be updated by a message received from the web worker has an id that ends in a number. So "progressbar0" refers to the progress bar that will be updated by upload worker with ID 0.
// Create the file processing web worker
for(var j = 0; j < files.length; j++) {
    var file = files[j];

    // Update the table with the file name
    $("#file" + j).text(file.name);

    // Create the file processing web worker
    var worker = newWorker("Scripts/workerprocessfile.js");

     worker.onmessage = function(e) {
            vardata = e.data;
            switch (data.type) {

            // Update the checksum value in the table
            case'checksum':
                  $("#local" + data.id).text(data.message);
                  break;

             // Update legend of the progressbar
             case 'status':
                   $("#file_name" + data.id).children('legend:first').text(data.message);
                   break;

             // Update the progressbar itself
             case'progress':
                   progress(data.percentage, data.id);
                   break;

             // Send and uplaod message to the web worker
             case'upload':
                   uploadworkers[data.id].postMessage({ 'chunk': data.blob, 'filename': data.filename,
                   'directory': $("#select_directory").val(), 'chunkCount': data.chunkCount,
                   'asyncstate': data.asyncstate, 'id': data.id });
                    break;

              // Send a merge message to the web worker
              case 'merge':
                    uploadworkers[data.id].postMessage({ 'filename': data.filename, 'directory':
                    $("#select_directory").val(), 'chunkCount': data.chunkCount, 'id': data.id });
                    break;

              // Show error messages and stop the web worker
              case 'error':
                    $("#errormessage").append('<p>' + data.message + '</p>');
                    for (var j = 0; j < workers.length; j++) {
                          workers[j].terminate();
                    }

                    for (var i = 0; i < uploadworkers.length; i++) {
                          uploadworkers[i].terminate();
                    }

                    break;
     }

  }

  worker.onerror = function (e) { $("#errormessage").append(e.message); }

  // Check if we are going to do an async upload of a large file
  varuploadlargfileasync = false;

   if($('#select_asyncstate').prop('checked')) {
         uploadlargfileasync = true;
   }

  // Start the file upload by sending a postMessage to the file processing web worker
   worker.postMessage({ 'cmd': 'start', 'files': file, 'directory': $("#select_directory").val(),
   'bytesperchunk': $("#select_bytesperchunk option:selected").text(), 'uploadlargfileasync':
    uploadlargfileasync, 'id': j });

    workers.push(worker);
}
The parent page starts the file upload by sending a "postMessage" to the file processing web worker.
The Web Workers
In the "Scripts/workerprocessfile.js" file the "self.onmessage" event is triggered when the file processing web worker receives a message from the parent page. In the "self.onmessge" function the message payload sent by the parent page is accessible to the web worker in the Event.data. There are several methods for passing data between the parent page and the web worker and the one that will be used in the file upload tool is to copy the data between the parent page and the web worker.
In the file processing web worker the file chunks are created by using the "slice" method of the File API specification. The "slice" method is used to create a blob that containing the data in the specified range of bytes from the source file. Once a file chunk is created the chunk is passed back to the parent page via a "upload" message.
In the file processing worker we keep track of the number of file chunks that are created and uploaded by using a "chunkCount" JSON array. The "chunkCount" array keeps track of the total number of file chunks that will be created, the current file chunk, the number of file chunks that have been uploaded, and the time at which we started to process the file. When the number of uploaded file chunks is equal to the total number of chunks the file processing web worker sends a "merge" message to the parent page.
// This worker is used to split the file into chunks,
// and calculate the file checksum.
// Each chunk is sent back to the parent page to be
// uploaded by another worker

// Import additional scripts
// MD5 checksum libraray https://github.com/satazor/SparkMD5
importScripts('/Scripts/spark-md5.js');

// Global variables
// Note IE 10 does not recognize the const declaration so we have to use var
varLARGE_FILE = 500 * 1024 * 1024;
varworkerdata = '';
varasyncstate = true;

// 1MB chunk sizes. The default
varBYTES_PER_CHUNK = 1 * 1024 * 1024;

// This function is used to read the file, calculate the checksum,
// and send the file chunk to the web worker that uploads the file chunk
functionprocessFile(blob) {

      // Size of the file
      var SIZE = blob.size;

      // The total number of file chunks
      varTotal_Number_of_Chunks = Math.ceil(blob.size / BYTES_PER_CHUNK);

      // Array used to hold the total number of chunks, the number of chunks that have been uploaded,
      // and the current chunk. This information is sent to the web worker that uploads the file chunks
      var chunkCount = {

          currentNumber: 1,
          numberOfChunks: Total_Number_of_Chunks,
          numberOfUploadedChunks: 0,
          starttime: newDate()
      };

      var start = 0;
      var end = BYTES_PER_CHUNK;

      var fileReader = newFileReaderSync();
      var spark = newSparkMD5.ArrayBuffer();

      while (start < SIZE) {

          var chunk = blob.slice(start, end);

          // Read the chunk into another variable to calculate the checksum
          var chunk1 = fileReader.readAsArrayBuffer(chunk);
          spark.append(chunk1);

          // Send the chunk back to the parent
          self.postMessage({ 'type': 'upload', 'filename': blob.name, 'blob': chunk, 'chunkCount':
          chunkCount, 'asyncstate': asyncstate,'id': workerdata.id });

          chunkCount.currentNumber++;
          chunkCount.numberOfUploadedChunks++;

          start = end;
          end = start + BYTES_PER_CHUNK;

          if(chunkCount.numberOfUploadedChunks == chunkCount.numberOfChunks) {

              // All done calculate the checksum
              varmd5hash = spark.end();
              self.postMessage({ 'type': 'checksum', 'message': md5hash.toUpperCase(), 'id': workerdata.id
              });

              // Merge the file on the remote server
              self.postMessage({ 'type': 'merge', 'filename': blob.name, 'chunkCount': chunkCount, 'id':
              workerdata.id });
          }
      }

  }


  // This is where we start.
  // The parent sends us the file as a part of the data
  self.onmessage = function (e) {

      workerdata = e.data;

      // If we have an id greater than 5 then we abort. We upload five files at a time.
      if (workerdata.id > 5) {
          self.postMessage({ 'type': 'error', 'message': "We can only upload five files at a time.", 'id':
          workerdata.id });
          return;
      }

      // If we have a large file we will use a synchronous upload by default.
      // Large file is greater than 500GB
      if(workerdata.files.size > LARGE_FILE && workerdata.uploadlargfileasync == false) {
          asyncstate = false;
      }


      // Configure the bytes per chunk.
      // The default is 1MB
      switch (workerdata.bytesperchunk) {

          case'50MB':
              BYTES_PER_CHUNK = 50 * 1024 * 1024;
              break;
          case'20MB':
              BYTES_PER_CHUNK = 20 * 1024 * 1024;
              break;
          case'10MB':
              BYTES_PER_CHUNK = 10 * 1024 * 1024;
              break;
          case'5MB':
              BYTES_PER_CHUNK = 5 * 1024 * 1024;
              break;
          case'2MB':
              BYTES_PER_CHUNK = 2 * 1024 * 1024;
              break;
          case'1MB':
              BYTES_PER_CHUNK = 1 * 1024 * 1024;
              break;
          case'500K':
              BYTES_PER_CHUNK = 500 * 1024;
              break;
          case'256K':
              BYTES_PER_CHUNK = 256 * 1024;
          case'128K':
              BYTES_PER_CHUNK = 128 * 1024;
              break;
          case'64K':
              BYTES_PER_CHUNK = 64 * 1024;
              break;
          default:
              BYTES_PER_CHUNK = 1024 * 1024;
      }


      // Process the file for uploading
     //  Send a status message to the parent page
      self.postMessage({ 'type': 'status', 'message': "Uploading file " + workerdata.files.name, 'id':
       workerdata.id });

      // Start processing the file
      processFile(workerdata.files);

  }
The upload worker is started when an upload message is received from the file processing worker in the Default.html page.
case 'upload':
uploadworkers[data.id].postMessage({ 'chunk': data.blob, 'filename': data.filename, 'directory': $("#select_directory").val(), 'chunkCount': data.chunkCount, 'asyncstate': data.asyncstate, 'id': data.id });
The upload worker receives this message in the "self.onmessage" event. On receipt of the message the upload worker creates six XMLHttpRequest objects in the XMLHttpRequest worker pool . It then post a file chunk to each of the UploadChunk urls on the web server. The UploadChunk urls are REST based urls.
The upload function is the heart of the upload worker script. In this function we get an XMLHttpRequest object from the worker pool and assign events to the "upload.onprogress", and the "onreadystatechange" events of the XMLHttpRequest object.
The "upload.onprogress" events allows us to send file upload progress messages back to the parent page. This is how the progress bar is updated.
The "onreadystatechange" event is fired during communication with the web server. The state that we are most interested in is state 4 which is fired when the request finished and response is ready. This allows us to get the HTTP status code that is returned from the web server.
The file chunk is uploaded to the web server using multipart/form-data encoding, and this is supported by the FormData object. However if the browser does not support the FormData object we use the "buildFormData" function to manually create the multipart/form-data encoded data by base64 encoding the file chunk. This is done by creating a FileReader object and converting the file chunk into a bse64 encoded string by using the "readAsDataURL" method of the FileReader object. The base64 string is extracted from the "data:URL" using a regular expression. It should note that some web browsers do not support the asynchronous version of the FileReader object in a web worker and as such we have to use the synchronous version of the FileReader object which is created by the FileReaderSync constructor.
// This worker is used to upload the file chunks to the backend server.
// The file chunks is sent to the worker by the parent page

// Url for WebAPI functions
varwebapiUrl = "/api/CelerFTFileUpload/UploadChunk";
varwebapiGetMergeAllUrl = "/api/CelerFTFileUpload/MergeAll";

// Global variables
// Note IE 10 does not recognize the const declaration so we have to use var
var LARGE_FILE = 500 * 1024 * 1024;
var workerdata = '';
var blocks = [];
var xhrworkerspool = '';
var totalnumberofchunks = 0;
var uploadedchunk = 0;
var urlcount = 0;


// Functionused to create the XMLHttpRequest worker pool
function XHRWorkerPool(numberofxhr) {
      this.xhrworkerpool = [];
     for(var i = 0; i < numberofxhr; i++) {
       var xhr = new XMLHttpRequest();
          this.xhrworkerpool.push(xhr);
      }
}
 XHRWorkerPool.prototype.getWorker = function () {
      varxhr;
      if(this.xhrworkerpool.length > 0) {
          xhr = this.xhrworkerpool.pop();
     }
      else{
          xhr = new XMLHttpRequest();
      }

      returnxhr;
 }

  XHRWorkerPool.prototype.releaseWorker = function (xhr) {

      this.xhrworkerpool.push(xhr);

  }

  XHRWorkerPool.prototype.terminateWorkers = function () {
      for(var i = 0; i < this.workerpool.length; i++) {
          this.xhrworkerpool[i].abort();
      }
  }

  // Function used to creae the multipart/form-data in browsers
  // that don't support Formdata
  functionbuildFormData(chunk) {

      // Transform the data into a base64 string
      varreader = new FileReaderSync();
      vardataUrl = reader.readAsDataURL(chunk);
      varchunkdata = dataUrl.match(/,(.*)$/)[1];

      // Create the form request

      // Hard code the boundary
      varboundary = '----12345678wertysdfg';

      // We start a new part in our body's request
      vardata = '';
      data += '--' + boundary+ '\r\n' + 'Content-Disposition: form-data; name="Slice"; filename="blob"';
      data += '\r\n';

      // We provide the mime type of the file. In this case it is text for base64 encoded file
      data += 'Content-Type: text/html; charset=UTF-8'
      data += '\r\n';

      // There is always a blank line between the meta-data and the data
      data += '\r\n';

      // We append the binary data to our body's request
      data += chunkdata + '\r\n';

      // Once we are done, we "close" the body's request
      data += '--' + boundary + '--';

      reader = null;

      returndata;

  }

  // Function used to send the request to the server to merge the file chunks
  // into one file
  functionmergeall(filename, chunkCount) {

      varxhr = new XMLHttpRequest();

      xhr.onreadystatechange = function (e) {

          if (this.readyState == 4 && this.status == 200) {

              // Update the UI with the information that we have finished the file upload, and indicate
                 the time taken
              // Update the UI with the remote file checksum
              if (chunkCount.numberOfUploadedChunks == chunkCount.numberOfChunks) {
                  var endtime = newDate();
                  var timetaken = newDate();
                  var timetaken = (((endtime.getTime() - chunkCount.starttime.getTime()) / 1000) / 60);
                  var md5hash = this.responseText.split(",");
                  self.postMessage({ 'type': 'status', 'message': filename + " uploaded succesfully. It
                  took " + timetaken.toFixed(2) + " minutes to upload.", 'id': workerdata.id });
                  self.postMessage({ 'type': 'checksum', 'message': md5hash[1], 'id': workerdata.id });

              }
          }

          // A 400 message indicates that we can't merge all of the files as yet.
          // So queue up the mergerequest to run in 5 seconds
          if (this.readyState == 4 && this.status == 400) {

              setTimeout(function () { mergeall(filename, chunkCount); }, 5000);
          }

      };

      // Send the request to merge the file
      xhr.open('GET', webapiGetMergeAllUrl + '/?filename=' + filename + '&directoryname=' +
      workerdata.directory + '&numberOfChunks=' + chunkCount.numberOfChunks, false);
      xhr.send(null);
      xhr = null;


  }

  // Function used to upload the file chunks
  functionupload(chunk, filename, chunkCount, uploadurl, asyncstate) {

      // Grab a worker from the pool
      varxhr = xhrworkerspool.getWorker();

      // xhr.upload causes an error in IE. Use the try catch block to
      // catch the failure in IE, and then upload the progress block in
      // the catch routine.
      try{
          if (asyncstate == true) {
              xhr.upload.onprogress = function (e) {

                  //var progress = parseInt((e.loaded * 100 / e.total), 10);
                  var progress = parseInt((chunkCount.currentNumber * 100 / chunkCount.numberOfChunks),
                  10);
                  self.postMessage({ 'type': 'progress', 'percentage': progress, 'id': workerdata.id });
              }(chunkCount);
          }
      }
      catch(e) {

          xhr.onprogress = function (e) {

              //var progress = parseInt((e.loaded * 100 / e.total), 10);
              var progress = parseInt((chunkCount.currentNumber * 100 / chunkCount.numberOfChunks), 10);
              self.postMessage({ 'type': 'progress', 'percentage': progress, 'id': workerdata.id });
          }(chunkCount);

      }


      xhr.onreadystatechange = function (e) {

          if (this.readyState == 4 && this.status == 200) {

              // Send back progess information for synchronous uploads
              // The upload.onprogress method only fires on asynchornous uploads
              // and we are doing synchronous uploads
              if (asyncstate == false) {
                  var progress = parseInt((chunkCount.currentNumber * 100 / chunkCount.numberOfChunks),
                  10);
                  self.postMessage({ 'type': 'progress', 'percentage': progress, 'id': workerdata.id });
              }

          }

          if (this.readyState == 4 && this.status == 415) {

              // Tried to upload file that is not multipart/form-data.
              // End the upload
              self.postMessage({ 'type': 'error', 'message': "Upload Error: " + this.responseText, 'id':
              workerdata.id });

          }

          if (this.readyState == 4 && this.status == 413) {

              // Tried to upload file that is greater than the maximum file size.
              // End the upload
              self.postMessage({ 'type': 'error', 'message': "Upload Error: " + this.responseText, 'id':
              workerdata.id });

          }


          if (this.readyState == 4 && this.status == 500) {

              // Fatal error occured on the server side
              // Send the error message and end the webworker
              self.postMessage({ 'type': 'error', 'message': "Server Error: " + this.responseText, 'id':
              workerdata.id });

          }

      };


      // Open the url and upload the file chunk
      xhr.open('POST', uploadurl + '?filename=' + filename + '&directoryname=' + workerdata.directory +
      '&chunkNumber=' + chunkCount.currentNumber + '&numberOfChunks=' + chunkCount.numberOfChunks,
      asyncstate);

      varformData = '';

      if(typeof FormData == "undefined") {

          // The browser does not support the FormData object.
          // We will manually create the from

          formData = buildFormData(chunk);

          // Create the form with appropriate header
          xhr.setRequestHeader("Content-Type", "multipart/form-data; boundary=----12345678wertysdfg");
          xhr.setRequestHeader("Content-Length", formData.length);
          xhr.setRequestHeader("CelerFT-Encoded", "base64");

      }
      else{
          // Browser supports the Formdata object
          // Create the form
          formData = new FormData();
          formData.append("Slice", chunk);

      }


      // Send the form
      xhr.send(formData);

      formData = null;

      xhrworkerspool.releaseWorker(xhr);

  }


  // This is where we start
  // The upload information is sent as the message payload
  // in e.data
  self.onmessage = function(e) {

      workerdata = e.data;

      // Create the xhr upload workers.
      // We will upload to multiple urls
      xhrworkerspool = new XHRWorkerPool(6);

      if(workerdata.chunk != null) {

          if (urlcount >= 6) {

              urlcount = 0;
          }

          if (urlcount == 0) {
              uploadurl = webapiUrl;
          }
          else {
              uploadurl = webapiUrl + urlcount;
          }

          upload(workerdata.chunk, workerdata.filename, workerdata.chunkCount, uploadurl,
          workerdata.asyncstate);
          urlcount++;
      }

      else{
          mergeall(workerdata.filename, workerdata.chunkCount);
      }


  }
The Server Side
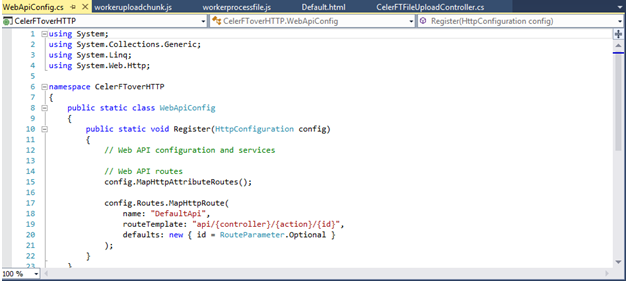
The web server side of the file uploader tool is based on ASP.NET Web API version 2.x. The ASP.NET Web API version 2.x is a RESTFUL based API and we will be using action based routing to call the methods exposed by the backend web server. This requires that we edit the "WebApiConfig.cs" file and an {action} in the routing template.
In the Solution Explorer we are going to add a Controller that will accept the file uploads. The Controller is named CelerFTFileUploadController.

The CelerFTFileUploadController exposes several methods. The "UploadChunk" are POST methods and accept the file uploads. The reason for using multiple "UploadChunk" POST methods is so that we can write to all of the methods in parallel.
[System.Web.Http.HttpPost]
public async Task<HttpResponseMessage> UploadChunk(stringfilename, string directoryname, int chunknumber, intnumberofChunks)

{
   HttpResponseMessage returnmessage = await ProcessChunk(filename, directoryname,
   chunknumber, numberofChunks);

  return returnmessage;
}
The "UploadChunk" POST methods implement the same functionality and this is defined in the "ProcessChunk" method. The "ProcessChunk" method checks to see if we are uploading multipart/form-data encoded data, and that we are not trying to upload a file chunk that is greater than 50MB.
Once we have passed those checks the next check is to look for the "CelerFT-Encoded" header. If this header is present it means that we are uploading the file chunk as a base64 encoded string. This means that we have to extract the base64 encoded string from the multipart/from-data encoded data and convert it to byte array using the "Convert.FromBase64String" method.
If the "CelerFT-Encoded" header is not present then we read the uploaded data into a byte array. Once we have read the file chunk into a byte array we save the byte array to file in a temporary directory. The temporary directory that is created is based on the name of the file.
Each file chunk is saved as a separate file and we pad the file names so that we can give each file a sequential number. This is important because when we try to merge the file chunks into a single file if the names of the file are not in the right order then we run the risk of creating a corrupt file. The sequential number is created by passing the "chunknumber" to the "UploadChunk" method and appending the "chunknumber" to the file name.
private asyncTask<HttpResponseMessage> ProcessChunk(string filename, stringdirectoryname, int chunknumber, int numberofChunks)
          {
              // Check if the request contains multipart/form-data.
              if(!Request.Content.IsMimeMultipartContent())
              {
                  throw newHttpResponseException(HttpStatusCode.UnsupportedMediaType);
              }

              // Check that we are not trying to upload a file greater than 50MB
              Int32 maxinputlength = 51 * 1024 * 1024;

              if (Convert.ToInt32(HttpContext.Current.Request.InputStream.Length) > maxinputlength)
              {
                  returnRequest.CreateErrorResponse(HttpStatusCode.RequestEntityTooLarge, "Maximum upload
                  chunk size exceeded");
              }

              try
              {

                  byte[] filedata = null;

                  // If we have the custom header then we are processing hand made multipart/form-data
                  if(HttpContext.Current.Request.Headers["CelerFT-Encoded"] != null)
                  {

                      // Read in the request
                      HttpPostedFileBase base64file = new
                      HttpPostedFileWrapper(HttpContext.Current.Request.Files["Slice"]);

                      if (base64file == null)
                      {
                          returnRequest.CreateErrorResponse(HttpStatusCode.BadRequest, "No file chunk
                          uploaded");
                      }

                      // Convert the base64 string into a byte array
                      byte[] base64filedata = new byte[base64file.InputStream.Length];
                      await base64file.InputStream.ReadAsync(base64filedata, 0,
                      Convert.ToInt32(HttpContext.Current.Request.InputStream.Length));

                      var base64string = System.Text.UTF8Encoding.UTF8.GetString(base64filedata);

                      filedata = Convert.FromBase64String(base64string);

                  }
                  else
                  {

                      HttpPostedFileBase file = new
                      HttpPostedFileWrapper(HttpContext.Current.Request.Files["Slice"]);

                      if (file == null)
                      {
                          returnRequest.CreateErrorResponse(HttpStatusCode.BadRequest, "No file chunk
                          uploaded");
                      }

                      filedata = new byte[file.InputStream.Length];
                       await file.InputStream.ReadAsync(filedata, 0,
                       Convert.ToInt32(HttpContext.Current.Request.InputStream.Length));

                  }

                  if (filedata == null)
                  {

                      returnRequest.CreateErrorResponse(HttpStatusCode.BadRequest, "No file chunk
                      uploaded");
                  }

                  // Write the byte array to a file
                  var newfilename = filename.Split('.');
                  string baseFilename = Path.GetFileNameWithoutExtension(filename);
                  string extension= Path.GetExtension(filename);

                  string tempdirectoryname = Path.GetFileNameWithoutExtension(filename);
                  var localFilePath = getFileFolder(directoryname + "\\" + tempdirectoryname) + "\\" +
                  baseFilename + "." + chunknumber.ToString().PadLeft(16, Convert.ToChar("0")) + "." +
                  extension + ".tmp";


                  var input = newMemoryStream(filedata);
                  var outputFile = File.Open(localFilePath, FileMode.OpenOrCreate, FileAccess.Write,
                  FileShare.Read);

                  await input.CopyToAsync(outputFile);
                  input.Close();
                  outputFile.Close();


                  filedata = null;

                  return newHttpResponseMessage()
                  {
                      Content = newStringContent(localFilePath),
                      StatusCode = HttpStatusCode.OK
                  };
              }
              catch (Exception ex)
              {
                  returnRequest.CreateErrorResponse(HttpStatusCode.InternalServerError, ex);
              }
          }
The "MergeAll" is a GET method and is used to merge all of the file chunks that are saved in a temporary folder into the file.
[System.Web.Http.HttpGet]
 publicHttpResponseMessage MergeAll(string filename, stringdirectoryname, int numberofChunks)
 {

              string tempdirectoryname = Path.GetFileNameWithoutExtension(filename);
              var localFilePath = getFileFolder(directoryname + "\\" + tempdirectoryname) + "\\";
              DirectoryInfo diSource = newDirectoryInfo(localFilePath);
              string baseFilename = Path.GetFileNameWithoutExtension(filename);
              string extension = Path.GetExtension(filename);

             // If the number of uploaded files is less than the total number of files then
             // return an error. This will happen in asynchronous file uploads where the final
             // chunk arrives before other chunks
              if (diSource.GetFiles("*.tmp").Length != numberofChunks)
              {
                  returnRequest.CreateErrorResponse(HttpStatusCode.BadRequest, "Numberof file chunks
                  less than total count");
              }

              FileStream outputFile = newFileStream(localFilePath + baseFilename + extension,
              FileMode.OpenOrCreate, FileAccess.Write);

              try
              {
                  // Get all of the file chunks in the directory and use them to create the final file.
                  // All of the file chunks are named in sequential order.
                  foreach (FileInfo fiPart indiSource.GetFiles("*.tmp")) {

                      byte[] filedata = System.IO.File.ReadAllBytes(fiPart.FullName);
                      outputFile.Write(filedata, 0, filedata.Length);
                      File.Delete(fiPart.FullName);

                  }

                  outputFile.Flush();
                  outputFile.Close();

                  // Move the file to the top level directory
                  string oldfilelocation = localFilePath + baseFilename + extension;
                  string newfilelocation = getFileFolder(directoryname + "\\") + baseFilename + extension;

                  // Check if the file exists. If it does delete it then move the file
                  if(System.IO.File.Exists(newfilelocation)) {
                      System.IO.File.Delete(newfilelocation);
                  }
                  System.IO.File.Move(oldfilelocation, newfilelocation);

                  // Delete the temporary directory
                  System.IO.Directory.Delete(localFilePath);

                  // Get the MD5 hash for the file and send it back to the client
                  HashAlgorithm MD5 = newMD5CryptoServiceProvider();
                  //string checksumMd5 = GetHashFromFile(localFilePath + baseFilename + extension, MD5);
                  string checksumMd5 = GetHashFromFile(newfilelocation, MD5);


                  return newHttpResponseMessage()
                  {
                      Content = newStringContent("Sucessfully merged file " + filename + "," +
                      checksumMd5),
                      StatusCode = HttpStatusCode.OK
                  };


              }
              catch (Exception ex)
              {
                  return Request.CreateErrorResponse(HttpStatusCode.InternalServerError, ex);
              }

          }
The Web.Config
The web.config file of the web server has to be edited to support large file uploads.
<httpRuntime maxRequestLength="2147483647" requestLengthDiskThreshold="10240" targetFramework="4.5" />

  <asp enableChunkedEncoding="true"/>
  <security>
    <requestFiltering>
      <requestLimits maxAllowedContentLength="2147483648" />
    </requestFiltering>
  </security>
  </system.webServer>
The Test Results
I have carried out several tests with the file upload tool. It took around 3 minutes to send a 900MB file across a 100MB WAN link to a remote server. I have also been able to upload five 9GB files in parallel across a 100MB WAN link in 135 minutes.
Please test and let me know your results. The complete source code for the CelerFT tool can be found at this GitHub repository https://github.com/adminastoolsmith/CelerFToverHTTP.