
Edison Getting Started Guide - Windows
5.00/5 (3 votes)
The following Intel® Edison Getting Started Guide has been written for use with the Arduino expansion board
Prerequisite: you have successfully flashed Edison with the latest image
Note: If you’re using Intel® Edison for the first time, we recommend starting with the Intel® Edison kit for Arduino* expansion board. The following Intel® Edison Getting Started Guide has been written for use with the Arduino expansion board (Edison Arduino expansion board hardware guide_331191-002.pdf). If you are using Intel® Edison for the first time with a different expansion board, please consult documentation provided by the supplier of that expansion board.
To get started with Edison, please select your OS below and follow the specified steps:
Windows
- Video Overview
- Step 1 – Connecting Edison
- Step 2 – Download Edison Arduino IDE
- Step 3 – Install required drivers
- Step 4 – Test the board with the Blink example
- Step 5 – Connect Edison to WiFi
Video Overview
Step 1 – Connecting Edison
- What’s included in the box

- Intel® Edison board
- Arduino* expansion board
- Two small hex nuts
- Four plastic spacers and screws
- Place the Edison board on the connector within the white outline on the Arduino* expansion board, lining up the holes on the Edison board with the screws on the expansion board.

- Press down on the Edison chip just below the words "What will you make?" until you feel a snap.

- Hand tighten the hex nuts onto the two screws that protrude through the Edison board. It is not imperative that these screw tight.

- Insert the screws into the holes on the edges of the Arduino board and screw them into the white plastic spacers.

- Connect two micro USB cables into the Arduino board, and the other ends into your computer. *note - make sure the micro switch in between the USB ports on the Arduino board is switched towards the micro USB ports*

Step 2 – Download Edison Arduino IDE
- Download the Edison Arduino IDE. *note - select your appropriate OS*
- Navigate to the folder where you downloaded the .zip Edison Arduino IDE
- Right click on the .zip file,highlight “7-zip”, and select “Extract to “arduino-…”

- Open the folder that was created

- You can move this folder wherever you want. A common place is your “C:\” drive. For this example, we will stick with the “Downloads” folder.
- Click through this folder until you see the IDE “arduino.exe” file

- Double-click this file and this window should open

Step 3 – Install required drivers
- Download FTDI drivers.
- Right-click the .exe file you downloaded, which should be called “CDM…” and select “Run as administrator”

- Click “Extract”

- Click “Next”
- Click “Finish” when you see this screen

- Download PuTTY terminal emulator
- PuTTY does not need to be installed, the .exe that you download is the actual application.
- Download Intel Edison Drivers to install the required RNDIS, CDC, and DFU drivers
- Double-click the .exe file to begin the install

- Click “Next”, and click “I Agree” to the License Agreement once you’ve read through it.
- Click “Next” in choosing the components to install

- It is best to leave the install directory with the default, but you may choose a location to install if you’d like. In this example we will use the default directory

- The drivers will now install
- Click “OK” when the installation has finished
- Click “Finish”
Step 4 – Test the board with the Blink example
- Go back to the Arduino IDE that you opened earlier
- Click on “File > Examples > Basics > Blink” and this window will open

- Click “Tools > Board” and select “Intel® Edison”

- Open “Device Manager by clicking “Start” and typing in “Device Manager”.

- Select “Tools > Serial Port” and select the number that is shown under “Ports (COM & LPT) > Gadget Serial (COM[#])” in your “Device Manager”. In this example we are using COM13.

- Click Upload to upload Blink to Edison

Step 5 – Connect Edison to WiFi
- Open “Device Manager by clicking “Start” and typing in “Device Manager”
Note: For this section to work, make sure you have updated your Edison with the latest firmware.
 N
N - Scroll down to “Ports (COM & LPT)” and take note of the COM number listed under “USB Serial Port (COM#)”. In this example it will be COM11”

- Open the PuTTY.exe application that you previously downloaded
- At the top right of this screen, click on “Serial” and enter “COM11” (or the COM # that you see in Device Manager) in the “Host Name (or IP address) text area and enter “115200” in the “Port” text area

- Click “Open”
- When you see this screen, press “Enter” two times

- Type in “root” and press “Enter”

- Type in “configure_edison --setup" and press “Enter”

- You will be asked to enter a name for your Edison
- You will then be asked to enter a password for the “root” user account
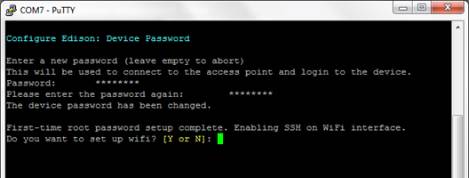
- To configure WiFi type in “Y” and press “Enter”
- Edison will scan for WiFi networks for 10 seconds. When it is finished, a list of available networks will be displayed

- Type in the number from the list for the network you’d like to connect to. In this example we will connect to “kafka” so we will type in “16” and press “Enter”

- The network in this example requires a password. Your network might require other information. Please enter the appropriate credentials.
- Press “Enter” when finished, and Edison will attempt to make a connection to the network

- If the connection fails, you may have typed in your credentials incorrectly. Try again by typing in “configure_edison --wifi" and repeat steps 11 – 14.
- You are now connected to your WiFi network. If your computer is connected to the same network you can open up a browser and type in the IP address or using the name of your Edison. In this example it will look like this “http://10.0.0.26” or “http://myedison.local”
- Visiting this address should open up this page

Congratulations, you have successfully connected to WiFi uploaded Blink to your Intel® Edison development board!
Congratulations, you have successfully uploaded Blink to your Intel® Edison development board!
Where to go next
- To learn how to develop Edison applications that discover, connect, and communicate with other Edison devices, use the iotkit-comm library.
- http://iotkit-comm-c.s3-website-us-west-2.amazonaws.com (C version)
- http://iotkit-comm-js.s3-website-us-west-2.amazonaws.com (NodeJS version)
Troubleshooting
If you are not seeing a blinking light try the following:
- Check connections between the board, and your computer.
- Make sure Intel Edison is selected from the Tools -> Board menu.
- Make sure you have the correct serial port selected in Tools -> Serial Port. This should be same number as "Virtual Com Port" shown in Device Manager.
- Make sure you uploaded the Blink sketch example, and that you didn't accidentally change the code.
- Make note of error messages.
- If all else fails, seek help from the Edison Support Community or the Arduino Forums.