
ASP.NET C# Tutorial - Development with Nido Framework for Dummies
This tutorial is designed for .NET programmers who need to understand ‘Nido’ framework and its application.
What you need?
-
Visual Studio 2012
-
MS SQL 2008
-
NuGet Package Manager
What is Nido?
Nido Framework is a reusable and highly generic code library developed using Microsoft .NET/ C# to provide a common platform all .NET systems. It provides a platform for quick software delivery and to easily customize and extend software without breaking the already developed parts of the system.
Nido Framework is developed on top of MSFT .NET Entity Framework, and also heavily influenced by the code first development technique. The framework provides a standard method of coding your business logic layer as well as data access layer. This way it will allow predictable, standard, and best performing codes despite variable expertise of the developers. Additionally once you start using Nido across the development center you will easily be able to move from one project to another without spending tons of time for knowledge transfers. Just give it a try and see…
Check for ‘NuGet’
Nido Framework needs NuGet Package Manager to install it. So let's see whether you have it installed and if not we will install it. If you have it installed you may omit this step.
Step 1: Go to Tools->Extensions and Updates… and Search for ‘NuGet’. If you see the right version of ‘NuGet’ is installed then you can proceed to configure ‘NidoFramework’. If you don’t have ‘NuGet’ then you have to install/ Update ‘NuGet’.
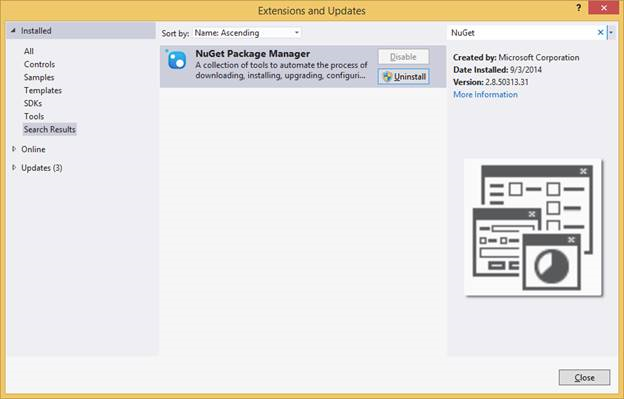
Note: NuGet is the package manager for the Microsoft development platform including .NET. The NuGet client tools provide the ability to produce and consume packages. The NuGet Gallery is the central package repository used by all package authors and consumers. You can install NuGet from here https://www.nuget.org/
Create a Business Logic Layer
Nido framework is for small to medium size systems. We allow Nido to be used in commercial products and you may refer to Nido license for more details on this.
It is important to find the right architectural mix for small to medium size projects. We do not want to overly complex the design or make it way too simple for the task. In this sense we propose having two main layers for any medium size project. The back end laye is consist of the both Business Logic and Data Access Layer together and the front end part of the system consists of the UI layer.
So as the next step we will be creating the Nido back end layer.
If you don't have much experience just obey these and follow the guidelines and I assure you that you will see the benifits in time to come.
Step 1: Let's create a library project first. Open Visual Studio 2012 and proceed to create a new class library project. Very importantly make sure that your project target .NET framework is either framework version 4.0, 4.5 or 4.5.1.

Step 2: Name the Project as ‘myTest.Bll’ and the solution as ‘myTestSolution’.
Note: Rightnow Nido needs .Net Framework version 4.0 or higher. But we are working on to get a scale down version for other .NET versions as well.
Step 3: Now Let's use NuGet Package Manager Console to format your backend library project. This will instroduce some standards, coding patterns to your back end layer. You have to use Nido installation to create/ format your business logic layer. Go to View -> Other Windows -> Package Manager Console. This will open the Console as shown below.
Step 4: In the package manager console type PM> install-package NidoFramework and press Enter. On the same node you got to make sure that the 'Default project' of package manager console is selected as 'myTest.bll'. You got to Wait herre and allow the package manager to install NidoFramework and all its dependency libraries. This will take a few minutes depending on your internet connection and machine speed.

Step 5: As the installation progress, you will see multiple directories are being created and references are being added. Once it complete doing all its work, you should possibly get a compilation error, rarely this could make your visual studio to stop responding too. You can ignore all that as this is simply because ‘DbContext.tt’ file is attempting to connect to a database using its default connection string that does not exist in your machine. So wait and give time for it to settle down.
Step 6: Once Visual Studio start responding, you may have to do another thing... You needs to navigate back to ‘Package Manager Console’ to see if it asking you for permission to overwrite the ‘App.Config’ file. If you don’t have an ‘App.Config’ it will not prompt for this. You have to say ‘Y’ and allow it to overwrite the existing configuration file. This will have all default configurations needed for Nido to work. You will be using this file later.

Step 7: After it complete the installation, you need to verify that all reference ‘dlls’ are correctly installed. The very first to confirm is that you have a reference to ‘Nido.Common.dll’. Number of people reported me an issue saying they does not get ‘Nido.Framework.dll’ installed even though all other libraries got installed. This could be due to the .NET verrsion of your project (it have to be v 4.0 or heigher). So if you also came across with the same but failed to resoplease post a question below.
Additionally, you may check for following references.
From .NET Framework library stack…
- Microsoft.CSharp
- System.Configuration
- System.Data.Entity
- System.Data.Entity.Design
- System.Data.Linq
- System.Security
- System.Runtime.Serialization
- System.Web.Extensions
- System.ComponentModel.DataAnnotations
Note: If they are not tthere hen you can add them manually or uninstall and install ‘Nido’.
From third party libraries
- EntityFramework.Extended.dll
- EntityFramework.BulkInsert.dll
- EntityFramework.MappingAPI.dll
- EntityFramework.dll
- CompareNETObjects.dll
- log4net.dll
- RefactorThis.GraphDiff.dll
Note: If they are not there then you have to install them manually. You can manually issue the installation command via package manager console. As an example to install log4net you have to say PM> Install-package log4net. You can follow the same pattern for other libraries as well.
Step 8: Check all the directories, files and t4 templates are being created correctly. Check the image bellow and validate your project against this one.

Create a Sample Database
Step1: Create a new sample Database in your MS SQL database. Add few tables to it and creates couple of fields for each table and define their relationship to test that with Nido framework.
There are few Database guidelines that you need to adhere if you are to easily use Nido.
- Give meaningful names for tables
- Use a primary key for all the tables. The primary key should have have a naming convension. The primary key should have the table name followed by the suffix 'Id' (e.g. primary key = TableNameId). This is applicable for all tables including composite tables as well.
- 'Name' column would come handy and make the coding easier if you are to display table records in a drop-down box.
- Foreign key name of a table also may use the respective table name followed by the suffix 'Id'
- The tables and fields can be created just like you create them in EF.
- Use Stored Procedures as much as possible to avoid unwanted database round trips.
- Use Views to combine multiple tables and load data in consolidated forms.
Step 1.1: There is a sample database install with Nido. You can also use the ‘Sample_Db_Bak.Sql’ (found inside DB folder) file to create a fresh database with couple of tables and sample data. Open ‘SQL Server Management Studio’ and login to it using a SQL server account. Then open a new Query Window and copy and paste the content of that file. Then click ‘Execute’ to create the new database with the name ‘School_N’ for you.
Generate Code with T4 Template
T4 (file extension is '.tt') is a general-purpose templating engine you can use to generate C# code, Visual Basic code, XML, HTML, or text of any kind. The T4 template processor will transform this file into a cs file by executing the code and processing directives inside. We are using this technology to create most of our back end codes.
Step 1: Open Templates folder of your 'myTest.Bll' Project and double click on (Open) the ‘DbContext.tt’. Trace the location where it specify the ‘connectionString’ and change the variable as per the configuration of your machine/ database.

Step 2: Save the updated file. This will automatically trigger the ‘Run Custom Tool’ command. If it doesn’t then you can manually call it by right clicking on the ‘DbContext.tt’ file and selecting ‘Run Custom Tool’ on the popup context menu. This will generate a ‘.cs’ file right next to the 'tt' file. Open it and verify that it has a content somewhat similar to the above showing image.
Step 3: Right click on the ‘Templates’ folder and select ‘Open Folder in File Location’. This will navigate you to the location where the actual ‘DbContext.cs’ file is created. Copy that file and pasted in in to the ‘DB’ folder of your project (Important: Copy them to the project via visual studio and not via the folder browser). Then on the solution explorer right click on the ‘DbContext.cs’ under ‘DbContext.tt’ and delete it.
Step 4: Repeat the above steps for ‘Hanlders.tt’ and ‘Models.tt’. However in these cases you need to copy the newly created files in to ‘Handlers’ and ‘Models’ folder respectively.
Note: We are creating the structure of the project and developing the classes in a particular order so that you can have the same pattern in all of your projects. Therefore, you just need to obey these guidelines for now and those will guarantee to give you benefits later.
Once you do all these, your project will look like this. Just to make sure that everything is all right, compile the project and see if that compile with zero errors.

Create a UI Project
Step 1: Right click on the solution named ‘myTestSolution’. Select Add -> New Project from the opening popup menu. Give a name for your new ‘APS.NET Web Forms Application’. I decided to name it as ‘myTestWeb’. Now click OK to add this project to your solution.
As you may have noticed, both of these projects are created on .Net Framework 4.5.

Step 2: Now you need to add references to the previously created back end project. So right click on the references node of the ‘myTestWeb’ and proceed to add reference to ‘myTest.Bll’ project as below.

Step 3: You need to add references to Nido.Framework.dll and other third party libraries that are referred by the Nido Framework.
- Compile the ‘myTest.Bll’ project in Release mode.
- Create a new folder with the name ‘Libraries’ in the ‘myTestWeb’ project.
- Navigate to 'myTest.Bll\Bin\Release' folder and copy all those the DLLs except 'myTest.Bll.dll' and paste them on to the ‘Libraries’ folder
- Add references to those dlls
Note: In most cases you will have an 'EntityFramework.dll' already being added to your UI project. In such cases be sure to delete that before proceed with adding references to the dlls from your library folder. As you may have noticed the entity framework version you have in your project is older than the one we are using with Nido.
Now you will see your Libraries folder as below.

Compile the project and see everything works well.
Modify the 'Web.Config' File
Step 1: You will find an ‘App.Config’ file in ‘myTest.Bll’ and you can use that file as the reference configuration file to configure the ‘Web.Config’.
Step 2: Let’s configure connection string and entity Framework. Entity Framework required the following line in 'ConfigSection' of the Web.Config. Most probably you will already have a line similar to this in your web.config file. Either you got to replace that one from this or modify that and make it similar to this. The main different we noticed most is the entity framework version differences. If you didn't have this tag then after you add this you need to add the "<entityFramework>" tag you find right at the lower part of the sample App.Config added with the installation.
<section name="entityFramework" type="System.Data.Entity.Internal.ConfigFile.EntityFrameworkSection, EntityFramework, Version=6.0.0.0, Culture=neutral, PublicKeyToken=b77a5c561934e089" requirePermission="false" />
Once you do that you got to locate the ‘ConnectionString’ element in ‘App.Config’ file next.
  <connectionStrings>
    <add name="your_dbContextClassName"
	connectionString="data source=your_server;
	initial catalog=your_database;user id=your_username;
	password=your_password;
	multipleactiveresultsets=True;
	timeout=500"
	providerName="System.Data.SqlClient" />
  </connectionStrings>
You need to fill information as per the configuration in your environment. As these are fairly straight forward settings, I am not going to go in to detail here. However let me highlight one point. The connection string name has to be the class name of the ‘DbContext.cs’ file you have inside ‘DB’ folder of ‘mytes.Bll’ project. So In our case it is ‘SchoolDBContext’.
Step 2: Let’s configure application settings next. You can find all default configuration in ‘App.Config’ file in ‘myTest.Bll’. Let me paste them here for you.
  <appSettings>
    <add key="SmtpHost" value="yoursmtphost" />
    <add key="SmtpClientUser" value="yourmail user" />
    <add key="SmtpClientPassword" value="your password" />
    <add key="FromEmailAddress" value="your from mail address" />

    <!--Just ignore this, but don't delete this-->
    <add key="FactoryId" value="2" />

    <!--Just ignore this, but don't delete this-->
    <add key="MaxModelRecordCount" value="100" />

    <!--This setting will enable auditing of all auditable models,
    so that it will create an entry to the AuditTrail table
    when the record is changed. In order to activate this
    you need to follow guidelines given in 'Models\AuditTrails.txt'-->
    <add key="EnableAuditTrail" value="false" />

    <!--This feature will stop updating records to the database and
    allow you to work/ test on a database. This is specially develop
    to debug errors occur in production environment without modifying the records.
    As an example if you configure the system to connect to production DB then you will have a special session created for you
    with a in memory DB where the change will commit and display back to you only in the virtual DB.
    The actaul DB will not touch and it is gurateed-->
    <add key="EnableTesting" value="false" />

    <!--This feature will write operational infomtion to exception log given that the INFO thresold is set in log4net section.
    This will give you a detail log with the parameters passed and the operation called and its status.-->
    <add key="EnableOptTracking" value="true" />
  </appSettings>
Step 3: Finally, let’s configure log4net for exception logging as well. You have to modify the ‘configSections’ as below.
  <configSections>
    <section name="log4net" type="log4net.Config.Log4NetConfigurationSectionHandler, log4net" />
  </configSections>
Then you need to add the actual configuration element to the last past of the configuration file. You will have these element added in the sample configuration file that downloaded with Nido framework.
  <log4net>
    <appender name="RollingFile" type="log4net.Appender.RollingFileAppender">
      <file value=".\\Errors\\Exception.log" />
      <appendToFile value="true" />
      <maximumFileSize value="256KB" />
      <maxSizeRollBackups value="10" />
      <!--DEBUG < INFO < WARN < ERROR < FATAL-->
      <param name="Threshold" value="WARN" />
      <layout type="log4net.Layout.PatternLayout">
        <conversionPattern value="%d [%t] %-5p %c - %m%n" />
      </layout>
    </appender>
    <root>
      <level value="ALL" />
      <appender-ref ref="RollingFile" />
    </root>
  </log4net>
Once you do all, you will see your configuration file looks like the one below.
<?xml version="1.0"?>
<!--
For more information on how to configure your ASP.NET application, please visit
http://go.microsoft.com/fwlink/?LinkId=169433
-->
<configuration>
<configSections>
<section name="log4net" type="log4net.Config.Log4NetConfigurationSectionHandler, log4net" />
<!-- For more information on Entity Framework configuration, visit http://go.microsoft.com/fwlink/?LinkID=237468 -->
<section name="entityFramework" type="System.Data.Entity.Internal.ConfigFile.EntityFrameworkSection, EntityFramework, Version=6.0.0.0, Culture=neutral, PublicKeyToken=b77a5c561934e089" requirePermission="false"/>
</configSections>

<connectionStrings>
<add name="SchoolDBContext" connectionString="data source=MTS-LT-ICT005;initial catalog=School;user id=smstest;password=welcome@123;multipleactiveresultsets=True; timeout=500" providerName="System.Data.SqlClient" />
<add name="DefaultConnection" providerName="System.Data.SqlClient" connectionString="Data Source=(LocalDb)\v11.0;Initial Catalog=aspnet-myTestWeb-20141016123151;Integrated Security=SSPI;AttachDBFilename=|DataDirectory|\aspnet-myTestWeb-20141016123151.mdf"/>
</connectionStrings>

<!--
For a description of web.config changes for .NET 4.5 see http://go.microsoft.com/fwlink/?LinkId=235367.
The following attributes can be set on the <httpRuntime> tag.

<system.Web>
<httpRuntime targetFramework="4.5" />
</system.Web>
-->
<system.web>
<compilation debug="true" targetFramework="4.5"/>
<httpRuntime/>
<pages controlRenderingCompatibilityVersion="4.0">
<namespaces>
<add namespace="System.Web.Optimization"/>
</namespaces>
<controls>
<add assembly="Microsoft.AspNet.Web.Optimization.WebForms" namespace="Microsoft.AspNet.Web.Optimization.WebForms" tagPrefix="webopt"/>
</controls>
</pages>

<authentication mode="Forms">
<forms loginUrl="~/Account/Login.aspx" timeout="2880"/>
</authentication>

<profile defaultProvider="DefaultProfileProvider">
<providers>
<add name="DefaultProfileProvider" type="System.Web.Providers.DefaultProfileProvider, System.Web.Providers, Version=1.0.0.0, Culture=neutral, PublicKeyToken=31bf3856ad364e35" connectionStringName="DefaultConnection" applicationName="/"/>
</providers>
</profile>

<membership defaultProvider="DefaultMembershipProvider">
<providers>
<add name="DefaultMembershipProvider" type="System.Web.Providers.DefaultMembershipProvider, System.Web.Providers, Version=1.0.0.0, Culture=neutral, PublicKeyToken=31bf3856ad364e35" connectionStringName="DefaultConnection" enablePasswordRetrieval="false" enablePasswordReset="true" requiresQuestionAndAnswer="false" requiresUniqueEmail="false" maxInvalidPasswordAttempts="5" minRequiredPasswordLength="6" minRequiredNonalphanumericCharacters="0" passwordAttemptWindow="10" applicationName="/"/>
</providers>

</membership>

<roleManager defaultProvider="DefaultRoleProvider">
<providers>
<add name="DefaultRoleProvider" type="System.Web.Providers.DefaultRoleProvider, System.Web.Providers, Version=1.0.0.0, Culture=neutral, PublicKeyToken=31bf3856ad364e35" connectionStringName="DefaultConnection" applicationName="/"/>
</providers>

</roleManager>

<!--

If you are deploying to a cloud environment that has multiple web server instances,
you should change session state mode from "InProc" to "Custom". In addition,
change the connection string named "DefaultConnection" to connect to an instance
of SQL Server (including SQL Azure and SQL Compact) instead of to SQL Server Express.

-->

<sessionState mode="InProc" customProvider="DefaultSessionProvider">
<providers>
<add name="DefaultSessionProvider" type="System.Web.Providers.DefaultSessionStateProvider, System.Web.Providers, Version=1.0.0.0, Culture=neutral, PublicKeyToken=31bf3856ad364e35" connectionStringName="DefaultConnection"/>
</providers>

</sessionState>

</system.web>

<appSettings>
<add key="SmtpHost" value="yoursmtphost" />
<add key="SmtpClientUser" value="yourmail user" />
<add key="SmtpClientPassword" value="your password" />
<add key="FromEmailAddress" value="your from mail address" />
<!--Just ignore this, but don't delete this-->
<add key="FactoryId" value="2" />
<!--Just ignore this, but don't delete this-->
<add key="MaxModelRecordCount" value="100" />
<!--This setting will enable auditing of all auditable models,
so that it will create an entry to the AuditTrail table
when the record is changed. In order to activate this
you need to follow guidelines given in 'Models\AuditTrails.txt'-->
<add key="EnableAuditTrail" value="false" />
<!--This feature will stop updating records to the database and
allow you to work/ test on a database. This is specially develop
to debug errors occur in production environment without modifying the records.
As an example if you configure the system to connect to production DB then you will have a special session created for you
with a in memory DB where the change will commit and display back to you only in the virtual DB.
The actaul DB will not touch and it is gurateed-->
<add key="EnableTesting" value="false" />
<!--This feature will write operational infomtion to exception log given that the INFO thresold is set in log4net section.
This will give you a detail log with the parameters passed and the operation called and its status.-->
<add key="EnableOptTracking" value="true" />
</appSettings>

<log4net>
<appender name="RollingFile" type="log4net.Appender.RollingFileAppender">
<file value=".\\Errors\\Exception.log" />
<appendToFile value="true" />
<maximumFileSize value="256KB" />
<maxSizeRollBackups value="10" />
<!--DEBUG < INFO < WARN < ERROR < FATAL-->
<param name="Threshold" value="WARN" />
<layout type="log4net.Layout.PatternLayout">
<conversionPattern value="%d [%t] %-5p %c - %m%n" />
</layout>
</appender>

<root>
<level value="ALL" />
<appender-ref ref="RollingFile" />
</root>

</log4net>
<entityFramework>
<defaultConnectionFactory type="System.Data.Entity.Infrastructure.SqlConnectionFactory, EntityFramework"/>
</entityFramework>
<runtime>
<assemblyBinding xmlns="urn:schemas-microsoft-com:asm.v1">
<dependentAssembly>
<assemblyIdentity name="EntityFramework" publicKeyToken="b77a5c561934e089" culture="neutral"/>
<bindingRedirect oldVersion="0.0.0.0-6.0.0.0" newVersion="6.0.0.0"/>
</dependentAssembly>
</assemblyBinding>
</runtime>
</configuration>
Step 3: As the final step you need to create a folder called "Errors" in the place where you have 'Content' and 'Images' folders. This will make system to log exception automatically. ‘Nido’ has a built in code to log all errors in to this file. The error are created with a reference ID. The same error reference ID is returned to UI layer as a message. You can display that to the user. Debug your code and see what you get when there is an error.
Other exception log configuration can be obtain by referring to the log4Net project site.
Codes to Load the Data
Step 1: Drag a Data Grid View from tool bar to your ‘Default.aspx’ and write the following code in Page_Load method. You got to resolve references for StudentHandler, GenericResponse and Student Object.
using Nido.Common;
using Nido.Common.BackEnd;
using myTest.Bll.Models;
StudentHandler studentHandler = new StudentHandler();
GenericResponse<IEnumerable<Student>> response = studentHandler.GetAllGeneric();

if (response.Successful)
{
this.GridView1.DataSource = response.Result.ToArray();
this.GridView1.DataBind();
}
else
// Handle Loading Failure
Just to make sure that this tutorial is complete let me show you how to Add, Edit and Delete records using Nido Framework. For help to do more complex operations please refer other references given below.
Update
StudentHandler studentHandler = new StudentHandler();
GenericResponse<IEnumerable<Student>> response = handlerStudent
.GetFirstGeneric(x => x.IsActive);
// You just retrieve a object just to test the update function

// Now let's proceed to update the record
if (response.Successful)
{
        Student myStudent = response.Result;
 	myStudent.Age = 1000;
 	GenericResponse<Student> updateResponse = handlerStudent.UpdateGeneric(myStudent);
 	if (updateResponse.Successful)
 	{
  		// Handle Update
 	} else
  		// Handle Update Failure
}
else
	// Handle Update Failure
Delete
GenericResponse<Student> response = handlerStudent.DeleteGeneric(x => x.StudentId == id);
Add
Student myStudent = new Student();
// assign properties for this new myStudent
GenericResponse<Student> response = handlerStudent.AddGeneric(myStudent);
Once you complete the coding part, debug the solution just to make sure that everything is compiled well. Right click the 'myTestWeb' project and select 'set as Start Project' to run the solution. You will see data is loading but you will also see that the grid view formatting is everywhere. Let’s get it organized little more next..
Formatting Grid View
You going to use some of the built-in feature here. So this is going to be interesting as well.
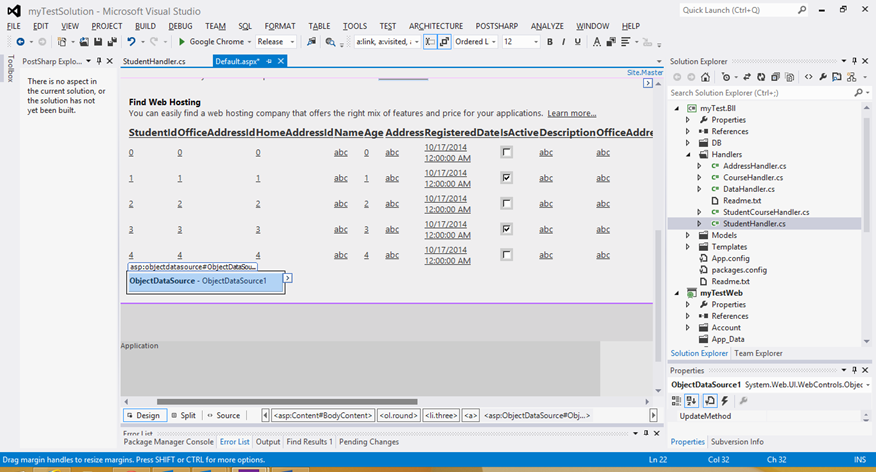
Step 1: You need to carefully follow this workaround step. Go to the design screen of the ‘Default.aspx’. Click on the small arrow mark that appear along with the grid view to get to the screen below. Click on ‘Choose Data Source’ and select ‘New Data Source’. Select ‘Object’ and click OK in next screen.

Step 2: Choose your business object. Since we are trying to display records extracted from the ‘Student’ table we need to choose the ‘myTest.Bll.Handlers.StudentHandler’ handler as the binding object for our data source. This is a trick that we do to get the grid view created the way we want.
Step 3: In the coming screen under SELECT tab choose ‘GetAll()’ method don’t even bother looking at other tabs and click ‘Finish’. This will create our grid view with all the columns of the ‘Student’ Object.

Step 3: Now delete your object data source and go to HTML Source of your page and delete ‘DataSourceID="ObjectDataSource1"’ from the ‘gridview’ element.
Step 4: Whenever the model has a property which its name ends with ‘popup’ suffix that indicated that it is a popup that basically allow you to display related table records in a popup box. As an example if you have ‘Student’ table and ‘Address’ table where every student has an address. Then t4 template automatically creates a popup property for you. Nido always assumes that you need to display those related records along with the parent records, hence has given you a default solution for it. When getting a popup property display on your grid you have to do the followings.
-
Add the styles to your main style sheet. Your designer will do a much better job for you but we have develop a basic style to demonstrate this feature. Copy the following style to your main css file. In my case it was the ‘Site.css’ found under Content folder.
a.info { text-decoration: none; position: relative; /*this is the key*/ color: #000; border-bottom-style: dotted; border-bottom-width: thin; margin-right: 10px; } a.info:hover { z-index: 25; background-color: #ff0; } a.info span { display: none; } a.info:hover span { /*the span will display just on :hover state*/ display: block; position: absolute; top: 2em; left: 2em; border: 1px solid #0cf; background: rgb(252, 252, 252); color: #000; text-align: left; z-index: 525; } -
Go to ‘Default.aspx’ HTML code and remove all unwanted columns from the newly formed grid. In my case I modify the grid as below. Notice that all popup columns has ‘HtmlEncode="false" and ReadOnly="True"’. Additionally each model class has a property named ‘CanDelete’, that basically tells you whether you can delete the particular object or not. If you have dependency records then this property is set to false automatically. So I have used that property to enable/ disable delete button and also to show you a tool tip when the delete button is disabled as bellow.
<asp:GridView ID="GridView1" runat="server" AutoGenerateColumns="False">
                <Columns>
                    <asp:BoundField DataField="StudentId" HeaderText="StudentId" SortExpression="StudentId" />
                    <asp:BoundField DataField="OfficeAddressId" HeaderText="OfficeAddressId" SortExpression="OfficeAddressId" />
                    <asp:BoundField DataField="HomeAddressId" HeaderText="HomeAddressId" SortExpression="HomeAddressId" />
                    <asp:BoundField DataField="Name" HeaderText="Name" SortExpression="Name" />
                    <asp:BoundField DataField="RegisteredDate" HeaderText="RegisteredDate" SortExpression="RegisteredDate" />
                    <asp:CheckBoxField DataField="IsActive" HeaderText="IsActive" SortExpression="IsActive" />
                    <asp:BoundField DataField="Description" HeaderText="Description" SortExpression="Description" />
                    <asp:BoundField DataField="HomeAddressPopup" HeaderText="HomeAddressPopup" ReadOnly="True"
                        HtmlEncode="false" SortExpression="HomeAddressPopup" />
                    <asp:BoundField DataField="OfficeAddressPopup" HeaderText="OfficeAddressPopup" ReadOnly="True"
                        HtmlEncode="false" SortExpression="OfficeAddressPopup" />
                    <asp:CheckBoxField DataField="CanDelete" HeaderText="CanDelete" SortExpression="CanDelete" />
                    <asp:TemplateField>
                        <ItemTemplate>
                            <asp:Button runat="server" ID="Btn_Delete" CommandName="Delete" Text="delete" Enabled='<%# Eval("CanDelete") %>'
                                ToolTip='<%# Eval("DeleteErrorText") %>' CommandArgument='<%# Eval("StudentId") %>' CausesValidation="True" UseSubmitBehavior="False" />
                        </ItemTemplate>
                    </asp:TemplateField>
                </Columns>
            </asp:GridView>
As we have number of popups here we need to modify the data retrieving part as well. We need to enhance the data object so that it retrieve not just the ‘Student’ but it retrieve each student with their Home and Office Address as well. See the updated code below.
StudentHandler studentHandler = new StudentHandler();
GenericResponse<IEnumerable<Student>> response = studentHandler
    .Include(x => x.HomeAddress)
    .Include(y => y.OfficeAddress)
    .GetAllGeneric();

this.GridView1.DataSource = response.Result.ToArray();
this.GridView1.DataBind();
Step 5: Compile the project and see if everything work as per the plan and run the application to see it display the records with all the popups. You have options to remove fields that are not needed from the popup. Check the ‘Not Mapped Property’ section and see how it is creating the popup and you will soon understand how to remove a unwanted property from the popup.

I hope I wrote enough for beginner to start using ‘Nido’ Framework and you will have more questions along the way. So you may post those questions here or Nido @ Codeplex so that I can answer those questions then and there.