
Flirting with Google Maps on Android
4.70/5 (17 votes)
Learning to implement a location-aware Google map on Android App.
Introduction
In one of my articles - Android User Interactivity and Sensors - I have explained the implementation of GPS in an Android app. However, I have stopped short of adding a map to it. In this article, I am going to make it up to you. You will learn the basics of setting up and implementing Google Maps in an Android app. With that, you will create a simple location-aware app that tracks a user's location using the "LocationManager" class and then updates the location on Google Map on the user's Android device. Sound interesting? Read on...
Setting the Stage
Google Maps Android API v2 is the current API that is responsible for putting a Google Map on an app. It handles access to Google Maps servers, displays map, and responses to gestures. It also provides many methods for adding and customizing the map.
Before you can start using Google Maps in an app, you have to get ready two things - installing the "Google Maps Android API V2" itself, and obtaining an "API key" to access the Google Maps Android API V2.
-
Installing Google Maps Android API V2 - The Google Maps Android API v2 is distributed as part of the freely distributed Google Play services SDK.
Download the Google Play services SDK using the Android SDK Manager. Select the "Google Play services" in the Android SDK Manager to install it as shown in Figure 1.
 Figure 1: Download and Install Google Play services SDK
Refer to the Google Play services documentation for detailed instructions on setting up the Google Play services in different development environments.
Declare the use of Google Play services in the app's manifest file like this:
<?xml version="1.0" encoding="utf-8"?> <manifest xmlns:android="http://schemas.android.com/apk/res/android" package="com.peterleow.madgooglemap" > <application ... <meta-data android:name="com.google.android.gms.version" android:value="@integer/google_play_services_version" /> <!-- ... --> </application> </manifest> -
Obtaining an API Key - In order to access the Google Maps servers with the Google Maps Android API V2, you need to obtain a free API key from the "Google APIs Console" with a signed certificate of your app and its package name. Each key is linked to a specific certificate/package pair and supports an unlimited number of users. After obtaining the key, add it to the app's manifest file and you are well on your way to implementing Google Maps in your app.
Refer to this "documentation" for detailed instructions on obtaining the API key. However, if you are using Android Studio to create the app, then do not bother to read it, at least not for now. You will find out why in a while.
After obtaining the API key, add it to your app's manifest file like this:
<?xml version="1.0" encoding="utf-8"?>
<manifest xmlns:android="http://schemas.android.com/apk/res/android"
    package="com.peterleow.madgooglemap" >

    <application ...

        <meta-data
            android:name="com.google.android.maps.v2.API_KEY"
            android:value="@string/google_maps_key" />

    <!-- ... -->

    </application>

</manifest>
Creating a Google Map App
Go on to create a new Project in Android Studio, let's called it "Follow Me", using the "Google Maps Activity" template as shown in Figure 2:
 |
|
Figure 2: "Google Maps Activity" Template
|
Using the "Google Maps Activity" template will save you a lot of effort in obtaining an API key. You will find out soon.
 |
|
Figure 3: Setting up the Activity
|
Take a look what the Android Studio has created using the "Google Maps Activity" template:
-
The main Activity called "MapsActivity" that is automatically set up by Android Studio and is ready to display a Google map as shown below:
package com.peterleow.followme;

import android.os.Bundle;
import android.support.v4.app.FragmentActivity;
import com.google.android.gms.maps.GoogleMap;
import com.google.android.gms.maps.SupportMapFragment;
import com.google.android.gms.maps.model.LatLng;
import com.google.android.gms.maps.model.MarkerOptions;

public class MapsActivity extends FragmentActivity {

    private GoogleMap mMap; // Might be null if Google Play services APK is not available.

    @Override
    protected void onCreate(Bundle savedInstanceState) {
        super.onCreate(savedInstanceState);
        setContentView(R.layout.activity_maps);
        setUpMapIfNeeded();
    }

    @Override
    protected void onResume() {
        super.onResume();
        setUpMapIfNeeded();
    }

    /**
     * Sets up the map if it is possible to do so (i.e., the Google Play services APK is correctly
     * installed) and the map has not already been instantiated.. This will ensure that we only ever
     * call {@link #setUpMap()} once when {@link #mMap} is not null.
     * <p>
     * If it isn't installed {@link SupportMapFragment} (and
     * {@link com.google.android.gms.maps.MapView MapView}) will show a prompt for the user to
     * install/update the Google Play services APK on their device.
     * <p>
     * A user can return to this FragmentActivity after following the prompt and correctly
     * installing/updating/enabling the Google Play services. Since the FragmentActivity may not
     * have been completely destroyed during this process (it is likely that it would only be
     * stopped or paused), {@link #onCreate(Bundle)} may not be called again so we should call this
     * method in {@link #onResume()} to guarantee that it will be called.
     */
    private void setUpMapIfNeeded() {
        // Do a null check to confirm that we have not already instantiated the map.
        if (mMap == null) {
            // Try to obtain the map from the SupportMapFragment.
            mMap = ((SupportMapFragment) getSupportFragmentManager().findFragmentById(R.id.map))
                    .getMap();
            // Check if we were successful in obtaining the map.
            if (mMap != null) {
                setUpMap();
            }
        }
    }

    /**
     * This is where we can add markers or lines, add listeners or move the camera. In this case, we
     * just add a marker near Africa.
     * <p>
     * This should only be called once and when we are sure that {@link #mMap} is not null.
     */
    private void setUpMap() {
        //mMap.setMapType(GoogleMap.MAP_TYPE_SATELLITE);
        mMap.addMarker(
                new MarkerOptions()
                        .position(new LatLng(0, 0))
                        .title("Marker"));
    }
}
The main actor in this Activity is the "GoogleMap" object called "mMap". The "GoogleMap" class is the main class of the Google Maps Android API and is the entry point for all methods related to the map. To obtain a "GoogleMap" object, call the "getMap()" method of the "SupportMapFragment" class like this:
mMap = ((SupportMapFragment) getSupportFragmentManager().findFragmentById(R.id.map)).getMap();
Android Studio is very helpful in providing elaborate comments to explain the working of each piece of code. So read them.
-
The layout file called "activity_maps.xml" contains a component of the "SupportMapFragment" class for placing the map in the app as shown below:
<fragment xmlns:android="http://schemas.android.com/apk/res/android" xmlns:tools="http://schemas.android.com/tools" android:layout_width="match_parent" android:layout_height="match_parent" android:id="@+id/map" tools:context=".MapsActivity" android:name="com.google.android.gms.maps.SupportMapFragment"/> -
The "AndroidManifest.xml" that is set up with the necessary <<uses-permission>'s for using Google map as shown below:
<?xml version="1.0" encoding="utf-8"?> <manifest xmlns:android="http://schemas.android.com/apk/res/android" package="com.peterleow.followme" > <application android:allowBackup="true" android:icon="@drawable/ic_launcher" android:label="@string/app_name" android:theme="@style/AppTheme" > <activity android:name=".MapsActivity" android:label="@string/title_activity_maps" > <intent-filter> <action android:name="android.intent.action.MAIN" /> <category android:name="android.intent.category.LAUNCHER" /> </intent-filter> </activity> <meta-data android:name="com.google.android.gms.version" android:value="@integer/google_play_services_version" /> <meta-data android:name="com.google.android.maps.v2.API_KEY" android:value="@string/google_maps_key" /> </application> <uses-permission android:name="android.permission.INTERNET" /> <uses-permission android:name="android.permission.ACCESS_NETWORK_STATE" /> <uses-permission android:name="android.permission.WRITE_EXTERNAL_STORAGE" /> <uses-permission android:name="com.google.android.providers.gsf.permission.READ_GSERVICES" /> <!-- The ACCESS_COARSE/FINE_LOCATION permissions are not required to use Google Maps Android API v2, but are recommended. --> <uses-permission android:name="android.permission.ACCESS_COARSE_LOCATION" /> <uses-permission android:name="android.permission.ACCESS_FINE_LOCATION" /> </manifest> -
Everything is ready except one missing piece - the API key! Navigate to "app/src/debug/res/values/" and open this file called "google_maps_api.xml". What do you see?
 Figure 4: google_maps_api.xml
Android Studio has created the SHA1 certificate fingerprint and appended it to a link as shown in Figure 4. Copy and paste this link on a browser and navigate to the "Google APIs Console" to register for Google Maps Android API V2 (Figure 5).
 Figure 5: Google APIs Console
Agree to the terms of service and continue to the next screen to create an API key (Figure 6).
 Figure 6: Create an API key
The textbox in Figure 6 should be auto-filled with the SHA1 certificate fingerprint. If not, copy and paste from the "google_maps_api.xml" file shown in Figure 4.
Click the create button and wait. You will be presented with an API key as shown in Figure 7.
 Figure 7: API Key Generated!
Replace the content of the "google_maps_key" resource with this API key.
That's it. You have just created an app to display a Google map. Launch it on a real device. What did you see?
 |
|
Figure 8: First Look
|
The app shows a default styled red marker at latitude zero and longitude zero on the map ("position(new LatLng(0, 0))") as instructed by this piece of code below:
private void setUpMap() {

    mMap.addMarker(
            new MarkerOptions()
                    .position(new LatLng(0, 0))
                    .title("Marker"));

}
If you click on the red marker, a title box will pop up that says "Marker" ("title("Marker")") (Figure 9).
 |
|
Figure 9: Too Bland!
|
So bland! Let's spice things up a bit, shall we?
First, try customizing the marker using the various methods of the "MarkerOptions" class like this:
private void setUpMap() {

    mMap.addMarker(
            new MarkerOptions()
                    .position(new LatLng(0, 0))
                    .snippet("Hello World!")
                    .icon(BitmapDescriptorFactory.fromResource(R.drawable.ic_launcher))
                    .flat(true)
                    .title("I'm here!"));
}
Then run it on a real device. This time (Figure 10), the red marker has been replaced with the ic_launcher icon ("icon(BitmapDescriptorFactory.fromResource(R.drawable.ic_launcher))"). Touching the icon will pop up a little box that shows a title ("title("I'm here!")") and a little text ("snippet("Hello World!")"). When you put two fingers on the screen and move them downward to tilt the map, the icon will also tilt ("flat(true)").
 |
|
Figure 10: Customized Marker Options
|
You can also change the map type to one of the five options - "MAP_TYPE_HYBRID", "MAP_TYPE_NONE", "MAP_TYPE_NORMAL", "MAP_TYPE_SATELLITE", or "MAP_TYPE_TERRAIN". The following code will show the map in "MAP_TYPE_SATELLITE" as shown in Figure 11.
private void setUpMap() {

    // ...

    mMap.setMapType(GoogleMap.MAP_TYPE_SATELLITE);

}
 |
|
Figure 11: MAP_TYPE_SATELLITE
|
The following code will show the map in "MAP_TYPE_HYBRID" as shown in Figure 12.
private void setUpMap() {

    // ...

    mMap.setMapType(GoogleMap.MAP_TYPE_HYBRID);

}
 |
|
Figure 12: MAP_TYPE_HYBRID
|
Making Location-Aware App
You have learned the basic of putting a Google map on an app. Let's add the location-aware feature to it so that it can display and update user's location on the map.
Add the necessary packages to the "MapsActivity" as shown:
package com.peterleow.followme;

import android.location.Criteria;
import android.location.Location;
import android.location.LocationListener;
import android.location.LocationManager;
import android.os.Bundle;
import android.support.v4.app.FragmentActivity;
import com.google.android.gms.maps.CameraUpdateFactory;
import com.google.android.gms.maps.GoogleMap;
import com.google.android.gms.maps.SupportMapFragment;
import com.google.android.gms.maps.model.BitmapDescriptorFactory;
import com.google.android.gms.maps.model.LatLng;
import com.google.android.gms.maps.model.MarkerOptions;

public class MapsActivity extends FragmentActivity {

//...
Create a method called "showCurrentLocation(Location location)" in the "MapsActivity" as shown:
private void showCurrentLocation(Location location){

    mMap.clear();

    LatLng currentPosition = new LatLng(location.getLatitude(),location.getLongitude());

    mMap.addMarker(new MarkerOptions()
            .position(currentPosition)
            .snippet("Lat: " + location.getLatitude() + ", Lng: " + location.getLongitude())
            .icon(BitmapDescriptorFactory.fromResource(R.drawable.ic_peterleow))
            .flat(true)
            .title("I'm here!"));

    // Zoom in, animating the camera.
    mMap.animateCamera(CameraUpdateFactory.newLatLngZoom(currentPosition, 18));
}
The "showCurrentLocation(Location location)" method takes a "Location" object containing the user's current geographical location data such as latitude, longitude, and other information, adds a marker on the map at the location indicated by the latitude and longitude of this "Location" object, and then animates the movement to this location by calling the "animateCamera()" method of the "GoogleMap" object.
Now the question is how and where does the app get the location update from? The answer lies with the "LocationManager" class. You have learned that in my article Android User Interactivity and Sensors. In a nutshell, the Android system provides the "LocationManager" class for accessing the system location service. You can request location updates from the "LocationManager" by calling its "requestLocationUpdates()" method and passing it a "LocationListener". The "LocationManager" will call the various callback methods of the "LocationListener" whenever the location of the Android device changes or when the status of the location service changes. Set all these up in the "setUpMap()" method as shown:
private void setUpMap() {

   LocationManager locationManager = (LocationManager) getSystemService(LOCATION_SERVICE);

    Criteria criteria = new Criteria();
    criteria.setAccuracy(Criteria.ACCURACY_FINE);

    String provider = locationManager.getBestProvider(criteria, true);

    LocationListener locationListener = new LocationListener() {

        @Override
        public void onLocationChanged(Location location) {
            showCurrentLocation(location);
        }
        @Override
        public void onStatusChanged(String s, int i, Bundle bundle) {
        }
        @Override
        public void onProviderEnabled(String s) {
        }
        @Override
        public void onProviderDisabled(String s) {
        }
    };

    locationManager.requestLocationUpdates(provider, 2000, 0, locationListener);

    // Getting initial Location
    Location location = locationManager.getLastKnownLocation(provider);
    // Show the initial location
    if(location != null)
    {
        showCurrentLocation(location);
    }
}
The app has been registered for location update at a minimum interval of 2000ms.
Launch this app on your device and bring it with you for a jog or walk outdoor, remember to enable the "Location Services" and turn on the GPS on your device. See that your location is being updated on the map as you move. An example screenshot is shown in Figure 13.
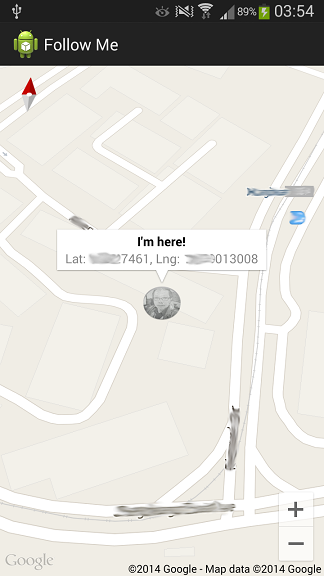 |
|
Figure 13: Follow Me
|
End of Journey
Congratulation! You have created you first location-aware Google map app. Have fun and hope to see you in another learning journey.