
Beginner's Guide to Android Animation/Graphics
4.99/5 (40 votes)
Learning to draw and animate simple 2D and 3D graphics in Android.
Introduction
To give your app an edge over their rivals, it has got to have visually appealing graphics and mind-blowing animations. In this respect, the Android framework provides a rich set of powerful APIs for applying animation to UI elements and graphics as well as drawing custom 2D and 3D graphics. In this article, you will learn to make use of these APIs to implement simple animations and to create simple 2D and 3D graphics through a series of hands-on exercises.
Animation Overview
Android provides three animation systems for meeting the animation needs of Android apps. From the most sophisticated "Property Animation" to the simpler "View Animation" and "Drawable Animation".
- Property Animation
-
Introduced in Android 3.0 (API level 11), the property animation system is the robust framework that lets you animate any properties of any objects, View or non-View objects, as well as any custom types. It is the preferred method of animation in Android. The "android.animation" provides classes that handle property animation.
- View Animation
-
As the older animation system, "View Animation" is also called "Tween Animation". It can only be used to animate the content of a View, and is limited to simple transformation such as moving, re-sizing, and rotation, but not its background color. The "android.view.animation" provides classes that handle "View Animation".
- Drawable Animation
-
Drawable animation works by displaying a running sequence of "Drawable" resources, i.e. images, frame by frame, inside a View object. It is implemented using the "AnimationDrawable" class.
2D and 3D Graphics Overview
Depending on the graphic types and the processing demand of your app, you may choose from these options for drawing graphics on Android:
- Canvas
-
Android framework provides a set of 2D-drawing APIs for rendering custom graphics either onto a canvas using the various drawing methods provided by the "Canvas" class.
- OpenGL ES
-
If you are venturing into 3D graphics or interacting gaming apps, you should consider the "OpenGL ES" APIs supported by the Android framework. It offers a set of extremely powerful tools for manipulating and displaying high-end animated 3D graphics that can be benefited from the hardware acceleration of graphics processing units (GPUs) provided on many Android devices.
Setting the Stage
I have prepared an Android projects for download - "AndroidAnimation.zip". The "AndroidAnimation" is an incomplete app that consists of a main Activity, six skeleton Activities, and other resources needed for subsequent exercises. The launch page is the "MainActivity" titled "AndroidAnimation" which consists of six buttons for navigating to six other Activities that you will complete in a series of exercises as you walk through this tutorial. Refer to Figure 1 for the visual composition of the app once it is completely built.
 |
|
Figure 1: Visual Composition of Android Animation App
|
You will get ready by following these steps:
-
Download and unzip the "AndroidAnimation.zip" and you should get this "AndroidAnimation" folder on your computer
-
Launch the Android Studio.
-
If it opens with an existing project, click File > Close Project to switch to the Welcome screen.
-
Click "Import Project..." on the Quick Start page of the Welcome screen.
-
Browse to the "AndroidAnimation" Project and click "OK" to open it in the Android Studio.
Let the journey begin...
Property Animation
ValueAnimator
A property animation animates an object by changing the value of one of its properties, such as the x position on the screen, from a start value to an end value, over a specified length of time based on some time varying function.
In property animation, Android provides the "ValueAnimator" class as the timing engine for starting and managing the whole animation process. It contains the details of each animation, such as the starting and ending values for the property that is being animated, the duration of the animation, a subclass of "TimeInterpolator" that defines the rate of change of the animation, and a subclass of "TypeEvaluator" that defines how to calculate the animated values.
During the animation, the "ValueAnimator" calculates the amount of time that has elapsed against the total duration of the animation to derive the "elapsed fraction" of between 0 and 1, with 0 meaning 0% and 1 meaning 100% completion of animation. For example, the elapsed fraction of an animation at 25ms over a total duration of 100ms would be .25.
TimeInterpolator
For each elapsed fraction calculated, the "ValueAnimator" calculates an "interpolated fraction" based on the "TimeInterpolator" that is set for the animation. A time interpolator is a function that defines the rate of change of an animated value across the whole animation process. For example, you can specify animations to occur uniformly over time using "LinearInterpolator" (Figure 2), or to start and end slowly but accelerate through the middle using "AccelerateDecelerateInterpolator" (Figure 3). From the following graphs, note that the interpolated fractions, i.e. f(t)'s, from the two interpolators at the elapsed fraction of t=0.25 are 0.25 and approximately 0.15 respectively.
 |
 |
| Figure 2: LinearInterpolator |
Figure 3: AccelerateDecelerateInterpolator
|
Refer to Table 1 for a summary of the various subclasses of the "TimeInterpolator" provided by Android.
| Callback | Description | Graph |
|---|---|---|
| LinearInterpolator |
A time-based function where the rate of change remains constant (Figure 2). |
|
| AccelerateDecelerateInterpolator |
A time-based function where the rate of change starts and ends slowly but accelerates through the middle (Figure 3). |
|
| AccelerateInterpolator |
A time-based function where the rate of change starts out slowly and then accelerates. |
 |
| DecelerateInterpolator | A time-based function where the rate of change starts out quickly and then decelerates. This is the opposite of "AccelerateInterpolator". |  |
| AnticipateInterpolator | A time-based function where the change starts backward and then moves forward. |  |
| OvershootInterpolator | A time-based function where the change overshoots the ending value, and finally goes back to the ending value. |  |
| AnticipateOvershootInterpolator | The first half of the change takes on that of the "AnticipateInterpolator" and the second half that of the "OvershootInterpolator". The animation starts backward, then moves forward and overshoots the ending value, and finally goes back to the ending value. |  |
| BounceInterpolator | A series of consecutive time-based functions that create the bouncing effect nearing the end of the animation. |  |
| CycleInterpolator | Repeat the animation for a specified number of cycles. |  |
TypeEvaluator
For each interpolated fraction calculated, the "ValueAnimator" calls the appropriate "TypeEvaluator" to calculate the value of the property that is being animated, based on the interpolated fraction, the starting value, and the ending value of the animation. Android provides three subclasses of "TypeEvaluator" and one interface for creating custom evaluators. Refer to Table 2 for a summary of the various implementations of "TypeEvaluator".
| Class/Interface | Elaboration |
|---|---|
| IntEvaluator |
Performs type interpolation between int values. |
| FloatEvaluator |
Performs type interpolation between float values. |
| ArgbEvaluator |
Performs type interpolation between integer values that represent ARGB colors. |
| TypeEvaluator |
An interface for use with the "setEvaluator(TypeEvaluator)" method of the "ValueAnimator" class that allows the implementation of custom evaluator for animation of arbitrary property types. |
So far, "ValueAnimator" has been very helpful in calculating the animated values for an animation; but it stops short of applying those values to the property of the object that is being animated. You will have to write the code to listen for updates to values calculated by "ValueAnimator" and modify the animated object accordingly. Do I really have to do that? No, you don't have to. We will call upon the subclass of "ValueAnimator", i.e. the "ObjectAnimator".
ObjectAnimator
"ObjectAnimator" is a subclass of ValueAnimator" that allows you to set a target object and its property to animate. It can compute animated values and updates the property accordingly with the new values. You will use "ObjectAnimator" most of the time in creating object animation.
AnimatorSet
Many a time, you want to manipulate multiple animations so that they can play together, sequentially, or after a specified delay. Android provides the "AnimatorSet" class for handling such a need.
Code or XML?
Besides creating object animations programmatically, you can declare property animations as XML resources so that they can be reused in multiple activities. It is also easier to edit animation details in XML than in code. The XML tags that represent their corresponding property animation classes are shown below:
-
<animator> for "ValueAnimator".
-
<objectAnimator> for "ObjectAnimator".
- <set> for "AnimatorSet".
Alright, enough of the theory, let's put them into practice.
Making Things Happen
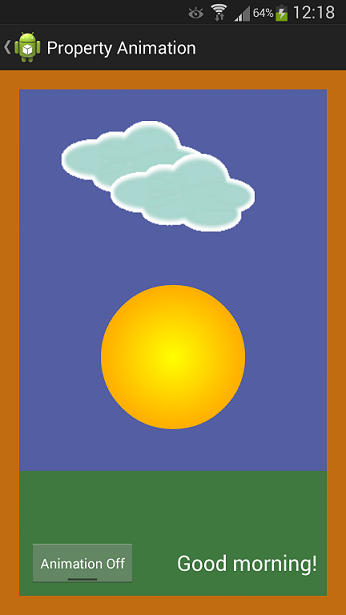
You are going to create an Activity in the "AndroidAnimation" project that exhibits a combination of animations using the "Property Animation" system. Refer to Figure 4 for a glimpse of the intended outcome.
 |
|
Figure 4: Object Animation
|
The screen in Figure 4 contains a Toggle button for toggling the start/stop of the animation. When the animation starts, the Sun rises from the ground (green colored area) towards the sky (purplish colored area), and the surroundings gradually brighten up. When the sun reaches the top of the screen, it starts to descend towards the ground and the surroundings gradually turn darker. In the midst of the morning and afternoon, two clouds emerge and flow across the sky from left to right.
Let's start with the Sun. In the "Project" pane of your Android Studio IDE:
-
Open the "activity_property_animation.xml" and add the following XML code to create the layout and UI controls as shown in Figure 5.
<RelativeLayout xmlns:android="http://schemas.android.com/apk/res/android"
    xmlns:tools="http://schemas.android.com/tools"
    android:layout_width="match_parent"
    android:layout_height="match_parent"
    android:id="@+id/sky"
    android:background="#00004C"
    tools:context="com.peterleow.androidanimation.PropertyAnimationActivity">

    <ImageView
        android:id="@+id/sun"
        android:layout_width="wrap_content"
        android:layout_height="wrap_content"
        android:contentDescription="@string/sun"
        android:src="@drawable/sun"
        android:layout_alignParentBottom="true"
        android:layout_centerHorizontal="true" />

    <ImageView
        android:id="@+id/cloud1"
        android:layout_width="wrap_content"
        android:layout_height="wrap_content"
        android:contentDescription="@string/cloud"
        android:src="@drawable/cloud"
        android:layout_alignParentRight="true"
        android:layout_marginRight="-200dp"
        android:layout_marginTop="40dp" />

    <ImageView
        android:id="@+id/cloud2"
        android:layout_width="wrap_content"
        android:layout_height="wrap_content"
        android:contentDescription="@string/cloud"
        android:src="@drawable/cloud"
        android:layout_alignParentRight="true"
        android:layout_marginRight="-300dp"
        android:layout_marginTop="100dp"/>

    <RelativeLayout
        android:layout_width="match_parent"
        android:layout_height="300dp"
        android:id="@+id/ground"
        android:background="#004700"
        android:layout_alignParentRight="true"
        android:layout_alignParentEnd="true"
        android:layout_alignTop="@+id/sun" >
    </RelativeLayout>

    <ImageView
        android:id="@+id/window"
        android:layout_width="fill_parent"
        android:layout_height="fill_parent"
        android:contentDescription="@string/window"
        android:src="@drawable/window" />

    <ToggleButton
        android:layout_width="wrap_content"
        android:layout_height="wrap_content"
        android:id="@+id/toggleAnimate"
        android:textColor="#ffffff"
        android:textOn="@string/animation_on"
        android:textOff="@string/animation_off"
        android:checked="false"
        android:onClick="onToggleClicked"
        android:layout_alignParentBottom="true"
        android:layout_alignParentLeft="true"
        android:layout_marginLeft="30dp"
        android:layout_marginBottom="30dp" />

    <TextView
        android:layout_width="wrap_content"
        android:layout_height="wrap_content"
        android:textAppearance="?android:attr/textAppearanceLarge"
        android:textColor="#ffffff"
        android:id="@+id/textView"
        android:layout_centerVertical="true"
        android:layout_alignParentRight="true"
        android:layout_alignParentBottom="true"
        android:layout_marginRight="30dp"
        android:layout_marginBottom="40dp" />

</RelativeLayout>
Figure 5: activity_property_animation.xml
The XML file has an overall <RelativeLayout> called "sky" that acts as the sky for the animation. It contains four <ImageView> elements, one nested <RelativeLayout>, one <TextView>, and one <ToggleButton>.
-
The <ImageView> elements take their sources from "app/src/main/res/drawable" - "sun.xml" (android:src="@drawable/sun") defining a "ShapeDrawable" object of the Sun, "window.xml" (android:src="@drawable/window") defining a "ShapeDrawable" object of the window frame, and "cloud.gif" (android:src="@drawable/cloud") respectively.
-
The nested <RelativeLayout> is called "ground" and acts as the ground in the animation.
-
The <TextView> is for displaying the appropriate greeting of the day during the animation.
-
The <ToggleButton> has an onClick event listener (android:onClick="onToggleClicked") for toggling the start/stop state of the animation.
Each of them is given a unique id so that they can be referenced to in the code for manipulations.
-
- To draw the Sun, create a "Shape Drawable" resource that represents the "ShapeDrawable" object of the Sun by defining its geometric shape, including colors and gradients in an XML file. In the "app/src/main/res/drawable/" directory, create an XML file called "sun.xml" and add the following code:
<shape xmlns:android="http://schemas.android.com/apk/res/android"
    android:dither="true"
    android:shape="oval" >

    <gradient
        android:endColor="#ffff7700"
        android:gradientRadius="250"
        android:startColor="#ffffff00"
        android:type="radial"
        android:useLevel="false" />

    <size
        android:height="150dp"
        android:width="150dp" />

</shape>
The <shape> declares a "ShapeDrawable" object of "oval" shape (android:shape="oval"). This shape is then further defined with the <gradient> and <size> elements.
-
Similarly, to draw the window frame, create a "Shape Drawable" resource that represents the "ShapeDrawable" object of the window frame. In the "app/src/main/res/drawable/" directory, create an XML file called "window.xml" and add the following code:
<shape xmlns:android="http://schemas.android.com/apk/res/android"
	android:shape="rectangle" >
    <solid android:color="#00000000" />

    <stroke
        android:width="20dp"
        android:color="#c16c11" />

</shape>
The <shape> declares a "ShapeDrawable" object of "rectangle" shape (android:shape="rectangle"). This shape is then further defined with the <stroke> element.
-
Next, define the animation details. In the "app/src/main/res/" directory, create a sub-directory called "animator", the default resource directory for storing object animation resources. Inside this directory, add two XML files as follows:
-
Create an animation resource file called "sun_movement.xml" for animating the Sun, and add the following code:
<?xml version="1.0" encoding="utf-8"?>

<set xmlns:android="http://schemas.android.com/apk/res/android"
    android:interpolator="@android:anim/accelerate_decelerate_interpolator"
    android:ordering="sequentially" >

    <objectAnimator
        android:duration="10000"
        android:propertyName="y"
        android:repeatCount="infinite"
        android:repeatMode="reverse"
        android:valueTo="20dp"
        android:valueType="floatType" />

</set>
The <set> declares an "AnimatorSet" object that takes the "AccelerateDecelerateInterpolator" as the time interpolator (android:interpolator="@android:anim/accelerate_decelerate_interpolator") and animates its animators (only one in this example, although you can add more animators, such as an animator for animating the x-axis.) in sequential order (android:ordering="sequentially"). In this case, the <set> contains only one "ObjectAnimator" class with the various attributes that set up the details for the object animation. In this example, the property to animate is y-axis (android:propertyName="y"), and the value to animate is of float type (android:valueType="floatType"), the ending value of the animation is 20dp (android:valueTo="20dp"), the duration of the animation is 10000ms, i.e. 10 seconds (android:duration="10000"). The attributes also specifies that the animation is to reverse play after each round of completion (android:repeatMode="reverse") and is to continue forever (android:repeatCount="infinite").
- Similarly, create an animation resource file called "cloud_movement.xml" for animating the clouds, and add the following code:
<?xml version="1.0" encoding="utf-8"?>

<set xmlns:android="http://schemas.android.com/apk/res/android"
    android:interpolator="@android:anim/linear_interpolator"
    android:ordering="together" >

    <objectAnimator
        android:duration="10000"
        android:propertyName="x"
        android:repeatCount="infinite"
        android:repeatMode="restart"
        android:valueTo="-300dp"
        android:valueType="floatType" />

    <objectAnimator
        android:duration="2000"
        android:propertyName="y"
        android:repeatCount="infinite"
        android:repeatMode="reverse"
        android:valueTo="70dp"
        android:valueType="floatType" />

</set>
The <set> declares an "AnimatorSet" object that takes the "LinearInterpolator" as the time interpolator (android:interpolator="@android:anim/linear_interpolator") and animates its two "ObjectAnimator" elements - one each for the "x" and "y" coordinates - concurrently (android:ordering="together").
-
-
Let take stock of what you have done so far - created a layout file and the UI controls, defined the respective "ShapeDrawable" object for the Sun and the window frame in XML, and created the respective animation resource files for the Sun and the clouds. To fire up the animation, you will have to add the code to the Activity. Open the "PropertyAnimationActivity.java" in Android Studio, and follow these steps:
-
Add the necessary packages and member variables as follows:
package com.peterleow.androidanimation;

import android.animation.Animator;
import android.animation.AnimatorInflater;
import android.animation.AnimatorListenerAdapter;
import android.animation.AnimatorSet;
import android.animation.ArgbEvaluator;
import android.animation.ObjectAnimator;
import android.animation.ValueAnimator;
import android.app.Activity;
import android.graphics.Color;
import android.os.Bundle;
import android.view.Menu;
import android.view.MenuItem;
import android.view.View;
import android.widget.ImageView;
import android.widget.TextView;
import android.widget.Toast;
import android.widget.ToggleButton;

public class PropertyAnimationActivity extends Activity {

    AnimatorSet sunAnimatorSet;
    AnimatorSet cloud1AnimatorSet;
    AnimatorSet cloud2AnimatorSet;
    ValueAnimator skyAnimator;
    ValueAnimator groundAnimator;

    @Override
    protected void onCreate(Bundle savedInstanceState) {
        super.onCreate(savedInstanceState);
        setContentView(R.layout.activity_property_animation);

    // ...
Note that the "android:animation" package provides all the classes used in "Property Animation" system.
-
Add the following code to prepare the animation for the Sun:
@Override
protected void onCreate(Bundle savedInstanceState) {

    // ...

    sunAnimatorSet = (AnimatorSet)AnimatorInflater.loadAnimator(this, R.animator.sun_movement);
    ImageView sun = (ImageView) findViewById(R.id.sun);
    sunAnimatorSet.setTarget(sun);

    // ...

}
The code first inflates the animation resource file called "sun_movement.xml" (R.animator.sun_movement) which contains the declaration of an "ObjectAnimator" object, and assign it to an "AnimatorSet" object called "sunAnimatorSet", and then calls the "setTarget" method of this "AnimatorSet" object to set the target of the animation to the ImageView object called "sun" (R.id.sun) whose image source is the "sun.xml" (android:src="@drawable/sun"). To start animate the Sun, call the "start()" method of the "AnimatorSet" object. However, you will add the "start()" method inside the onClick event handler of the toggle button later.
-
Add an animation listener to the "sunAnimatorSet" object by extending the "AnimatorListenerAdapter" class to listen for events like "onAnimationStart()" and "onAnimationEnd()". For example:
@Override
protected void onCreate(Bundle savedInstanceState) {

    // ...

    sunAnimatorSet.addListener(

            new AnimatorListenerAdapter() {

                public void onAnimationStart(Animator animation) {
                    Toast.makeText(getApplicationContext(), "Animation started!",
                            Toast.LENGTH_SHORT).show();
                }

                public void onAnimationEnd(Animator animation) {
                    Toast.makeText(getApplicationContext(), "Animation ended!",
                            Toast.LENGTH_SHORT).show();
                }

            });

    // ...

}
The listener will capture and announce the start and end events of the animation in a "Toast" pop up message.
-
Add the following code to prepare the animation for the clouds:
@Override
protected void onCreate(Bundle savedInstanceState) {

    // ...

    // cloud1
    ImageView cloud1 = (ImageView) findViewById(R.id.cloud1);
    cloud1AnimatorSet = (AnimatorSet)AnimatorInflater.loadAnimator(this, R.animator.cloud_movement);
    cloud1AnimatorSet.setTarget(cloud1);

    // cloud2
    ImageView cloud2 = (ImageView) findViewById(R.id.cloud2);
    cloud2AnimatorSet = (AnimatorSet)AnimatorInflater.loadAnimator(this, R.animator.cloud_movement);
    cloud2AnimatorSet.setTarget(cloud2);

    // ...

}
Note that the two clouds share the same animation resource file - "cloud_movement.xml" - which contains the declaration of two "ObjectAnimator" objects that will animate concurrently.
-
Add the following code to prepare the animation for the sky:
@Override
protected void onCreate(Bundle savedInstanceState) {

    // ...

    skyAnimator = ObjectAnimator.ofInt
            (findViewById(R.id.sky), "backgroundColor",
                    Color.rgb(0x00, 0x00, 0x4c), Color.rgb(0xae, 0xc2, 0xff));
    //set same duration and animation properties as others
    skyAnimator.setDuration(10000);
    skyAnimator.setEvaluator(new ArgbEvaluator());
    skyAnimator.setRepeatCount(ValueAnimator.INFINITE);
    skyAnimator.setRepeatMode(ValueAnimator.REVERSE);

    // ...

}
The code creates an "ObjectAnimator" object called "skyAnimator" (not from XML) through the static "ObjectAnimator.ofInt()" method. This method takes several arguments - the sky object referenced by "R.id.sky" as the target of animation, the property of the object -which is the "backgroundColor" in this example - to be animated, and a set of values that will be animated over time which in this example, consists of the starting color value and the ending color value. Call the appropriate "setXxx()" methods of the "ObjectAnimator" object to set the details of the animation, e.g. "skyAnimator.setDuration(10000);".
-
Add an update listener to the "skyAnimator" object by implementing the "onAnimationUpdate()" method of the "ValueAnimator.AnimatorUpdateListener" interface to receive the update callback on every animation frame. For example:
@Override
protected void onCreate(Bundle savedInstanceState) {

    // ...

    skyAnimator.addUpdateListener(

            new ValueAnimator.AnimatorUpdateListener() {

                TextView textView = (TextView) findViewById(R.id.textView);
                float animatedFractionPrev = 0.0f;
                float animatedFractionCurr = 0.0f;

                @Override
                public void onAnimationUpdate(ValueAnimator valueAnimator) {
                    animatedFractionCurr = valueAnimator.getAnimatedFraction();
                    if (animatedFractionCurr > animatedFractionPrev) {
                        if (animatedFractionCurr > 0.0 && animatedFractionCurr <= 0.70) {
                            textView.setText("Good morning!");
                        } else {
                            textView.setText("Good day!");
                        }
                    } else {
                        if (animatedFractionCurr >= 0.8) {
                            textView.setText("Good day!");
                        } else if (animatedFractionCurr < 0.8 && animatedFractionCurr >= 0.1) {
                            textView.setText("Good afternoon!");
                        } else {
                            textView.setText("Good Evening!");
                        }
                    }
                    animatedFractionPrev = animatedFractionCurr;
                }
            }
    );

    // ...

}
At each callback, get the current animated fraction by calling the "getAnimatedFraction()" of the "ValueAnimator". This current animated fraction is then used to determine the appropriate greeting to be announced in a "Toast" pop up message. I will leave it to you to figure out the logic on this.
-
Add the following code to prepare the animation for the ground:
@Override
protected void onCreate(Bundle savedInstanceState) {

    // ...

    groundAnimator = ObjectAnimator.ofInt
            (findViewById(R.id.ground), "backgroundColor",
                    Color.rgb(0x00, 0x47, 0x00), Color.rgb(0x85, 0xae, 0x85));
    //set same duration and animation properties as others
    groundAnimator.setDuration(10000);
    groundAnimator.setEvaluator(new ArgbEvaluator());
    groundAnimator.setRepeatCount(ValueAnimator.INFINITE);
    groundAnimator.setRepeatMode(ValueAnimator.REVERSE);

    // ...

}
The code is similar to that for preparing the animation for the sky.
-
Add the onClick event handler called "onToggleClicked" to toggle the start/stop of the animation. For example:
public void onToggleClicked(View view) { boolean on = ((ToggleButton) view).isChecked(); if (on) { sunAnimatorSet.start(); skyAnimator.start(); groundAnimator.start(); cloud1AnimatorSet.start(); cloud2AnimatorSet.start(); } else { sunAnimatorSet.cancel(); skyAnimator.cancel(); groundAnimator.cancel(); cloud1AnimatorSet.cancel(); cloud2AnimatorSet.cancel(); } }} -
Add the following code to the "onResume()" lifecycle event of the Activity to reset the Toggle button state to "unchecked" whenever the Activity resumes:
@Override
public void onResume() {
    super.onResume();
    ((ToggleButton)findViewById(R.id.toggleAnimate)).setChecked(false);
}
-
You have completed an exercise to implement animations using the "Property Animation" system, test it out on a real device or an AVD.
View Animation
Go on to do an exercise to create a simple tween animation using the "View Animation" system. Refer to Figure 6 for a glimpse of the intended outcome.
 |
|
Figure 6: View Animation
|
The screen in Figure 5 contains a button and five code project mascots scattering across the screen. When the button is clicked, the five mascots will rotate and move to converge at the center of the screen all at the same time.
In Android Studio IDE:
-
Open the "activity_view_animation.xml" and add the following XML code to create the layout and UI controls as shown in Figure 7.
<RelativeLayout xmlns:android="http://schemas.android.com/apk/res/android"
    xmlns:tools="http://schemas.android.com/tools"
    android:layout_width="match_parent"
    android:layout_height="match_parent"
    android:paddingLeft="@dimen/activity_horizontal_margin"
    android:paddingRight="@dimen/activity_horizontal_margin"
    android:paddingTop="@dimen/activity_vertical_margin"
    android:paddingBottom="@dimen/activity_vertical_margin"
    tools:context="com.peterleow.androidanimation.ViewAnimationActivity"
    android:background="@color/background">

    <Button
        android:layout_width="wrap_content"
        android:layout_height="wrap_content"
        android:id="@+id/btnGetTogether"
        android:onClick="getTogether"
        android:text="@string/get_together"
        android:layout_centerHorizontal="true"/>

    <ImageView
        android:id="@+id/imageView1"
        android:layout_width="wrap_content"
        android:layout_height="wrap_content"
        android:src="@drawable/codeproject_mascot"
        android:layout_above="@+id/imageView2"
        android:layout_toLeftOf="@+id/imageView2"
        android:layout_toStartOf="@+id/imageView2" />

    <ImageView
        android:id="@+id/imageView2"
        android:layout_width="wrap_content"
        android:layout_height="wrap_content"
        android:src="@drawable/codeproject_mascot"
        android:layout_centerVertical="true"
        android:layout_alignParentRight="true"/>

    <ImageView
        android:id="@+id/imageView3"
        android:layout_width="wrap_content"
        android:layout_height="wrap_content"
        android:src="@drawable/codeproject_mascot"
        android:layout_toStartOf="@+id/btnGetTogether"
        android:layout_above="@+id/imageView5"
        android:layout_alignRight="@+id/imageView4"
        android:layout_alignEnd="@+id/imageView4" />

    <ImageView
            android:id="@+id/imageView4"
            android:layout_width="wrap_content"
            android:layout_height="wrap_content"
            android:src="@drawable/codeproject_mascot"
            android:layout_toStartOf="@+id/btnGetTogether"
            android:layout_below="@+id/btnGetTogether"
            android:layout_alignParentLeft="true"
            android:layout_alignParentStart="true" />

    <ImageView
        android:id="@+id/imageView5"
        android:layout_width="wrap_content"
        android:layout_height="wrap_content"
        android:src="@drawable/codeproject_mascot"
        android:layout_alignParentBottom="true"
        android:layout_centerHorizontal="true"
        android:layout_marginBottom="43dp" />

</RelativeLayout>
Figure 7: activity_view_animation.xml
The XML file consists of the following elements:
-
The five <ImageView> elements take their sources from "codeproject_mascot.gif" (android:src="@drawable/codeproject_mascot") in the "app/src/main/res/drawable/".
-
The <Button> element has an onClick event listener (android:onClick="getTogether") for starting the animation.
-
-
To fire up the animation, you will have to add the code to the Activity. Open the "ViewAnimationActivity.java" in Android Studio, and follow these steps:
-
Add the necessary packages as follows:
package com.peterleow.androidanimation;

import android.app.Activity;
import android.os.Bundle;
import android.util.DisplayMetrics;
import android.view.Menu;
import android.view.MenuItem;
import android.view.View;
import android.view.animation.AccelerateDecelerateInterpolator;
import android.view.animation.Animation;
import android.view.animation.AnimationSet;
import android.view.animation.LinearInterpolator;
import android.view.animation.RotateAnimation;
import android.view.animation.TranslateAnimation;
import android.widget.ImageView;

public class ViewAnimationActivity extends Activity {
    @Override
    protected void onCreate(Bundle savedInstanceState) {
        super.onCreate(savedInstanceState);
        setContentView(R.layout.activity_view_animation);
    }

// ...
Note that the "android.view.animation" provides all the classes used in the "View Animation" system.
-
Add the event handler "getTogether()" for the onClick event listener of the button (android:onClick="getTogether") as shown:
public void getTogether(View view) {

    ImageView imageView = (ImageView) findViewById(R.id.imageView1 );
    move(imageView);

    imageView = (ImageView) findViewById(R.id.imageView2 );
    move(imageView);

    imageView = (ImageView) findViewById(R.id.imageView3 );
    move(imageView);

    imageView = (ImageView) findViewById(R.id.imageView4);
    move(imageView);

    imageView = (ImageView) findViewById(R.id.imageView5);
    move(imageView);
}
The code simply gets the five ImageView controls from the XML file and submit them to a move() method to animate.
-
The animation code is contained in the "move()" method as shown:
private void move( View view )
{
    // Get the x, y coordinates of the screen center
    DisplayMetrics displayMetrics = new DisplayMetrics();
    this.getWindowManager().getDefaultDisplay().getMetrics(displayMetrics);
    int x_centerOfScreen = (displayMetrics.widthPixels / 2) - (view.getMeasuredWidth() / 2);
    int y_centerOfScreen = (displayMetrics.heightPixels / 2) - (view.getMeasuredHeight() / 2);

    // Get the starting coordinates of the view
    int startPosition[] = new int[2];
    view.getLocationOnScreen(startPosition);

    AnimationSet animationSet = new AnimationSet(false);

    RotateAnimation rotate = new RotateAnimation(0,360,
            Animation.RELATIVE_TO_SELF, 0.5f , Animation.RELATIVE_TO_SELF,0.5f );
    rotate.setInterpolator(new LinearInterpolator());
    rotate.setRepeatCount(Animation.INFINITE);
    rotate.setDuration(2000);

    animationSet.addAnimation(rotate);

    TranslateAnimation translate =  new TranslateAnimation(Animation.ABSOLUTE, 0.0f,
            Animation.ABSOLUTE, x_centerOfScreen - startPosition[0],
            Animation.ABSOLUTE, 0.0f, Animation.ABSOLUTE, y_centerOfScreen - startPosition[1]);
    translate.setInterpolator(new AccelerateDecelerateInterpolator());
    translate.setDuration(2000);
    animationSet.addAnimation(translate);

    animationSet.setFillAfter(true);

    view.startAnimation(animationSet);
}
Apart from getting the x and y coordinates of the screen center and the starting position of the ImageView object, the code creates an "AnimationSet" object called "animationSet" from the "android.view.animation" package to group a set of animations that will play together.
Create two types of animation - "RotateAnimation" and "TranslateAnimation". The former is for rotating the View, and the latter change its position on screen. Each of these two animations will have their own animation parameters (e.g. interpolator, duration, etc.) defined by the various "setXxx()" methods (e.g. setInterpolator(), setDuration(), etc.). Add these two animations to the "animationSet" by calling "addAnimation()" method of the "AnimationSet" class. To animate the View, call and pass the "animationSet" object to the "startAnimation()" method of that View. The "setFillAfter(true)" specifies that the transformation will persist when it is finished, in other words, all the five mascots will remain at the screen center after the animation. However, if you click the button again, the five mascots will reappear at their original positions and then animate to the screen center again. What does this tell you? Well, animations under "View Animation" system do not modify the original Views, it simply re-draws them at their new positions.
-
You have completed an exercise to implement animations using the "View Animation" system, test it out on a real device or an AVD.
Drawable Animation
Go on to do an exercise to create a "Drawable Animation" that plays a series of drawable resources one after another like a slideshow. Refer to Figure 8 for a glimpse of the intended outcome.
 |
|
Figure 8: Drawable Animation
|
The screen in Figure 8 shows a photograph. When you click on the photograph, it will cycle through the list of eight photographs and show them one by one for the duration of 1500ms each.
In Android Studio IDE:
-
Open the "activity_drawable_animation.xml" and add one <ImageView> element as shown:
<RelativeLayout xmlns:android="http://schemas.android.com/apk/res/android"
    xmlns:tools="http://schemas.android.com/tools"
    android:layout_width="match_parent"
    android:layout_height="match_parent"
    android:paddingLeft="@dimen/activity_horizontal_margin"
    android:paddingRight="@dimen/activity_horizontal_margin"
    android:paddingTop="@dimen/activity_vertical_margin"
    android:paddingBottom="@dimen/activity_vertical_margin"
    tools:context="com.peterleow.androidanimation.DrawableAnimationActivity"
    android:background="@color/background">

    <ImageView
        android:layout_width="wrap_content"
        android:layout_height="wrap_content"
        android:id="@+id/imageViewSlideShow"
        android:layout_alignParentTop="true"
        android:layout_centerHorizontal="true"
        android:layout_marginTop="43dp" />

</RelativeLayout>
This <ImageView> will be the placeholder for the changing of photographs to take place in the slideshow.
-
In the "/app/src/main/res/drawable/" directory, create an XML file called "slide_show.xml" and add the following code:
<?xml version="1.0" encoding="utf-8"?>

<animation-list xmlns:android="http://schemas.android.com/apk/res/android"
    android:oneshot="false">

    <item android:drawable="@drawable/photo_1" android:duration="1500" />
    <item android:drawable="@drawable/photo_2" android:duration="1500" />
    <item android:drawable="@drawable/photo_3" android:duration="1500" />
    <item android:drawable="@drawable/photo_4" android:duration="1500" />
    <item android:drawable="@drawable/photo_5" android:duration="1500" />
    <item android:drawable="@drawable/photo_6" android:duration="1500" />
    <item android:drawable="@drawable/photo_7" android:duration="1500" />
    <item android:drawable="@drawable/photo_8" android:duration="1500" />

</animation-list>
The XML file consists of an <animation-list> node that contains eight <item> nodes. Each of the <item> node represents a frame in the animation, is given a photograph (android:drawable="@drawable/photo_1"), and will animate for 1500ms. The animation will repeat indefinitely as specified by "android:oneshot="false" in the <animation-list>
-
To fire up the animation, you will have to add the code to the Activity. Open the "DrawableAnimationActivity.java" in Android Studio, and follow these steps:
-
Add the necessary packages as follows:
package com.peterleow.androidanimation;

import android.app.Activity;
import android.graphics.drawable.AnimationDrawable;
import android.os.Bundle;
import android.view.Menu;
import android.view.MenuItem;
import android.view.MotionEvent;
import android.widget.ImageView;

public class DrawableAnimationActivity extends Activity {

    AnimationDrawable slideShowAnimation;

    @Override
    protected void onCreate(Bundle savedInstanceState) {
        super.onCreate(savedInstanceState);
        setContentView(R.layout.activity_drawable_animation);

    // ...
Note that the "AnimationDrawable" class in the "android.graphics.drawable" package is responsible for creating the frame-by-frame animation.
-
Add the following code to prepare the animation as shown:
@Override
protected void onCreate(Bundle savedInstanceState) {

    // ...

    ImageView slideShow = (ImageView) findViewById(R.id.imageViewSlideShow);
    slideShow.setBackgroundResource(R.drawable.slide_show);
    slideShowAnimation = (AnimationDrawable) slideShow.getBackground();
}
The code simply gets the drawable resource, i.e. "slide_show.xml", and adds it as the background image to the ImageView.
-
Add the "onTouchEvent()" as shown:
public boolean onTouchEvent(MotionEvent event) {

    if (event.getAction() == MotionEvent.ACTION_DOWN) {
        slideShowAnimation.start();
        return true;
    }

    return super.onTouchEvent(event);
}
When you touch the photograph on the screen, this method will be fired and call the "start()" method of the "AnimationDrawable" class to start the slideshow animation.
-
You have completed an exercise to implement an animation using the "Drawable Animation" system, test it out on a real device or an AVD.
Canvas
You have used ready-made images and XML-defined graphics as drawable resources in the preceding exercises. These drawable resources are static and cannot be changed. There are cases where you need to draw shapes dynamically on the screen. For that, you have to engage the service of the "Canvas" class.
For example, to draw a rectangle shape dynamically on the screen, there are two ways:
- Through a "ShapeDrawable" class
-
Extend the "View" class, create a "RectShape" object which is a subclass of the "Shape" class with the necessary dimensions based on the user's input, and then pass it to a "ShapeDrawable" object to manage its presence on the screen. When it is time to draw the rectangle, call the "invalidate()" method of the View which causes a callback to the "onDraw()" method to do the actual drawing.
ShapeDrawable shapeDrawable;

//...

Shape shape = new RectShape();
shapeDrawable = new ShapeDrawable(shape);
shapeDrawable.setBounds(left, top, right, bottom);
shapeDrawable.getPaint().setColor(Color.BLUE);

// ...

invalidate();
Override the "onDraw()" method of the View to do the drawing by calling the "draw()" method of the "ShapeDrawable" object that takes the "Canvas" object as an argument.
@Override
protected void onDraw(Canvas canvas) {
    super.onDraw(canvas);

    shapeDrawable.draw(canvas);
}
Using this method, you will create an Activity that allows users to draw rectangles freely on the screen. Refer to Figure 9 for a glimpse of the intended outcome.
 Figure 9: Drawing on Canvas
When you touch, move, and lift your finger off the screen consecutively, a blue rectangle will be drawn.
First, create a custom "View" class called "ShapeDrawableView.java" as follows:
package com.peterleow.androidanimation;

import android.content.Context;
import android.graphics.Canvas;
import android.graphics.Color;
import android.graphics.drawable.ShapeDrawable;
import android.graphics.drawable.shapes.RectShape;
import android.graphics.drawable.shapes.Shape;
import android.view.MotionEvent;
import android.view.View;
import java.util.ArrayList;
import java.util.List;

/**
 * Created by Peter Leow on 28/9/2014.
 */
public class ShapeDrawableView extends View {

    int startX, startY, endX, endY;

    private List<ShapeDrawable> shapeDrawables =
            new ArrayList<ShapeDrawable>();

    public ShapeDrawableView(Context context) {
        super(context);
    }

    @Override
    protected void onDraw(Canvas canvas) {
        super.onDraw(canvas);
        for(ShapeDrawable shapeDrawable: shapeDrawables) {
            shapeDrawable.draw(canvas);
        }
    }

    @Override
    public boolean onTouchEvent(MotionEvent event) {

        if (event.getAction() == MotionEvent.ACTION_DOWN) {
            startX = (int)event.getX();
            startY = (int)event.getY();
            return true;
        } else if (event.getAction() == MotionEvent.ACTION_UP){
            endX = (int)event.getX();
            endY = (int)event.getY();
            if (startX > endX) {
                int tmp = startX;
                startX = endX;
                endX = tmp;
            }
            if (startY > endY) {
                int tmp = startY;
                startY = endY;
                endY = tmp;
            }

            Shape shape = new RectShape();
            ShapeDrawable shapeDrawable = new ShapeDrawable(shape);
            shapeDrawable.setBounds(startX, startY, endX, endY);
            shapeDrawable.getPaint().setColor(Color.BLUE);
            shapeDrawables.add(shapeDrawable);
            invalidate();

            return true;
        }
        return false;
    }
}
Part of the code stores all the rectangles drawn to an "ArrayList" so that they can be redrawn at each "onDraw()" callback. The code also includes the logic for determining the starting and ending points of the rectangle to be drawn by detecting the finger positions at respective gesture events - "MotionEvent.ACTION_DOWN" and "MotionEvent.ACTION_UP".
Next, open the "ShapeDrawableActivity" and add the following code to display the "ShapeDrawableView" view.
package com.peterleow.androidanimation;

import android.app.Activity;
import android.os.Bundle;
import android.view.Menu;
import android.view.MenuItem;

public class ShapeDrawableActivity extends Activity {

    @Override
    protected void onCreate(Bundle savedInstanceState) {
        super.onCreate(savedInstanceState);

        ShapeDrawableView shapeDrawableView = new ShapeDrawableView(this);
        setContentView(shapeDrawableView);
    }

    // ...
}
It is now ready for testing!
- Through the "Canvas" drawXxx() Methods
-
Extend the "View" class, create a "Paint" object that defines the style and color information about the shape to be drawn. When it is time to draw the shape, call the "invalidate()" method of the View which causes a callback to the "onDraw()" method to do the actual drawing.
Paint paint = new Paint();

//...

paint.setColor(Color.WHITE);
paint.setAntiAlias(true);
paint.setTextSize(45f);
paint.setStrokeWidth(2.0f);
paint.setStyle(Paint.Style.STROKE);
paint.setShadowLayer(5.0f, 10.0f, 10.0f, Color.BLACK);

// ...

invalidate();
Override the "onDraw()" method of the View to draw the rectangle by calling the "drawRect()" method of the "Canvas" object given by the "onDraw()" method as an argument. The rectangle will be rendered according to the style and color information of the "Paint" object passed into the "drawRect()" method.
@Override
protected void onDraw(Canvas canvas) {
    super.onDraw(canvas);

    canvas.drawRect(left, top, right, bottom, paint);
}
Using this method, you will create an Activity that will repeatedly "draw" a text message at different angles on the screen. Refer to Figure 10 for a glimpse of the intended outcome.
 Figure 10: Drawing on Canvas
First, create a custom "View" class called "RotateTextView.java" as follows:
package com.peterleow.androidanimation;

import android.content.Context;
import android.graphics.Canvas;
import android.graphics.Color;
import android.graphics.Paint;
import android.view.View;

/**
 * Created by Peter Leow on 28/9/2014.
 */
public class RotateTextView extends View {

    private String message = "     Code Project";

    public RotateTextView(Context context) {
        super(context);
        this.setBackgroundColor(Color.GRAY);
    }

    @Override
    protected void onDraw(Canvas canvas) {
        super.onDraw(canvas);
        int viewWidth = getWidth();
        int viewHeight = getHeight();
        canvas.translate(viewWidth/2, viewHeight/2);

        Paint paint = new Paint();
        paint.setColor(Color.WHITE);
        paint.setAntiAlias(true);
        paint.setTextSize(45f);
        paint.setStrokeWidth(2.0f);
        paint.setStyle(Paint.Style.STROKE);
        paint.setShadowLayer(5.0f, 10.0f, 10.0f, Color.BLACK);

        for(int i = 0; i < 10; i++) {

            canvas.drawText(message, 0, 0, paint);

            canvas.rotate(36);
        }
    }
}
The code will draw a text message ten times at different angle.
Next, open the "RotateTextViewActivity" and add the following code to display the "RotateTextView" view.
package com.peterleow.androidanimation;

import android.app.Activity;
import android.os.Bundle;
import android.view.Menu;
import android.view.MenuItem;

public class RotateTextViewActivity extends Activity {

    @Override
    protected void onCreate(Bundle savedInstanceState) {
        super.onCreate(savedInstanceState);
        RotateTextView rotateTextView = new RotateTextView(this);
        setContentView(rotateTextView);
    }

    // ...
}
It is now ready for testing!
OpenGL ES
Enough of all those 2D graphics and animations, let's move on to have a basic exposure on how 3D graphics and animation can be created in Android using the OpenGL ES API.
Knowing the Basics
In General, the OpenGL ES API provides two main classes in the Android framework for this purpose - "GLSurfaceView" and "GLSurfaceView.Renderer".
The "GLSurfaceView" provides a View object where 3D graphics can be drawn and manipulated. The actual drawing is done by a renderer object that implements the "GLSurfaceView.Renderer" interface and is attached to the "GLSurfaceView" object. For example:
package com.peterleow.androidanimation;

import android.app.Activity;
import android.opengl.GLSurfaceView;

public class OpenGLActivity extends Activity {

    private GLSurfaceView glSurfaceView;

    @Override
    protected void onCreate(Bundle savedInstanceState) {
        super.onCreate(savedInstanceState);

        glSurfaceView = new GLSurfaceView(this);
        glSurfaceView.setRenderer(new OpenGLRenderer());
        setContentView(glSurfaceView);
    }

// ...
The renderer object must implement the following three methods of the "GLSurfaceView.Renderer" interface:
-
onSurfaceCreated() - Called once when the "GLSurfaceView" is created. A place for setting and initializing the OpenGL environment parameters and graphic objects.
-
onSurfaceChanged() - Called on each redraw of the "GLSurfaceView".
-
onDrawFrame() - Called when the GLSurfaceView geometry changes, such as when the device changes from portrait to landscape.
A skeleton of the renderer class is shown below:
public class OpenGLRenderer implements GLSurfaceView.Renderer {

    public OpenGLRenderer()
    {
        // ...
    }
    public void onSurfaceCreated(GL10 gl, EGLConfig config)
    {
        // ...
    }
    public void onSurfaceChanged(GL10 gl, int width, int height)
    {
        // ...
    }
    @Override
    public void onDrawFrame(GL10 gl)
    {
        // ...
    }
}
Making Things Happen
Go on to do an exercise by creating a cube that rotates around its 3 axes using the OpenGL ES 1.0. (There are different versions of API available, I have chosen to use OpenGL ES 1.0 here which is sufficed for this introductory level.) Refer to Figure 11 for a glimpse of the intended outcome.
 |
|
Figure 11: Rotating Cube
|
Start by creating a Java class called "Cube" that represents the cube object. Follow these steps:
-
Add the necessary packages, especially this one - "javax.microedition.khronos.opengles.GL10", and declare a "ByteBuffer", "ByteOrder", and "FloatBuffer".
package com.peterleow.androidanimation; import java.nio.ByteBuffer; import java.nio.ByteOrder; import java.nio.FloatBuffer; import javax.microedition.khronos.opengles.GL10; /** * Created by Peter Leow on 29/9/2014. */ public class Cube { private FloatBuffer vertexBuffer; private ByteBuffer drawListBuffer; private FloatBuffer colorBuffer; // ... -
Define the coordinates of the eight vertices of the cube in an array called "cubeCoords" like this:
// ... public class Cube { // ... // Coordinates for vertices static float cubeCoords[] = { -1.0f, -1.0f, 1.0f, // vertex 0 (x0, y0, z0) 1.0f, -1.0f, 1.0f, // vertex 1 (x1, y1, z1) 1.0f, 1.0f, 1.0f, // vertex 2 (x2, y2, z2) -1.0f, 1.0f, 1.0f, // vertex 3 (x3, y3, z3) -1.0f, -1.0f, -1.0f, // and so on... 1.0f, -1.0f, -1.0f, 1.0f, 1.0f, -1.0f, -1.0f, 1.0f, -1.0f }; // ... } -
Define the color for each vertex in an array called "colors" like this
// ... public class Cube { // ... // Color definition private float colors[] = { 1.0f, 0.0f, 0.0f, 1.0f, // red for vertex 0 0.0f, 1.0f, 0.0f, 1.0f, // gree for vertex 1 0.0f, 0.0f, 1.0f, 1.0f, // blue for vertex 2 1.0f, 1.0f, 0.0f, 1.0f, // yellow for vertex 3 1.0f, 1.0f, 0.0f, 1.0f, // and so on... 0.0f, 0.0f, 1.0f, 1.0f, 0.0f, 1.0f, 0.0f, 1.0f, 1.0f, 0.0f, 0.0f, 1.0f }; } // ... -
Specify the order of drawing the cube in an array called "drawOrder" like this:
// ...

public class Cube {

    // ...

    // Drawing order of cubeCoords[]
    private byte drawOrder[] = {
            0, 1, 3, 1, 3, 2,
            1, 2, 6, 1, 6, 5,
            0, 3, 7, 0, 7, 4,
            4, 7, 6, 4, 6, 5,
            3, 7, 2, 7, 2, 6,
            0, 4, 1, 4, 1, 5
    };

    // ...

}
The value of each element in the array corresponds to the coordinates of a vertices in the "cubeCoords". For example, the value of 2 refers to the vertex 2 at (x2, y2, z2), and so on.
-
In the constructor, put the information of vertices, colors , and drawing order into their respective buffers.
public Cube() { ByteBuffer byteBuffer = ByteBuffer.allocateDirect(cubeCoords.length * 4); byteBuffer.order(ByteOrder.nativeOrder()); vertexBuffer = byteBuffer.asFloatBuffer(); vertexBuffer.put(cubeCoords); vertexBuffer.position(0); byteBuffer = ByteBuffer.allocateDirect(colors.length * 4); byteBuffer.order(ByteOrder.nativeOrder()); colorBuffer = byteBuffer.asFloatBuffer(); colorBuffer.put(colors); colorBuffer.position(0); drawListBuffer = ByteBuffer.allocateDirect(drawOrder.length); drawListBuffer.put(drawOrder); drawListBuffer.position(0); } -
Create a method "draw()" that call the various methods from the OpenGL ES 1.0 API to put things together and render the cube. Refer to "javax.microedition.khronos.opengles.GL10" for details of these methods.
public void draw(GL10 gl) {

    // Enable vertex array buffer to be used during rendering
    gl.glEnableClientState(GL10.GL_VERTEX_ARRAY);
    // Tell openGL where the vertex array buffer is
    gl.glVertexPointer(3, GL10.GL_FLOAT, 0, vertexBuffer);


    // Enable color array buffer to be used during rendering
    gl.glEnableClientState(GL10.GL_COLOR_ARRAY);
    // Tell openGL where the color array buffer is
    gl.glColorPointer(4, GL10.GL_FLOAT, 0, colorBuffer);

    // Draw each plane as a pair of triangles, based on the drawListBuffer information
    gl.glDrawElements(GL10.GL_TRIANGLES, drawOrder.length, GL10.GL_UNSIGNED_BYTE, drawListBuffer);

}
You have created a Java class "Cube" that represents a cube object. Next, create a renderer class called "OpenGLRenderer" that implements the "GLSurfaceView.Renderer" interface for rendering the cube. Follow these steps:
-
Add the necessary packages and instantiate a "Cube" object in the constructor like this:
package com.peterleow.androidanimation; import android.opengl.GLSurfaceView; import android.opengl.GLU; import javax.microedition.khronos.egl.EGLConfig; import javax.microedition.khronos.opengles.GL10; /** * Created by Peter Leow on 29/9/2014. */ public class OpenGLRenderer implements GLSurfaceView.Renderer { private Cube cube; private float rotationAngle; public OpenGLRenderer() { cube = new Cube(); } // ... -
Add the code to implement the three methods of the "GLSurfaceView.Renderer" interface.
public void onSurfaceCreated(GL10 gl, EGLConfig config)
{
    gl.glEnable(GL10.GL_DEPTH_TEST);
}

public void onSurfaceChanged(GL10 gl, int width, int height)
{
    gl.glViewport(0, 0, width, height);
    gl.glMatrixMode(GL10.GL_PROJECTION);
    gl.glLoadIdentity();

    float fovy = 50.0f; // Field of view angle, in degrees, in the Y direction.
    float aspect = (float)width / (float)height;
    float zNear = 0.1f;
    float zFar = 100.0f;
    // Set up a perspective projection matrix
    GLU.gluPerspective(gl, fovy, aspect, zNear, zFar);

    gl.glMatrixMode(GL10.GL_MODELVIEW);
    gl.glLoadIdentity();
}

@Override
public void onDrawFrame(GL10 gl)
{
    gl.glClear(GL10.GL_COLOR_BUFFER_BIT | GL10.GL_DEPTH_BUFFER_BIT);
    // Replace the current matrix with the identity matrix.
    gl.glLoadIdentity();
    gl.glTranslatef(0.0f, 0.0f, -6.0f);
    gl.glScalef(0.8f, 0.8f, 0.8f);
    gl.glRotatef(rotationAngle, 1.0f, 1.0f, 1.0f);
    cube.draw(gl);
    rotationAngle -= 0.4f;
    }
}
Open the "OpenGLActivity" to add the code for displaying the 3D cube. Follow these steps:
-
Add the "android.opengl.GLSurfaceView" package, instantiate a "GLSurfaceView" view that takes an instance of the "OpenGLRenderer" class created earlier as argument, and set this "GLSurfaceView" view as the content view of the Activity.
package com.peterleow.androidanimation; // ... import android.opengl.GLSurfaceView; public class OpenGLActivity extends Activity { private GLSurfaceView glSurfaceView; @Override protected void onCreate(Bundle savedInstanceState) { super.onCreate(savedInstanceState); glSurfaceView = new GLSurfaceView(this); glSurfaceView.setRenderer(new OpenGLRenderer()); setContentView(glSurfaceView); } // ... -
Add the code to pause and resume rendering in the respective "onPause()" and "onResume()" methods of the Activity's lifecycle.
@Override
protected void onPause()
{
    super.onPause();
    glSurfaceView.onPause();
}

@Override
protected void onResume()
{
    super.onResume();
    glSurfaceView.onResume();
}
Summary
In this journey, you have learned and explore the various APIs to implement simple animations and to create simple 2D and 3D graphics through a series of hands-on exercises. For easy reference, I have put them into a link for a quick jump to the respective topics in this article.