
Acunetix WVS – Audit Your Website Security
2.00/5 (1 vote)
Acunetix WVS audits your website security by running a host of tests. It then provides a concise report of issues it found. Not only does it do this, but it also suggests changes you need to make to fix the issues found.
Introduction
Acunetix WVS – I have been checking out Acunetix Web Vulnerability Scanner and the awesome features it provides. As a software developer, I can definitely see a benefit to the guys and girls of my trade. Acunetix WVS audits your website security by running a host of tests. It then provides a concise report of issues it found. Not only does it do this, but it also suggests changes you need to make to fix the issues found.
Acunetix WVS – Performing a Scan
So what I usually like to do is jump right in and try the software out without reading through a lot of documentation or tutorials beforehand. I do this to gauge how easy it is to get to grips with the software from the get-go. Acunetix WVS is very intuitive and its features are rich. I had no trouble finding my way around and performing my first scan.
But before I could do a scan, I needed to find a site to scan. There are on-line websites designed and published specifically for this reason, but I wanted to take a different approach. I decided to create a small ASP.NET Web Application consisting of a single log in form that redirects to another page. From the code below you can see that the log in logic is a real gem. It has SQL Injection written all over it. Unfortunately, this is something I still see often in legacy systems I support from time to time.

I obviously didn’t adhere to any best practices with this ASP.NET site. What this code does is build up a SQL query (the wrong way) and check to see if the user exists in the database. I then published this to my localhost. Check out this quick tutorial if you want to get up to speed on how to do this: Publish a Website with IIS from Visual Studio 2012 by Richard Wilkinson.

Starting a new scan is easy enough to do. Here I select that I want to scan a single website. This is the web app I created and published to my localhost.

The scan wizard then asks me to select a scanning profile. Acunetix WVS has several profiles that you can choose from. You can also create your own custom profiles and select those during the scan (more on this later). For my web application, I only want to test blind SQL Injection vulnerabilities (See the section below on the Default scanning profile).

Acunetix WVS supports several web technologies. It will usually detect the correct technology from the URL you provided earlier. Seeing as I created an ASP.NET app, it is already correctly selected the correct technology for me by default. It might sound strange to some, but this little bit of intelligence built in to the product goes a long way to providing a smooth user friendly experience.

Because I have a login page, I can create a new login sequence which will be saved as a login sequence file. I can also specify which parts of the website I do not want crawled (think of the logout link).

Point the login sequence recorder to the login page and click next.

You then enter your login details and allow the page to log in. As you can see (pun intended), my password is very secure.

After you have saved the login sequence, the scan wizard will start the scan run. Depending on the amount of scripts you have to run, the scan can take a while.
Acunetix WVS – The Scan Results
When the scan completes, as is expected Acunetix WVS displays the Blind SQL Injection vulnerabilities as critical. The severity of vulnerabilities are color coded red for severe, orange for moderate and green for informational.

And here is the true gem of this product. If I click on the specific entry in the scan results for the SQL Injection, I get a detailed description displayed to me in a pane to the right. It also details the impact of this vulnerability as well as what to do to fix the vulnerability. Have a look at the screenshot below.


Based upon the detailed description of the Blind SQL Injection vulnerability, I have decided to modify my SQL query. I am going to use parameters instead of in-line SQL.
The Default Scanning Profile
I just want to highlight something here, and that is the Default scanning profile. This is by no means less functional than any of the other profiles. In fact, it is the most complete and will scan everything. It would have also picked up my simple password among other things.
Acunetix WVS – Fixing The Code
In my UserLogin method, I modify the SQL not to contain any in-line variables. I change the SQL to accept parameters which I hook up to a SQL Command object and pass the variables in that way. A stored procedure on the server would probably be better, but I just wanted to quickly modify the code to show you the change. When the code is changed, I simply publish the web application again.

Re-running the scan is as easy as right clicking on the scan and selecting ‘Retest alert(s)’. Acunetix WVS jumps into action and scans the alerts previously generated. This scan is obviously quicker because it only tests the alerts generated by the previous scan.

Acunetix then marks all fixed alerts with a strike through font. As you can see the change I made to the SQL query in my code resolved the SQL Injection vulnerability.

From here you can go ahead than save the scan results and more importantly, generate incredibly detailed reports for developers.
Acunetix WVS – Generating Reports
Clicking on the Reporter button on the main menu will launch a separate application called Acunetix WVS Reporter.

When Acunetix WVS Reporter loads, you will notice the different types of reports that can be generated. You would obviously favor the developer report to give to the developers responsible for fixing uncovered vulnerabilities. The executive summary report is more suited for management and contains only a high-level overview of the discovered vulnerabilities.

Navigating to the Database Explorer node you will see both my scans listed there.

You can also generate a report from a specific scan straight from the database entry by right-clicking on the scan and clicking on the ‘Generate Report’ link.

Heading back to Acunetix WVS, I am also able to generate a report for the specific scan by clicking on the ‘Report’ button on the toolbar.

A collage professor of mine used to say that the system you develop will always only be as good as the reports it generates. It can be how feature-rich, without anything the user can take away from the system, the application will not be of much use. Acunetix WVS doesn’t disappoint at all in this department. You are able to customize the cover page of the report with your own logo and report title (only available in certain editions) making the generated reports stellar.
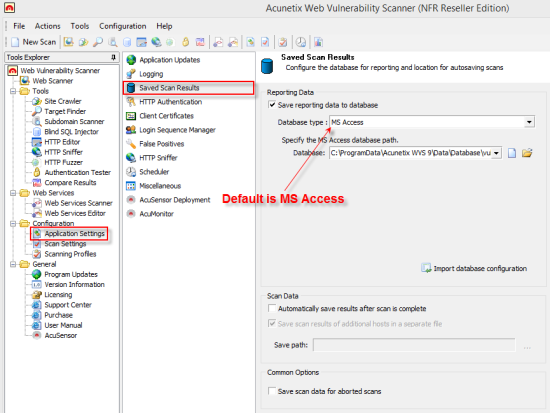
Acunetix WVS – Saving Scan Results To SQL
All the data generated by the scan results are stored by default in an Access database. This is something I decided to change from the onset to my own SQL Server. Doing so is also really easy. Navigate to Configuration -> Application Settings -> Saved Scan Results and change the database type to SQL Server.
You will need to have already created a blank database that will contain your scan results. Acunetix will create the tables required when you click on Apply changes.

You have the option not to create the database tables and this would obviously be if you are connecting to an already created scanning database.

Having a look at the database structure in SQL Server Management Studio, you can see that there are several tables created.

This now allows you to back-up your scanning database as part of your usual SQL Server back-up strategy.
Acunetix WVS – Updating
Updating Acunetix WVS is also a very easy task to perform. There is an option under the Help menu that will run a tool to check for any patches or new releases for your installation of Acunetix WVS. The process of updating and applying patches is very smooth and can easily be managed right from within the product.

There is no need to leave the product in order to click on an exe to install an update or apply a patch. This is another great addition to the overall user experience and adds to the feeling of ease of use.
Acunetix WVS – Profiles
Lastly I want to talk about Scanning Profiles. If you can remember from the scan wizard, we were able to select from several scan profiles. If you head on over to Configuration -> Scanning Profiles, you will see what each profile tests.

The tests screen also has a very useful filter. I decided to check for one of the more serious and newly discovered (and thankfully patched) vulnerabilities ... The Heartbleed Bug. You can read more on it here, but it is one nasty sucker. Acunetix has you covered, because the test script is included in the Default scan profile as well as the High_Risk_Alerts profile.

If you change your profile, you will notice that the tests performed during a scan change. Some are omitted.

Now assume that you want to roll your own custom profile, Acunetix provides that ability straight out the box. Click on the ‘Create a new profile’ button on the toolbar.

Because we just mentioned the Heartbleed bug, I want to create a profile that will only run that one single test.

I just need to add a suitable name to the New Profile dialog and it will appear in the profile list after clicking on the OK button.

Now you can go and check / uncheck the tests you want to include in your new profile. When you have completed that, click on the ‘Save new profile’ button.

The next time you go to your scan wizard, you will see that your custom scan profile is listed in the scanning profile list.

This makes it really easy to roll your own scan profiles based on your specific needs and situation.
Acunetix WVS – Backup Profiles
After you have tweaked Acunetix WVS just the way you want it, you might want to consider backing up the required setting files such as the scan profiles. Acunetix WVS allows you to do this by going to the Help menu and clicking on the Application Directories menu item. This will open Windows Explorer for you in the location of the Application Directories which you can then back up.

AcuSensor Technology
This new security technology does more than traditional web application scanning (.NET and PHP). It will indicate exactly where in your code (as in line of code) the vulnerability is and also reports debug information. AcuSensor does not require the .NET source code as it can be injected into already compiled .NET applications.
Because AcuSensor provides more information on the detected vulnerabilities, it reduces false positives. I didn’t use this technology on the web application I created above, simply because my web app was very small and I wanted to focus on a specific vulnerability.
Final thoughts
Acunetix also includes a set of manual penetration tools. These are designed for use by penetration testers but can also be used by developers to debug certain vulnerabilities. Most of these manual penetration tools can be invoked from within the scan results. I could have for example, tested the SQL Injection vulnerability using the Blind SQL Injection tool.
There is still a lot that I can write about Acunetix WVS which would make this blog post much longer than I believe it should be. There is simply just too much to write about. I hope that I have provided a broad overview of some of the stunning features that Acunetix WVS offers security professionals and developers alike. Acunetix also has an on-line vulnerability scanner in addition to the downloadable version I wrote about above. The only way to really get to grips with the product is to download a 14 day trial and give it a spin for yourself. You definitely will not be disappointed.