
Beginner’s Guide to Android Services
4.87/5 (9 votes)
Exploring and implementing Android services and sending notifications.
- Download RemoteApplication.zip - 360.8 KB
- Download remoteapplication-release-apk.zip - 54.2 KB
- Download androidservices-release-apk.zip - 104.4 KB
- Download AndroidServices.zip - 609 KB
Introduction
We have been used to seeing apps with visible UIs and UI controls. These are created using Android Activities. However, there are other invisible components of the apps that do work behind the scene without your notice. They are the faceless "Android Services"! For example, when a user initiates a download of video from the Internet by clicking a button on the app's UI; the actual task of the download is then handed off to a service to perform quietly in the background; while the user continues with other interactions with the app without being affected by the long download process; the service can inform the user with a notification when the download is complete.
Android Services play an important role in helping to deliver pleasant and seamless user experience with Android apps. The article will take you through the journey of exploring and implementing Android services and to send a notification from a service.
Knowing the Basics
Services are application components that possess the following characteristics:
-
Do not have a UI;
-
Run in the background;
-
Run in the main thread of its hosting process. For this reason, if a service is handling tasks that are CPU intensive or involve I/O blocking, then it should run in a separate thread.
-
Called by other activities or application components, in the same app or different apps, to perform tasks that require a long time to run; and
-
Have their own life cycles that are different from those of the activities and application components that call them. In other words, services can outlive their callers.
Typically, a service is created as a Java class that extends the "Services" base class. Depending on the actual implementation, a service can take on either one or both of these forms - "Started Service" and "Bound Service". The details are explained in Table 1.
| Started Service | Bound Service | |
|---|---|---|
| Starting Service | A "Started Service" is created when an application component, such as an activity, starts it by calling "startService()". | A "Bound Service" is created when an application component, such as an activity, binds to it by calling "bindService()". |
| Characteristics | A "Started Service" is used to perform a long running operation, such as download or upload a media file over the network, that does not need any interaction with the caller other than the initial request to the service. | A "Bound Service" "binds" the callers and the service via a programmatic interface that enables the callers to interact with the service, such as sending requests and getting results. A good example will be the location service included in the Android system that exposes several methods that any location-aware apps can use without the need to re-invent the wheels. |
| Stopping Service | A "Started Service" will run indefinitely even after the caller has stopped. It is a good practice to stop the service explicitly when its service is no longer needed by calling "stopSelf()" in the service itself or "stopService()" from another component. | A "Bound Service" will run for as long as there is at least one application component bound to it. The system will destroy the bound service when all the clients have unbound from it by calling "unbindService()". |
| Lifecycle |  |
 |
A service can be both "started" and "bound" at the same time. In this case, calling "stopSelf()" or "stopService()" does not immediately stop the service until all the clients have unbound from it. Likewise, unbinding all clients from such a service will not cause it to be destroyed immediately if it is still in "started" state.
The "Services" base class comes with several callback methods. When you create a service, you do not have to implement all the callback methods. In fact, the only callback method that must be implemented in the service is "onBind()". However, you may need to override some callback methods in order to make the service behaves the way you want. The most important ones are given in Table 2.
| Callback | Elaboration |
|---|---|
| onCreate() |
The system calls this method when the service is first created to perform a one-time setup. For example, you can create a "HandlerThread" object to start a new thread that has an associated "Looper" (message loop) in the "onCreate" method. The code snippet is shown below:
package com.peterleow.androidservices;
// ...
private Looper looper;

@Override
public void onCreate() {
    HandlerThread thread = new HandlerThread("BoundService", android.os.Process.THREAD_PRIORITY_BACKGROUND);
    thread.start();
    looper = thread.getLooper();
    // ...
}
|
| onStartCommand() |
The system calls this method when another component, such as an activity, explicitly starts the service by calling "startService(Intent)", and supplies it the necessary arguments, including a unique integer called "startId" representing the current start request. This "startId" is an incremented value generated by the system upon the "startService(Intent)" call. When the service tries to call "stopSelf(startId)" method to stop itself based on the current "startId", while a new "startService()" has been called that generated a new "startId" and yet to reach the "onStartCommand()", this will result in two different versions of "startId". The "stopSelf(startId)" will be aborted when the "startId" that passed to it is not the same as the one generated by the "startService(Intent)". The code snippet for "onStartCommand()" is shown below:
@Override
public int onStartCommand(Intent intent, int flags, int startId) {
    Message msg = handler.obtainMessage();
    msg.arg1 = startId;
    msg.what = intent.getExtras().getInt("MESSAGE_TYPE");
    handler.sendMessage(msg);
    // Restart the service if got killed
    return START_STICKY;
}
The "onStartCommand()" method must return an integer that dictates how the system should treat the service in the event that the service got killed when the method returns. It must take one of the following constants:
|
| onBind() |
The system calls this method when another component, such as an activity, wants to bind with the service by calling "bindService()". This method must return an "IBinder" representing an interface that clients can use to communicate with the service. For example:
private final IBinder binder = new MyBinder();
public class MyBinder extends Binder {
    LocalBoundService getServiceInstance() {
    // Return this instance of LocalBoundService
    // from which the clients can call any public methods in here
        return LocalBoundService.this;
    }
}

@Override
public IBinder onBind(Intent intent) {
    return binder;
}
Every service must implement this method whether it is a "started service" or a "bound service". For solely "started service", make this method return null. |
| onDestroy() |
The system calls this method to notify the service that it is being removed after the service has been stopped or unbound. This is the last call that the service will receive and it should implement this method to free up resources. |
To sum up our discussion on services in general so far, I have provided a template for constructing a service as shown:
package com.peterleow.androidservices;

import android.app.Service;
import android.content.Intent;
import android.os.IBinder;
/**
 * Created by Peter Leow on 20/9/2014.
 */
public class ServiceTemplate extends Service {

    // Dictate the behavior if the service is killed
    // when the onStartCommand returns
    int reStartMode;

    //interface for binding with clients
    IBinder binder;

    /**
     * The system calls this method when the service is first created.
     */
    @Override
    public void onCreate() {
    }

    /**
     * The system call this method when a client want
     * to start the service by calling startService()
     */
    @Override
    public int onStartCommand(Intent intent, int flags, int startId) {
        return reStartMode;
    }

    /**
     * The system call this method when a client want to bind
     * to the service by calling bindService()
     */

    @Override
    public IBinder onBind(Intent intent) {
        return binder;
    }

    @Override
    public void onDestroy() {
    }
}
Getting Your Hands Dirty
Armed with the basic knowledge of Android Services, you are now ready to dive deeper into each of them by making things happen through a series of hands-on exercises as follows:
Setting the Stage
I have prepared two Android projects for download - "AndroidServices.zip" and "RemoteApplication.zip". The "AndroidServices" is an incomplete app that consists of the activities and resources needed for the various exercises but without the code for implementing the services. You will learn to add the code to complete the exercises bit by bit as you walk through this tutorial. The "RemoteApplication", on the other hand, is a working app that will call the remote bound service in the "AndroidServices" app once it is complete.
You will get ready by following these steps:
-
Download and unzip the "AndroidServices.zip" and you should get this "AndroidServices" folder on your computer
-
Launch the Android Studio.
-
If it opens with an existing project, click File > Close Project to switch to the Welcome screen.
-
Click "Open Project" on the Quick Start page of the Welcome screen.
-
Browse to the "AndroidServices" Project and click "OK" to open it in the Android Studio.
-
Do the same for the "RemoteApplication.zip".
Let see what the incomplete "AndroidServices" Project has provided.
The launch page is the "MainActivity" which consists of four buttons for navigating to four other Activities each of which will launch a particular service type. Refer to Figure 1 for the visual composition of the app once it is completely built.
 |
|
Figure 1: Visual Composition of Android Services App
|
Started Service
There are two ways to creating a "Started Service", create a Java class that extends either one of the following two classes:
-
"Service" base class that you will override some of its callback methods to elicit the desired behavior for the purpose of the service. You will also have to take care of the nitty-gritty of implementing this in a new thread for long-running operations.
-
"IntentService" which is a subclass of the "Service" base class. This class takes away the chores of overriding individual callback methods and creating a new thread. All you have to do is to implement the "onHandleIntent()" and it will create a worker thread to handle all start requests.
If using "IntentService" subclass is so much simpler to implement a "started service" as compared to using the "Service" base class, why not just use the "IntentService" class whenever we have to create a "started service"? Not so fast! Unlike the "Service" base class where you can handle simultaneous calls to "onStartCommand()", the "IntentService" can only cater to a single start request at a time. So choose them wisely.
You will create a started service for sending notifications using the "IntentService" in the notification service section later. For now, you will create a started service based on the "Service" base class.
Creating a Started Service
In the "AndroidServices" project, open the "StartedService.java" as shown below:
package com.peterleow.androidservices;

import android.app.Service;
import android.content.Intent;
import android.os.Handler;
import android.os.HandlerThread;
import android.os.IBinder;
import android.os.Looper;
import android.os.Message;
import android.os.Process;
import android.widget.Toast;
/**
 * Created by Peter Leow on 18/9/2014.
 */
public class StartedService extends Service {

    @Override
    public IBinder onBind(Intent intent) {
        return null;
    }

}
Note the only callback method you have to implement is the "onBind()" method. As this service is going to be "started", just make it return null. You will add code to make the service useful.
Create an inner class called "ServiceHandler" that extends the "Handler" class to receive and process messages dispatched by a "Looper" (message queue) of a thread (to be created later).
// ...
// Message types to the service to display a message
static final int MSG_STOP_SERVICE = 0;
static final int MSG_HELLO = 1;
static final int MSG_HAPPY_BIRTHDAY = 2;

// Handler that receives messages from the thread
private final class ServiceHandler extends Handler {

    public ServiceHandler(Looper looper) {
        super(looper);
    }

    @Override
    public void handleMessage(Message msg) {
        switch (msg.what) {
            case MSG_STOP_SERVICE:
                Toast.makeText(getApplicationContext(), "Service is shutting down...", Toast.LENGTH_SHORT).show();
                stopSelf(msg.arg1);
                break;
            case MSG_HELLO:
                Toast.makeText(getApplicationContext(), "Hello, Code Project! Greeting from Android Service.", Toast.LENGTH_SHORT).show();
                break;
            case MSG_HAPPY_BIRTHDAY:
                Toast.makeText(getApplicationContext(), "Happy Birthday to you!", Toast.LENGTH_SHORT).show();
                break;
            default:
                super.handleMessage(msg);
        }
    }
}
In the "onCreate()" callback method, create a new thread based on "HandlerThread" class with an associated "Looper" (message queue), and then instantiate the "Handler" class (above) by associating it with the new thread. For example:
// ...
private ServiceHandler handler;
// ...

@Override
public void onCreate() {
    Toast.makeText(getApplicationContext(), "Service is starting...", Toast.LENGTH_SHORT).show();


    HandlerThread thread = new HandlerThread("StartedService", Process.THREAD_PRIORITY_BACKGROUND);
    thread.start();

    // Get the HandlerThread's Looper and use it for our Handler
    looper = thread.getLooper();
    handler = new ServiceHandler(looper);
}
In the "onStartCommand()" callback method, call the "obtainMessage()" method to obtain a new "Message" object from the "Handler" and assign the extras from the "Intent" object and the "startId" to the respective arguments of this "Message" object, and then call the "sendMessage()" method to queue this "Message" object to be handled by the "handleMessage(Message)" method in the "Handler" class. For example:
@Override
public int onStartCommand(Intent intent, int flags, int startId) {

    Message msg = handler.obtainMessage();
    msg.arg1 = startId;
    msg.what = intent.getExtras().getInt("MESSAGE_TYPE");

    handler.sendMessage(msg);

    // Restart the service if it got killed
    return START_STICKY;
}
You have built a "started service" component. Let work on the activity - "StartedServiceActivity" - that will call this service to do work.
Declaring the Service in the Manifest
Like activities, every service class must be declared in the app's manifest file before it can be used. For example:
<?xml version="1.0" encoding="utf-8"?>
<manifest xmlns:android="http://schemas.android.com/apk/res/android"
    package="com.peterleow.androidservices" >
    <application ... >
            ...
        <activity ...>
            ...
        </activity>

        <service android:name=".StartedService" />

    </application>
</manifest>
Creating the Client Component
Open the "StartedServiceActivity.java"; in the "onCheckedChanged()" event handler, add the following code to start the "StartedService" service by calling "startService(Intent)" method and passing it the service intent with the bundle extra that contains the tag attribute of the selected radio button identified by the "Message_Type" key. The "startService(Intent)" method returns immediately while the Android system calls the "onStartCommand()" method of the target service - "StartedService". If the service is not already running, the system will call the "onCreate()" method in the service to start the service first, followed by calling the "onStartCommand()" method to start the service.
boolean isServiceStarted = false;
// ...
@Override
public void onCheckedChanged(RadioGroup radioGroup, int i) {
    int radioButtonId = radioGroup.getCheckedRadioButtonId();
    RadioButton radioButton = (RadioButton)radioGroup.findViewById(radioButtonId);
    int messageType = Integer.parseInt(radioButton.getTag().toString());

    Intent intent = new Intent(this, StartedService.class);
    Bundle bundle = new Bundle();
    bundle.putInt("MESSAGE_TYPE", messageType);
    intent.putExtras(bundle);

    if (startService(intent) == null) return;
    isServiceStarted = true;
}
Add the following code in the "onStop()" method (called by the system when the activity is no longer visible on the screen) to instruct the "StartedService" to stop itself by passing it the "Message_Type" extra of zero. For example:
@Override
protected void onStop() {

    super.onStop();

    if (isServiceStarted) {
        Intent intent = new Intent(this, StartedService.class);
        Bundle bundle = new Bundle();
        bundle.putInt("MESSAGE_TYPE", 0);
        intent.putExtras(bundle);
        startService(intent);
        isServiceStarted = false;
    }
}
Testing 1, 2, 3, ...
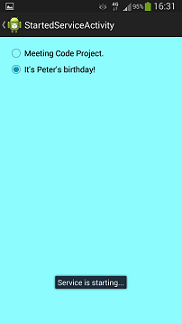
Launch the app on a real device or an AVD; click the "Started Service" button on the launch page to navigate to the "StartedServiceActivity" page (Figure 2); clicking one of the radio buttons for the first time will start and send the selected option to the "StartedService" service (Figure 3); the ""StartedService" will response with a message (Figure 4).
 |
|
 |
||
| Figure 2: StartedServiceActivity | Figure 3: Start and send the selected option to the Service | Figure 4: Response from the Service |
When you navigate back to the launch page, the service will be shutdown.
Local Bound Service
If you want to allow a client component to be able to interact with a service, then the service must be implemented as a "Bound Service". "Bound Service" provides a programmatic interface through the "Binder" class that a client component can interact with. A "bound service" is implemented differently depending on whether the service is to be used locally within the hosting app or by other apps or across separate processes. I call the former "local bound service" and the latter "remote bound service". We will deal with "remote bound service" in the next session. For now, you will create a local bound service.
Creating a Local Bound Service
In the "AndroidServices" project, open the "LocalBoundService.java" and create an inner class called "MyBinder" that extends the "Binder" class. In the "MyBinder" class, create a method called "getServiceInstance()" that returns an instance of this service. For example:
public class MyBinder extends Binder {

    LocalBoundService getServiceInstance() {
        // Return this instance of LocalBoundService
        // from which the clients can call any public methods in here
        return LocalBoundService.this;
    }

}
Instantiate a "MyBinder" object. For example:
private final IBinder binder = new MyBinder();
In the the "onBind()" callback method, return the "MyBinder" object to the client components that want to bind with this service. For example:
@Override
public IBinder onBind(Intent intent) {
    return binder;
}
Create a public method called "add()" that simply returns the addition of its two arguments as shown:
public int add(int first, int second) {
    return first + second;
}
The client components that are bound to this service will be able to access this public method inside the service through the "MyBinder" object. In other words, the "MyBinder" object acts as the interface between the "local bound service" and its bound client components.
Declaring the Service in the Manifest
Declare the "LocalBoundService" class in the app's manifest file. For example:
<?xml version="1.0" encoding="utf-8"?>
<manifest xmlns:android="http://schemas.android.com/apk/res/android"
    package="com.peterleow.androidservices" >
    <application ... >
            ...
        <activity ...>
            ...
        </activity>

        <service android:name=".LocalBoundService" />

    </application>
</manifest
Creating the Client Component
As the binding process is asynchronous, the "bindService()" method returns immediately after being called. In order to receive the "IBinder", the client must create an instance of "ServiceConnection" and pass it as one of the arguments to the "bindService()" method which initiates the request for binding. The "ServiceConnection" includes two callback methods - "onServiceDisconnected()" and "onServiceDisconnected()". When a connection to the service is established, the system call the "onServiceConnected()" callback method to deliver the "IBinder". When a connection is lost, it will call the "onServiceDisconnected()" method.
Open the "LocalBoundServiceActivity.java", and create an instance of "ServiceConnection" class. Override the "onServiceConnected()" callback method to obtain an instance of the "LocalBoundService" service from the "IBinder" and set its bound status to "true" when a connection is established. Conversely, set the bound status to "false" in the "onServiceDisconnected()" method.
LocalBoundService localBoundService;
// ...
// Define the callbacks to monitor the state of a service
private ServiceConnection serviceConnection = new ServiceConnection() {

    @Override
    public void onServiceConnected(ComponentName className, IBinder service) {
        // When bound, get an instance of the local bound service
        LocalBoundService.MyBinder binder = (LocalBoundService.MyBinder) service;
        localBoundService = binder.getServiceInstance();

        isBound = true;
    }

    @Override
    public void onServiceDisconnected(ComponentName arg0) {
        isBound = false;
    }
};
Add the following code in the "onStart()" method of the activity. The code will create an explicit intent that identifies the service - "LocalBoundService" - to bind, and call "bindService()" that takes this intent as the first argument and the "ServiceConnection" instance created above as the second argument to initiate the binding request to this service. The third argument - "BIND_AUTO_CREATE" - is a flag indicating that the service is to be created if it is not already running. The other possible flag values are "BIND_ABOVE_CLIENT", "BIND_DEBUG_UNBIND", and "BIND_NOT_FOREGROUND" or 0 for none.
The "ServiceConnection" instance will receive the service object when it is connected and is made aware of the change in the connection states through its two callback methods. For example:
@Override
protected void onStart() {

    super.onStart();

    // Bind to local bound service
    Intent intent = new Intent(this, LocalBoundService.class);
    bindService(intent, serviceConnection, Context.BIND_AUTO_CREATE);
}
Add the following code in the "onStop()" method to unbind the service which will then trigger the "onServiceDisconnected()" callback method of the "ServiceConnection" instance to change the bound status to "false".
@Override
protected void onStop() {

    super.onStop();
    // Unbind from local bound service

    if (isBound) {
        unbindService(serviceConnection);
    }
}
Lastly, create an "onClick" event handler called "add()" for the "Add them up..." button. Upon clicked, this button will pass the two input integers from the text fields to the "add()" method of the "LocalBoundService" service instance which sums up these two integers and returns the result to the client component - "LocalBoundServiceActivity" - for display. For example:
public void add(View view) {

    if (isBound) {
        // Call a method in the local bound service instance, e.g. add(int, int).
        // I have omitted inputs validation here. That is your homework
        int firstNumber = Integer.parseInt(((EditText) findViewById(R.id.editTextFirstNumber)).getText().toString());
        int secondNumber = Integer.parseInt(((EditText) findViewById(R.id.editTextSecondNumber)).getText().toString());
        int sum = localBoundService.add(firstNumber, secondNumber);
        ((TextView) findViewById(R.id.textViewAnswer)).setText(String.valueOf(sum));
    }
}
Testing 1, 2, 3, ...
Launch the app on a real device or an AVD; click the "Local Bound Service" button on the launch page to navigate to the "LocalBoundServiceActivity" page (Figure 5) and test it out. Note that input validation code has been omitted, you may add it yourself as homework.
 |
| Figure 5: LocalBoundServiceActivity |
When you navigate back to the launch page, the service will shut down.
Remote Bound Service
In addition to local bound services, which run in the same process as the calling components, you can implement services to allow access from remote client components. Android provides the "Messenger" class to perform inter-process communication to a service.
Creating a Remote Bound Service
In the "AndroidServices" project, open the "RemoteBoundService.java", and create an inner class called "ServiceHandler" that extends the "Handler" class to receive and process messages dispatched by a "Looper" (message queue) of a thread (to be created later). This part of code has been explained in "StartedService.java".
// ...
// Message types to the service to display a message
static final int MSG_STOP_SERVICE = 0;
static final int MSG_HELLO = 1;
static final int MSG_HAPPY_BIRTHDAY = 2;

// Handler that receives messages from the thread
private final class ServiceHandler extends Handler {

    public ServiceHandler(Looper looper) {
        super(looper);
    }

    @Override
    public void handleMessage(Message msg) {
        switch (msg.what) {
            case MSG_STOP_SERVICE:
                Toast.makeText(getApplicationContext(), "Service is shutting down...", Toast.LENGTH_SHORT).show();
                stopSelf(msg.arg1);
                break;
            case MSG_HELLO:
                Toast.makeText(getApplicationContext(), "Hello, Code Project! Greeting from Android Service.", Toast.LENGTH_SHORT).show();
                break;
            case MSG_HAPPY_BIRTHDAY:
                Toast.makeText(getApplicationContext(), "Happy Birthday to you!", Toast.LENGTH_SHORT).show();
                break;
            default:
                super.handleMessage(msg);
        }
    }
}
In the "onCreate()" callback method, create a new thread based on "HandlerThread" class with an associated "Looper" (message queue), and then instantiate the "Handler" class (above) by associating it with the new thread. Next, instantiate a "Messenger" object that points to this "Handler" instance.
// ...
private ServiceHandler handler;
Messenger messenger;
// ...

@Override
public void onCreate() {
    Toast.makeText(getApplicationContext(), "Service is starting...", Toast.LENGTH_SHORT).show();

    HandlerThread thread = new HandlerThread("StartedService", Process.THREAD_PRIORITY_BACKGROUND);
    thread.start();

    // Get the HandlerThread's Looper and use it for our Handler
    looper = thread.getLooper();
    handler = new ServiceHandler(looper);

    messenger = new Messenger(handler);
}
In the "onBind()" callback method, return an "IBinder" that the "Messenger" object is using to the client components that want to bind with this service. For example:
@Override
public IBinder onBind(Intent intent) {
    Toast.makeText(getApplicationContext(), "Service is binding...", Toast.LENGTH_SHORT).show();
    return messenger.getBinder();
}
Declaring the Service in the Manifest
Declare the "RemoteBoundService" class in the app's manifest file. For example:
<?xml version="1.0" encoding="utf-8"?>
<manifest xmlns:android="http://schemas.android.com/apk/res/android"
    package="com.peterleow.androidservices" >
    <application ... >
            ...
        <activity ...>
            ...
        </activity>

        <service android:name=".RemoteBoundService" />

    </application>
</manifest
Creating the Client Component
Open the "RemoteBoundServiceActivity.java", and create an instance of "ServiceConnection" class that has two callback methods - "onServiceDisconnected()" and "onServiceDisconnected()". The role of the "ServiceConnection" class has been explained in earlier session on "Local Bound Service". In the "onServiceDisconnected()", it uses the "IBinder" returned from the "onBind()" callback method of the service to instantiate the "Messenger" object that references the Handler of the service (above). The client component uses this "Messenger" object to send message as "Message" objects to the service which in turn hands off to the "handleMessage()" method of the "Handler" instance for processing. For example:
Messenger messenger = null;
boolean isBound = false;

// Define the callbacks on service binding to be pass to bindService()
private ServiceConnection serviceConnection = new ServiceConnection() {

    @Override
    public void onServiceConnected(ComponentName className, IBinder service) {
        // Get a instance of Messenger from the IBinder object
        // return from onBind()
        messenger = new Messenger(service);
        isBound = true;
    }

    @Override
    public void onServiceDisconnected(ComponentName arg0) {
        messenger = null;
        isBound = false;
    }
};
Add the following code in the "onStart()" method to bind the service.
@Override
protected void onStart() {

    super.onStart();

    Intent intent = new Intent(this, RemoteBoundService.class);
    bindService(intent, serviceConnection, Context.BIND_AUTO_CREATE);
}
Add the following code in the "onStop()" method to unbind the service.
@Override
protected void onStop() {

    super.onStop();

    if (isBound) {
        unbindService(serviceConnection);
    }
}
In the "onCheckedChanged()" event handler, add the following code to add the tag attribute of the selected radio button in a "Message" object by calling the "Message.obtain()" method, and then pass this message object to the remote bound service - "RemoteBoundService" - through the "send()" method of the "Messenger" object. For example:
@Override
public void onCheckedChanged(RadioGroup radioGroup, int i) {

    int radioButtonId = radioGroup.getCheckedRadioButtonId();
    RadioButton radioButton = (RadioButton)radioGroup.findViewById(radioButtonId);

    int messageType = Integer.parseInt(radioButton.getTag().toString());
    if (!isBound) {
        bindService(new Intent(this, RemoteBoundService.class), serviceConnection,
                Context.BIND_AUTO_CREATE);
    }

    // Send a message to the service
    Message msg = Message.obtain(null, messageType, 0, 0);
    try {
        messenger.send(msg);
    } catch (RemoteException e) {
        e.printStackTrace();
    }

    if (messageType == 0){
        unbindService(serviceConnection);
        isBound = false;
    }
}
Testing 1, 2, 3, ...
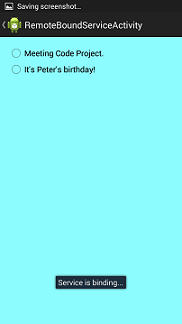
Launch the app on a real device or an AVD; click the "Remote Bound Service" button on the launch page to navigate to the "RemoteBoundServiceActivity" page which will start the binding process as soon as the page is loaded (Figures 6 and 7); selecting one of the radio buttons will send the selected option to the "RemoteBoundService" service which will response with a message (Figure 8).
 |
|
 |
||
| Figure 6: onStart() | Figure 7: onStart() | Figure 8: Response from the Service |
So far, this test has been done locally with the client and service residing inside the same app. How to access this service from remote clients? Read on...
Setting up a (Real) Remote Service
In the app's manifest file, declare an "<intent-filter>" element that contains an "<action>" inside the <service> tag of the remote bound service - "RemoteBoundService" - to publish its intention, and enable the "android:exported" attribute of the <service> tag to allow other components to invoke this service. Make sure to give a unique name (e.g. package name of the app) to the <action> element. For example:
<service
    android:name=".RemoteBoundService"
    android:exported="true" >
    <intent-filter>
        <action android:name="com.peterleow.androidservices" />
    </intent-filter>
</service>
In the external client that want to access this service, create a new Intent that takes the action name of the service's intent filter, and pass it as an argument to either "startService()" or "bindService()". For example:
Intent intent = new Intent("com.peterleow.androidservices");
bindService(intent, serviceConnection, Context.BIND_AUTO_CREATE);
 |
|
 |
||
| Figure 9: onStart() | Figure10: onStart() | Figure 11: Response from the Service |

Android Notifications
Unlike activities where users are given visual cue of the tasks at hand, services run in the background and they need some ways to notify the users of new events or update the users on the progress of the tasks being handled by the services. In this respect, Android provides two notification options - "Toast Notifications" and "Status Bar Notifications".
Toast Notifications
A toast notification appears as a little quick popup near the center bottom of the screen and carries a simple message for a limited duration, while the current activity remains visible and responsive. You have been using toast notifications in the preceding exercises to display responses from services (e.g. Figures 9 to 10).
To send a toast notification, first create a "Toast" view by calling its static "makeText()" method and passing it three arguments - the application context to use, the message to show, and the duration - either "LENGTH_SHORT" or "LENGTH_LONG" - for showing the message. The "Toast" view can then be displayed by calling "show()". For example:
Context context = getApplicationContext();
CharSequence text = "Service is binding...";
int duration = Toast.LENGTH_SHORT;
Toast toast = Toast.makeText(context, text, duration);
toast.show();
or you can simply chain them up into a one-line statement, like this:
Toast.makeText(context, text, duration).show();
Most of the time, that is all that you would need to make and send a toast notification. However, you can change the location of a toast instead of the default bottom center of the screen using the "setGravity(int, int, int)" method that takes three parameters - a "Gravity" constant, an x-offset, and a y-offset. The "Gravity" parameter represents a pre-defined location on the screen, the x-offset and y-offset provide the horizontal and vertical distances respectively from the location defined by the "Gravity" parameter. For example, you can position a toast on the top center of the screen with this:
toast.setGravity(Gravity.TOP|Gravity.CENTER, 0, 0);
Status Bar Notifications
While a "Toast Notification" is simple and quick to implement, it is inherently short-lived and allows no follow-up from the user. A "Status Bar Notification", on the other hand, provides an icon and a message in the status bar that persists until the user selects it to initiate a follow-up action, such as starting an activity, and is therefore more appropriate for displaying notifications that require follow-up actions from the users. For example, an email alert implemented as a status bar notification allows the recipient to select and expand the notification to see more details, and to start an email app to read the full content. When we mention notifications in Android, we usually mean "Status Bar Notifications" implicitly.
The Basics of Notifications
When a notification arrives, it will appear as an icon with an optional ticker (that little text that reads "New Agenda Alert!" in Figure 12) in the notification area which is the status bar on top of the screen.
 |
| Figure 12: Status Bar Notification |
When the user performs a downward swipe on the icon, the system will respond by opening the notification drawer which is a UI view (Figure 13) that contains details about the notification. Some of the details are the content title ("Agenda"), the content text ("Arrival of new agenda"), a larger icon, and time of notification.
 |
| Figure 13: Example of a Normal view Drawer |
The visual style of the notification drawer in Figure 13 is called the "Normal view". The height of a normal view is limited to 64dp. As of Android 4.1 (API level 16), a new visual style called the "Big view" was introduced to the notification drawer (Figure 14). The most notable difference between the two views is the bigger details area for the "Big view" drawer.
 |
| Figure 14: Example of a Big view Drawer |
Setting Notification Priority
You can influence how and where your Android device displays a particular notification in comparison to other notifications by assigning it one of the five priority levels as shown in Table 3. This is to make sure the users always gets to see the more important notifications.
| Callback | Elaboration |
|---|---|
| PRIORITY_DEFAULT |
An integer constant representing the default priority. Notification.Builder builder = new new Notification.Builder(this).setPriority(Notification.PRIORITY_DEFAULT) |
| PRIORITY_MAX |
An integer constant representing the highest priority that requires the user;s prompt attention or follow-up action. Notification.Builder builder = new new Notification.Builder(this).setPriority(Notification.PRIORITY_MAX) |
| PRIORITY_HIGH |
An integer constant representing notifications or alerts that are more important than notifications that marked as PRIORITY_DEFAULT. These notifications may be shown in larger size or at a higher position in notification lists than their default counterparts. Notification.Builder builder = new new Notification.Builder(this).setPriority(Notification.PRIORITY_HIGH) |
| PRIORITY_LOW |
An integer constant representing notifications that are less important than notifications that marked as PRIORITY_DEFAULT. These notifications may be shown in smaller size or at a lower position in notification lists than their default counterparts. Notification.Builder builder = new new Notification.Builder(this).setPriority(Notification.PRIORITY_LOW) |
| PRIORITY_MIN |
An integer constant representing notifications that are trivial (e.g. weather information) and thus of no urgency. The system will not display them on the status bar. The users only notice them when they expand the notification drawers. Notification.Builder builder = new new Notification.Builder(this).setPriority(Notification.PRIORITY_MIN) |
Creating and Sending a Notification
To create a notification, first specify the UI information and actions for a notification in a "Notification.Builder" object, such as setting the icon, ticker, content title, etc. Next, call the "Notification.Builder.build()" method to create a "Notification" object that contains all the specifications for the notification. To send out the notification, pass this "Notification" object to the system by calling the "notify()" method of a "NotificationManager" object. The "notify()" method takes two arguments - an integer that uniquely identifies this "Notification" object, and the "Notification" object itself. The code snippet below will produce the notification sequel from the icon in the status bar in Figure 12 to the normal view drawer in Figure 13.
final Notification.Builder builder =
        new Notification.Builder(this)
                .setSmallIcon(R.drawable.ic_peterleow)
                .setTicker("New Agenda Alert!")
                .setContentTitle("Agenda")
                .setContentText("Arrival of new agenda.")
                .setPriority(Notification.PRIORITY_DEFAULT)
                .setAutoCancel(true);

final Notification notification = builder.build();

final NotificationManager notificationManager =
                (NotificationManager) getSystemService(Context.NOTIFICATION_SERVICE);

notificationManager.notify(0, notification);
To add a big view notification drawer, call "Notification.Builder.setStyle()" and supply it with one of the "Notification.Style" subclass object such as a "Notification.InboxStyle" object that can display a list of up to five string items. The code snippet below will produce the big view notification drawer shown in Figure 14. Note that this big view drawer is only available as of Android 4.1 which is API level 16.
Notification.InboxStyle inboxStyle =
        new Notification.InboxStyle();

inboxStyle.setBigContentTitle("Agenda");

String[] items = new String[5];
items[0] = new String("1. Planning");
items[1] = new String("2. Analysis");
items[2] = new String("3. Design");
items[3] = new String("4. Implementation");
items[4] = new String("5. Maintenance");

for (int c = 0; c < items.length; c++) {
    inboxStyle.addLine(items[c]);
}

builder.setStyle(inboxStyle);
Updating a Notification
When a notification has to be issued multiple times for the same type of event, you should consider updating the previous notification than to issue a new one. To update a previous notification, create a notification object as you have done above, then call the "notify()" method of the "NotificationManager" object and issuing it with the same notification ID as the previous notification. If the previous notification is still visible, the system will update it with the new content. If the previous notification has been dismissed, the system will create a new one. The notification can display the number of updates received on the notification drawer by calling the "setNumber(int updateCount)" of the "Notification.Builder" object.
The following sample code demonstrates the update of a notification through a simulated loop and the outcome is shown in Figure 15. Note the incremental integer displayed on the bottom right corner of the notification drawer as new update comes in.
protected void displayNotification() {
    final Notification.Builder builder =
            new Notification.Builder(this)
                    .setSmallIcon(R.drawable.ic_peterleow)
                    .setTicker("New Mail Alert!")
                    .setContentTitle("New Mail!")
                    .setContentText("You've got new mail.")
                    .setPriority(Notification.PRIORITY_DEFAULT)
                    .setAutoCancel(true);
    final NotificationManager notificationManager =
            (NotificationManager) getSystemService(Context.NOTIFICATION_SERVICE);
    // Start a long-running operation in a background thread
    new Thread(
            new Runnable() {
                @Override
                public void run() {
                    int notificationID = 1;
                    for (int i = 1; i <= 10; i++) {
                        // Increment notification count
                        builder.setNumber(i);
                        notificationManager.notify(notificationID, builder.build());
                        // Put the thread to sleep
                        // to simulating long-running operation
                        try {
                            // Sleep for 0.5 seconds
                            Thread.sleep(500);
                        } catch (InterruptedException e) {
                            e.getStackTrace();
                        }
                    }
                }
            }
    ).start();
}
 |
| Figure 15: Update a Notification |
Attaching an Action with a Notification
Although optional, it is common to attach an action with the notification so that when the user clicks on the notification drawer, it can start an activity directly to do any follow-up work. However, the start of a new activity from a notification drawer should not disrupt the normal navigation that user expects when clicking the back button. In order to preserve the user's expected navigation experience, we have to engage the help of the "TaskStackBuilder" class to construct an artificial back stack for the started activity so that navigating backward from this activity will lead out of the app to the Home screen. The steps are as follows:
-
In the "AndroidManifest.xml", modify the activity element for the activity to be started from the notification drawer, say "NotificationActivity", to specify its parent activity.
<activity android:name=".NotificationActivity" android:label="@string/title_activity_notification" android:parentActivityName=".MainActivity" > <meta-data android:name="android.support.PARENT_ACTIVITY" android:value="com.peterleow.androidservices.MainActivity" /> </activity> -
In the Java class file, create an Intent object to start the intended activity, e.g. "NotificationActivity":
Intent notifyIntent = new Intent(this, NotificationActivity.class);
-
Create a "TaskStackBuilder" object by calling "TaskStackBuilder.create()".
TaskStackBuilder stackBuilder = TaskStackBuilder.create(this);
-
Add the entire parent stack of the intended activity to the "TaskStackBuilder" object by calling "addParentStack()".
stackBuilder.addParentStack(NotificationActivity.class);
-
Add the Intent object to the "TaskStackBuilder" object by calling "addNextIntent()".
stackBuilder.addNextIntent(notifyIntent);
-
Obtain a "PendingIntent" for the "TaskStackBuilder" object by calling "getPendingIntent()".
PendingIntent notifyPendingIntent = stackBuilder.getPendingIntent( 0, PendingIntent.FLAG_UPDATE_CURRENT ); -
Pass the "PendingIntent" to the "setContentIntent()" method of the "Notification.Builder" object so that when the user clicks the notification text in the notification drawer, the intended activity will be started.
builder.setContentIntent(notifyPendingIntent);
That's it. The complete code for adding an action to a notification is shown below:
Intent notifyIntent = new Intent(this, NotificationActivity.class);

TaskStackBuilder stackBuilder = TaskStackBuilder.create(this);

stackBuilder.addParentStack(NotificationActivity.class);

stackBuilder.addNextIntent(notifyIntent);

PendingIntent notifyPendingIntent =
    stackBuilder.getPendingIntent(
         0,
         PendingIntent.FLAG_UPDATE_CURRENT
    );

builder.setContentIntent(notifyPendingIntent);
Notification Service
You are now ready to create a notification service for sending notifications from a "started service". This time, you will create the "started service" by extending the "IntentService" class.
Creating a Notification Service
In the "AndroidServices" project, open the "NotificationService.java", and add the constructor and override the "onHandleIntent()" to do work required of the service, e.g. sending a notification.
// ...
public class NotificationService extends IntentService {

    public NotificationService() {
        super("NotificationService");
    }

    @Override
    protected void onHandleIntent(Intent intent) {
        // do work
    }

// ...
}
Note that it is so much simpler to implement a "started service" by extending the "IntentService" class. What the "IntentService" does is creating a worker thread to execute all requests one at a time and stop itself when all the work is done. It also handles all the default implementations needed by the "Service" base class, such as implementing the "onBind()" method that returns null.
Next, create a method called "sendNotification()" that contains the code for creating and sending a notification:
protected void sendNotification() {
    // Configure Normal View
    final Notification.Builder builder =
            new Notification.Builder(this)
                    .setSmallIcon(R.drawable.ic_peterleow)
                    .setContentTitle("Downloading...")
                    .setTicker("New Agenda Alert!")
                    .setAutoCancel(true);

    Intent notifyIntent = new Intent(this, NotificationActivity.class);
    TaskStackBuilder stackBuilder = TaskStackBuilder.create(this);
    stackBuilder.addParentStack(NotificationActivity.class);
    stackBuilder.addNextIntent(notifyIntent);
    PendingIntent notifyPendingIntent =
            stackBuilder.getPendingIntent(
                    0,
                    PendingIntent.FLAG_UPDATE_CURRENT
            );
    builder.setContentIntent(notifyPendingIntent);

    final NotificationManager notificationManager =
            (NotificationManager) getSystemService(Context.NOTIFICATION_SERVICE);

    // Start a long-running operation in a background thread
    new Thread(
            new Runnable() {
                @Override
                public void run() {
                    for (int i = 0; i <= 100; i+=5) {
                        builder.setProgress(100, i, false);
                        notificationManager.notify(0, builder.build());
                        // Put the thread to sleep
                        // to simulating long-running operation
                        try {
                            // Sleep for 0.5 seconds
                            Thread.sleep(500);
                        } catch (InterruptedException e) {
                            e.getStackTrace();
                        }
                    }
                    builder.setProgress(0,0,false);

                    // Configure Big View
                    Notification.InboxStyle inboxStyle =
                            new Notification.InboxStyle();
                    String[] items = new String[5];
                    items[0] = new String("1. Planning");
                    items[1] = new String("2. Analysis");
                    items[2] = new String("3. Design");
                    items[3] = new String("4. Implementation");
                    items[4] = new String("5. Maintenance");
                    inboxStyle.setBigContentTitle("Agenda");
                    for (int c = 0; c < items.length; c++) {
                        inboxStyle.addLine(items[c]);
                    }
                    builder.setStyle(inboxStyle);
                    notificationManager.notify(0, builder.build());
                }
            }
    ).start();
}
Call the "sendNotification()" from the "onHandleIntent" method:
@Override
protected void onHandleIntent(Intent intent) {
    sendNotification();
}
Declaring the Service in the Manifest
Declare "NotificationService" as a service in the app's manifest file:
<?xml version="1.0" encoding="utf-8"?>
<manifest xmlns:android="http://schemas.android.com/apk/res/android"
    package="com.peterleow.androidservices" >
    <application ... >
            ...
        <activity ...>
            ...
        </activity>

        <service android:name=".NotificationService" />

    </application>
</manifest>
You have built the notification service. Let test it out!
Testing 1, 2, 3, ...
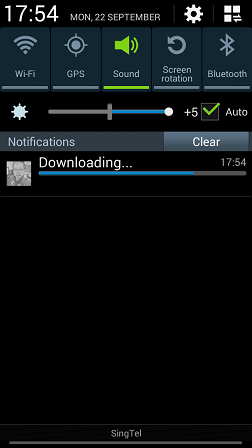
Launch the app on a real device or an AVD; click the "Notification" button on the launch page to call the "NotificationService" service which will send out a notification to the user. See the sequel of actions from Figures 16 to 19. Enjoy!
 |
Swipe downward on the icon
|
|
| Figure 16: Notification Alert | Figure 17: Normal View Drawer | |
|
Download complete
|
||
 |
Click on the content area
|
 |
| Figure 19: Intended Activity Launched | Figure 18: Big View Drawer |
Running a Service in the Foreground
When it is running low in memory, the Android system will start to shut down services to reclaim resources for the activity that has user's focus. Services that are bound to an activity that has user's focus are less likely to be killed. Another way to avoid being killed by the system prematurely is to set the service to run in the foreground.
Declaring a service to run in the foreground will cause its priority to rise so that it is less likely to be killed. The trade-off is that the foreground running service has to maintain an on-going notification in the "Ongoing" heading (Figure 20), so that the user is explicitly aware of this service. An example is a service that is called by a music player to play a song; among other things, the notification may indicate the title of the current music that is playing on the status bar, and should provide a way for the user to launch an activity to interact with the music player or to change music.
 |
| Figure 20: Example of an Ongoing Notification |
To create a service that runs in the foreground, in the "onCreate()" method, create a "Notification" object, and then call "startForeground()" method of the "Service" class and passing it two arguments - a non-zero integer that uniquely identifies the "Notification" object and the "Notification" object itself. For example:
@Override
public void onCreate() {

    final Notification.Builder builder =
            new Notification.Builder(this)
                    .setSmallIcon(R.drawable.ic_peterleow)
                    .setContentTitle("Foreground Service")
                    .setContentText("Playing Background music...");

    final Notification notification = builder.build();

    startForeground(1, notification);
}
The above code will create a service that runs in the foreground with an on-going notification as shown in Figure 21.
 |
| Figure 21: An on-going Notification of a Foreground Service |
When a foreground running service is shutdown, its associated on-going notification will also be removed.
To remove the service from the foreground, simply call "stopForeground()" method of the "Service". This does not stop the service but allows it to be killed by the system if the memory is running low. To remove the on-going notification associated with this service, call the "stopForeground()" method by passing it an argument of "false".
End of Service
In this journey, you have learned the basics of Android services and put them into practice by implementing them in an app. You have also leaned to send a notification from a service in the app. For easy reference, I have put them into a link for a quick jump to the respective topics in this article.